Apache Unomi™
Apache Unomi 3.x
Documentation

1. Foreword
This documentation provides a comprehensive guide to Apache Unomi 3.x, a powerful and flexible Customer Data Platform (CDP) that enables organizations to collect, manage, and leverage customer data for personalization and marketing automation.
Apache Unomi is built on open standards and provides a robust foundation for building customer-centric applications. Whether you’re implementing personalization, running marketing campaigns, or building customer profiles, this documentation will help you understand and effectively use Apache Unomi’s capabilities.
This guide covers everything from getting started with your first installation to advanced topics like plugin development, migration strategies, and integration patterns. We recommend starting with the "Discover Unomi" section if you’re new to the platform, and then exploring the specific topics that match your needs.
The Apache Unomi community is committed to providing comprehensive, accurate, and up-to-date documentation. We welcome feedback and contributions to help improve this documentation for all users.
Happy reading!
This edition documents Apache Unomi 3.x, which requires Java 17, Elasticsearch 9.x or OpenSearch 3.x, and (from 3.1) tenant API keys for public endpoints.
2. What’s new
2.1. What’s new in Apache Unomi 3.1
Apache Unomi 3.1 builds on the 3.0 platform (Elasticsearch 9 client, Karaf 4.4, Java 17) with operator-focused features for multi-tenant production deployments.
2.1.1. Multi-tenancy and API keys
Complete tenant isolation for profiles, events, segments, rules, and schemas. Public endpoints (for example /cxs/context.json) require a tenant public API key; administrative work uses tenant private keys or system administrator credentials.
-
Operator guide: Multi-tenancy
-
Migration: Migrate from 3.0 to 3.1
-
Migrating from Unomi 2.x: V2 compatibility mode (
v2.compatibilitymode.enabledinorg.apache.unomi.rest.authentication.cfg)
2.1.2. Cluster-aware task scheduler
Built-in background job scheduler with persistence, cluster locks, recovery, REST API (/cxs/tasks), and Karaf shell commands.
2.1.3. OpenSearch 3 support
Official alternative to Elasticsearch, including secured Docker deployments.
-
Configuration: Configuration
-
Migration from Elasticsearch: Migrate from Elasticsearch to OpenSearch
2.1.4. Persistence-based clustering
Cluster node registry and heartbeats through Elasticsearch or OpenSearch (no Karaf Cellar). See Cluster setup.
2.1.5. Tenant usage and retention
Read-only per-tenant usage metrics and an event retention purge API for upstream control planes.
-
REST:
/cxs/tenants/{tenantId}/usageand/cxs/tenants/{tenantId}/purge/events(see Useful URLs)
2.1.6. Request tracing
Administrators can trace how context and event-collector requests are processed using explain=true on supported endpoints.
2.1.7. Condition validation
Segments, rules, and queries are validated against condition type definitions at save time. Invalid parameters are rejected before they reach runtime evaluation.
2.2. What’s new in Apache Unomi 3.0
Apache Unomi 3.0 is a major platform release. It upgrades the search-engine client, the OSGi runtime, and the minimum Java version.
2.2.1. Java 17
Unomi 3.0 requires Java 17 or later. Java 11 is no longer supported.
2.2.2. Karaf 4.4
Karaf was upgraded from 4.2.x to 4.4.11 to support current dependencies and Java 17.
2.2.3. Elasticsearch 9 Java API client
The legacy Elasticsearch REST high-level client was replaced by the official Elasticsearch 9 Java API client.
-
Client reference: https://www.elastic.co/docs/reference/elasticsearch/clients/java
-
Data migration from Elasticsearch 7: Migrate from Elasticsearch 7 to Elasticsearch 9
2.2.4. QueryBuilder ID renames
Built-in condition queryBuilder IDs were renamed to remove Elasticsearch-specific suffixes. Custom plugins and JSON definitions must be updated. See the mapping table in Migrate from 2.x to 3.0.
2.2.5. Persistence-based clustering
Cluster coordination moved from Karaf Cellar to a persistence-backed node registry (see Cluster setup).
2.2.6. Health check extension
HTTP health endpoint at /health/check with pluggable providers (Karaf, search engine, persistence, cluster, Unomi bundles). See Health check.
3. Discover Unomi
3.1. Quick start with Docker
Begin by creating a docker-compose.yml file. You can choose between ElasticSearch or OpenSearch:
3.1.1. Option 1: Using ElasticSearch
version: '3.8'
services:
    elasticsearch:
        image: docker.elastic.co/elasticsearch/elasticsearch:9.4.3
        environment:
            - discovery.type=single-node
        ports:
            - 9200:9200
    unomi:
        # Unomi version can be updated based on your needs
        image: apache/unomi:3.1.0
        environment:
            - UNOMI_ELASTICSEARCH_ADDRESSES=elasticsearch:9200
            - UNOMI_THIRDPARTY_PROVIDER1_IPADDRESSES=0.0.0.0/0,::1,127.0.0.1
        ports:
            - 8181:8181
            - 9443:9443
            - 8102:8102
        links:
            - elasticsearch
        depends_on:
            - elasticsearch
3.1.2. Option 2: Using OpenSearch
version: '3.8'
services:
    opensearch-node1:
        image: opensearchproject/opensearch:3
        environment:
            - cluster.name=opensearch-cluster
            - node.name=opensearch-node1
            - discovery.type=single-node
            - bootstrap.memory_lock=true
            - "OPENSEARCH_JAVA_OPTS=-Xms512m -Xmx512m"
            - OPENSEARCH_INITIAL_ADMIN_PASSWORD=${OPENSEARCH_INITIAL_ADMIN_PASSWORD:-admin}
        ulimits:
            memlock:
                soft: -1
                hard: -1
            nofile:
                soft: 65536
                hard: 65536
        volumes:
            - opensearch-data1:/usr/share/opensearch/data
        ports:
            - 9200:9200
            - 9600:9600

    unomi:
        image: apache/unomi:3.1.0
        environment:
            - UNOMI_DISTRIBUTION=unomi-distribution-opensearch
            - UNOMI_OPENSEARCH_ADDRESSES=opensearch-node1:9200
            - UNOMI_OPENSEARCH_USERNAME=admin
            - UNOMI_OPENSEARCH_PASSWORD=${OPENSEARCH_INITIAL_ADMIN_PASSWORD:-admin}
            - UNOMI_HEALTHCHECK_PROVIDERS=cluster,opensearch,unomi,persistence
        ports:
            - 8181:8181
            - 9443:9443
            - 8102:8102
        depends_on:
            - opensearch-node1

volumes:
    opensearch-data1:
From the same folder, start the environment using docker-compose up and wait for the startup to complete.
3.1.3. After startup (ElasticSearch Docker path)
Once Unomi is running, create a tenant and save the API keys from the response:
curl -X POST http://localhost:8181/cxs/tenants \
  --user karaf:karaf \
  -H "Content-Type: application/json" \
  -d '{
    "requestedId": "default",
    "properties": {
      "name": "Default Tenant",
      "description": "Default tenant for quick start"
    }
  }'
Use the public API key in X-Unomi-Api-Key for /cxs/context.json requests. See Multi-tenancy.
Try accessing https://localhost:9443/cxs/cluster with username/password: karaf/karaf . You might get a certificate warning in your browser, just accept it despite the warning it is safe.
3.2. Quick Start manually
3.2.1. Option 1: Using ElasticSearch
1) Install JDK 17 and make sure you set the JAVA_HOME variable (see our Getting Started guide for more information on JDK compatibility)
2) Download ElasticSearch here : https://www.elastic.co/downloads/past-releases/elasticsearch-9-4-3 (please make sure you use the proper version : 9.4.3)
3) Uncompress it and change the config/elasticsearch.yml to include the following config :
cluster.name: contextElasticSearch4) Launch ElasticSearch using : bin/elasticsearch
3.2.2. Option 2: Using OpenSearch
1) Install JDK 17 as described above
2) Download OpenSearch here: https://opensearch.org/downloads.html (please make sure you use version 3.x)
3) Uncompress it and change the config/opensearch.yml to include the following config:
cluster.name: opensearch-cluster
discovery.type: single-node
4) Launch OpenSearch using: bin/opensearch
3.2.3. Complete the Setup
5) Download Apache Unomi here : https://unomi.apache.org/download.html
6) Start it using : ./bin/karaf
7) Start the Apache Unomi packages using:
- unomi:start
Note that you could change or set the distribution (if not defined using environment variable) using:
- unomi:setup -d=unomi-distribution-opensearch -f=true
- unomi:start
The unomi:setup parameter specifies which distribution to use (unomi-distribution-elasticsearch or unomi-distribution-opensearch), which determines which set of features and bundles are installed and started. A custom distribution can also be used if available in Karaf (by adding the relevant feature repository)
8) Wait for startup to complete
9) Try accessing https://localhost:9443/cxs/cluster with username/password: karaf/karaf . You might get a certificate warning in your browser, just accept it despite the warning it is safe.
10) Create a tenant that will own all your data:
curl -X POST http://localhost:8181/cxs/tenants \
  --user karaf:karaf \
  -H "Content-Type: application/json" \
  -d '{
    "requestedId": "default",
    "properties": {
      "name": "Default Tenant",
      "description": "Default tenant for quick start"
    }
  }'
Save the API keys from the response - you’ll need them for API calls.
11) Request your first context:
curl -X POST http://localhost:8181/cxs/context.json?sessionId=1234 \
  -H "Content-Type: application/json" \
  -H "X-Unomi-Api-Key: <YOUR_PUBLIC_API_KEY>" \
  -d '{
    "source": {
      "itemId": "homepage",
      "itemType": "page",
      "scope": "default"
    }
  }'
Or access it directly in a browser (requires API key in header):
http://localhost:8181/cxs/context.js?sessionId=1234
|
Note
|
For the context request to work, you’ll need to include the public API key from step 10 in the request header: X-Unomi-Api-Key: <YOUR_PUBLIC_API_KEY>
|
12) If something goes wrong, you should check the logs in ./data/log/karaf.log. If you get errors on the search engine,
make sure you are using the proper version.
Next steps:
-
Trying our integration samples page
Note: When using OpenSearch, make sure to: - Set up proper SSL certificates or disable SSL verification for development - Configure the admin password via OPENSEARCH_INITIAL_ADMIN_PASSWORD - Enable SSL in Unomi configuration if using secure connections
3.3. Getting started with Unomi
We will first get you up and running with an example. We will then lift the corner of the cover somewhat and explain in greater details what just happened.
3.3.1. Prerequisites
This document assumes working knowledge of git to be able to retrieve the code for Unomi and the example. Additionally, you will require a working Java 17 or above install. Refer to http://www.oracle.com/technetwork/java/javase/ for details on how to download and install Java SE 17 or greater.
JDK compatibility
Starting with Java 9, Oracle made some big changes to the Java platform releases. This is why Apache Unomi is focused on supporting the Long Term Supported versions of the JDK, currently version 17. We do not test with intermediate versions so they may or may not work properly. Currently the most tested version is version 17.
Also, as there are new licensing restrictions on JDKs provided by Oracle for production usages, Apache Unomi has also added support for OpenJDK builds. Other JDK distributions might also work but are not regularly tested so you should use them at your own risks.
Search Engine Compatibility
Apache Unomi supports two search engine backends:
-
ElasticSearch: Version 9.x (for example 9.4.3) is required for Unomi 3.0 and later. Version 7.17.5 applies only to Unomi 2.x.
-
OpenSearch: Version 3.x is supported starting with Unomi 3.1
It is highly recommended to use the versions specified in the documentation. When in doubt, consult the Apache Unomi community for the latest compatibility information.
Note for OpenSearch users: - Security is enabled by default and requires SSL/TLS - Default admin credentials are required (username: admin) - The initial admin password can be configured via environment variable
3.3.2. Running Unomi
Start Unomi
Start Unomi according to the quick start with docker or by compiling using the building instructions. Once you have Karaf running, you should wait until you see the following messages on the Karaf console:
Initializing user list service endpoint...
Initializing geonames service endpoint...
Initializing segment service endpoint...
Initializing scoring service endpoint...
Initializing campaigns service endpoint...
Initializing rule service endpoint...
Initializing profile service endpoint...
Initializing cluster service endpoint...
This indicates that all the Unomi services are started and ready to react to requests.
Before you can use the API, you need to create a tenant:
curl -X POST http://localhost:8181/cxs/tenants \
  --user karaf:karaf \
  -H "Content-Type: application/json" \
  -d '{
    "requestedId": "default",
    "properties": {
      "name": "Default Tenant",
      "description": "Default tenant for getting started"
    }
  }'
Save the API keys from the response - you’ll need them for all subsequent API calls. See Multi-tenancy for authentication details.
Now you can:
-
Access the RESTful services list:
http://localhost:8181/cxs -
Retrieve an initial context:
curl -X POST http://localhost:8181/cxs/context.json?sessionId=1234 \
  -H "Content-Type: application/json" \
  -H "X-Unomi-Api-Key: <YOUR_PUBLIC_API_KEY>" \
  -d '{
    "source": {
      "itemId": "homepage",
      "itemType": "page",
      "scope": "default"
    }
}'|
Note
|
This request will automatically create a profile and session if they don’t exist, and return a cookie with the profile ID. See How profile tracking works for details. |
+
3. View the introduction page: http://localhost:8181
Also now that your service is up and running you can go look at the request examples to learn basic requests you can do once your server is up and running.
3.4. Unomi web tracking tutorial
In this tutorial we will guide through the basic steps of getting started with a web tracking project. You will see how to integrate the built-in web tracker with an existing web site and what this enables.
If you prefer to use existing HTML and Javascript rather than building your own, all the code we feature in this tutorial is extracted from our tracker sample which is available here: https://github.com/apache/unomi/blob/master/extensions/web-tracker/wab/src/main/webapp/index.html . However you will still need to use the REST API calls to create the scope and rule to make it all work.
3.4.1. Installing the web tracker in a web page
Using the built-in tracker is pretty simple, simply add the following code to your HTML page :
<script type="text/javascript" src="/tracker/unomi-web-tracker.min.js"></script>or you can also use the non-minified version that is available here:
<script type="text/javascript" src="/tracker/unomi-web-tracker.js"></script>This will only load the tracker. To initialize it use a snipper like the following code:
    <script type="text/javascript">
        (function () {
            const unomiTrackerTestConf = {
                "scope": "unomi-tracker-test",
                "site": {
                    "siteInfo": {
                        "siteID": "unomi-tracker-test"
                    }
                },
                "page": {
                    "pageInfo": {
                        "pageID": "unomi-tracker-test-page",
                        "pageName": document.title,
                        "pagePath": document.location.pathname,
                        "destinationURL": document.location.origin + document.location.pathname,
                        "language": "en",
                        "categories": [],
                        "tags": []
                    },
                    "attributes": {},
                    "consentTypes": []
                },
                "events:": [],
                "wemInitConfig": {
                    "contextServerUrl": document.location.origin,
                    "timeoutInMilliseconds": "1500",
                    "contextServerCookieName": "context-profile-id",
                    "activateWem": true,
                    "trackerSessionIdCookieName": "unomi-tracker-test-session-id",
                    "trackerProfileIdCookieName": "unomi-tracker-test-profile-id"
                }
            }

            // generate a new session
            if (unomiWebTracker.getCookie(unomiTrackerTestConf.wemInitConfig.trackerSessionIdCookieName) == null) {
                unomiWebTracker.setCookie(unomiTrackerTestConf.wemInitConfig.trackerSessionIdCookieName, unomiWebTracker.generateGuid(), 1);
            }

            // init tracker with our conf
            unomiWebTracker.initTracker(unomiTrackerTestConf);

            unomiWebTracker._registerCallback(() => {
                console.log("Unomi tracker test successfully loaded context", unomiWebTracker.getLoadedContext());
            }, 'Unomi tracker test callback example');

            // start the tracker
            unomiWebTracker.startTracker();
        })();
    </script>
3.4.2. Creating a scope to collect the data
You might notice the scope used in the snippet. All events sent to Unomi must be associated with a scope, that must have been created before events are accepted. So in order to make sure the events are collected with the above Javascript code, we must create a scope with the following request.
curl --location --request POST 'http://localhost:8181/cxs/scopes' \
  --user "TENANT_ID:PRIVATE_KEY" \
  --header 'Content-Type: application/json' \
  --data-raw '{
    "itemId": "unomi-tracker-test",
    "metadata": {
      "id": "unomi-tracker-test",
      "name": "Unomi tracker Test Scope"
    }
}'|
Note
|
Replace TENANT_ID and PRIVATE_KEY with your actual tenant ID and private API key. Only the Tenant API (/cxs/tenants) uses system administrator authentication (karaf:karaf). The default karaf:karaf credentials should be changed as soon as possible by modifying the etc/users.properties file.
|
3.4.3. Using tracker in your own JavaScript projects
The tracker also exists as an NPM library that you can integrate with your own Javascript projects. You can find the library here:
https://www.npmjs.com/package/apache-unomi-tracker
Here’s an example on how to use it:
yarn add apache-unomi-trackerYou can then simply use it in your JS code using something like this:
import {useTracker} from "apache-unomi-tracker";

(function () {
    const unomiWebTracker = useTracker();
    const unomiTrackerTestConf = {
        "scope": "unomi-tracker-test",
        "site": {
            "siteInfo": {
                "siteID": "unomi-tracker-test"
            }
        },
        "page": {
            "pageInfo": {
                "pageID": "unomi-tracker-test-page",
                "pageName": document.title,
                "pagePath": document.location.pathname,
                "destinationURL": document.location.origin + document.location.pathname,
                "language": "en",
                "categories": [],
                "tags": []
            },
            "attributes": {},
            "consentTypes": []
        },
        "events:": [],
        "wemInitConfig": {
            "contextServerUrl": document.location.origin,
            "timeoutInMilliseconds": "1500",
            "contextServerCookieName": "context-profile-id",
            "activateWem": true,
            "trackerSessionIdCookieName": "unomi-tracker-test-session-id",
            "trackerProfileIdCookieName": "unomi-tracker-test-profile-id"
        }
    }

    // generate a new session
    if (unomiWebTracker.getCookie(unomiTrackerTestConf.wemInitConfig.trackerSessionIdCookieName) == null) {
        unomiWebTracker.setCookie(unomiTrackerTestConf.wemInitConfig.trackerSessionIdCookieName, unomiWebTracker.generateGuid(), 1);
    }

    // init tracker with our conf
    unomiWebTracker.initTracker(unomiTrackerTestConf);

    unomiWebTracker._registerCallback(() => {
        console.log("Unomi tracker test successfully loaded context", unomiWebTracker.getLoadedContext());
    }, 'Unomi tracker test callback example');

    // start the tracker
    unomiWebTracker.startTracker();
})();
3.4.4. Viewing collected events
There are multiple ways to view the events that were received. For example, you could use the following cURL request:
curl --location --request POST 'http://localhost:8181/cxs/events/search' \
  --user "TENANT_ID:PRIVATE_KEY" \
  --header 'Content-Type: application/json' \
  --data-raw '{
    "sortby" : "timeStamp:desc",
    "condition" : {
      "type" : "matchAllCondition"
    }
  }'
Another (powerful) way to look at events is to use the SSH Console. You can connect to it with the following shell command:
ssh -p 8102 karaf@localhostUsing the same username password (karaf:karaf) and then you can use command such as :
-
event-tailto view in realtime the events as they come in (CTRL+C to stop) -
event-listto view the latest events -
event-view EVENT_IDto view the details of a specific event
3.4.5. Viewing the current profile
By default, Unomi uses a cookie called context-profile-id to keep track of the current profile. You can use this the value of this cookie which contains a UUID to lookup the details of the profile. For example with the SSH console you can simply to:
profile-view PROFILE_UUID
Which will print out the details of the profile with the associated ID.
Another interesting command is profile-list to list all the recently modified profiles
You could also retrieve the profile details using the REST API by using a request such as this one:
curl --location --request GET 'http://localhost:8181/cxs/profiles/PROFILE_UUID' \
--user "TENANT_ID:PRIVATE_KEY"
3.4.6. Adding a rule
Rules are a powerful ways to react in real-time to incoming events. For example a rule could update a profile when a certain event comes in, either copying values from the event or performing some kind of computation when the event occurs, including accessing remote systems such as a Salesforce CRM (see the Salesforce connector sample).
In this example we will simply setup a basic rule that will react to the view event and set a property in the current profile.
curl --location --request POST 'http://localhost:8181/cxs/rules' \
--user "TENANT_ID:PRIVATE_KEY" \
--header 'Content-Type: application/json' \
--data-raw '{
    "metadata": {
        "id": "viewEventRule",
        "name": "View event rule",
        "description": "Increments a property on a profile to indicate that this rule executed successfully when a view event occurs"
    },
    "condition": {
        "type": "eventTypeCondition",
        "parameterValues": {
            "eventTypeId": "view"
        }
    },
    "actions": [
        {
            "type": "incrementPropertyAction",
            "parameterValues": {
                "propertyName": "pageViewCount"
            }
        }
    ]
}'
The above rule will execute when a view event is received (which is automatically sent by the tracker when a page is loaded) and increments a property called pageViewCount on the user’s profile.
You can then reload then page and check with the profile-view PROFILE_UUID SSH command that the profile was updated with the new property and that it is incremented on each page reload.
You can also use the rule-list command to display all the rules in the system and the rule-tail to watch in real-time which rules are executed. The rule-view RULE_ID command will let you view the contents of a rule.
3.4.7. Adding personalization
The last step is to use the newly added property to the profile to perform some page personalization. In order to do that we will use the tracker’s API to register a personalization that will be using a condition that checks if the pageViewCount is higher than 5. If it has, variant1 will be displayed, otherwise the fallback variant variant2 will be used instead.
            variants = {
                "var1" : {
                    content : "variant1",
                },
                "var2" : {
                    content : "variant2",
                }
            }
            unomiWebTracker.registerPersonalizationObject({
                "id": "testPersonalization",
                "strategy": "matching-first",
                "strategyOptions": {"fallback": "var2"},
                "contents": [{
                    "id": "var1",
                    "filters": [{
                        "condition": {
                            "type": "profilePropertyCondition",
                            "parameterValues": {
                                "propertyName" : "properties.pageViewCount.<scope>",
                                "comparisonOperator" : "greaterThan",
                                "propertyValueInteger" : 5
                            }
                        }
                    }]
                }, {
                    "id": "var2"
                }]
            }, variants, false, function (successfulFilters, selectedFilter) {
                if (selectedFilter) {
                    document.getElementById(selectedFilter.content).style.display = '';
                }
            });
As you can see in the above code snippet, a variants array is created with two objects that associated personalization IDs with content IDs. Then we build the personalization object that contains the two IDs and their associated conditions (only a condition on var1 is passed in this case) as well as an option to indicate which is the fallback variant in case no conditions are matched.
The HTML part of this example looks like this:
    <div id="variant1" style="display: none">
        You have already seen this page 5 times
    </div>
    <div id="variant2" style="display: none">
        Welcome. Please reload this page 5 times until it triggers the personalization change
    </div>
As you can see we hide the variants by default so that there is no "flashing" effect and then use the callback function to display to variant resolve by Unomi’s personalization engine.
3.4.8. Conclusion
What have we achieved so far ?
-
Installed a tracker in a web page
-
Created a scope in which to collect the data
-
Learned how to use the tracker as an NPM library
-
How to view the collected events
-
How to view the current visitor profile
-
How to add a rule to update a profile property
-
How to personalize a web page’s content based on the property updated by the rule
Of course this tutorial is just one example of what could be achieved, and hasn’t even yet introduced more advanced notions such as profile segmentation or Groovy action scripting. The system is capable of much more, for example by directly using its actions to integrate with third-party systems (CRM, social networks, etc..)
3.4.9. Next steps
-
Learn more about the web tracker, custom events, API, …
-
Learn more about segmentation
-
View some more samples
-
Continue reading Unomi’s user manual to see all that is possible with this technology
4. Apache Unomi Recipes and requests
4.1. Recipes
4.1.1. Introduction
In this section of the documentation we provide quick recipes focused on helping you achieve a specific result with Apache Unomi.
4.1.2. Enabling debug mode
Although the examples provided in this documentation are correct (they will work "as-is"), you might be tempted to modify them to fit your use case, which might result in errors.
The best approach during development is to enable Apache Unomi debug mode, which will provide you with more detailed logs about events processing.
The debug mode can be activated via the karaf SSH console (default credentials are karaf/karaf):
ubuntu@ip-10-0-3-252:~/$ ssh -p 8102 karaf@localhost
Password authentication
Password:
        __ __                  ____
       / //_/____ __________ _/ __/
      / ,<  / __ `/ ___/ __ `/ /_
     / /| |/ /_/ / /  / /_/ / __/
    /_/ |_|\__,_/_/   \__,_/_/

  Apache Karaf (4.2.15)

Hit '<tab>' for a list of available commands
and '[cmd] --help' for help on a specific command.
Hit 'system:shutdown' to shutdown Karaf.
Hit '<ctrl-d>' or type 'logout' to disconnect shell from current session.

karaf@root()> log:set DEBUG org.apache.unomi.schema.impl.SchemaServiceImpl
You can then either watch the logs via your preferred logging mechanism (docker logs, log file, …) or simply tail the logs to the terminal you used to enable debug mode.
karaf@root()> log:tail
08:55:28.128 DEBUG [qtp1422628821-128] Schema validation found 2 errors while validating against schema: https://unomi.apache.org/schemas/json/events/view/1-0-0
08:55:28.138 DEBUG [qtp1422628821-128] Validation error: There are unevaluated properties at following paths $.source.properties
08:55:28.140 DEBUG [qtp1422628821-128] Validation error: There are unevaluated properties at following paths $.source.itemId, $.source.itemType, $.source.scope, $.source.properties
08:55:28.142 ERROR [qtp1422628821-128] An event was rejected - switch to DEBUG log level for more information
The example above shows schema validation failure at the $.source.properties path.
Note that the validation will output one log line for the exact failing path and a log line for its parent,
therefore to find the source of a schema validation issue it’s best to start from the top.
4.1.3. How to read a profile
The simplest way to retrieve profile data for the current profile is to simply send a request to the /cxs/context.json endpoint. However you will need to send a body along with that request. Here’s an example:
|
Note
|
The |
Here is an example that will retrieve all the session and profile properties, as well as the profile’s segments and scores
curl -X POST http://localhost:8181/cxs/context.json?sessionId=1234 \
-H "Content-Type: application/json" \
-H "X-Unomi-Api-Key: YOUR_PUBLIC_API_KEY" \
--data-raw '{
    "source": {
        "itemId":"homepage",
        "itemType":"page",
        "scope":"example"
    },
    "requiredProfileProperties":["*"],
    "requiredSessionProperties":["*"],
    "requireSegments":true,
    "requireScores":true
}'
The requiredProfileProperties and requiredSessionProperties are properties that take an array of property names
that should be retrieved. In this case we use the wildcard character '*' to say we want to retrieve all the available
properties. The structure of the JSON object that you should send is a JSON-serialized version of the
ContextRequest Java class.
Note that it is also possible to access a profile’s data through the /cxs/profiles/ endpoint but that really should be reserved to administrative purposes. All public accesses should always use the /cxs/context.json endpoint for consistency and security.
4.1.4. How to update a profile from the public internet
Before we get into how to update a profile directly from a request coming from the public internet, we’ll quickly talk first about how NOT to do it, because we often see users using the following anti-patterns.
How NOT to update a profile from the public internet
Please avoid using the /cxs/profile endpoint. This endpoint was initially the only way to update a profile but it has multiple issues:
-
it requires authenticated access. The temptation can be great to use this endpoint because it is simple to access but the risk is that developers might include the credentials to access it in non-secure parts of code such as client-side code. Since there is no difference between this endpoint and any other administration-focused endpoints, attackers could easily re-use stolen credentials to wreak havock on the whole platform.
-
No history of profile modifications is kept: this can be a problem for multiple reasons: you might want to keep an trail of profile modifications, or even a history of profile values in case you want to understand how a profile property was modified.
-
Even when protected using some kind of proxy, potentially the whole profile properties might be modified, including ones that you might not want to be overriden.
Recommended ways to update a profile
Instead you can use the following solutions to update profiles:
-
(Preferred) Use you own custom event(s) to send data you want to be inserted in a profile, and use rules to map the event data to the profile. This is simpler than it sounds, as usually all it requires is setting up a simple rule, defining the corresponding JSON schema and you’re ready to update profiles using events.
-
Use the protected built-in "updateProperties" event. This event is designed to be used for administrative purposes only. Again, prefer the custom events solution because as this is a protected event it will require sending the Unomi key as a request header, and as Unomi only supports a single key for the moment it could be problematic if the key is intercepted. But at least by using an event you will get the benefits of auditing and historical property modification tracing (see request tracing).
Let’s go into more detail about the preferred way to update a profile. Let’s consider the following example of a rule:
curl -X POST http://localhost:8181/cxs/rules \
--user "TENANT_ID:PRIVATE_KEY" \
-H "Content-Type: application/json" \
--data-raw '{
  "metadata": {
    "id": "setContactInfo",
    "name": "Copy the received contact info to the current profile",
    "description": "Copies the contact info received in a custom event called 'contactInfoSubmitted' to the current profile"
  },
  "raiseEventOnlyOnceForSession": false,
  "condition": {
    "type": "eventTypeCondition",
    "parameterValues": {
      "eventTypeId": "contactInfoSubmitted"
    }
  },
  "actions": [
    {
      "type": "setPropertyAction",
      "parameterValues": {
        "setPropertyName": "properties(firstName)",
        "setPropertyValue": "eventProperty::properties(firstName)",
        "setPropertyStrategy": "alwaysSet"
      }
    },
    {
      "type": "setPropertyAction",
      "parameterValues": {
        "setPropertyName": "properties(lastName)",
        "setPropertyValue": "eventProperty::properties(lastName)",
        "setPropertyStrategy": "alwaysSet"
      }
    },
    {
      "type": "setPropertyAction",
      "parameterValues": {
        "setPropertyName": "properties(email)",
        "setPropertyValue": "eventProperty::properties(email)",
        "setPropertyStrategy": "alwaysSet"
      }
    }
  ]
}'
What this rule does is that it listen for a custom event (events don’t need any registration, you can simply start sending them to Apache Unomi whenever you like) of type 'contactInfoSubmitted' and it will search for properties called 'firstName', 'lastName' and 'email' and copy them over to the profile with corresponding property names. You could of course change any of the property names to find your needs. For example you might want to prefix the profile properties with the source of the event, such as 'mobileApp:firstName'.
Now that our rule is defined, the next step is to create a scope and a JSON Schema corresponding to the event to be submitted.
We will start by creating a scope called "example" scope:
curl --location --request POST 'http://localhost:8181/cxs/scopes' \
--user "TENANT_ID:PRIVATE_KEY" \
--header 'Content-Type: application/json' \
--data-raw '{
"itemId": "example",
"itemType": "scope"
}'|
Note
|
Replace TENANT_ID and PRIVATE_KEY with your actual tenant ID and private API key. Only the Tenant API (/cxs/tenants) uses system administrator authentication (karaf:karaf).
|
The next step consist in creating a JSON Schema to validate our event.
curl --location --request POST 'http://localhost:8181/cxs/jsonSchema' \
--user "TENANT_ID:PRIVATE_KEY" \
--header 'Content-Type: application/json' \
--data-raw '{
    "$id": "https://unomi.apache.org/schemas/json/events/contactInfoSubmitted/1-0-0",
    "$schema": "https://json-schema.org/draft/2019-09/schema",
    "self": {
        "vendor": "org.apache.unomi",
        "name": "contactInfoSubmitted",
        "format": "jsonschema",
        "target": "events",
        "version": "1-0-0"
    },
    "title": "contactInfoSubmittedEvent",
    "type": "object",
    "allOf": [{ "$ref": "https://unomi.apache.org/schemas/json/event/1-0-0" }],
    "properties": {
        "source" : {
          "$ref" : "https://unomi.apache.org/schemas/json/item/1-0-0"
        },
        "target" : {
          "$ref" : "https://unomi.apache.org/schemas/json/item/1-0-0"
        },
        "properties": {
          "type": "object",
          "properties": {
            "firstName": {
              "type": ["null", "string"]
            },
            "lastName": {
              "type": ["null", "string"]
            },
            "email": {
              "type": ["null", "string"]
            }
          }
        }
    },
    "unevaluatedProperties": false
}'
You can notice the following in the above schema:
-
We are creating a schema of type "events" ("self.target" equals "events")
-
The name of this schema is "contactInfoSubmitted", this MUST match the value of the "eventType" field in the event itself (below)
-
To simplify our schema declaration, we’re referring to an already existing schema (https://unomi.apache.org/schemas/json/item/1-0-0) to validate the "source" and "target" properties. Apache Unomi ships with a set of predefined JSON Schemas, detailed here: https://github.com/apache/unomi/tree/master/extensions/json-schema/services/src/main/resources/META-INF/cxs/schemas.
-
"unevaluatedProperties": falseindicates that the event should be rejected if it contains any additional metadata.
Finally, send the contactInfoSubmitted event using a request similar to this one:
curl -X POST http://localhost:8181/cxs/eventcollector \
-H "Content-Type: application/json" \
-H "X-Unomi-Api-Key: YOUR_PUBLIC_API_KEY" \
--data-raw '{
    "sessionId" : "1234",
    "events":[
        {
            "eventType":"contactInfoSubmitted",
            "scope": "example",
            "source":{
                "itemType": "site",
                "scope": "example",
                "itemId": "mysite"
            },
            "target":{
                "itemType": "form",
                "scope": "example",
                "itemId": "contactForm"
            },
            "properties" : {
              "firstName": "John",
              "lastName": "Doe",
              "email": "john.doe@acme.com"
            }
        }
    ]
}'
The event we just submitted can be retrieved using the following request:
curl -X POST http://localhost:8181/cxs/events/search \
--user "TENANT_ID:PRIVATE_KEY" \
-H "Content-Type: application/json" \
--data-raw '{
  "offset" : 0,
  "limit" : 20,
  "condition" : {
    "type": "eventPropertyCondition",
    "parameterValues" : {
      "propertyName" : "properties.firstName",
      "comparisonOperator" : "equals",
      "propertyValue" : "John"
    }
  }
}'
Troubleshooting common errors
There could be two types of common errors while customizing the above requests: * The schema is invalid * The event is invalid
While first submitting the schema during its creation, Apache Unomi will validate it is syntactically correct (JSON) but will not perform any further validation. Since the schema will be processed for the first time when events are submitted, errors might be noticeable at that time.
Those errors are usually self-explanatory, such as this one pointing to an incorrect location for the "firstName" keyword:
09:35:56.573 WARN [qtp1421852915-83] Unknown keyword firstName - you should define your own Meta Schema. If the keyword is irrelevant for validation, just use a NonValidationKeywordIf an event is invalid, the logs will contain details about the part of the event that did not validate against the schema. In the example below, an extra property "abcd" was added to the event:
12:27:04.269 DEBUG [qtp1421852915-481] Schema validation found 1 errors while validating against schema: https://unomi.apache.org/schemas/json/events/contactInfoSubmitted/1-0-0
12:27:04.272 DEBUG [qtp1421852915-481] Validation error: There are unevaluated properties at following paths $.properties.abcd
12:27:04.273 ERROR [qtp1421852915-481] An event was rejected - switch to DEBUG log level for more information
4.1.5. How to search for profile events
Sometimes you want to retrieve events for a known profile. You will need to provide a query in the body of the request that looks something like this (and documentation is available in the REST API) :
curl -X POST http://localhost:8181/cxs/events/search \
--user "TENANT_ID:PRIVATE_KEY" \
-H "Content-Type: application/json" \
--data-raw '{
  "offset" : 0,
  "limit" : 20,
  "condition" : {
    "type": "eventPropertyCondition",
    "parameterValues" : {
      "propertyName" : "profileId",
      "comparisonOperator" : "equals",
      "propertyValue" : "PROFILE_ID"
    }
  }
}'
where PROFILE_ID is a profile identifier. This will indeed retrieve all the events for a given profile.
4.1.6. How to create a new rule
There are basically two ways to create a new rule :
-
Using the REST API
-
Packaging it as a predefined rule in a plugin
In both cases the JSON structure for the rule will be exactly the same, and in most scenarios it will be more interesting to use the REST API to create and manipulate rules, as they don’t require any development or deployments on the Apache Unomi server.
curl -X POST http://localhost:8181/cxs/rules \
--user "TENANT_ID:PRIVATE_KEY" \
-H "Content-Type: application/json" \
--data-raw '{
  "metadata": {
    "id": "exampleEventCopy",
    "name": "Example Copy Event to Profile",
    "description": "Copy event properties to profile properties"
  },
  "condition": {
      "type": "eventTypeCondition",
      "parameterValues": {
        "eventTypeId" : "myEvent"
      }
  },
  "actions": [
    {
      "parameterValues": {
      },
      "type": "allEventToProfilePropertiesAction"
    }
  ]
}'
The above rule will be executed if the incoming event is of type myEvent and will simply copy all the properties
contained in the event to the current profile.
4.1.7. How to search for profiles
In order to search for profiles you will have to use the /cxs/profiles/search endpoint that requires a Query JSON structure. Here’s an example of a profile search with a Query object:
curl -X POST http://localhost:8181/cxs/profiles/search \
--user "TENANT_ID:PRIVATE_KEY" \
-H "Content-Type: application/json" \
--data-raw '{
  "text" : "unomi",
  "offset" : 0,
  "limit" : 10,
  "sortby" : "properties.lastName:asc,properties.firstName:desc",
  "condition" : {
    "type" : "booleanCondition",
    "parameterValues" : {
      "operator" : "and",
      "subConditions" : [
        {
          "type": "profilePropertyCondition",
          "parameterValues": {
            "propertyName": "properties.leadAssignedTo",
            "comparisonOperator": "exists"
          }
        },
        {
          "type": "profilePropertyCondition",
          "parameterValues": {
            "propertyName": "properties.lastName",
            "comparisonOperator": "exists"
          }
        }
      ]
    }
  }
}'
In the above example, you search for all the profiles that have the leadAssignedTo and lastName properties and that
have the unomi value anywhere in their profile property values. You are also specifying that you only want 10 results
beginning at offset 0. The results will be also sorted in alphabetical order for the lastName property value, and then
by reverse alphabetical order for the firstName property value.
As you can see, queries can be quite complex. Please remember that the more complex the more resources it will consume on the server and potentially this could affect performance.
4.1.8. Getting / updating consents
You can find information on how to retrieve or create/update consents in the Consent API section.
4.1.9. How to send a login event to Unomi
Tracking logins must be done carefully with Unomi. A login event is considered a "privileged" event and therefore for not be initiated from the public internet. Ideally user authentication should always be validated by a trusted third- party even if it is a well-known social platform such as Facebook or Twitter. Basically what should NEVER be done:
-
Login to a social platform
-
Call back to the originating page
-
Send a login event to Unomi from the page originating the login in step 1
The problem with this, is that any attacker could simply directly call step 3 without any kind of security. Instead the flow should look something like this:
-
Login to a social platform
-
Call back to a special secured system that performs an server-to-server call to send the login event to Apache Unomi using the Unomi key.
For simplicity reasons, in our login example, the first method is used, but it really should never be done like this in production because of the aforementioned security issues. The second method, although a little more involved, is much preferred.
When sending a login event, you can setup a rule that can check a profile property to see if profiles can be merged on an universal identifier such as an email address.
In our login sample we provide an example of such a rule. You can find it here:
As you can see in this rule, we call an action called :
mergeProfilesOnPropertyAction
with as a parameter value the name of the property on which to perform the merge (the email). What this means is that upon successful login using an email, Unomi will look for other profiles that have the same email and merge them into a single profile. Because of the merge, this should only be done for authenticated profiles, otherwise this could be a security issue since it could be a way to load data from other profiles by merging their data !
4.1.10. Technical Implementation Details
Profile Selection Strategy
By default, profiles are merged with the oldest profile (determined by the firstVisit property) becoming the master profile. This behavior can be overridden by setting forceEventProfileAsMaster to true in the action parameters, which forces the current event’s profile to become the master.
Property Merge Strategy
When merging profile properties, Unomi follows these rules:
-
Properties from all profiles are combined into the master profile
-
When conflicting values exist for a property, the master profile’s value takes precedence
-
Multi-valued properties (arrays/collections) are merged together
-
Profile segments and scores are recalculated after the merge
A custom property merge strategy can be implemented by:
-
Creating a class that implements
PropertyMergeStrategyType -
Registering it as an OSGi service
-
Configuring it in your merge action
Asynchronous Processing
To ensure performance, Unomi processes resource-intensive operations asynchronously:
-
The profile merge itself happens synchronously during event processing
-
Session and event reassignment is scheduled asynchronously via the SchedulerService
-
Property updates triggered by the merge may cause delayed rule evaluation
Result Codes
The MergeProfilesOnPropertyAction returns one of the following result codes:
-
EventService.NO_CHANGE- No merge was performed -
EventService.PROFILE_UPDATED- A profile was updated during the merge -
EventService.PROFILE_UPDATED + EventService.SESSION_UPDATED- Both profile and session were updated
4.1.11. What profile aliases are and how to use them
Profile aliases make it possible to reference profiles using multiple identifiers.
The profile alias object basically contains a link between the alias ID and the profile ID. The itemId of a profile alias is the actual alias ID, which the profileID field contains the reference to the aliased profile.
What they are
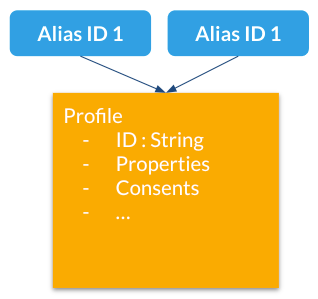
Profile aliases:
-
Make it possible to lookup profiles by main (Unomi) ID or by any other alias ID
-
Aliases are just IDs stored in a dedicated index
-
A profile may have an unlimited number of aliases attached to it.
How to use them
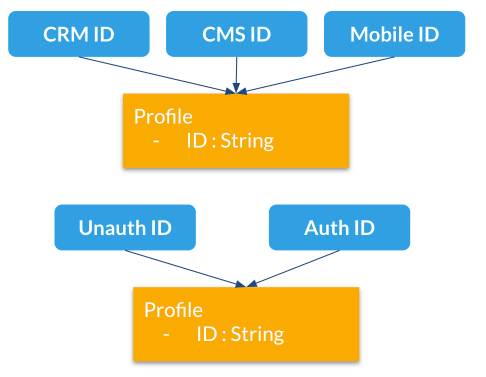
Here are different use cases for profile aliases:
-
Connect different systems to Unomi such as a CRM, CMS and native mobile app that all have their own iD for a single customer
-
Merging profiles when a visitor is identified
-
Adding new IDs at a later time
Example
Here is an example of multiple external aliases pointing to a single Unomi profile
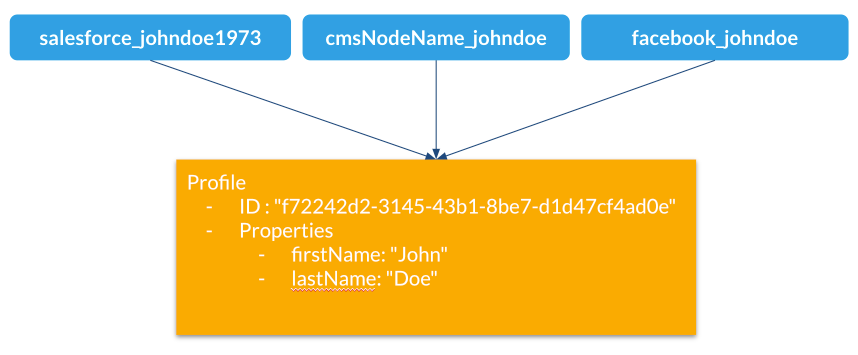
Interactions with merging
Profile merges have been modified to use aliases starting Unomi 2
Upon merge:
-
Properties are copied to the master profile as before
-
An alias is created for the "master" profile with the ID of the merged profile
-
Merged profiles are now deleted
-
"mergedWith" property is no longer used since we deleted the merged profiles
API
/context.json and /eventcollector will now look up profiles by profile ID or aliases from the same cookie (context-profile-id) or body parameters (profileId)
| Verb | Path | Description |
|---|---|---|
GET |
/cxs/profiles/PROFILE_ID_OR_ALIAS |
Retrieves a profile by ID or Alias ID (useful if an external system wants to get a profile) |
GET |
/cxs/profiles/PROFILE_ID/aliases |
Get all the aliases for a profile |
POST |
/cxs/profiles/PROFILE_ID/aliases/ALIAS_ID |
Add an alias to a profile |
DELETE |
/cxs/profiles/PROFILE_ID/aliases/ALIAS_ID |
Remove an alias from a profile |
4.1.12. Common Issues and Best Practices
Decision Guide for Profile Merging
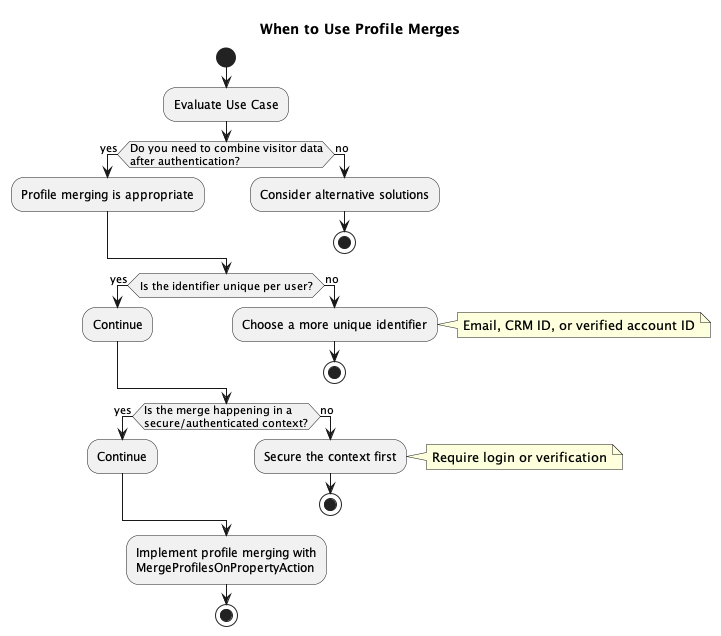
Troubleshooting Common Issues
Merge Not Happening
If profiles aren’t merging as expected, check:
-
The merge property exists on both profiles with exactly matching values
-
The merge property is stored as a system property (
systemProperties.mergeIdentifier) -
The rule containing the merge action is correctly triggered
-
The profiles aren’t personas or anonymous profiles (which are skipped)
-
Ensure the
maxProfilesInOneMergelimit (default 50) is not being exceeded
Data Loss During Merge
By default, when property values conflict, the master profile’s values take precedence. This can appear as data loss from secondary profiles.
Consider:
-
Implementing a custom PropertyMergeStrategy for complex merging logic
-
Pre-processing profiles to ensure critical data is preserved
-
Logging pre-merge state for audit purposes
Performance Issues
Profile merges can impact performance, especially in high-traffic sites:
-
Monitor Elasticsearch load during merge operations
-
Consider batch processing for bulk merges
-
Adjust the
maxProfilesInOneMergeparameter based on your system capabilities -
Schedule large merge operations during off-peak hours
Testing Recommendations
To properly test profile merges, consider:
-
Test Environment: Set up a separate testing environment that closely mirrors production
-
Test Scenarios:
-
Simple merge of two profiles
-
Merge of profiles with conflicting property values
-
Merge with session data and event history
-
Race condition testing (simultaneous merges)
-
-
Data Verification: Verify that all important data is preserved after merges
-
Performance Testing: Test merge operations under load to identify bottlenecks
Implementation Best Practices
-
Security First: Always implement merges in authenticated contexts only
-
Clear Audit Trail: Maintain logs of merge operations for troubleshooting
-
Graceful Degradation: Handle merge failures gracefully without disrupting the user experience
-
Monitoring: Set up alerts for unusual merge patterns that might indicate security issues
-
Data Protection: Consider regulations like GDPR when merging personal data
-
Backup Strategy: Ensure you have a strategy to recover from problematic merges
4.2. Request examples
4.2.1. Prerequisites
Before running any of the examples below, you need to:
1. Create a tenant
First, create a tenant that will own all the data:
curl -X POST http://localhost:8181/cxs/tenants \
--user karaf:karaf \
-H "Content-Type: application/json" \
-d '{
    "requestedId": "mytenant",
    "properties": {
        "name": "My Company",
        "description": "My tenant description"
    }
}'
The response will include the created tenant with automatically generated API keys:
{
    "itemId": "mytenant",
    "name": "My Company",
    "description": "My tenant description",
    "apiKeys": [
        {
            "type": "PUBLIC",
            "key": "public-key-abc123...",
            "created": "2024-01-01T00:00:00Z"
        },
        {
            "type": "PRIVATE",
            "key": "private-key-xyz789...",
            "created": "2024-01-01T00:00:00Z"
        }
    ]
}
After creating the tenant, you will need to use these credentials in the examples:
- Tenant ID: mytenant
- Private API Key: Extract the key value from the API key with type: "PRIVATE" in the response
- Public API Key: Extract the key value from the API key with type: "PUBLIC" in the response
2. Create a scope
Then, create a scope for your digital property (website, mobile app, etc.):
curl -X POST http://localhost:8181/cxs/scopes \
--user "mytenant:YOUR_PRIVATE_API_KEY" \
-H "Content-Type: application/json" \
-d '{
    "metadata": {
        "id": "mydigital",
        "name": "My Digital Property",
        "description": "My website scope"
    }
}'|
Tip
|
The scope creation response will include a public API key that you should save for use with the public APIs. |
|
Important
|
Tenant Resolution (Version 3.1+) Starting with Apache Unomi 3.1, tenant resolution is mandatory for all requests to
All examples in this document use the |
|
Note
|
In all the examples below, replace:
- YOUR_TENANT_ID with mytenant
- YOUR_PRIVATE_API_KEY with your actual private API key
- example scope with mydigital
- YOUR_PUBLIC_API_KEY with the public key from the scope creation response
|
3. Verify the scope
You can verify the scope was created correctly by retrieving it:
curl -X GET http://localhost:8181/cxs/scopes/mydigital \
--user "mytenant:YOUR_PRIVATE_API_KEY"
Or list all scopes:
curl -X GET http://localhost:8181/cxs/scopes \
--user "mytenant:YOUR_PRIVATE_API_KEY"|
Tip
|
To get nicely formatted JSON responses, you can pipe the curl output through For multi-line curl requests using heredoc syntax ( Useful jq options and filters: |
4.2.2. Retrieving your first context
You can retrieve a context using curl like this :
curl http://localhost:8181/cxs/context.js?sessionId=1234 \
-H "X-Unomi-Api-Key: YOUR_PUBLIC_API_KEY"
This will retrieve a JavaScript script that contains a cxs object that contains the context with the current user
profile, segments, scores as well as functions that makes it easier to perform further requests (such as collecting
events using the cxs.collectEvents() function).
|
Note
|
When you make a request to the
For detailed information about how profile tracking, session management, event processing, and rule execution work, see the How profile tracking works section. |
4.2.3. Retrieving a context as a JSON object.
If you prefer to retrieve a pure JSON object, you can simply use a request formed like this:
curl http://localhost:8181/cxs/context.json?sessionId=1234 \
-H "X-Unomi-Api-Key: YOUR_PUBLIC_API_KEY"
The same automatic profile and session creation behavior applies to context.json requests. See How profile tracking works for complete details.
4.2.4. Accessing profile properties in a context
By default, in order to optimize the amount of data sent over the network, Apache Unomi will not send the content of the profile or session properties. If you need this data, you must send a JSON object to configure the resulting output of the context.js(on) servlet.
Here is an example that will retrieve all the session and profile properties, as well as the profile’s segments and scores
curl -X POST http://localhost:8181/cxs/context.json?sessionId=1234 \
-H "Content-Type: application/json" \
-H "X-Unomi-Api-Key: YOUR_PUBLIC_API_KEY" \
-d @- <<'EOF'
{
    "source": {
        "itemId":"homepage",
        "itemType":"page",
        "scope":"mydigital"
    },
    "requiredProfileProperties":["*"],
    "requiredSessionProperties":["*"],
    "requireSegments":true,
    "requireScores":true
}
EOF
The requiredProfileProperties and requiredSessionProperties are properties that take an array of property names
that should be retrieved. In this case we use the wildcard character '*' to say we want to retrieve all the available
properties. The structure of the JSON object that you should send is a JSON-serialized version of the ContextRequest
Java class.
4.2.5. Sending events using the context servlet
At the same time as you are retrieving the context, you can also directly send events in the ContextRequest object as illustrated in the following example:
curl -X POST http://localhost:8181/cxs/context.json?sessionId=1234 \
-H "Content-Type: application/json" \
-H "X-Unomi-Api-Key: YOUR_PUBLIC_API_KEY" \
-d @- <<'EOF'
{
    "source":{
        "itemId":"homepage",
        "itemType":"page",
        "scope":"mydigital"
    },
    "events":[
        {
            "eventType":"view",
            "scope": "mydigital",
            "source":{
                "itemType": "site",
                "scope":"mydigital",
                "itemId": "mysite"
            },
            "target":{
                "itemType":"page",
                "scope":"mydigital",
                "itemId":"homepage",
                "properties":{
                    "pageInfo":{
                        "referringURL":"https://apache.org/"
                    }
                }
            }
        }
    ]
}
EOF
Upon received events, Apache Unomi will execute all the rules that match the current context, and return an updated context. This way of sending events is usually used upon first loading of a page. If you want to send events after the page has finished loading you could either do a second call and get an updating context, or if you don’t need the context and want to send events in a network optimal way you can use the eventcollector servlet (see below).
4.2.6. Sending events using the eventcollector servlet
If you only need to send events without retrieving a context, you should use the eventcollector servlet that is optimized respond quickly and minimize network traffic. Here is an example of using this servlet:
curl -X POST http://localhost:8181/cxs/eventcollector \
-H "Content-Type: application/json" \
-H "X-Unomi-Api-Key: YOUR_PUBLIC_API_KEY" \
-d @- <<'EOF'
{
    "sessionId" : "1234",
    "events":[
        {
            "eventType":"view",
            "scope": "mydigital",
            "source":{
                "itemType": "site",
                "scope":"mydigital",
                "itemId": "mysite"
            },
            "target":{
                "itemType":"page",
                "scope":"mydigital",
                "itemId":"homepage",
                "properties":{
                    "pageInfo":{
                        "referringURL":"https://apache.org/"
                    }
                }
            }
        }
    ]
}
EOF
Note that the eventcollector executes the rules but does not return a context. If is generally used after a page is loaded to send additional events.
4.2.7. Where to go from here
-
You can find more useful Apache Unomi URLs that can be used in the same way as the above examples.
-
Read the Twitter sample documentation that contains a detailed example of how to integrate with Apache Unomi.
4.3. Public API Examples
4.3.1. Sending a context request
curl -X POST http://localhost:8181/cxs/context.json?sessionId=1234 \
-H "Content-Type: application/json" \
-H "X-Unomi-Api-Key: YOUR_PUBLIC_API_KEY" \
-d @- <<'EOF'
{
    "source":{
        "itemId":"homepage",
        "itemType":"page",
        "scope":"mydigital"
    },
    "events":[
        {
            "eventType":"view",
            "scope": "mydigital",
            "source":{
                "itemType": "site",
                "scope":"mydigital",
                "itemId": "mysite"
            },
            "target":{
                "itemType":"page",
                "scope":"mydigital",
                "itemId":"homepage",
                "properties":{
                    "pageInfo":{
                        "referringURL":"https://apache.org/"
                    }
                }
            }
        }
    ]
}
EOF
4.3.2. Collecting events
curl -X POST http://localhost:8181/cxs/eventcollector \
-H "Content-Type: application/json" \
-H "X-Unomi-Api-Key: YOUR_PUBLIC_API_KEY" \
-d '{
    "sessionId" : "1234",
    "events":[
        {
            "eventType":"contactInfoSubmitted",
            "scope": "mydigital",
            "source":{
                "itemType": "site",
                "scope": "mydigital",
                "itemId": "mysite"
            },
            "target":{
                "itemType": "form",
                "scope": "mydigital",
                "itemId": "contactForm"
            },
            "properties" : {
              "firstName": "John",
              "lastName": "Doe",
              "email": "john.doe@acme.com"
            }
        }
    ]
}'
4.4. Private API Examples
4.4.1. Setting up birthday personalization
This example shows how to set up and test birthday-based personalization in Unomi.
1. Creating test profiles
First, let’s create two test profiles - one with today’s birth date and another with a different date:
# Create a profile with today's birth date
curl -X POST http://localhost:8181/cxs/profiles \
--user "YOUR_TENANT_ID:YOUR_PRIVATE_API_KEY" \
-H "Content-Type: application/json" \
-d '{
    "itemId": "profile-1",
    "itemType": "profile",
    "scope": "mydigital",
    "properties": {
        "firstName": "John",
        "lastName": "Birthday",
        "email": "john.birthday@example.com",
        "birthDate": "2000-03-24",
        "birthday": "03-24"
    }
}'

# Create a profile with a different birth date
curl -X POST http://localhost:8181/cxs/profiles \
--user "YOUR_TENANT_ID:YOUR_PRIVATE_API_KEY" \
-H "Content-Type: application/json" \
-d '{
    "itemId": "profile-2",
    "itemType": "profile",
    "scope": "mydigital",
    "properties": {
        "firstName": "Jane",
        "lastName": "Regular",
        "email": "jane.regular@example.com",
        "birthDate": "1995-12-31",
        "birthday": "12-31"
    }
}'|
Note
|
The birthday property stores just the month and day in MM-DD format for easy matching, while birthDate stores the full date.
|
2. Verifying the profiles
You can verify that both profiles were created with their birth dates:
curl -X POST http://localhost:8181/cxs/profiles/search \
--user "YOUR_TENANT_ID:YOUR_PRIVATE_API_KEY" \
-H "Content-Type: application/json" \
-d '{
  "offset": 0,
  "limit": 20,
  "condition": {
    "type": "profilePropertyCondition",
    "parameterValues": {
      "propertyName": "properties.birthday",
      "comparisonOperator": "exists"
    }
  }
}'
3. Finding profiles with birthdays today
To find all profiles whose birthday matches today’s date:
curl -X POST http://localhost:8181/cxs/profiles/search \
--user "YOUR_TENANT_ID:YOUR_PRIVATE_API_KEY" \
-H "Content-Type: application/json" \
-d '{
  "offset": 0,
  "limit": 20,
  "condition": {
    "type": "profilePropertyCondition",
    "parameterValues": {
      "propertyName": "properties.birthday",
      "comparisonOperator": "equals",
      "propertyValue": "03-24"
    }
  }
}'|
Important
|
Replace The format is always |
You can also update the personalization example to use the birthday property:
curl -X POST http://localhost:8181/cxs/context.json \
-H "Content-Type: application/json" \
-H "X-Unomi-Api-Key: YOUR_PUBLIC_API_KEY" \
-d '{
    "sessionId": "birthday-session",
    "profileId": "profile-1",
    "source": {
        "itemId": "homepage",
        "itemType": "page",
        "scope": "mydigital"
    },
    "requiredProfileProperties": ["properties.birthday"],
    "personalizations": [
        {
            "id": "birthdayMessage",
            "strategy": "matching-first",
            "strategyOptions": {
                "fallback": "Welcome to our site!"
            },
            "contents": [
                {
                    "id": "birthday-content",
                    "path": "/birthday",
                    "content": "🎉 Happy Birthday! Enjoy your special day!",
                    "filters": [
                        {
                            "condition": {
                                "type": "profilePropertyCondition",
                                "parameterValues": {
                                    "propertyName": "properties.birthday",
                                    "comparisonOperator": "equals",
                                    "propertyValue": "03-24"
                                }
                            }
                        }
                    ]
                }
            ]
        }
    ]
}'
And similarly for the birthday segment:
curl -X POST http://localhost:8181/cxs/segments \
--user "YOUR_TENANT_ID:YOUR_PRIVATE_API_KEY" \
-H "Content-Type: application/json" \
-d '{
  "metadata": {
    "id": "birthdaySegment",
    "name": "Users with Birthday Today",
    "scope": "mydigital"
  },
  "condition": {
    "type": "profilePropertyCondition",
    "parameterValues": {
      "propertyName": "properties.birthday",
      "comparisonOperator": "equals",
      "propertyValue": "03-24"
    }
  }
}'|
Tip
|
To make this more maintainable in a production environment, you can deploy a custom condition type that handles birthday matching: After deploying the condition, you can use it in your searches and segments like this: For example, to create a segment using this condition: |
4. Testing personalization
Now we can test how personalization works for both profiles. We’ll use the context.json endpoint to get personalized content:
For the birthday profile (should show birthday message):
curl -X POST http://localhost:8181/cxs/context.json \
-H "Content-Type: application/json" \
-H "X-Unomi-Api-Key: YOUR_PUBLIC_API_KEY" \
-d '{
    "sessionId": "birthday-session",
    "profileId": "profile-1",
    "source": {
        "itemId": "homepage",
        "itemType": "page",
        "scope": "mydigital"
    },
    "requiredProfileProperties": ["properties.birthday"],
    "personalizations": [
        {
            "id": "birthdayMessage",
            "strategy": "matching-first",
            "strategyOptions": {
                "fallback": "Welcome to our site!"
            },
            "contents": [
                {
                    "id": "birthday-content",
                    "path": "/birthday",
                    "content": "🎉 Happy Birthday! Enjoy your special day!",
                    "filters": [
                        {
                            "condition": {
                                "type": "profilePropertyCondition",
                                "parameterValues": {
                                    "propertyName": "properties.birthday",
                                    "comparisonOperator": "equals",
                                    "propertyValue": "03-24"
                                }
                            }
                        }
                    ]
                }
            ]
        }
    ]
}'
For the non-birthday profile (should show welcome message):
curl -X POST http://localhost:8181/cxs/context.json \
-H "Content-Type: application/json" \
-H "X-Unomi-Api-Key: YOUR_PUBLIC_API_KEY" \
-d '{
    "sessionId": "regular-session",
    "profileId": "profile-2",
    "source": {
        "itemId": "homepage",
        "itemType": "page",
        "scope": "mydigital"
    },
    "requiredProfileProperties": ["properties.birthday"],
    "personalizations": [
        {
            "id": "birthdayMessage",
            "strategy": "matching-first",
            "strategyOptions": {
                "fallback": "Welcome to our site!"
            },
            "contents": [
                {
                    "id": "birthday-content",
                    "path": "/birthday",
                    "content": "🎉 Happy Birthday! Enjoy your special day!",
                    "filters": [
                        {
                            "condition": {
                                "type": "profilePropertyCondition",
                                "parameterValues": {
                                    "propertyName": "properties.birthday",
                                    "comparisonOperator": "equals",
                                    "propertyValue": "03-24"
                                }
                            }
                        }
                    ]
                }
            ]
        }
    ]
}'
The responses will include a personalizations object that contains:
- For profile-1: The birthday message "🎉 Happy Birthday! Enjoy your special day!"
- For profile-2: The fallback message "Welcome to our site!"
5. Creating a birthday segment
You can also create a segment to automatically group profiles with birthdays today:
curl -X POST http://localhost:8181/cxs/segments \
--user "YOUR_TENANT_ID:YOUR_PRIVATE_API_KEY" \
-H "Content-Type: application/json" \
-d '{
  "metadata": {
    "id": "birthdaySegment",
    "name": "Users with Birthday Today",
    "scope": "mydigital"
  },
  "condition": {
    "type": "profilePropertyCondition",
    "parameterValues": {
      "propertyName": "properties.birthday",
      "comparisonOperator": "equals",
      "propertyValue": "03-24"
    }
  }
}'
4.4.2. Searching profiles
curl -X POST http://localhost:8181/cxs/profiles/search \
--user "YOUR_TENANT_ID:YOUR_PRIVATE_API_KEY" \
-H "Content-Type: application/json" \
-d '{
  "offset" : 0,
  "limit" : 20,
  "condition" : {
    "type": "profilePropertyCondition",
    "parameterValues" : {
      "propertyName" : "properties.firstName",
      "comparisonOperator" : "equals",
      "propertyValue" : "John"
    }
  }
}'
4.4.3. Creating a segment
curl -X POST http://localhost:8181/cxs/segments \
--user "YOUR_TENANT_ID:YOUR_PRIVATE_API_KEY" \
-H "Content-Type: application/json" \
-d '{
  "metadata": {
    "id": "newSegment",
    "name": "New Segment",
    "scope": "mydigital"
  },
  "condition": {
    "type": "profilePropertyCondition",
    "parameterValues": {
      "propertyName": "properties.age",
      "comparisonOperator": "greaterThan",
      "propertyValueInteger": 25
    }
  }
}'
4.4.4. Setting up product view tracking
Before using the product view search examples, you need to send product view events to Unomi. Here’s how to set it up:
1. Sending a product view event
You can use the eventcollector endpoint to send product view events:
curl -X POST http://localhost:8181/cxs/eventcollector \
-H "Content-Type: application/json" \
-H "X-Unomi-Api-Key: YOUR_PUBLIC_API_KEY" \
-d '{
    "sessionId": "1234",
    "events": [
        {
            "eventType": "view",
            "scope": "mydigital",
            "source": {
                "itemType": "site",
                "scope": "mydigital",
                "itemId": "mysite"
            },
            "target": {
                "itemType": "product",
                "scope": "mydigital",
                "itemId": "product-123",
                "properties": {
                    "pageInfo": {
                        "referringURL": "https://www.google.com"
                    }
                }
            }
        }
    ]
}'
Key points about the event structure:
1. Use "eventType": "view" for view events
2. Set target.itemType to "product" for product views
3. Include product details in target.properties
4. Use consistent itemId values to track the same product
2. Using the context.json endpoint
For web applications, you can also send product views through the context.json endpoint:
curl -X POST http://localhost:8181/cxs/context.json?sessionId=1234 \
-H "Content-Type: application/json" \
-H "X-Unomi-Api-Key: YOUR_PUBLIC_API_KEY" \
-d '{
    "source": {
        "itemId": "product-page",
        "itemType": "page",
        "scope": "mydigital"
    },
    "events": [
        {
            "eventType": "view",
            "scope": "mydigital",
            "source": {
                "itemType": "site",
                "scope": "mydigital",
                "itemId": "mysite"
            },
            "target": {
                "itemType": "product",
                "scope": "mydigital",
                "itemId": "product-123",
                "properties": {
                    "pageInfo": {
                        "referringURL": "https://www.google.com"
                    }
                }
            }
        }
    ],
    "requiredProfileProperties": ["*"]
}'
3. Product properties schema
|
Important
|
To simplify product view tracking, you can deploy a custom condition type that combines all the necessary event conditions: After deploying the condition, you can use it in your searches like this: This custom condition type:
1. Is properly tagged with |
Unomi is flexible with product properties - you don’t need to declare a schema beforehand. However, for consistency, you should: 1. Use consistent property names across events 2. Use consistent value types (e.g., always use numbers for prices) 3. Use consistent categories and other enumerated values
Common product properties to consider:
- name: Product name (string)
- category: Product category (string)
- price: Product price (number)
- brand: Product brand (string)
- sku: Stock keeping unit (string)
- color: Product color (string)
- size: Product size (string)
- inStock: Stock status (boolean)
4. Testing the setup
To verify your events are being recorded, you can:
-
Send multiple view events for the same product
-
Wait a few seconds for processing
-
Use the profile search example below to check if the views were counted
curl -X POST http://localhost:8181/cxs/profiles/search \
--user "YOUR_TENANT_ID:YOUR_PRIVATE_API_KEY" \
-H "Content-Type: application/json" \
-d '{
  "offset": 0,
  "limit": 20,
  "condition": {
    "type": "pastEventCondition",
    "parameterValues": {
      "numberOfDays": 1,
      "minimumEventCount": 1,
      "eventCondition": {
        "type": "productViewEventCondition",
        "parameterValues": {
          "productId": "product-123"
        }
      }
    }
  }
}'
4.4.5. Searching profiles with frequent product views
This example shows how to find profiles that have viewed a specific product at least 3 times in the last 7 days:
curl -X POST http://localhost:8181/cxs/profiles/search \
--user "YOUR_TENANT_ID:YOUR_PRIVATE_API_KEY" \
-H "Content-Type: application/json" \
-d '{
  "offset": 0,
  "limit": 20,
  "condition": {
    "type": "pastEventCondition",
    "parameterValues": {
      "numberOfDays": 7,
      "minimumEventCount": 3,
      "eventCondition": {
        "type": "productViewEventCondition",
        "parameterValues": {
          "productId": "product-123"
        }
      }
    }
  }
}'
This search will: 1. Look for product view events in the past 7 days 2. Match events that: - Have type "view" - Target a product (target.itemType = "product") - Target the specific product ID (product-123) 3. Return profiles that have at least 3 such events 4. Results are paginated (20 results per page)
You can adjust:
- minimumEventCount: change the minimum number of views required
- maximumEventCount: optionally set a maximum number of views
- numberOfDays: modify the time period to look back
- operator: use "eventsOccurred" (default) or "eventsNotOccurred"
- productId: change which product to track
For example, to find profiles that have viewed products in a specific category, you could create another custom condition type productCategoryViewEventCondition.json:
{
  "metadata": {
    "id": "productCategoryViewEventCondition",
    "name": "productCategoryViewEventCondition",
    "description": "A condition that matches product views in a category",
    "systemTags": [
      "eventCondition",
      "event",
      "condition"
    ]
  },
  "parentCondition": {
    "type": "booleanCondition",
    "parameterValues": {
      "operator": "and",
      "subConditions": [
        {
          "type": "eventTypeCondition",
          "parameterValues": {
            "eventTypeId": "view"
          }
        },
        {
          "type": "eventPropertyCondition",
          "parameterValues": {
            "propertyName": "target.itemType",
            "comparisonOperator": "equals",
            "propertyValue": "product"
          }
        },
        {
          "type": "eventPropertyCondition",
          "parameterValues": {
            "propertyName": "target.properties.category",
            "comparisonOperator": "equals",
            "propertyValue": "parameter::category"
          }
        }
      ]
    }
  },
  "parameters": [
    {
      "id": "category",
      "type": "string",
      "multivalued": false
    }
  ]
}
Then use it like this:
curl -X POST http://localhost:8181/cxs/profiles/search \
--user "YOUR_TENANT_ID:YOUR_PRIVATE_API_KEY" \
-H "Content-Type: application/json" \
-d '{
  "offset": 0,
  "limit": 20,
  "condition": {
    "type": "pastEventCondition",
    "parameterValues": {
      "numberOfDays": 30,
      "minimumEventCount": 5,
      "eventCondition": {
        "type": "productCategoryViewEventCondition",
        "parameterValues": {
          "category": "electronics"
        }
      }
    }
  }
}'
4.5. Setting up Groovy Actions
4.5.1. Deploying a Groovy Action
This example shows how to deploy and use a Groovy action to automatically extract the birthday (MM-DD) from a full birthDate.
1. Create the Groovy action file
First, create a file named ExtractBirthdayAction.groovy with this content:
package org.apache.unomi.groovy.actions

import org.apache.unomi.api.Event
import org.apache.unomi.api.Profile
import org.apache.unomi.api.actions.Action
import org.apache.unomi.api.actions.ActionExecutor
import org.apache.unomi.api.services.EventService

class ExtractBirthdayAction implements ActionExecutor {
    public int execute(Action action, Event event) {
        Profile profile = event.getProfile()
        def birthDate = profile.getProperty("birthDate")

        if (birthDate != null && birthDate instanceof String && birthDate.length() >= 10) {
            try {
                // Extract month-day part (e.g., "03-24" from "2000-03-24")
                def monthDay = birthDate.substring(5, 10)

                // Only update if different to avoid unnecessary saves
                if (monthDay != profile.getProperty("birthday")) {
                    profile.setProperty("birthday", monthDay)
                    return EventService.PROFILE_UPDATED
                }
            } catch (Exception e) {
                // Log error or handle invalid date format
            }
        }
        return EventService.NO_CHANGE
    }
}
2. Deploy the Groovy action
Use the Groovy actions endpoint to deploy the action:
curl -X POST http://localhost:8181/cxs/groovyActions \
--user "YOUR_TENANT_ID:YOUR_PRIVATE_API_KEY" \
-H "Content-Type: multipart/form-data" \
-F "file=@ExtractBirthdayAction.groovy"|
Note
|
The action ID will be extractBirthday (derived from the filename without the .groovy extension).
|
3. Create the action definition
After deploying the Groovy script, create the action definition:
curl -X POST http://localhost:8181/cxs/definitions \
--user "YOUR_TENANT_ID:YOUR_PRIVATE_API_KEY" \
-H "Content-Type: application/json" \
-d '{
  "metadata": {
    "id": "extractBirthdayAction",
    "name": "Extract Birthday Action",
    "description": "Extracts MM-DD from birthDate and sets it as birthday property",
    "systemTags": [
      "profileTags",
      "demographic",
      "event"
    ]
  },
  "actionExecutor": "groovy:extractBirthday",
  "parameters": []
}'
4. Create a rule to trigger the action
Create a rule that will trigger the Groovy action whenever a profile’s birthDate is set or modified:
curl -X POST http://localhost:8181/cxs/rules \
--user "YOUR_TENANT_ID:YOUR_PRIVATE_API_KEY" \
-H "Content-Type: application/json" \
-d '{
  "metadata": {
    "id": "setBirthdayRule",
    "name": "Set Birthday Rule",
    "description": "Sets birthday property when birthDate changes",
    "scope": "mydigital"
  },
  "condition": {
    "type": "booleanCondition",
    "parameterValues": {
      "operator": "and",
      "subConditions": [
        {
          "type": "profilePropertyCondition",
          "parameterValues": {
            "propertyName": "properties.birthDate",
            "comparisonOperator": "exists"
          }
        },
        {
          "type": "profileUpdatedEventCondition",
          "parameterValues": {
            "propertyName": "properties.birthDate"
          }
        }
      ]
    }
  },
  "actions": [
    {
      "type": "extractBirthdayAction",
      "parameterValues": {}
    }
  ]
}'
5. Test with example profiles
Create test profiles to verify the action works:
# Create a profile with birthDate - should trigger the action
curl -X POST http://localhost:8181/cxs/profiles \
--user "YOUR_TENANT_ID:YOUR_PRIVATE_API_KEY" \
-H "Content-Type: application/json" \
-d '{
    "itemId": "test-profile-1",
    "properties": {
        "firstName": "John",
        "lastName": "Doe",
        "birthDate": "1990-03-24"
    }
}'

# Verify the birthday property was set
curl -X GET http://localhost:8181/cxs/profiles/test-profile-1 \
--user "YOUR_TENANT_ID:YOUR_PRIVATE_API_KEY" | jq '.'

# Update an existing profile's birthDate - should trigger the action
curl -X PATCH http://localhost:8181/cxs/profiles/test-profile-1 \
--user "YOUR_TENANT_ID:YOUR_PRIVATE_API_KEY" \
-H "Content-Type: application/json" \
-d '{
    "properties": {
        "birthDate": "1990-12-31"
    }
}'

# Verify the birthday property was updated
curl -X GET http://localhost:8181/cxs/profiles/test-profile-1 \
--user "YOUR_TENANT_ID:YOUR_PRIVATE_API_KEY" | jq '.'
The responses should show:
1. First profile creation: birthday property set to "03-24"
2. After update: birthday property changed to "12-31"
6. Remove the Groovy action (if needed)
To remove the Groovy action:
curl -X DELETE http://localhost:8181/cxs/groovyActions/extractBirthday \
--user "YOUR_TENANT_ID:YOUR_PRIVATE_API_KEY" \
-H "Content-Type: application/json"|
Note
|
This will only remove the Groovy script. You’ll need to separately delete the action definition and rule if desired. |
|
Tip
|
Best practices for Groovy actions: 1. Always handle potential errors gracefully 2. Check property existence and types 3. Avoid unnecessary profile updates 4. Use meaningful action and rule names 5. Test with various date formats |
4.5.2. Using the explain parameter for request tracing
Apache Unomi provides a powerful request tracing feature through the explain query parameter. This feature helps administrators understand how requests are processed internally, including event processing, condition evaluations, and rule executions.
For save-time condition checks (before runtime), see Condition validation. For a conditions-focused debugging walkthrough, see Debugging conditions.
Prerequisites
To use the explain parameter, you must have one of the following roles: - ADMINISTRATOR - TENANT_ADMINISTRATOR
Request examples
Context request with explain
curl -X POST http://localhost:8181/cxs/context.json?sessionId=1234&explain=true \
-H "X-Unomi-Api-Key: YOUR_PUBLIC_API_KEY" \
-H "Content-Type: application/json" \
-d @- <<'EOF'
{
    "source": {
        "itemId":"homepage",
        "itemType":"page",
        "scope":"mydigital"
    },
    "requiredProfileProperties":["*"],
    "requireSegments":true
}
EOF
Event collector request with explain
curl -X POST http://localhost:8181/cxs/eventcollector?explain=true \
-H "X-Unomi-Api-Key: YOUR_PUBLIC_API_KEY" \
-H "Content-Type: application/json" \
-d @- <<'EOF'
{
    "sessionId": "1234",
    "events": [
        {
            "eventType":"view",
            "scope": "mydigital",
            "source":{
                "itemType": "site",
                "scope":"mydigital",
                "itemId": "mysite"
            },
            "target":{
                "itemType":"page",
                "scope":"mydigital",
                "itemId":"homepage"
            }
        }
    ]
}
EOF
Understanding the trace output
The explain parameter adds a requestTracing field to the response that contains a tree structure of all operations performed during request processing. Here’s an example trace output:
{
    "profileId": "12345",
    "sessionId": "1234",
    // ... other response fields ...
    "requestTracing": {
        "operationType": "request-processing",
        "description": "Processing context request",
        "startTime": 1234567890,
        "endTime": 1234567899,
        "children": [
            {
                "operationType": "event-validation",
                "description": "Validating event: view",
                "startTime": 1234567891,
                "endTime": 1234567892,
                "traces": [
                    "Validating against schema event/1-0-0",
                    "Event validation successful"
                ]
            },
            {
                "operationType": "rule-evaluation",
                "description": "Evaluating rules for event",
                "startTime": 1234567893,
                "endTime": 1234567895,
                "children": [
                    {
                        "operationType": "condition-evaluation",
                        "description": "Evaluating condition: matchAll",
                        "startTime": 1234567894,
                        "endTime": 1234567894,
                        "result": true
                    }
                ]
            }
        ]
    }
}
Request processing flow
The following diagram shows the high-level flow of request processing when explain is enabled:
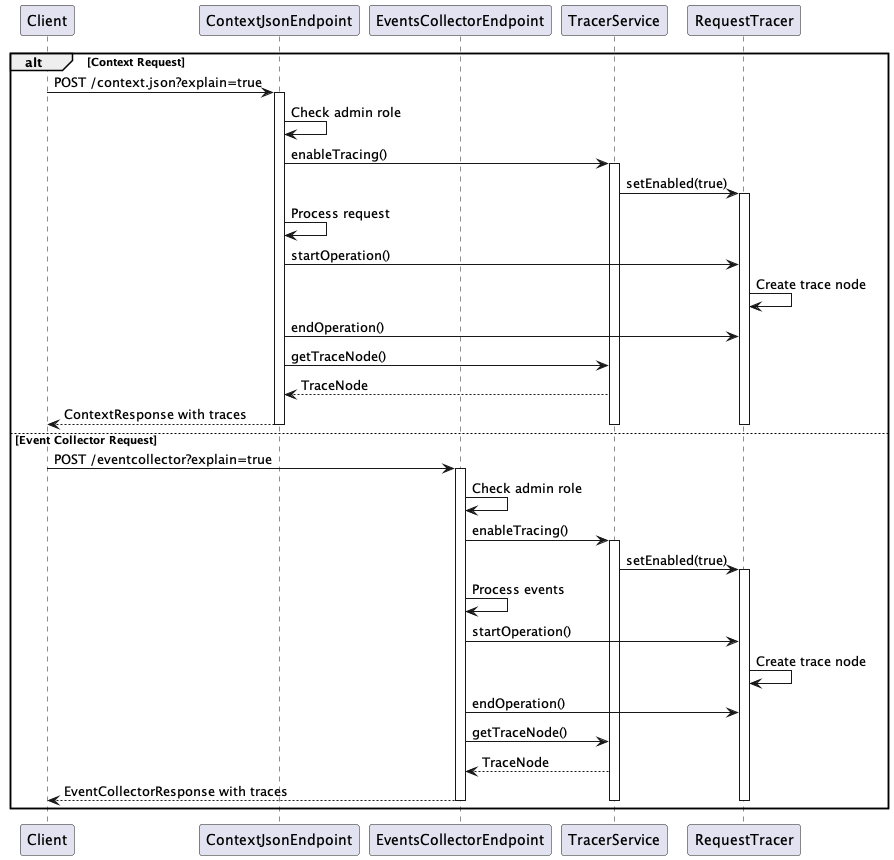
Common trace operations
The tracing system captures various types of operations:
-
Request Processing
-
Overall request handling
-
Parameter validation
-
Schema validation
-
-
Event Processing
-
Event validation
-
Event type resolution
-
Event property processing
-
-
Rule Evaluation
-
Condition evaluation
-
Action execution
-
Score updates
-
-
Profile Operations
-
Profile merging
-
Property updates
-
Segment evaluation
-
Each operation in the trace contains: - Operation type - Description - Start time - End time - Result (if applicable) - Child operations - Trace messages
Best practices
-
Use explain parameter selectively
-
Only enable when debugging or troubleshooting
-
Disable in production environments
-
Consider performance impact
-
-
Analyze trace output
-
Look for unexpected operations
-
Check operation timing
-
Review validation results
-
Monitor rule evaluations
-
-
Security considerations
-
Only grant admin access to trusted users
-
Monitor explain parameter usage
-
Review trace data for sensitive information
-
Complex personalization example with explain
This example demonstrates using the explain parameter to understand how personalization filters are evaluated:
curl -X POST http://localhost:8181/cxs/context.json?sessionId=1234&explain=true \
-H "X-Unomi-Api-Key: YOUR_PUBLIC_API_KEY" \
-H "Content-Type: application/json" \
-d @- <<'EOF'
{
    "source": {
        "itemId": "homepage",
        "itemType": "page",
        "scope": "mydigital"
    },
    "requiredProfileProperties": ["*"],
    "requireSegments": true,
    "personalizations": [
        {
            "id": "homepage-hero",
            "strategy": "matching-first",
            "strategyOptions": {
                "fallback": "default-content"
            },
            "contents": [
                {
                    "id": "premium-user-content",
                    "filters": [
                        {
                            "condition": {
                                "type": "profileSegmentCondition",
                                "parameterValues": {
                                    "segments": ["premium-users"]
                                }
                            }
                        },
                        {
                            "condition": {
                                "type": "pastEventCondition",
                                "parameterValues": {
                                    "eventType": "purchase",
                                    "minimumEventCount": 1,
                                    "numberOfDays": 30
                                }
                            }
                        }
                    ]
                },
                {
                    "id": "new-visitor-content",
                    "filters": [
                        {
                            "condition": {
                                "type": "sessionPropertyCondition",
                                "parameterValues": {
                                    "propertyName": "duration",
                                    "comparisonOperator": "lessThan",
                                    "propertyValueInteger": 300
                                }
                            }
                        }
                    ]
                }
            ]
        }
    ]
}
EOF
The response will include detailed tracing of the personalization evaluation process:
{
    "profileId": "12345",
    "sessionId": "1234",
    "requestTracing": {
        "operationType": "request-processing",
        "description": "Processing context request with personalization",
        "startTime": 1234567890,
        "endTime": 1234567899,
        "children": [
            {
                "operationType": "personalization-evaluation",
                "description": "Evaluating personalization: homepage-hero",
                "startTime": 1234567891,
                "endTime": 1234567895,
                "children": [
                    {
                        "operationType": "content-filter-evaluation",
                        "description": "Evaluating filters for content: premium-user-content",
                        "startTime": 1234567892,
                        "endTime": 1234567893,
                        "children": [
                            {
                                "operationType": "condition-evaluation",
                                "description": "Evaluating segment condition",
                                "startTime": 1234567892,
                                "endTime": 1234567892,
                                "result": false,
                                "traces": [
                                    "Profile not in segment: premium-users"
                                ]
                            },
                            {
                                "operationType": "condition-evaluation",
                                "description": "Evaluating past event condition",
                                "startTime": 1234567892,
                                "endTime": 1234567893,
                                "result": false,
                                "traces": [
                                    "No purchase events found in last 30 days"
                                ]
                            }
                        ],
                        "result": false
                    },
                    {
                        "operationType": "content-filter-evaluation",
                        "description": "Evaluating filters for content: new-visitor-content",
                        "startTime": 1234567893,
                        "endTime": 1234567894,
                        "children": [
                            {
                                "operationType": "condition-evaluation",
                                "description": "Evaluating session duration condition",
                                "startTime": 1234567893,
                                "endTime": 1234567894,
                                "result": true,
                                "traces": [
                                    "Session duration: 120 seconds, threshold: 300 seconds"
                                ]
                            }
                        ],
                        "result": true
                    }
                ]
            }
        ]
    },
    "personalizations": {
        "homepage-hero": "new-visitor-content"
    }
}
This example demonstrates:
-
Complex personalization setup
-
Multiple content variants
-
Different condition types
-
Fallback content
-
Strategy configuration
-
-
Detailed tracing of
-
Personalization evaluation flow
-
Filter condition evaluation
-
Segment membership checks
-
Past event queries
-
Session property checks
-
-
Trace node hierarchy showing
-
Parent-child relationships
-
Timing information
-
Decision points
-
Result propagation
-
The trace output helps understand: - Why specific content was selected - Which conditions failed/passed - Performance of different operations - Order of evaluation
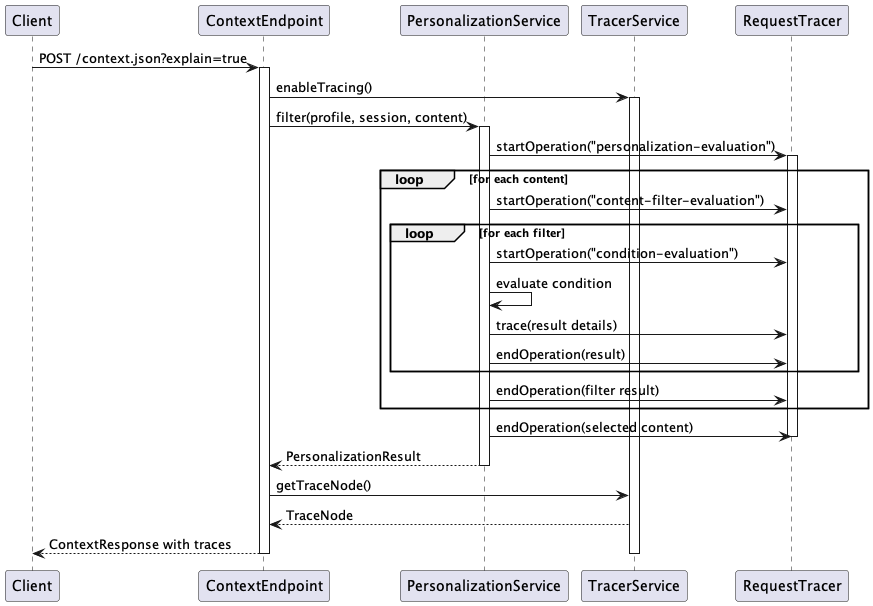
This sequence diagram shows the detailed flow of personalization evaluation with tracing enabled, including: 1. Initial request handling 2. Personalization service interaction 3. Filter evaluation loops 4. Trace node creation and updates 5. Result aggregation and response
5. Configuration
5.1. Centralized configuration
Apache Unomi uses a centralized configuration file that contains both system properties and configuration properties. These settings are then fed to the OSGi and other configuration files using placeholder that look something like this:
contextserver.publicAddress=${org.apache.unomi.cluster.public.address:-http://localhost:8181}
contextserver.internalAddress=${org.apache.unomi.cluster.internal.address:-https://localhost:9443}
Default values are stored in a file called $MY_KARAF_HOME/etc/custom.system.properties but you should never modify
this file directly, as an override mechanism is available. Simply create a file called:
unomi.custom.system.properties
and put your own property values in their to override the defaults OR you can use environment variables to also override
the values in the $MY_KARAF_HOME/etc/custom.system.properties. See the next section for more information about that.
5.2. Changing the default configuration using environment variables (i.e. Docker configuration)
You might want to use environment variables to change the default system configuration, especially if you intend to run Apache Unomi inside a Docker container. You can find the list of all the environment variable names in the following file:
If you are using Docker Container, simply pass the environment variables on the docker command line or if you are using Docker Compose you can put the environment variables in the docker-compose.yml file.
If you want to "save" the environment values in a file, you can use the bin/setenv(.bat) to setup the environment
variables you want to use.
5.3. Changing the default configuration using property files
If you want to change the default configuration using property files instead of environment variables, you can perform
any modification you want in the $MY_KARAF_HOME/etc/unomi.custom.system.properties file.
By default this file does not exist and is designed to be a file that will contain only your custom modifications to the default configuration.
For example, if you want to change the HTTP ports that the server is listening on, you will need to create the following lines in the $MY_KARAF_HOME/etc/unomi.custom.system.properties (and create it if you haven’t yet) file:
org.osgi.service.http.port.secure=9443
org.osgi.service.http.port=8181
If you change these ports, also make sure you adjust the following settings in the same file :
org.apache.unomi.cluster.public.address=http://localhost:8181
org.apache.unomi.cluster.internal.address=https://localhost:9443
If you need to specify a search engine configuration that is different than the default, it is recommended to do this BEFORE you start the server for the first time, or you will lose all the data you have stored previously.
Apache Unomi supports both ElasticSearch and OpenSearch as search engine backends. Here are the configuration properties for each:
For ElasticSearch:
org.apache.unomi.elasticsearch.cluster.name=contextElasticSearch
# The elasticsearch.addresses may be a comma separated list of host names and ports such as
# hostA:9200,hostB:9200
# Note: the port number must be repeated for each host.
org.apache.unomi.elasticsearch.addresses=localhost:9200
# Optional Elasticsearch security (when xpack security is enabled)
org.apache.unomi.elasticsearch.username=elastic
org.apache.unomi.elasticsearch.password=${env:ELASTIC_PASSWORD}
org.apache.unomi.elasticsearch.sslEnable=true
org.apache.unomi.elasticsearch.sslTrustAllCertificates=true
For OpenSearch:
org.apache.unomi.opensearch.cluster.name=opensearch-cluster
# The opensearch.addresses may be a comma separated list of host names and ports such as
# hostA:9200,hostB:9200
# Note: the port number must be repeated for each host.
org.apache.unomi.opensearch.addresses=localhost:9200

# OpenSearch security settings (required by default since OpenSearch 3)
org.apache.unomi.opensearch.sslEnable=true
org.apache.unomi.opensearch.username=admin
org.apache.unomi.opensearch.password=${env:OPENSEARCH_INITIAL_ADMIN_PASSWORD:-admin}
org.apache.unomi.opensearch.sslTrustAllCertificates=true
To select which search engine to use, you can:
1. Use the appropriate configuration properties above
2. When building from source, use the appropriate Maven profile:
* For ElasticSearch (default): no special profile needed
* For OpenSearch: add -Duse.opensearch=true to your Maven command
(this will only impact the integration tests if they are activated using the -Pintegration-tests profile)
3. When using Docker:
* For ElasticSearch: use UNOMI_DISTRIBUTION=unomi-distribution-elasticsearch
* For OpenSearch: use UNOMI_DISTRIBUTION=unomi-distribution-opensearch
* For custom configurations: use UNOMI_DISTRIBUTION=your-custom-distribution-name
Note: The UNOMI_DISTRIBUTION environment variable accepts any karaf feature that is available from Karaf. Two built-in distributions (unomi-distribution-elasticsearch, unomi-distribution-opensearch) are packaged with UNOMI archive but any other can be added, either in the package or by adding a feature repository that contains the desired one in Karaf.
Note: When using OpenSearch 3.x: - Security is enabled by default and requires SSL/TLS - The default admin username is 'admin' - The initial admin password can be set via OPENSEARCH_INITIAL_ADMIN_PASSWORD environment variable
5.4. Refresh Policy Configuration
Apache Unomi provides the ability to configure refresh policies for different item types in both ElasticSearch and OpenSearch. This feature allows you to optimize when changes to documents are made visible to search.
For ElasticSearch:
# refresh policy per item type in Json format.
# Valid values are WAIT_UNTIL/IMMEDIATE/NONE. The default refresh policy is NONE.
# Example: {"event":"WAIT_UNTIL","rule":"NONE"}
org.apache.unomi.elasticsearch.itemTypeToRefreshPolicy={"scheduledTask":"WAIT_UNTIL"}
For OpenSearch:
# refresh policy per item type in Json format.
# Valid values are WaitFor/True/False. The default refresh policy is False.
# Example: {"event":"WaitFor","rule":"False"}
org.apache.unomi.opensearch.itemTypeToRefreshPolicy={"scheduledTask":"WaitFor"}
The refresh policy can be configured per item type and affects when changes to documents of that type become visible:
-
WAIT_UNTIL/WaitFor: Changes will be visible after the operation completes but will wait for a refresh. This ensures changes are immediately visible while being more efficient than an immediate refresh.
-
IMMEDIATE/True: Changes will be made visible immediately (forces an index refresh). This is the most resource-intensive option but guarantees immediate visibility.
-
NONE/False: Changes will be made visible when a refresh happens, either from the configured refresh interval or when manually triggered. This is the most efficient option but doesn’t guarantee when changes will be visible.
For distributed task management, it’s recommended to use WAIT_UNTIL/WaitFor for the scheduledTask item type to ensure lock state changes are immediately visible to all nodes without requiring explicit refresh calls in the code.
Authentication Rules:
-
If JAAS authentication is provided (username/password), it grants full access to all endpoints
-
Public paths (like /context.json) require a valid public API key
-
Private paths require both tenantId and private API key
-
All other requests are denied
5.5. Secured events configuration
Apache Unomi secures some events by default. It comes out of the box with a default configuration that you can adjust
by using the centralized configuration file override in $MY_KARAF_HOME/etc/unomi.custom.system.properties
You can find the default configuration in the following file:
$MY_KARAF_HOME/etc/custom.system.properties
The properties start with the prefix : org.apache.unomi.thirdparty.* and here are the default values :
org.apache.unomi.thirdparty.provider1.key=${env:UNOMI_THIRDPARTY_PROVIDER1_KEY:-670c26d1cc413346c3b2fd9ce65dab41}
org.apache.unomi.thirdparty.provider1.ipAddresses=${env:UNOMI_THIRDPARTY_PROVIDER1_IPADDRESSES:-127.0.0.1,::1}
org.apache.unomi.thirdparty.provider1.allowedEvents=${env:UNOMI_THIRDPARTY_PROVIDER1_ALLOWEDEVENTS:-login,updateProperties}
The events set in allowedEvents will be secured and will only be accepted if the call comes from the specified IP address, and if the secret-key is passed in the X-Unomi-Api-Key HTTP request header. The "env:" part means that it will attempt to read an environment variable by that name, and if it’s not found it will default to the value after the ":-" marker.
It is now also possible to use IP address ranges instead of having to list all valid IP addresses for event sources. This is very useful when working in cluster deployments where servers may be added or removed dynamically. In order to support this Apache Unomi uses a library called IPAddress that supports IP ranges and subnets. Here is an example of how to setup a range:
org.apache.unomi.thirdparty.provider1.ipAddresses=${env:UNOMI_THIRDPARTY_PROVIDER1_IPADDRESSES:-192.168.1.1-100,::1}
The above configuration will allow a range of IP addresses between 192.168.1.1 and 192.168.1.100 as well as the IPv6 loopback.
Here’s another example using the subnet format:
org.apache.unomi.thirdparty.provider1.ipAddresses=${env:UNOMI_THIRDPARTY_PROVIDER1_IPADDRESSES:-1.2.0.0/16,::1}
The above configuration will allow all addresses starting with 1.2 as well as the IPv6 loopback address.
Wildcards may also be used:
org.apache.unomi.thirdparty.provider1.ipAddresses=${env:UNOMI_THIRDPARTY_PROVIDER1_IPADDRESSES:-1.2.*.*,::1}
The above configuration is exactly the same as the previous one.
More advanced ranges and subnets can be used as well, please refer to the IPAddress library documentation for details on how to format them.
If you want to add another provider you will need to add them manually in the following file (and make sure you maintain the changes when upgrading) :
$MY_KARAF_HOME/etc/org.apache.unomi.thirdparty.cfg
Usually, login events, which operate on profiles and do merge on protected properties, must be secured. For each trusted third party server, you need to add these 3 lines :
thirdparty.provider1.key=secret-key
thirdparty.provider1.ipAddresses=127.0.0.1,::1
thirdparty.provider1.allowedEvents=login,updateProperties
5.6. Installing the MaxMind GeoIPLite2 IP lookup database
Apache Unomi requires an IP database in order to resolve IP addresses to user location. The GeoLite2 database can be downloaded from MaxMind here : http://dev.maxmind.com/geoip/geoip2/geolite2/
Simply download the GeoLite2-City.mmdb file into the "etc" directory.
5.7. Installing Geonames database
Apache Unomi includes a geocoding service based on the geonames database ( http://www.geonames.org/ ). It can be used to create conditions on countries or cities.
In order to use it, you need to install the Geonames database into . Get the "allCountries.zip" database from here : http://download.geonames.org/export/dump/
Download it and put it in the "etc" directory, without unzipping it.
Edit $MY_KARAF_HOME/etc/unomi.custom.system.properties and set org.apache.unomi.geonames.forceImport to true,
import should start right away.
Otherwise, import should start at the next startup. Import runs in background, but can take about 15 minutes.
At the end, you should have about 4 million entries in the geonames index.
5.8. REST API Security
The Apache Unomi Context Server REST API is protected using JAAS authentication and using Basic or Digest HTTP auth. By default, the login/password for the REST API full administrative access is "karaf/karaf".
The generated package is also configured with a default SSL certificate. You can change it by following these steps :
Replace the existing keystore in $MY_KARAF_HOME/etc/keystore by your own certificate :
Update the keystore and certificate password in $MY_KARAF_HOME/etc/unomi.custom.system.properties file :
org.ops4j.pax.web.ssl.keystore=${env:UNOMI_SSL_KEYSTORE:-${karaf.etc}/keystore}
org.ops4j.pax.web.ssl.password=${env:UNOMI_SSL_PASSWORD:-changeme}
org.ops4j.pax.web.ssl.keypassword=${env:UNOMI_SSL_KEYPASSWORD:-changeme}
You should now have SSL setup on Karaf with your certificate, and you can test it by trying to access it on port 9443.
Changing the default Karaf password can be done by modifying the org.apache.unomi.security.root.password in the
$MY_KARAF_HOME/etc/unomi.custom.system.properties file
5.9. Tenant Management and API Access
Apache Unomi supports multi-tenancy, allowing multiple organizations to use the same Unomi instance while keeping their data completely isolated. Each tenant has its own set of API keys for authentication.
5.9.1. Creating and Managing Tenants
|
Important
|
All tenant management operations (create, list, update, delete, API key management) are restricted to administrators only and require JAAS authentication. These endpoints cannot be accessed using tenant API keys. |
To manage tenants, you need administrator access to Unomi (default credentials: karaf/karaf). You can manage tenants using either the REST API or the Karaf shell commands:
Using REST API (requires admin credentials):
# Create a new tenant (JAAS auth required)
curl -X POST "http://localhost:8181/cxs/tenants" \
  -u karaf:karaf \
  -H "Content-Type: application/json" \
  -d '{
    "requestedId": "mytenant",
    "properties": {
      "name": "My Company",
      "description": "My Company tenant",
      "address": "123 Main St",
      "country": "USA"
    }
  }'

# Response (HTTP 201 Created):
{
    "requestedId": "mytenant",
    "name": "My Company",
    "description": "My Company tenant",
    "properties": {
        "address": "123 Main St",
        "country": "USA"
    },
    "itemType": "tenant",
    "version": 1,
    "status": "ACTIVE",
    "creationDate": "2024-03-14T10:30:00Z",
    "lastModificationDate": "2024-03-14T10:30:00Z"
}

# List all tenants (JAAS auth required)
curl -X GET "http://localhost:8181/cxs/tenants" \
  -u karaf:karaf \
  -H "Accept: application/json"

# Get tenant details (JAAS auth required)
curl -X GET "http://localhost:8181/cxs/tenants/mytenant" \
  -u karaf:karaf \
  -H "Accept: application/json"

# Delete a tenant (JAAS auth required)
curl -X DELETE "http://localhost:8181/cxs/tenants/mytenant" \
  -u karaf:karaf
Using Karaf shell (requires admin access to Karaf console). See Shell commands for full syntax:
# Create a tenant (JSON properties)
unomi:crud create tenant -d '{"itemId":"mytenant","name":"My Company","description":"My Company tenant"}'

# List tenants
unomi:crud list tenant

# View tenant details
unomi:crud read tenant -i mytenant

# Delete a tenant
unomi:crud delete tenant -i mytenant
5.9.2. API Keys and Authentication
Each tenant has two types of API keys: * Public API Key: Used for client-side operations and public endpoints * Private API Key: Used for secure operations and administrative tasks
The API keys are automatically generated when creating a tenant. You can view them using:
# Using Karaf shell (requires admin access)
unomi:crud read tenant -i mytenant

# Output example:
Tenant Details:
ID: mytenant
Name: My Company
Description: My Company tenant
Status: ACTIVE
Creation Date: 2024-03-14T10:30:00Z
Last Modified: 2024-03-14T10:30:00Z
Public API Key: 8f7d9a2c-5e4b-3f1a-9b8c-7d6e5f4a3b2c
Private API Key: 1a2b3c4d-5e6f-7g8h-9i0j-k1l2m3n4o5p6
To generate new API keys (requires admin access):
# Using REST API (JAAS auth required)
curl -X POST "http://localhost:8181/cxs/tenants/mytenant/apikeys?type=PUBLIC&validityDays=30" \
  -u karaf:karaf \
  -H "Content-Type: application/json"

# Response (HTTP 200 OK):
{
    "key": "8f7d9a2c-5e4b-3f1a-9b8c-7d6e5f4a3b2c",
    "type": "PUBLIC",
    "expirationDate": "2024-04-13T10:30:00Z",
    "creationDate": "2024-03-14T10:30:00Z"
}

# Using Karaf shell (requires admin access)
unomi:crud create apikey -d '{"tenantId":"mytenant","keyType":"PUBLIC","validityPeriod":30}'
5.9.3. Accessing API Endpoints
There are three ways to authenticate with the Unomi API:
-
Tenant Authentication (Recommended for most endpoints):
# List all profiles (tenant access)
curl -X GET "http://localhost:8181/cxs/profiles" \
  --user "TENANT_ID:PRIVATE_KEY" \
  -H "Accept: application/json"

# Response (HTTP 200 OK):
{
    "list": [
        {
            "itemId": "profile1",
            "properties": {
                "firstName": "John",
                "lastName": "Doe"
            }
        }
    ],
    "offset": 0,
    "pageSize": 50,
    "totalSize": 1
}
+ 2. Public API Access (Client-Side Operations):
# Get context data
curl -X POST "http://localhost:8181/cxs/context.json" \
  -H "X-Unomi-Api-Key: 8f7d9a2c-5e4b-3f1a-9b8c-7d6e5f4a3b2c" \
  -H "Content-Type: application/json" \
  -d '{
    "source": {
        "itemId": "homepage",
        "itemType": "page",
        "scope": "example"
    },
    "requiredProfileProperties": ["firstName", "lastName"]
  }'

# Response (HTTP 200 OK):
{
    "profileId": "xyz123",
    "sessionId": "abc456",
    "profileProperties": {
        "firstName": "John",
        "lastName": "Doe"
    }
}
+ 3. Private API Access (Server-Side Operations):
# Get profiles using tenant credentials
curl -X GET "http://localhost:8181/cxs/profiles" \
  --user "mytenant:1a2b3c4d-5e6f-7g8h-9i0j-k1l2m3n4o5p6" \
  -H "Accept: application/json"

# Response (HTTP 200 OK):
{
    "list": [
        {
            "itemId": "profile1",
            "scope": "mytenant",
            "properties": {
                "firstName": "John",
                "lastName": "Doe"
            }
        }
    ],
    "offset": 0,
    "pageSize": 50,
    "totalSize": 1
}
Authentication Rules:
-
If JAAS authentication is provided (username/password), it grants full access to all endpoints
-
Public paths (like /context.json) require a valid public API key
-
Private paths require both tenantId and private API key
-
All other requests are denied
5.9.4. Public vs Private Endpoints
Public endpoints (requiring only public API key):
-
GET/POST /context.json
# Example request
curl -X GET "http://localhost:8181/cxs/context.json?sessionId=abc123" \
  -H "X-Unomi-Api-Key: 8f7d9a2c-5e4b-3f1a-9b8c-7d6e5f4a3b2c"
+ 2. GET/POST /eventcollector
# Example request
curl -X POST "http://localhost:8181/cxs/eventcollector" \
  -H "X-Unomi-Api-Key: 8f7d9a2c-5e4b-3f1a-9b8c-7d6e5f4a3b2c" \
  -H "Content-Type: application/json" \
  -d '{
    "events": [{
        "eventType": "view",
        "scope": "example",
        "source": {
            "itemId": "page1",
            "itemType": "page",
            "scope": "example"
        },
        "target": {
            "itemId": "product1",
            "itemType": "product",
            "scope": "example"
        }
    }]
  }'
+ 3. GET /client/*
# Example request
curl -X GET "http://localhost:8181/cxs/client/myapp/status" \
  -H "X-Unomi-Api-Key: 8f7d9a2c-5e4b-3f1a-9b8c-7d6e5f4a3b2c"
All other endpoints are considered private and require either: * JAAS authentication with admin credentials, or * Private API key authentication with tenant credentials
Example private endpoint access:
# Get segment details
curl -X GET "http://localhost:8181/cxs/segments/important-customers" \
  --user "mytenant:1a2b3c4d-5e6f-7g8h-9i0j-k1l2m3n4o5p6" \
  -H "Accept: application/json"

# Create a new segment
curl -X POST "http://localhost:8181/cxs/segments" \
  --user "mytenant:1a2b3c4d-5e6f-7g8h-9i0j-k1l2m3n4o5p6" \
  -H "Content-Type: application/json" \
  -d '{
    "itemId": "high-value-customers",
    "name": "High Value Customers",
    "description": "Customers with high purchase value",
    "condition": {
        "type": "profilePropertyCondition",
        "parameterValues": {
            "propertyName": "totalPurchases",
            "comparisonOperator": "greaterThan",
            "propertyValue": 1000
        }
    }
  }'
5.10. Scripting security
5.10.1. Multi-layer scripting filtering system
The scripting security system is multi-layered.
For requests coming in through the /cxs/context.json endpoint, the following flow is used to secure incoming requests:

Conditions submitted through the context.json public endpoint are first sanitized, meaning that any scripting directly injected is removed. However, as conditions can use sub conditions that include scripting, only the first directly injected layer of scripts are removed.
The second layer is the expression filtering system, that uses an allow-listing mechanism to only accept pre-vetted expressions (through configuration and deployment on the server side). Any unrecognized expression will not be accepted.
Finally, once the script starts executing in the scripting engine, a filtering class loader will only let the script access classes that have been allowed.
This multi-layered approach makes it possible to retain a high level of security even if one layer is poorly configured or abused.
For requests coming in through the secure APIs such as rules, only the condition sanitizing step is skipped, otherwise the rest of the filtering system is the same.
5.10.2. Scripts and expressions
Apache Unomi allows using different types of expressions in the following subsystems:
-
context.json filters and personalization queries
-
rule conditions and actions parameters
Apache Unomi uses an integrated scripting language to provide this functionality: MVEL. MVEL is used in rule actions as in the following example:
{
  "metadata": {
    "id": "_ajhg9u2s5_sessionAssigned",
    "name": "Session assigned to a profile",
    "description": "Update profile visit information",
    "readOnly":true
  },

  "condition": {
    "type": "booleanCondition",
    "parameterValues": {
      "subConditions":[
        {
          "type": "eventTypeCondition",
          "parameterValues": {
            "eventTypeId": "sessionCreated"
          }
        },
        {
          "type": "eventTypeCondition",
          "parameterValues": {
            "eventTypeId": "sessionReassigned"
          }
        }

        ],
      "operator":"or"

    }
  },

  "actions": [
    {
      "parameterValues": {
        "setPropertyName": "properties.previousVisit",
        "setPropertyValue": "profileProperty::lastVisit",
        "storeInSession": false
      },
      "type": "setPropertyAction"
    },
    {
      "parameterValues": {
        "setPropertyName": "properties.lastVisit",
        "setPropertyValue": "now",
        "storeInSession": false
      },
      "type": "setPropertyAction"
    },
    {
      "parameterValues": {
        "setPropertyName": "properties.nbOfVisits",
        "setPropertyValue": "script::profile.properties.?nbOfVisits != null ? (profile.properties.nbOfVisits + 1) : 1",
        "storeInSession": false
      },
      "type": "setPropertyAction"
    },
    {
      "parameterValues": {
        "setPropertyName": "properties.totalNbOfVisits",
        "setPropertyValue": "script::profile.properties.?totalNbOfVisits != null ? (profile.properties.totalNbOfVisits + 1) : 1",
        "storeInSession": false
      },
      "type": "setPropertyAction"
    }
  ]

}
As we see in the above example, we use an MVEL script with the setPropertyAction to set a property value. Starting with version 1.5.2, any expression use in rules MUST be allow-listed.
By default, Apache Unomi comes with some built-in allowed expressions that cover all the internal uses cases.
Default allowed MVEL expressions (from https://github.com/apache/unomi/blob/unomi-1.5.x/plugins/baseplugin/src/main/resources/META-INF/cxs/expressions/mvel.json) :
[
  "\\Q'systemProperties.goals.'+goalId+'TargetReached'\\E",
  "\\Q'now-'+since+'d'\\E",
  "\\Q'scores.'+scoringPlanId\\E",
  "\\QminimumDuration*1000\\E",
  "\\QmaximumDuration*1000\\E",
  "\\Qprofile.properties.?nbOfVisits != null ? (profile.properties.nbOfVisits + 1) : 1\\E",
  "\\Qprofile.properties.?totalNbOfVisits != null ? (profile.properties.totalNbOfVisits + 1) : 1\\E",
  "\\Qsession != null ? session.size + 1 : 0\\E",
  "\\Q'properties.optimizationTest_'+event.target.itemId\\E",
  "\\Qevent.target.properties.variantId\\E",
  "\\Qprofile.properties.?systemProperties.goals.\\E[\\w\\_]*\\QReached != null ? (profile.properties.systemProperties.goals.\\E[\\w\\_]*\\QReached) : 'now'\\E",
  "\\Qprofile.properties.?systemProperties.campaigns.\\E[\\w\\_]*\\QEngaged != null ? (profile.properties.systemProperties.campaigns.\\E[\\w\\_]*\\QEngaged) : 'now'\\E"
]
If you require or are already using custom expressions, you should add a plugin to Apache Unomi to allow for this. The choice of a plugin was to make sure only system administrators and solution developers could provide such a list, avoiding the possibility to provide it through an API call or another security sensitive deployment mechanism.
There is another way of allow-listing expressions through configuration, see the “scripting configuration parameters” section below.
Procedure to add allowed expressions:
-
Create a new Apache Unomi plugin project.
-
Create a JSON file in src/main/resources/META-INF/cxs/expressions/mvel.json with an array of regular expressions that will contain the allowed expressions.
-
Build the project and deploy it to Apache Unomi
Warning: Do not make regular expressions too general. They should actually be as specific as possible to avoid potential injection of malicious code.
5.10.3. Scripting expression filtering configuration parameters
Alongside with the allow-listing technology, there are new configuration parameters to control the security of the scripting engines:
# These parameters control the list of classes that are allowed or forbidden when executing expressions.
org.apache.unomi.scripting.allow=${env:UNOMI_ALLOW_SCRIPTING_CLASSES:-org.apache.unomi.api.Event,org.apache.unomi.api.Profile,org.apache.unomi.api.Session,org.apache.unomi.api.Item,org.apache.unomi.api.CustomItem,java.lang.Object,java.util.Map,java.util.HashMap,java.lang.Integer,org.mvel2.*}
org.apache.unomi.scripting.forbid=${env:UNOMI_FORBID_SCRIPTING_CLASSES:-}

# This parameter controls the whole expression filtering system. It is not recommended to turn it off. The main reason to turn it off would be to check if it is interfering with something, but it should always be active in production.
org.apache.unomi.scripting.filter.activated=${env:UNOMI_SCRIPTING_FILTER_ACTIVATED:-true}

# The following parameters control the filtering using regular expressions for each scripting sub-system.
# The "collections" parameter tells the expression filtering system which configurations to expect. By default only MVEL is accepted values, but in the future these might be replaced by new scripting sub-systems.
org.apache.unomi.scripting.filter.collections=${env:UNOMI_SCRIPTING_FILTER_COLLECTIONS:-mvel}

# For each scripting sub-system, there is an allow and a forbid property that reference a .json files,
# you can either edit this files or reference your own file directly in the following config.
# Note: You can add new expressions to the "allow" file, although it is better to add them inside any plugins you may be adding.
#       This configuration is only designed to compensate for the cases where something was not properly designed or to deal with compatibility issues.
#       Just be VERY careful to make your patterns AS SPECIFIC AS POSSIBLE in order to avoid introducing a way to abuse the expression filtering.
# Note: It is NOT recommended to change the built-in "forbid" value unless you are having issues with its value.
# Note: mvel-allow.json contains an empty array: [], this mean nothing is allowed, so far.
#       If you want to allow all expression, just remove the property org.apache.unomi.scripting.filter.mvel.allow, but this is not recommended
#       It's better to list your expressions, and provide them in the mvel-allow.json file
#       example: ["\\Qsession.size + 1\\E"]
org.apache.unomi.scripting.filter.mvel.allow=${env:UNOMI_SCRIPTING_FILTER_MVEL_ALLOW:-${karaf.etc}/mvel-allow.json}
org.apache.unomi.scripting.filter.mvel.forbid=${env:UNOMI_SCRIPTING_FILTER_MVEL_FORBID:-${karaf.etc}/mvel-forbid.json}

# This parameter controls the condition sanitizing done on the ContextServlet (/cxs/context.json). If will remove any expressions that start with "script::". It is not recommended to change this value, unless you run into compatibility issues.
org.apache.unomi.security.personalization.sanitizeConditions=${env:UNOMI_SECURITY_SANITIZEPERSONALIZATIONCONDITIONS:-true}
5.10.4. Groovy Actions
Groovy actions offer the ability to define a set of actions and action types (aka action descriptors) purely from Groovy scripts defined at runtime.
Initially submitted to Unomi through a purpose-built REST API endpoint, Groovy actions are then stored in the persistence layer (Elasticsearch or OpenSearch). When an event matches a rule configured to execute an action, the corresponding action is fetched from persistence and executed.
Anatomy of a Groovy Action
To be valid, a Groovy action must follow a particular convention which is divided in two parts:
-
An annotation used to define the associated action type
-
The function to be executed
Placed right before the function, the "@"Action annotation contains a set of parameter detailing how the action should be triggered.
| Field name | Type | Required | Description |
|---|---|---|---|
id |
String |
YES |
Id of the action |
actionExecutor |
String |
YES |
Action executor contains the name of the script to call for the action type and must be prefixed with "groovy:". The prefix indicates to Unomi which dispatcher to use when processing the action. The name must be the file name of the groovy file containing the action without the extension (groovy:<filename>). |
name |
String |
Action name |
|
hidden |
Boolean |
Define if the action is hidden or not. It is usually used to hide objects in a UI. |
|
parameters |
List<Parameter> |
The parameters of the actions, also defined by annotations |
|
systemTags |
List<String> |
A (reserved) list of tags for the associated object. This is usually populated through JSON descriptors and is not meant to be modified by end users. These tags may include values that help classify associated objects. |
The function contained within the Groovy Action must be called execute() and its last instruction must be an integer.
This integer serves as an indication whether the values of the session and profile should be persisted. In general, the codes used are defined in the EventService interface.
Each groovy actions extends by default a Base script defined here
REST API
Actions can be deployed/updated/deleted via the dedicated /cxs/groovyActions rest endpoint.
Deploy/update an Action:
curl -X POST 'http://localhost:8181/cxs/groovyActions' \
--user "TENANT_ID:PRIVATE_KEY" \
--form 'file=@"<file location>"'|
Note
|
Replace TENANT_ID and PRIVATE_KEY with your actual tenant ID and private API key.
|
A Groovy Action can be updated by submitting another Action with the same id.
Delete an Action:
curl -X DELETE 'http://localhost:8181/cxs/groovyActions/<Action id>' \
--user "TENANT_ID:PRIVATE_KEY"
Note that when a groovy action is deleted by the API, the action type associated with this action will also be deleted.
Hello World!
In this short example, we’re going to create a Groovy Action that will be adding "Hello world! " to the logs whenever a new view event is triggered.
The first step consists in creating the groovy script on your filesystem, start by creating the file helloWorldGroovyAction.groovy:
@Action(id = "helloWorldGroovyAction",
        actionExecutor = "groovy:helloWorldGroovyAction",
        parameters = [@Parameter(id = "location", type = "string", multivalued = false)])
def execute() {
    logger.info("Hello {}", action.getParameterValues().get("location"))
    EventService.NO_CHANGE
}
As the last instruction of the script is EventService.NO_CHANGE, data will not be persisted.
Once the action has been created you need to submit it to Unomi (from the same folder as helloWorldGroovyAction.groovy).
curl -X POST 'http://localhost:8181/cxs/groovyActions' \
--user "TENANT_ID:PRIVATE_KEY" \
--form 'file=@helloWorldGroovyAction.groovy'
Important: A bug ( UNOMI-847 ) in Apache Unomi 2.5 and lower requires the filename of a Groovy file being submitted to be the same than the id of the Groovy action (as per the example above).
Finally, register a rule to trigger execution of the groovy action:
curl -X POST 'http://localhost:8181/cxs/rules' \
--user "TENANT_ID:PRIVATE_KEY" \
--header 'Content-Type: application/json' \
--data-raw '{
 "metadata": {
   "id": "scriptGroovyActionRule",
   "name": "Test Groovy Action Rule",
   "description": "A sample rule to test Groovy actions"
 },
 "condition": {
     "type": "eventTypeCondition",
     "parameterValues": {
       "eventTypeId": "view"
     }
 },
 "actions": [
   {
     "parameterValues": {
       "location": "world!"
     },
     "type": "helloWorldGroovyAction"
   }
 ]
}'
Note that this rule contains a "location" parameter, with the value "world!", which is then used in the log message triggered by the action.
You can now use unomi to trigger a "view" event and see the corresponding message in the Unomi logs.
Once you’re done with the Hello World! action, it can be deleted using the following command:
curl -X DELETE 'http://localhost:8181/cxs/groovyActions/helloWorldGroovyAction' \
--user "TENANT_ID:PRIVATE_KEY"
And the corresponding rule can be deleted using the following command:
curl -X DELETE 'http://localhost:8181/cxs/rules/scriptGroovyActionRule' \
--user "TENANT_ID:PRIVATE_KEY"
Inject an OSGI service in a groovy script
It’s possible to use the services provided by unomi directly in the groovy actions.
In the following example, we are going to create a groovy action that displays the number of existing profiles by using the profile service provided by unomi.
import org.osgi.framework.Bundle
import org.osgi.framework.BundleContext
import org.osgi.framework.FrameworkUtil
import org.apache.unomi.groovy.actions.GroovyActionDispatcher
import org.osgi.framework.ServiceReference
import org.slf4j.Logger
import org.slf4j.LoggerFactory

final Logger LOGGER = LoggerFactory.getLogger(GroovyActionDispatcher.class.getName());

@Action(id = "displayNumberOfProfilesAction", actionExecutor = "groovy:DisplayNumberOfProfilesAction", description = "Display the number of existing profiles")
def execute() {

    // Use OSGI function to get the bundleContext
    Bundle bundle = FrameworkUtil.getBundle(GroovyActionDispatcher.class);
    BundleContext context = bundle.getBundleContext();

    // Get the service reference
    ServiceReference<ProfileService> serviceReference = context.getServiceReference(ProfileService.class);

    // Get the service you are looking for
    ProfileService profileService = context.getService(serviceReference);

    // Example of displaying the number of profile
    LOGGER.info("Display profile count")
    LOGGER.info("{}", profileService.getAllProfilesCount().toString())

    return EventService.NO_CHANGE
}
Known limitation
Only the services accessible by the class loader of the GroovyActionDispatcher class can be used in the groovy actions. That includes the services in the following packages:
org.apache.unomi.api.actions
org.apache.unomi.api.services
org.apache.unomi.api
org.apache.unomi.groovy.actions
org.apache.unomi.groovy.actions.annotations
org.apache.unomi.groovy.actions.services
org.apache.unomi.metrics
org.apache.unomi.persistence.spi
org.apache.unomi.services.actions;version
5.10.5. Scripting roadmap
Scripting will probably undergo major changes in future versions of Apache Unomi, with the likely retirement of MVEL in favor of Groovy Actions detailed above.
These changes will not happen on maintenance versions of Apache Unomi, only in the next major version. Maintenance versions will of course maintain compatibility with existing scripting solutions.
5.11. Automatic profile merging
Apache Unomi is capable of merging profiles based on a common property value. In order to use this, you must add the MergeProfileOnPropertyAction to a rule (such as a login rule for example), and configure it with the name of the property that will be used to identify the profiles to be merged. An example could be the "email" property, meaning that if two (or more) profiles are found to have the same value for the "email" property they will be merged by this action.
5.11.1. How profile merging works
When a profile merge is triggered, the following process takes place:
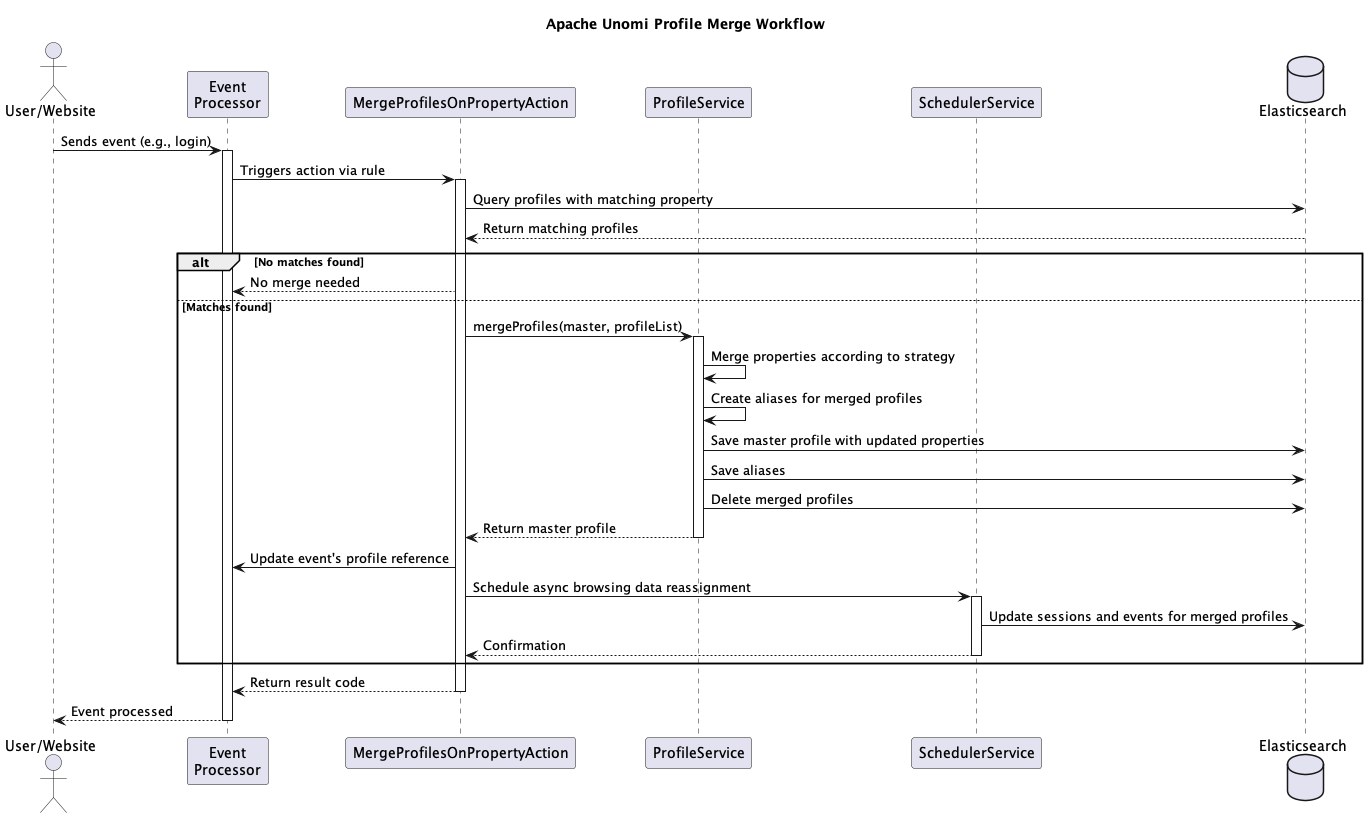
5.11.2. Before and after a profile merge
This diagram illustrates the state of profiles before and after a merge:
Starting from Unomi 2:
-
The oldest profile (by firstVisit timestamp) becomes the master profile by default
-
All properties from merged profiles are combined into the master profile
-
An alias is created for each merged profile, pointing to the master profile
-
The original merged profiles are deleted
-
All sessions and events from merged profiles are reassigned to the master profile asynchronously
5.11.3. Configuration parameters
The MergeProfilesOnPropertyAction supports the following parameters:
| Parameter | Type | Description | Required |
|---|---|---|---|
mergeProfilePropertyName |
String |
The system property name used to identify profiles for merging |
Yes |
mergeProfilePropertyValue |
String |
The value to match against the property. Often set dynamically from event properties using |
Yes |
forceEventProfileAsMaster |
Boolean |
If true, forces the current event’s profile to be the master profile after merging. If false, the oldest profile (by firstVisit) becomes the master. |
No (defaults to false) |
5.11.4. Security considerations
|
Important
|
Never trigger profile merges from unauthenticated operations such as form submissions or public-facing APIs. Always verify user identity before performing a merge. |
The following diagram highlights key security considerations:
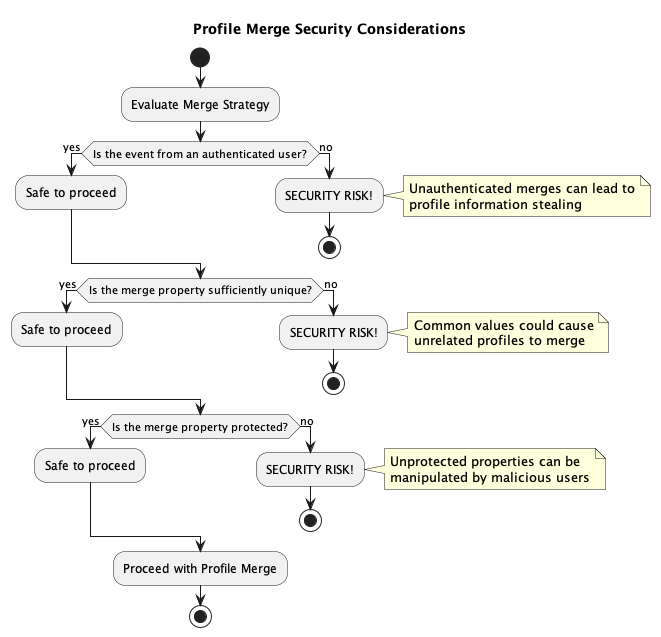
Key security recommendations:
-
Always authenticate users before performing profile merges
-
Use protected properties that require authentication to modify
-
Choose unique identifiers like verified email or account ID
-
Implement rate limiting for merge operations to prevent abuse
-
Consider additional verification before merging profiles with sensitive data
5.11.5. Troubleshooting profile merges
If profiles aren’t merging as expected, check:
-
The merge property exists on both profiles with exactly matching values
-
The merge property is stored as a system property (
systemProperties.mergeIdentifier) -
The rule containing the merge action is correctly triggered
-
The profiles aren’t personas or anonymous profiles (which are skipped)
5.11.6. Performance considerations
-
The
maxProfilesInOneMergeparameter (default: 50) limits how many profiles are merged in a single operation -
Large numbers of merges can impact system performance
-
Session and event reassignment happens asynchronously to prevent blocking the event processing pipeline
-
Consider the impact of merges on your Elasticsearch cluster, especially for high-traffic sites
To test, simply configure the action in the "login" or "facebookLogin" rules and set it up on the "email" property. Upon sending one of the events, all matching profiles will be merged.
5.12. Securing a production environment
Before going live with a project, you should absolutely read the following section that will help you setup a proper secure environment for running your context server.
Step 1: Install and configure a firewall
You should setup a firewall around your cluster of context servers and/or Elasticsearch nodes. If you have an application-level firewall you should only allow the following connections open to the whole world :
All other ports should not be accessible to the world.
For your Apache Unomi client applications (such as the Jahia CMS), you will need to make the following ports accessible :
8181 (Context Server HTTP port)
9443 (Context Server HTTPS port)
The Apache Unomi actually requires HTTP Basic Auth for access to the Context Server administration REST API, so it is highly recommended that you design your client applications to use the HTTPS port for accessing the REST API.
The user accounts to access the REST API are actually routed through Karaf’s JAAS support, which you may find the documentation for here :
The default username/password is
karaf/karafYou should really change this default username/password as soon as possible. Changing the default Karaf password can be
done by modifying the org.apache.unomi.security.root.password in the $MY_KARAF_HOME/etc/unomi.custom.system.properties file
Or if you want to also change the user name you could modify the following file :
$MY_KARAF_HOME/etc/users.properties
But you will also need to change the following property in the $MY_KARAF_HOME/etc/unomi.custom.system.properties :
karaf.local.user = karaf
For your context servers, and for any standalone Elasticsearch nodes you will need to open the following ports for proper node-to-node communication : 9200 (Elasticsearch REST API), 9300 (Elasticsearch TCP transport)
Of course any ports listed here are the default ports configured in each server, you may adjust them if needed.
Step 2 : Follow industry recommended best practices for securing Elasticsearch
You may find more valuable recommendations here :
Step 4 : Setup a proxy in front of the context server
As an alternative to an application-level firewall, you could also route all traffic to the context server through a proxy, and use it to filter any communication.
5.13. Integrating with an Apache HTTP web server
If you want to setup an Apache HTTP web server in from of Apache Unomi, here is an example configuration using mod_proxy.
In your Unomi package directory, in $MY_KARAF_HOME/etc/unomi.custom.system.properties setup the public address for
the hostname unomi.apache.org:
org.apache.unomi.cluster.public.address=https://unomi.apache.org/ org.apache.unomi.cluster.internal.address=http://192.168.1.1:8181
and you will also need to change the cookie domain in the same file:
org.apache.unomi.profile.cookie.domain=apache.org
Main virtual host config:
<VirtualHost *:80>
        Include /var/www/vhosts/unomi.apache.org/conf/common.conf
</VirtualHost>

<IfModule mod_ssl.c>
    <VirtualHost *:443>
        Include /var/www/vhosts/unomi.apache.org/conf/common.conf

        SSLEngine on

        SSLCertificateFile    /var/www/vhosts/unomi.apache.org/conf/ssl/24d5b9691e96eafa.crt
        SSLCertificateKeyFile /var/www/vhosts/unomi.apache.org/conf/ssl/apache.org.key
        SSLCertificateChainFile /var/www/vhosts/unomi.apache.org/conf/ssl/gd_bundle-g2-g1.crt

        <FilesMatch "\.(cgi|shtml|phtml|php)$">
                SSLOptions +StdEnvVars
        </FilesMatch>
        <Directory /usr/lib/cgi-bin>
                SSLOptions +StdEnvVars
        </Directory>
        BrowserMatch "MSIE [2-6]" \
                nokeepalive ssl-unclean-shutdown \
                downgrade-1.0 force-response-1.0
        BrowserMatch "MSIE [17-9]" ssl-unclean-shutdown

    </VirtualHost>
</IfModule>
common.conf:
ServerName unomi.apache.org
ServerAdmin webmaster@apache.org

DocumentRoot /var/www/vhosts/unomi.apache.org/html
CustomLog /var/log/apache2/access-unomi.apache.org.log combined
<Directory />
        Options FollowSymLinks
        AllowOverride None
</Directory>
<Directory /var/www/vhosts/unomi.apache.org/html>
        Options FollowSymLinks MultiViews
        AllowOverride None
        Order allow,deny
        allow from all
</Directory>
<Location /cxs>
    Order deny,allow
    deny from all
    allow from 88.198.26.2
    allow from www.apache.org
</Location>

RewriteEngine On
RewriteCond %{REQUEST_METHOD} ^(TRACE|TRACK)
RewriteRule .* - [F]
ProxyPreserveHost On
ProxyPass /server-status !
ProxyPass /robots.txt !

RewriteCond %{HTTP_USER_AGENT} Googlebot [OR]
RewriteCond %{HTTP_USER_AGENT} msnbot [OR]
RewriteCond %{HTTP_USER_AGENT} Slurp
RewriteRule ^.* - [F,L]

ProxyPass / http://localhost:8181/ connectiontimeout=20 timeout=300 ttl=120
ProxyPassReverse / http://localhost:8181/
5.14. Changing the default tracking location
When performing localhost requests to Apache Unomi, a default location will be used to insert values into the session
to make the location-based personalization still work. You can modify the default location settings using the
centralized configuration file ($MY_KARAF_HOME/etc/unomi.custom.system.properties).
Here are the default values for the location settings :
# The following settings represent the default position that is used for localhost requests
org.apache.unomi.ip.database.location=${env:UNOMI_IP_DB:-${karaf.etc}/GeoLite2-City.mmdb}
org.apache.unomi.ip.default.countryCode=${env:UNOMI_IP_DEFAULT_COUNTRYCODE:-CH}
org.apache.unomi.ip.default.countryName=${env:UNOMI_IP_DEFAULT_COUNTRYNAME:-Switzerland}
org.apache.unomi.ip.default.city=${env:UNOMI_IP_DEFAULT_CITY:-Geneva}
org.apache.unomi.ip.default.subdiv1=${env:UNOMI_IP_DEFAULT_SUBDIV1:-2660645}
org.apache.unomi.ip.default.subdiv2=${env:UNOMI_IP_DEFAULT_SUBDIV2:-6458783}
org.apache.unomi.ip.default.isp=${env:UNOMI_IP_DEFAULT_ISP:-Cablecom}
org.apache.unomi.ip.default.latitude=${env:UNOMI_IP_DEFAULT_LATITUDE:-46.1884341}
org.apache.unomi.ip.default.longitude=${env:UNOMI_IP_DEFAULT_LONGITUDE:-6.1282508}
You might want to change these for testing or for demonstration purposes.
5.15. Apache Karaf SSH Console
The Apache Karaf SSH console is available inside Apache Unomi, but the port has been changed from the default value of 8101 to 8102 to avoid conflicts with other Karaf-based products. So to connect to the SSH console you should use:
ssh -p 8102 karaf@localhostor the user/password you have setup to protect the system if you have changed it. You can find the list of Apache Unomi shell commands in the "Shell commands" section of the documentation.
5.16. ElasticSearch authentication and security
With ElasticSearch 7, it’s possible to secure the access to your data. (see https://www.elastic.co/guide/en/elasticsearch/reference/7.17/configuring-stack-security.html and https://www.elastic.co/guide/en/elasticsearch/reference/7.17/secure-cluster.html)
5.16.1. User authentication !
If your ElasticSearch have been configured to be only accessible by authenticated users, edit etc/org.apache.unomi.persistence.elasticsearch.cfg to add the following settings:
username=USER
password=PASSWORD
5.16.2. SSL communication
By default Unomi will communicate with ElasticSearch using http
but you can configure your ElasticSearch server(s) to allow encrypted request using https.
You can follow this documentation to enable SSL on your ElasticSearch server(s): https://www.elastic.co/guide/en/elasticsearch/reference/7.17/security-basic-setup-https.html
If your ElasticSearch is correctly configure to encrypt communications on https:
Just edit etc/org.apache.unomi.persistence.elasticsearch.cfg to add the following settings:
sslEnable=trueBy default, certificates will have to be configured on the Apache Unomi server to be able to trust the identity of the ElasticSearch server(s). But if you need to trust all certificates automatically, you can use this setting:
sslTrustAllCertificates=true5.16.3. Permissions
Apache Unomi requires a particular set of Elasticsearch permissions for its operation.
If you are using Elasticsearch in a production environment, you will most likely need to fine tune permissions given to the user used by Unomi.
The following permissions are required by Unomi:
-
required cluster privileges:
manageORall -
required index privileges on unomi indices:
write, manage, readORall
5.17. Unomi Distribution (features configuration)
You can define a specific distribution for Apache Unomi to configure desired features when the server boots up. Is it a classic Karaf feature that defines desired features for Unomi. Be aware that, even if a distribution is a classic Karaf feature XML file, it must only be composed feature’s dependencies as this file is interpreted by the Unomi ManagementService. No bundle nor config file will be processed from this file.
To set the desired distribution, set the unomi.distribution system property or UNOMI_DISTRIBUTION environment variable to the name of your desired distribution.
You can also use the dedicated unomi:setup command to set the distribution interactively.
Apache Unomi comes with some predefined distributions that you can use directly.
5.17.1. Default Distributions
By default, Apache Unomi comes with four predefined distributions:
unomi-distribution-elasticsearch, unomi-distribution-elasticsearch-graphql, unomi-distribution-opensearch, unomi-distribution-opensearch-graphql
Key Differences Between Distributions:
The only difference between the Elasticsearch and OpenSearch configurations is the persistence layer:
-
Elasticsearch: Uses
unomi-elasticsearch-coreandunomi-elasticsearch-conditions -
OpenSearch: Uses
unomi-opensearch-coreandunomi-opensearch-conditions
All other features remain identical between both configurations. Each one is derived with or without GraphQL support.
5.17.2. Environment-Specific Distributions
You can create different distributions for different deployment environments by creating a dedicated distribution feature.
Be aware that in distribution’s feature, you should only reference other features, not bundles or configuration directly.
Development Environment (includes development tools and debugging features):
<features name="unomi-distributions" xmlns="http://karaf.apache.org/xmlns/features/v1.6.0" xmlns:xsi="http://www.w3.org/2001/XMLSchema-instance" xsi:schemaLocation="http://karaf.apache.org/xmlns/features/v1.6.0 https://karaf.apache.org/xmlns/features/v1.6.0">

    <repository>mvn:org.apache.karaf.features/specs/${karaf.version}/xml/features</repository>
    <repository>mvn:org.apache.cxf.karaf/apache-cxf/${cxf.version}/xml/features</repository>
    <repository>mvn:org.apache.unomi/unomi-kar/${project.version}/xml/features</repository>

    <feature name="unomi-distribution-elasticsearch-dev" description="Apache Unomi :: ElasticSearch Development Distribution" version="${project.version}">
        <feature dependency="true" version="${project.version}">unomi-base</feature>
        <feature dependency="true" version="${project.version}">unomi-startup</feature>
        <feature dependency="true" version="${project.version}">unomi-elasticsearch-core</feature>
        <feature dependency="true" version="${project.version}">unomi-persistence-core</feature>
        <feature dependency="true" version="${project.version}">unomi-services</feature>
        <feature dependency="true" version="${project.version}">unomi-rest-api</feature>
        <feature dependency="true" version="${project.version}">unomi-cxs-lists-extension</feature>
        <feature dependency="true" version="${project.version}">unomi-cxs-geonames-extension</feature>
        <feature dependency="true" version="${project.version}">unomi-cxs-privacy-extension</feature>
        <feature dependency="true" version="${project.version}">unomi-elasticsearch-conditions</feature>
        <feature dependency="true" version="${project.version}">unomi-plugins-base</feature>
        <feature dependency="true" version="${project.version}">unomi-plugins-request</feature>
        <feature dependency="true" version="${project.version}">unomi-plugins-mail</feature>
        <feature dependency="true" version="${project.version}">unomi-plugins-optimization-test</feature>
        <feature dependency="true" version="${project.version}">unomi-shell-dev-commands</feature>
        <feature dependency="true" version="${project.version}">unomi-wab</feature>
        <feature dependency="true" version="${project.version}">unomi-web-tracker</feature>
        <feature dependency="true" version="${project.version}">unomi-healthcheck-elasticsearch</feature>
NOTE: For OpenSearch distributions, use `unomi-healthcheck-opensearch` instead of `unomi-healthcheck-elasticsearch` in custom feature XML.

        <feature dependency="true" version="${project.version}">unomi-router-karaf-feature</feature>
        <feature dependency="true" version="${project.version}">unomi-groovy-actions</feature>
        <feature dependency="true" version="${project.version}">unomi-rest-ui</feature>
        <feature dependency="true" version="${project.version}">unomi-startup-complete</feature>
    </feature>
</features>
Staging Environment (production-like but with some development features):
<features name="unomi-distributions" xmlns="http://karaf.apache.org/xmlns/features/v1.6.0" xmlns:xsi="http://www.w3.org/2001/XMLSchema-instance" xsi:schemaLocation="http://karaf.apache.org/xmlns/features/v1.6.0 https://karaf.apache.org/xmlns/features/v1.6.0">

    <repository>mvn:org.apache.karaf.features/specs/${karaf.version}/xml/features</repository>
    <repository>mvn:org.apache.cxf.karaf/apache-cxf/${cxf.version}/xml/features</repository>
    <repository>mvn:org.apache.unomi/unomi-kar/${project.version}/xml/features</repository>

    <feature name="unomi-distribution-elasticsearch-staging" description="Apache Unomi :: ElasticSearch Staging Distribution" version="${project.version}">
        <feature dependency="true" version="${project.version}">unomi-base</feature>
        <feature dependency="true" version="${project.version}">unomi-startup</feature>
        <feature dependency="true" version="${project.version}">unomi-elasticsearch-core</feature>
        <feature dependency="true" version="${project.version}">unomi-persistence-core</feature>
        <feature dependency="true" version="${project.version}">unomi-services</feature>
        <feature dependency="true" version="${project.version}">unomi-rest-api</feature>
        <feature dependency="true" version="${project.version}">unomi-cxs-lists-extension</feature>
        <feature dependency="true" version="${project.version}">unomi-cxs-geonames-extension</feature>
        <feature dependency="true" version="${project.version}">unomi-cxs-privacy-extension</feature>
        <feature dependency="true" version="${project.version}">unomi-elasticsearch-conditions</feature>
        <feature dependency="true" version="${project.version}">unomi-plugins-base</feature>
        <feature dependency="true" version="${project.version}">unomi-plugins-request</feature>
        <feature dependency="true" version="${project.version}">unomi-plugins-mail</feature>
        <feature dependency="true" version="${project.version}">unomi-plugins-optimization-test</feature>
        <feature dependency="true" version="${project.version}">unomi-shell-dev-commands</feature>
        <feature dependency="true" version="${project.version}">unomi-wab</feature>
        <feature dependency="true" version="${project.version}">unomi-web-tracker</feature>
        <feature dependency="true" version="${project.version}">unomi-healthcheck-elasticsearch</feature>
        <feature dependency="true" version="${project.version}">unomi-router-karaf-feature</feature>
        <feature dependency="true" version="${project.version}">unomi-groovy-actions</feature>
        <feature dependency="true" version="${project.version}">unomi-rest-ui</feature>
        <feature dependency="true" version="${project.version}">unomi-startup-complete</feature>
    </feature>
</features>
Production Environment (minimal, secure configuration):
<features name="unomi-distributions" xmlns="http://karaf.apache.org/xmlns/features/v1.6.0" xmlns:xsi="http://www.w3.org/2001/XMLSchema-instance" xsi:schemaLocation="http://karaf.apache.org/xmlns/features/v1.6.0 https://karaf.apache.org/xmlns/features/v1.6.0">

    <repository>mvn:org.apache.karaf.features/specs/${karaf.version}/xml/features</repository>
    <repository>mvn:org.apache.cxf.karaf/apache-cxf/${cxf.version}/xml/features</repository>
    <repository>mvn:org.apache.unomi/unomi-kar/${project.version}/xml/features</repository>

    <feature name="unomi-distribution-elasticsearch-prod" description="Apache Unomi :: ElasticSearch Production Distribution" version="${project.version}">
        <feature dependency="true" version="${project.version}">unomi-base</feature>
        <feature dependency="true" version="${project.version}">unomi-startup</feature>
        <feature dependency="true" version="${project.version}">unomi-elasticsearch-core</feature>
        <feature dependency="true" version="${project.version}">unomi-persistence-core</feature>
        <feature dependency="true" version="${project.version}">unomi-services</feature>
        <feature dependency="true" version="${project.version}">unomi-rest-api</feature>
        <feature dependency="true" version="${project.version}">unomi-cxs-lists-extension</feature>
        <feature dependency="true" version="${project.version}">unomi-cxs-geonames-extension</feature>
        <feature dependency="true" version="${project.version}">unomi-cxs-privacy-extension</feature>
        <feature dependency="true" version="${project.version}">unomi-elasticsearch-conditions</feature>
        <feature dependency="true" version="${project.version}">unomi-plugins-base</feature>
        <feature dependency="true" version="${project.version}">unomi-plugins-request</feature>
        <feature dependency="true" version="${project.version}">unomi-plugins-mail</feature>
        <feature dependency="true" version="${project.version}">unomi-plugins-optimization-test</feature>
        <feature dependency="true" version="${project.version}">unomi-wab</feature>
        <feature dependency="true" version="${project.version}">unomi-web-tracker</feature>
        <feature dependency="true" version="${project.version}">unomi-healthcheck-elasticsearch</feature>
        <feature dependency="true" version="${project.version}">unomi-router-karaf-feature</feature>
        <feature dependency="true" version="${project.version}">unomi-groovy-actions</feature>
        <feature dependency="true" version="${project.version}">unomi-rest-ui</feature>
        <feature dependency="true" version="${project.version}">unomi-startup-complete</feature>
    </feature>
</features>
Environment Differences Summary:
| Feature | Development | Staging | Production |
|---|---|---|---|
|
✓ (included) |
✗ (excluded) |
✗ (excluded) |
|
✓ (included) |
✓ (included) |
✗ (excluded) |
5.17.3. Distribution Feature Format
Each start features configuration follows the classic Karaf features XML format, but you must only reference other features in your distribution feature. If you reference bundles or configuration files directly, they will be ignored by Unomi.
To use a custom distribution, the corresponding feature must be accessible by Karaf. It can be done by publishing the feature maven artefact and adding it as a feature repository in Karaf os for any other feature. Of course you can also add your distribution feature in the existing source code and repackage Unomi making it available directly.
5.17.4. Using Custom Distributions
You can use your custom distribution with:
# Using system property
-Dunomi.distribution=unomi-distribution-elasticsearch

# Using environment variable
UNOMI_DISTRIBUTION=unomi-distribution-opensearch

# Using the setup command
unomi:setup unomi-distribution-elasticsearch-staging
Once you have called the unomi:setup command with your desired distribution, you can start Apache Unomi using the unomi:start command.
The setup command only needs to be called once unless you want to change the distribution ; it creates a marker file to remember the chosen distribution.
In case you want to change it, you can use the unomi:setup --force command again with the desired distribution name (using the --force option will override the existing distribution).
5.17.5. Auto-Start
You can configure Apache Unomi to automatically start when the server boots up. See the next section for details. This is useful for production deployments where you want the server to start automatically without manual intervention.
To enable auto-start, set the unomi.autoStart system property or UNOMI_AUTO_START environment variable to 'true'
Note: Auto-start only works when Apache Unomi is not already running. If the server is already started, the auto-start setting will be ignored.
5.18. Customizing Apache Unomi Distribution
Apache Unomi allows you to create custom distributions by repackaging the standard distribution with your own configuration files and customizations. This is useful for creating deployment-specific packages that include your custom configurations, plugins, and settings.
5.18.1. Note on Custom Distributions (Advanced)
You can build custom distributions of Unomi using the Karaf Maven Plugin to assemble features and overlay configuration. This is an advanced path and not required for most users. We recommend Docker-based packaging and configuration overrides as documented above.
For details about custom distributions, see the Karaf documentation (Karaf Maven Plugin):
5.18.2. Important Notes
-
Distribution changes require restart: After forcing a modification of the distribution, you must restart Apache Unomi for the changes to take effect (be aware that in production it can have unpredictable side effects)
-
Feature dependencies: When adding custom features, ensure they have all required dependencies and are compatible with your chosen persistence implementation
-
Backup your distribution: As a distribution is a maven artifact, use the versionning to ensure you can rollback to a previous version.
-
Feature availability: According to Karaf maven repository access, you can add any feature repository that holds a Unomi distribution’s feature and use it into an existing Unomi instance.
5.18.3. Available Features
To see all available features in your Apache Unomi installation, you can use the Karaf shell command:
feature:listThis will show you all available features that can be included in your distribution.
5.18.4. Docker Deployment with Custom Distribution
For Docker deployments, you can declare a custom distribution feature repository (online) or a local one and mount the corresonding XML file accordingly: -e KARAF_FEATURES_REPOSITORIES=mvn:com.example/myfeatures/1.0.0/xml/features
version: '3.8'
services:
  unomi:
    image: apache/unomi:3.1.0
    volumes:
      - ./unomi-custom-distribution-features.xml:/opt/apache-unomi/features/unomi-custom-distribution-features.xml
    environment:
      - KARAF_FEATURES_REPOSITORIES=file:/opt/apache-unomi/features/unomi-custom-distribution-features.xml
      - UNOMI_DISTRIBUTION=unomi-distribution-custom
    depends_on:
      - elasticsearch
  elasticsearch:
    image: docker.elastic.co/elasticsearch/elasticsearch:9.4.3
    environment:
      - discovery.type=single-node
      - xpack.security.enabled=false
Key Points:
- Mount your custom distribution feature repository file to /opt/apache-unomi/etc/features/your-features-files.xml (not necessary if the feature file is available in a online maven repository)
- Declare the feature repository in Karaf using KARAF_FEATURES_REPOSITORIES environment variable pointing to your mounted file or a online maven artifact (mvn:com.example/custom-unomi-distribs/1.0.0/xml/features)
- Use the UNOMI_DISTRIBUTION environment variable to specify which distribution (using the feature name) to use from that feature’s repository
5.18.5. Configuration Override Priority
Apache Unomi follows this priority order for configuration files (highest to lowest priority):
-
Environment Variables: Override any configuration property
-
Custom Configuration Files: Files in
etc/directory override defaults -
Default Configuration Files: Built-in configuration files
Example of Configuration Override:
Default configuration in etc/custom.system.properties:
org.apache.unomi.cluster.public.address=${env:UNOMI_PUBLIC_ADDRESS:-http://localhost:8181}Custom override in etc/unomi.custom.system.properties:
org.apache.unomi.cluster.public.address=https://unomi.example.comEnvironment variable override:
export UNOMI_PUBLIC_ADDRESS=https://production.unomi.example.comFinal Result: The system will use https://production.unomi.example.com (environment variable takes precedence).
5.18.6. Best Practices for Custom Distributions
-
Version Control: Keep your custom configuration files in version control
-
Documentation: Document all customizations and their purposes
-
Testing: Test your custom distribution thoroughly before deployment
-
Backup: Always backup the original distribution before customization
-
Upgrade Path: Plan how to apply your customizations to future Apache Unomi versions
5.18.7. Deployment with Custom Distribution
Once you have created and published your custom distribution, you can deploy it using the same methods as the standard distribution:
Docker Deployment:
version: '3.8'
services:
  unomi:
    build:
      context: .
      dockerfile: Dockerfile
    environment:
      - KARAF_FEATURES_REPOSITORIES=mvn:com.example/your-custom-unomi-distributions/1.0.0/xml/features
      - UNOMI_DISTRIBUTION=elasticsearch-prod
    depends_on:
      - elasticsearch
  elasticsearch:
    image: docker.elastic.co/elasticsearch/elasticsearch:9.4.3
    environment:
      - discovery.type=single-node
      - xpack.security.enabled=false
Dockerfile:
FROM apache/unomi:3.1.0
COPY apache-unomi-custom-*.tar.gz /tmp/
RUN cd /opt/apache-unomi && tar -xzf /tmp/apache-unomi-custom-*.tar.gz
Traditional Deployment:
# Extract your custom distribution
tar -xzf apache-unomi-custom-*.tar.gz
cd apache-unomi-custom-*

# Start with your custom configuration
./bin/karaf start
./bin/karaf shell
unomi:start elasticsearch-prod
5.19. Health Check Extension
The Health Check extension provides a way to check is required Unomi components are 'live'.
It consists in a simple http endpoint that provide a JSON view of integrated health checks. It can then be used to determine if the server is up and running and can serve requests.
The health check endpoint is available at the following URL: /health/check and returns a simple JSON response that includes all health check provider responses.
Basic Http Authentication enforce security for the health check endpoint using the existing karaf realm. The user needs to have the specific role health to access the endpoint. Users and roles can be configured in the etc/users.properties file. By default, a login/pass health/health is configured.
Specific configuration is located in : org.apache.unomi.healthcheck.cfg Existing health checks are using configuration from that file, including authentication realm.
Existing health checks gives information about : - Karaf (as soon as the karaf container is started, that check is LIVE) - Elasticsearch (connection to elasticsearch cluster and its health) - Unomi (unomi bundles status) - Persistence (unomi to elasticsearch binding) - Cluster health (unomi cluster status and nodes information)
All healthcheck can have a status : - DOWN (service is not available) - UP (service is running or starting) - LIVE (service is ready to serve requests) - ERROR (an error occurred during service health check)
Any subsystem health check have a timeout of 400ms where check is cancelled and will be returned as error.
Typical response to /health/check when unomi NOT started is :
[
  {
    "name":"karaf",
    "status":"LIVE",
    "collectingTime":0
  },
  {
    "name":"cluster",
    "status":"DOWN",
    "collectingTime":0
  },
  {
    "name":"elasticsearch",
    "status":"LIVE",
    "collectingTime":6
  },
  {
    "name":"persistence",
    "status":"DOWN",
    "collectingTime":0
  },
  {
    "name":"unomi",
    "status":"DOWN",
    "collectingTime":0
  }
]
Existing health check can be extended by adding specific provider in the extension. A provider is a class that implements the HealthCheckProvider interface.
package org.apache.unomi.healthcheck;

public interface HealthCheckProvider {
    String name();
    HealthCheckResponse execute();
}
Calls to provider are supposed to be done at a regular rate (every 15 seconds for example) and should be fast to execute. Feel free to include any caching strategy if needed.
5.19.1. Configuration
Healthcheck extension configuration is located in the file etc/org.apache.unomi.healthcheck.cfg
Extension can be enabled by setting the property enabled to true. An environment variable can be used to set this property : UNOMI_HEALTHCHECK_ENABLED.
You must restart the bundle for that config to take effect.
By default, all healthcheck providers are included but the list of those included providers can be customized by setting the property providers with a comma separated list of provider names. An environment variable can be used to set this property : UNOMI_HEALTHCHECK_PROVIDERS.
Karaf provider is the one needed by healthcheck (always LIVE), it cannot be ignored.
The timeout used for each health check can be set by setting the property timeout to the desired value in milliseconds. An environment variable can be used to set this property : UNOMI_HEALTHCHECK_TIMEOUT
5.20. API Access Examples
-
Basic Authentication Example:
# Get authentication token
curl -X POST "http://localhost:8181/cxs/login" \
  -H "Content-Type: application/json" \
  -d '{
    "username": "myuser",
    "password": "mypassword"
  }'

# Response (HTTP 200 OK):
{
    "token": "eyJhbGciOiJIUzI1NiIsInR5cCI6IkpXVCJ9...",
    "totalSize": 1
}
+ 2. Public API Access (Client-Side Operations):
# Get context data
curl -X POST "http://localhost:8181/cxs/context.json" \
  -H "X-Unomi-Api-Key: 8f7d9a2c-5e4b-3f1a-9b8c-7d6e5f4a3b2c" \
  -H "Content-Type: application/json" \
  -d '{
    "source": {
        "itemId": "homepage",
        "itemType": "page",
        "scope": "example"
    },
    "requiredProfileProperties": ["firstName", "lastName"]
  }'

# Response (HTTP 200 OK):
{
    "profileId": "xyz123",
    "sessionId": "abc456",
    "profileProperties": {
        "firstName": "John",
        "lastName": "Doe"
    }
}
+ 3. Private API Access (Server-Side Operations):
# Get profiles using tenant credentials
curl -X GET "http://localhost:8181/cxs/profiles" \
  --user "mytenant:1a2b3c4d-5e6f-7g8h-9i0j-k1l2m3n4o5p6" \
  -H "Accept: application/json"

# Response (HTTP 200 OK):
{
    "list": [
        {
            "itemId": "profile1",
            "scope": "mytenant",
            "properties": {
                "firstName": "John",
                "lastName": "Doe"
            }
        }
    ],
    "offset": 0,
    "pageSize": 50,
    "totalSize": 1
}
Authentication Rules:
-
If JAAS authentication is provided (username/password), it grants full access to all endpoints
-
Public paths (like /context.json) require a valid public API key
-
Private paths require both tenantId and private API key
-
All other requests are denied
5.20.1. Public vs Private Endpoints
Public endpoints (requiring only public API key):
-
GET/POST /context.json
# Example request
curl -X GET "http://localhost:8181/cxs/context.json?sessionId=abc123" \
  -H "X-Unomi-Api-Key: 8f7d9a2c-5e4b-3f1a-9b8c-7d6e5f4a3b2c"
+ 2. GET/POST /eventcollector
# Example request
curl -X POST "http://localhost:8181/cxs/eventcollector" \
  -H "X-Unomi-Api-Key: 8f7d9a2c-5e4b-3f1a-9b8c-7d6e5f4a3b2c" \
  -H "Content-Type: application/json" \
  -d '{
    "events": [{
        "eventType": "view",
        "scope": "example",
        "source": {
            "itemId": "page1",
            "itemType": "page",
            "scope": "example"
        },
        "target": {
            "itemId": "product1",
            "itemType": "product",
            "scope": "example"
        }
    }]
  }'
+ 3. GET /client/*
# Example request
curl -X GET "http://localhost:8181/cxs/client/myapp/status" \
  -H "X-Unomi-Api-Key: 8f7d9a2c-5e4b-3f1a-9b8c-7d6e5f4a3b2c"
All other endpoints are considered private and require either: * JAAS authentication with admin credentials, or * Private API key authentication with tenant credentials
Example private endpoint access:
# Get segment details
curl -X GET "http://localhost:8181/cxs/segments/important-customers" \
  --user "mytenant:1a2b3c4d-5e6f-7g8h-9i0j-k1l2m3n4o5p6" \
  -H "Accept: application/json"

# Create a new segment
curl -X POST "http://localhost:8181/cxs/segments" \
  --user "mytenant:1a2b3c4d-5e6f-7g8h-9i0j-k1l2m3n4o5p6" \
  -H "Content-Type: application/json" \
  -d '{
    "itemId": "high-value-customers",
    "name": "High Value Customers",
    "description": "Customers with high purchase value",
    "condition": {
        "type": "profilePropertyCondition",
        "parameterValues": {
            "propertyName": "totalPurchases",
            "comparisonOperator": "greaterThan",
            "propertyValue": 1000
        }
    }
  }'
6. Multi-tenancy
6.1. Multi-tenancy guide
Apache Unomi 3.1+ isolates profiles, events, segments, rules, and schemas per tenant. Each tenant has public and private API keys. See also Migrate from 3.0 to 3.1 for authentication changes.
7. Overview
Apache Unomi provides robust multi-tenancy support, allowing multiple organizations to use the same Unomi instance while maintaining complete data isolation. Each tenant gets their own dedicated space with separate data storage, configuration, and API keys.
8. Key Features
-
Complete data isolation between tenants
-
Dual API key system (public and private keys)
-
Tenant-specific configuration
-
Per-tenant usage metrics (quotas enforced upstream)
-
Migration tools for existing data
-
Support for REST APIs (and GraphQL when enabled)
9. Authentication Methods
9.1. Public API Key
Used for public endpoints (e.g., context requests) that are typically accessed from client-side applications.
X-Unomi-Api-Key: <PUBLIC_KEY>9.2. Private API Key
Used for administrative operations and sensitive endpoints. Requires Basic Authentication using tenant ID and private key.
--user "TENANT_ID:PRIVATE_KEY"|
Note
|
curl automatically handles Base64 encoding when using the --user option, so you don’t need to manually encode the credentials.
|
10. Getting Started
10.1. Creating Your First Tenant
To create a new tenant, use the Tenant API endpoint:
curl -X POST http://localhost:8181/cxs/tenants \
  --user karaf:karaf \
  -H "Content-Type: application/json" \
  -d '{
    "requestedId": "my-tenant",
    "properties": {
      "name": "My Organization",
      "description": "My organization description"
    }
  }'
The response includes the tenant with automatically generated API keys:
{
  "itemId": "my-tenant",
  "name": "My Organization",
  "description": "My organization description",
  "apiKeys": [
    {
      "type": "PUBLIC",
      "key": "abc123...",
      "created": "2024-01-01T00:00:00Z"
    },
    {
      "type": "PRIVATE",
      "key": "xyz789...",
      "created": "2024-01-01T00:00:00Z"
    }
  ]
}|
Note
|
Both public and private API keys are automatically generated when creating a tenant. Extract the key value from the appropriate API key object in the apiKeys array.
|
10.2. Making Your First API Call
10.2.1. Public Endpoint Example (Context Request)
curl http://localhost:8181/cxs/context.json \
  -H "X-Unomi-Api-Key: <PUBLIC_KEY>" \
  -H "Content-Type: application/json" \
  -d '{
    "sessionId": "session-123",
    "source": {
      "itemId": "homepage",
      "itemType": "page",
      "scope": "example"
    }
  }'
10.2.2. Private Endpoint Example (Profile Management)
curl -X GET http://localhost:8181/cxs/profiles \
  --user "TENANT_ID:PRIVATE_KEY" \
  -H "Content-Type: application/json"
11. Configuration
11.1. Basic Setup
Configure default tenant settings in etc/org.apache.unomi.tenant.cfg:
# Default tenant ID for backward compatibility
tenant.default.id=default

# API key validity period
tenant.apikey.validity.period=30
tenant.apikey.validity.unit=DAYS

# Warn this many days before an API key expires
tenant.apikey.rotation.warning.days=7

# Prefix for tenant-specific security roles
tenant.security.roles.prefix=unomi_tenant_
11.2. Security Provider Configuration
For Elasticsearch:
tenant.security.provider=elasticsearchFor OpenSearch:
tenant.security.provider=opensearch12. Security Model
12.1. Roles and Permissions
Apache Unomi implements a hierarchical role-based access control (RBAC) system. The main roles are:
-
ROLE_UNOMI_SYSTEM: Highest privilege level, used for system operations -
ROLE_UNOMI_ADMIN: Administrative access across the platform -
ROLE_UNOMI_TENANT_USER: Basic tenant access for public operations -
ROLE_UNOMI_TENANT_ADMIN: Extended tenant access for private operations -
ROLE_UNOMI_TENANT_PUBLIC_PREFIX_*: Tenant-specific public roles -
ROLE_UNOMI_TENANT_PRIVATE_PREFIX_*: Tenant-specific private roles
Configure system roles in etc/org.apache.unomi.security.cfg:
# Define system roles
systemRoles=ROLE_UNOMI_SYSTEM,ROLE_UNOMI_ADMIN

# Enable encryption for sensitive data
enableEncryption=false

# Operation role mappings
operation.roles.QUERY=ROLE_UNOMI_TENANT_USER,ROLE_UNOMI_TENANT_ADMIN
operation.roles.PROFILE_UPDATE=ROLE_UNOMI_TENANT_ADMIN
operation.roles.SYSTEM_MAINTENANCE=ROLE_UNOMI_SYSTEM
operation.roles.TENANT_MANAGEMENT=ROLE_UNOMI_ADMIN
operation.roles.DECRYPT_PROFILE_DATA=ROLE_UNOMI_TENANT_ADMIN
operation.roles.SEGMENT_UPDATE=ROLE_UNOMI_TENANT_ADMIN
operation.roles.RULE_UPDATE=ROLE_UNOMI_TENANT_ADMIN
The configuration uses the format operation.roles.OPERATION_NAME=ROLE1,ROLE2,… where:
- OPERATION_NAME is the uppercase operation identifier
- Multiple roles are comma-separated
- Changes take effect immediately without restart
12.2. Operation Configuration
Operations in Unomi can be customized to require specific roles. This is configured through OSGi configuration files.
12.2.1. Configuration File
Create or modify the file etc/org.apache.unomi.security.cfg:
# Define system roles
systemRoles=ROLE_UNOMI_SYSTEM,ROLE_UNOMI_ADMIN

# Enable encryption for sensitive data
enableEncryption=false

# Operation role mappings
operation.roles.QUERY=ROLE_UNOMI_TENANT_USER,ROLE_UNOMI_TENANT_ADMIN
operation.roles.PROFILE_UPDATE=ROLE_UNOMI_TENANT_ADMIN
operation.roles.SYSTEM_MAINTENANCE=ROLE_UNOMI_SYSTEM
operation.roles.TENANT_MANAGEMENT=ROLE_UNOMI_ADMIN
operation.roles.DECRYPT_PROFILE_DATA=ROLE_UNOMI_TENANT_ADMIN
operation.roles.SEGMENT_UPDATE=ROLE_UNOMI_TENANT_ADMIN
operation.roles.RULE_UPDATE=ROLE_UNOMI_TENANT_ADMIN
The configuration uses the format operation.roles.OPERATION_NAME=ROLE1,ROLE2,… where:
- OPERATION_NAME is the uppercase operation identifier
- Multiple roles are comma-separated
- Changes take effect immediately without restart
12.2.2. Common Operations
Here are some common operations and their typical role requirements:
| Operation | Description | Default Required Roles |
|---|---|---|
QUERY |
Basic data querying |
ROLE_UNOMI_TENANT_USER, ROLE_UNOMI_TENANT_ADMIN |
PROFILE_UPDATE |
Update profile data |
ROLE_UNOMI_TENANT_ADMIN |
SYSTEM_MAINTENANCE |
System-level operations |
ROLE_UNOMI_SYSTEM |
TENANT_MANAGEMENT |
Tenant administration |
ROLE_UNOMI_ADMIN |
DECRYPT_PROFILE_DATA |
Access to encrypted profile data |
ROLE_UNOMI_TENANT_ADMIN |
SEGMENT_UPDATE |
Update user segments |
ROLE_UNOMI_TENANT_ADMIN |
RULE_UPDATE |
Update business rules |
ROLE_UNOMI_TENANT_ADMIN |
12.2.3. Custom Operations
To define custom operations:
-
Define the operation name (use uppercase by convention)
-
Add the operation-role mapping to the configuration file
-
Use
securityService.validateTenantOperation()to enforce the permission
Example:
-
Add to
etc/org.apache.unomi.security.cfg:operation.roles.CUSTOM_OPERATION=ROLE_UNOMI_TENANT_ADMIN -
Use in your code:
public void performCustomOperation() {
    securityService.validateTenantOperation("CUSTOM_OPERATION");
    // Operation implementation
}
12.3. Subjects and Authentication
A Subject represents an authenticated entity in the system. There are three types of subjects:
-
System Subject:
-
Used for system-level operations
-
Has full access across all tenants
-
Created with
ROLE_UNOMI_SYSTEM
-
-
Admin Subject:
-
Used for administrative operations
-
Has tenant management capabilities
-
Created with
ROLE_UNOMI_ADMIN
-
-
Tenant Subject:
-
Represents a tenant-specific user
-
Has access only to their tenant’s resources
-
Created with tenant-specific roles
-
Example of subject creation:
Subject tenantSubject = new Subject();
tenantSubject.getPrincipals().add(new UserPrincipal("tenant-id"));
tenantSubject.getPrincipals().add(new RolePrincipal("ROLE_UNOMI_TENANT_ADMIN"));
12.4. Tenant-Role Relationship
Each tenant has associated public and private roles:
-
User Role (
ROLE_UNOMI_TENANT_USER):-
Basic read-only access to tenant data
-
Can perform queries and view profiles
-
-
Admin Role (
ROLE_UNOMI_TENANT_ADMIN):-
Full access to tenant data
-
Can perform all tenant operations
-
12.5. Operation Validation
The security service validates operations based on:
-
Subject’s roles
-
Operation type
-
Tenant context
Example of operation validation:
// Validate a tenant operation
securityService.validateTenantOperation("SYSTEM_MAINTENANCE");

// Execute with elevated privileges
securityService.executeAsSystemSubject(() -> {
    // Perform system operation
});
12.6. Best Practices
-
Role Assignment:
-
Assign minimum required roles
-
Use tenant-specific roles when possible
-
Avoid using system roles for regular operations
-
-
Subject Management:
-
Clear subjects after operations
-
Use temporary privileged subjects sparingly
-
Always validate tenant context
-
-
Security Configuration:
-
Regularly rotate API keys
-
Enable encryption for sensitive data
-
Monitor failed authentication attempts
-
-
Operation Execution:
-
Use
executeAsSystemSubjectfor system operations -
Validate operations before execution
-
Maintain proper audit trails
-
13. Tenant Management
13.1. Listing Tenants
curl -X GET http://localhost:8181/cxs/tenants \
  --user karaf:karaf \
  -H "Content-Type: application/json"
13.2. Updating a Tenant
curl -X PUT http://localhost:8181/cxs/tenants/my-tenant \
  --user karaf:karaf \
  -H "Content-Type: application/json" \
  -d '{
    "displayName": "Updated Organization Name",
    "description": "Updated description"
  }'
13.3. Regenerating API Keys
curl -X POST http://localhost:8181/cxs/tenants/my-tenant/apikeys \
  --user karaf:karaf \
  -H "Content-Type: application/json" \
  -d '{
    "type": "PUBLIC",
    "validityDays": 30
}'|
Note
|
You can specify type as PUBLIC or PRIVATE, and optionally set validityDays for key expiration. If omitted, both keys will be regenerated.
|
13.4. Deleting a Tenant
curl -X DELETE http://localhost:8181/cxs/tenants/my-tenant \
  --user karaf:karaf \
  -H "Content-Type: application/json"
14. GraphQL Support
GraphQL endpoints support both public and private authentication methods:
curl -X POST http://localhost:8181/graphql \
  --user "TENANT_ID:PRIVATE_KEY" \
  -H "Content-Type: application/json" \
  -d '{
    "query": "{ profiles { edges { node { id } } } }"
  }'
14.1. Tenant-Specific GraphQL Schemas
The GraphQL API provides tenant-specific schemas, meaning each tenant can have a unique GraphQL schema based on their property types and configurations. This ensures that tenants only see the data and fields relevant to their specific implementation.
When a tenant accesses the GraphQL API:
-
The system automatically detects the tenant from the authentication context
-
It retrieves (or creates) a GraphQL schema specific to that tenant
-
The schema only includes property types defined for that tenant
-
Changes to a tenant’s property types are automatically reflected in their schema
For complete details on the GraphQL multi-tenancy implementation, refer to the GraphQL API section of the documentation.
15. Monitoring and Management
15.1. Monitoring API Usage
Unomi exposes read-only usage metrics per tenant. Quota enforcement belongs in your upstream gateway or control plane.
curl -X GET "http://localhost:8181/cxs/tenants/my-tenant/usage?period=current-month" \
  --user karaf:karaf \
  -H "Content-Type: application/json"
Supported period values are current-month (default), YYYY-MM (for example 2026-07), and legacy 24h (same as the current calendar month).
The response includes profile, scope, segment, and rule totals, per-scope segment/rule breakdown (scopeUsages), monthly eventCount for the requested period (periodStart / periodEnd in epoch millis), active API key count, storage document count, in-memory REST request count since process start, and collectedAt (epoch millis). Values refresh on a background schedule and may be stale until the next collection cycle.
15.2. Event retention purge
Upstream control planes can delete old tenant events through Unomi instead of talking to the search cluster directly:
curl -X POST "http://localhost:8181/cxs/tenants/my-tenant/purge/events?retentionDays=90" \
  --user karaf:karaf \
  -H "Content-Type: application/json"
The response reports how many events matched the retention cutoff before deletion ran (eventsMatched) and whether the delete-by-query completed successfully (purgeRequested); a purgeRequested of false means the deletion failed and the request returns HTTP 500 (see server logs for the cause). The minimum accepted retention is seven days, to guard against accidentally purging recent or active event data.
15.3. Data Migration
Migrate data between tenants:
curl -X POST http://localhost:8181/cxs/tenants/source-tenant/migrate/target-tenant \
  --user karaf:karaf \
  -H "Content-Type: application/json"
16. Best Practices
16.1. API Key Management
-
Rotate keys regularly using the key regeneration endpoint
-
Use public keys only for public endpoints
-
Never expose private keys in client-side code
-
Monitor API key usage and implement rate limiting
16.2. Resource Management
-
Set appropriate quotas for each tenant
-
Monitor resource usage through the tenant usage API (
GET /cxs/tenants/{tenantId}/usage) -
Configure alerts for quota limits
-
Regularly review and adjust limits based on usage patterns
16.3. Security
-
Always use HTTPS in production
-
Implement proper key rotation policies
-
Conduct regular security audits
-
Monitor for suspicious activity patterns
-
Keep tenant configurations up to date
17. Troubleshooting
17.1. Common Issues
17.1.1. 401 Unauthorized
-
Verify API key is correct
-
Check if using public key for private endpoint
-
Ensure tenant ID matches the API key
17.1.2. 400 Bad Request
-
Check if API key header is present
-
Verify request format is correct
17.1.3. 404 Not Found
-
Verify tenant ID exists
-
Check if endpoint path is correct
17.2. Logging
Enable debug logging for tenant-related operations:
log4j.logger.org.apache.unomi.tenant=DEBUG18. Migration Guide
18.1. Migrating Existing Data
To migrate existing data to use multi-tenancy:
# Step 1: Create new tenant
curl -X POST http://localhost:8181/cxs/tenants \
  --user karaf:karaf \
  -H "Content-Type: application/json" \
  -d '{
    "requestedId": "new-tenant",
    "properties": {
      "name": "New Tenant",
      "description": "Migrated tenant"
    }
  }'

# Step 2: Migrate data
curl -X POST http://localhost:8181/cxs/tenants/migration/default/new-tenant \
  --user karaf:karaf \
  -H "Content-Type: application/json"
18.2. Verification
After migration, verify data integrity:
# Check profile count
curl -X GET http://localhost:8181/cxs/tenants/new-tenant/profiles/count \
  --user karaf:karaf \
  -H "Content-Type: application/json"
19. Working with Events and Rules
19.1. Creating Custom Event Types
First, create a JSON schema for your custom event type and deploy it using the JSON schema endpoint:
curl -X POST http://localhost:8181/cxs/jsonSchema \
  --user "TENANT_ID:PRIVATE_KEY" \
  -H "Content-Type: application/json" \
--data-raw '{
    "$id": "https://unomi.apache.org/schemas/json/events/purchaseCompleted/1-0-0",
    "$schema": "https://json-schema.org/draft/2019-09/schema",
    "self": {
        "vendor": "org.apache.unomi",
        "name": "purchaseCompleted",
        "format": "jsonschema",
        "target": "events",
        "version": "1-0-0"
    },
    "title": "Purchase Completed Event",
    "type": "object",
    "allOf": [{ "$ref": "https://unomi.apache.org/schemas/json/event/1-0-0" }],
    "properties": {
        "properties": {
            "type": "object",
            "properties": {
                "orderId": {
                    "type": "string",
                    "description": "The unique order identifier"
                },
                "amount": {
                    "type": "number",
                    "description": "The total purchase amount"
                },
                "currency": {
                    "type": "string",
                    "description": "The currency code (e.g., USD)"
                },
                "items": {
                    "type": "array",
                    "items": {
                        "type": "object",
                        "properties": {
                            "productId": {
                                "type": "string"
                            },
                            "quantity": {
                                "type": "integer"
                            },
                            "price": {
                                "type": "number"
                            }
                        },
                        "required": ["productId", "quantity", "price"]
                    }
                }
            },
            "required": ["orderId", "amount", "currency"]
        }
    },
    "unevaluatedProperties": false
}'
You can verify your schema has been deployed by listing all available schemas:
curl -X GET http://localhost:8181/cxs/jsonSchema \
  --user "TENANT_ID:PRIVATE_KEY" \
-H "Content-Type: application/json"|
Note
|
Replace TENANT_ID and PRIVATE_KEY with your actual tenant ID and private API key. Only the Tenant API (/cxs/tenants) uses system administrator authentication (karaf:karaf).
|
You can also validate events against your schema using the validation endpoint:
curl -X POST http://localhost:8181/cxs/jsonSchema/validateEvent \
  --user "TENANT_ID:PRIVATE_KEY" \
  -H "Content-Type: application/json" \
  --data '{
    "eventType": "purchaseCompleted",
    "scope": "myapp",
    "properties": {
      "orderId": "order-123",
      "amount": 99.99,
      "currency": "USD",
      "items": [
        {
          "productId": "product-001",
          "quantity": 2,
          "price": 49.99
        }
      ]
    }
  }'
19.2. Sending Custom Events
Once the event type is defined, you can send events:
curl -X POST http://localhost:8181/cxs/context.json \
  -H "X-Unomi-Api-Key: <PUBLIC_KEY>" \
  -H "Content-Type: application/json" \
  -d '{
    "sessionId": "session-123",
    "profileId": "profile-456",
    "source": {
      "itemId": "checkout-page",
      "itemType": "page",
      "scope": "myapp"
    },
    "events": [{
      "eventType": "purchaseCompleted",
      "scope": "myapp",
      "properties": {
        "orderId": "order-789",
        "amount": 99.99,
        "currency": "USD",
        "items": [
          {
            "productId": "product-001",
            "quantity": 2,
            "price": 49.99
          }
        ]
      }
    }]
  }'
19.3. Creating Rules for Event Processing
Create a rule to update profile properties based on purchase events:
curl -X POST http://localhost:8181/cxs/rules \
  --user "TENANT_ID:PRIVATE_KEY" \
  -H "Content-Type: application/json" \
  -d '{
    "metadata": {
      "id": "updateTotalPurchases",
      "name": "Update total purchases",
      "description": "Updates profile properties when a purchase is completed",
      "scope": "myapp"
    },
    "condition": {
      "type": "eventTypeCondition",
      "parameterValues": {
        "eventTypeId": "purchaseCompleted"
      }
    },
    "actions": [
      {
        "type": "setPropertyAction",
        "parameterValues": {
          "setPropertyName": "properties.totalPurchases",
          "setPropertyValue": "script::profile.properties.totalPurchases != null ? profile.properties.totalPurchases + 1 : 1",
          "setPropertyStrategy": "alwaysSet"
        }
      },
      {
        "type": "setPropertyAction",
        "parameterValues": {
          "setPropertyName": "properties.totalRevenue",
          "setPropertyValue": "script::profile.properties.totalRevenue != null ? profile.properties.totalRevenue + event.properties.amount : event.properties.amount",
          "setPropertyStrategy": "alwaysSet"
        }
      }
    ]
  }'
19.4. Testing the Event Processing
To test that everything works:
-
Send a purchase event:
curl -X POST http://localhost:8181/cxs/context.json \
  -H "X-Unomi-Api-Key: <PUBLIC_KEY>" \
  -H "Content-Type: application/json" \
  -d '{
    "sessionId": "session-123",
    "profileId": "profile-456",
    "source": {
      "itemId": "checkout-page",
      "itemType": "page",
      "scope": "myapp"
    },
    "events": [{
      "eventType": "purchaseCompleted",
      "scope": "myapp",
      "properties": {
        "orderId": "order-790",
        "amount": 149.99,
        "currency": "USD",
        "items": [
          {
            "productId": "product-002",
            "quantity": 1,
            "price": 149.99
          }
        ]
      }
    }]
  }'
+ 2. Verify profile properties were updated:
curl -X GET http://localhost:8181/cxs/profiles/profile-456 \
  --user "TENANT_ID:PRIVATE_KEY" \
  -H "Content-Type: application/json"
Expected response will show updated properties:
{
  "itemId": "profile-456",
  "properties": {
    "totalPurchases": 1,
    "totalRevenue": 149.99
  }
  // ... other profile properties ...
}
19.5. Advanced Rule Examples
19.5.1. Segmenting High-Value Customers
Create a segment for customers with high total revenue:
curl -X POST http://localhost:8181/cxs/segments \
  --user "TENANT_ID:PRIVATE_KEY" \
  -H "Content-Type: application/json" \
  -d '{
    "metadata": {
      "id": "highValueCustomers",
      "name": "High Value Customers",
      "scope": "myapp"
    },
    "condition": {
      "type": "profilePropertyCondition",
      "parameterValues": {
        "propertyName": "properties.totalRevenue",
        "comparisonOperator": "greaterThan",
        "propertyValueInteger": 1000
      }
    }
  }'
19.5.2. Tracking Purchase Frequency
Create a rule to track days between purchases:
curl -X POST http://localhost:8181/cxs/rules \
  --user "TENANT_ID:PRIVATE_KEY" \
  -H "Content-Type: application/json" \
  -d '{
    "metadata": {
      "id": "trackPurchaseFrequency",
      "name": "Track Purchase Frequency",
      "scope": "myapp"
    },
    "condition": {
      "type": "eventTypeCondition",
      "parameterValues": {
        "eventTypeId": "purchaseCompleted"
      }
    },
    "actions": [
      {
        "type": "setPropertyAction",
        "parameterValues": {
          "setPropertyName": "properties.lastPurchaseDate",
          "setPropertyValue": "script::currentDate",
          "setPropertyStrategy": "alwaysSet"
        }
      },
      {
        "type": "setPropertyAction",
        "parameterValues": {
          "setPropertyName": "properties.daysBetweenPurchases",
          "setPropertyValue": "script::profile.properties.lastPurchaseDate != null ? Duration.between(profile.properties.lastPurchaseDate.toInstant(), currentDate.toInstant()).toDays() : null",
          "setPropertyStrategy": "alwaysSet"
        }
      }
    ]
  }'
20. JSON schemas
20.1. Introduction
Introduced with Apache Unomi 2.0, JSON-Schema are used to validate data submitted through all of the public (unprotected) API endpoints.
20.1.1. What is a JSON Schema
JSON Schema is a powerful standard for validating the structure of JSON data. Described as a JSON object, a JSON schema file contains format, types, patterns, and more. Used against JSON data, a JSON schema validates that the data is compatible with the specified schema.
Example of a basic JSON schema that validates that the path property is a string property:
{
    "$id":"https://unomi.apache.org/schemas/json/example/1-0-0",
    "$schema":"https://json-schema.org/draft/2019-09/schema",
    "title":"Example of a basic schema",
    "type":"object",
    "properties":{
        "path":{
            "type":"string",
            "$comment":"Example of a property."
        }
    }
}
{
"path": "example/of/path" //Is valid
}{
"path": 100 // Is not valid
}Apache Unomi is using json-schema-validator to integrate JSON schema. The library and its source code is available at: https://github.com/networknt/json-schema-validator, you can refer to the feature’s pom.xml available at json-schema/service/pom.xml to identify which version of the library is currently integrated.
You can discover and play with JSON schema using online tools such as JSON Schema Validator. Such tools allow you to validate a schema against JSON data (such as the example above), and can point to particular errors. More details about JSON schema are available on the official specification’s website: https://json-schema.org/specification.html
20.1.2. Key concepts
This section details concepts that are important to understand in order to use JSON schema validation with Apache Unomi.
$id keyword
The $id keyword:
Each schema in Apache Unomi should have a $id, the $id value is an URI which will be used to retrieve the schema and must be unique.
Example:
{
    "$id":"https://unomi.apache.org/schemas/json/example/1-0-0"
}
$ref keyword
The $ref keyword allows you to reference another JSON schema by its $id keyword. It’s possible to separate complex structures or repetitive parts of schema into other small files and use $ref to include them into several json schemas.
Example with a person and an address:
{
    "$id": "https://example.com/schemas/address",
    "type": "object",
    "properties": {
        "street_address": { "type": "string" },
        "city": { "type": "string" },
        "state": { "type": "string" }
    }
}
{
"type": "object",
"properties": {
"first_name":{ "type": "string" },
"last_name": { "type": "string" },
"shipping_address": {
"$ref": "https://example.com/schemas/address"
},
"billing_address": {
"$ref": "https://example.com/schemas/address"
}
}
}More details about $ref can be found in the specifications: https://json-schema.org/understanding-json-schema/structuring.html#ref
allOf keyword
The allOf keyword is an array of fields which allows schema composition. The data will be valid against a schema if the data are valid against all of the given subschemas in the allOf part and are valid against the properties defined in the schema.
{
    "$id": "https://unomi.apache.org/schemas/json/example/1-0-0",
    "$schema": "https://json-schema.org/draft/2019-09/schema",
    "type": "object",
    "allOf": [
        {
            "type": "object",
            "properties": {
                "fromAllOf": {
                    "type": "integer",
                    "$comment": "Example of allOf."
                }
            }
        }
    ],
    "properties": {
        "myProperty": {
            "type": "string",
            "$comment": "Example of a property."
        }
    }
}
Valid JSON:
{
    "myProperty": "My property",
    "fromAllOf" : 10
}
Invalid JSON:
{
    "myProperty": "My property",
    "fromAllOf" : "My value"
}
It’s also possible to use a reference $ref in the allOf keyword to reference another schema.
In Unomi, there is an example of using $ref in the allOf keyword to validate the properties which are defined in the event schema. This schema contains properties common to all events. It’s done in the the view event schema. The file can be found on github: view.json More details about allOf can be found in the specifications: https://json-schema.org/understanding-json-schema/reference/combining.html#allof
unevaluatedProperties keyword
The unevaluatedProperties keyword is useful for schema composition as well as enforcing stricter schemas. This keyword is similar to additionalProperties except that it can recognize properties declared in sub schemas. When setting the unevaluatedProperties value to false, the properties which are not present in the properties part and are not present in the sub schemas will be considered as invalid.
Example with the following schema:
{
    "$id": "https://unomi.apache.org/schemas/json/example/1-0-0",
    "$schema": "https://json-schema.org/draft/2019-09/schema",
    "type": "object",
    "allOf": [
        {
            "$ref": "https://unomi.apache.org/schemas/json/subschema/1-0-0"
        }
    ],
    "properties": {
        "myProperty": {
            "type": "string",
            "$comment": "Example of a property."
        }
    },
    "unevaluatedProperties": false
}
Sub schema:
{
    "$id": "https://unomi.apache.org/schemas/json/subschema/1-0-0",
    "$schema": "https://json-schema.org/draft/2019-09/schema",
    "type": "object",
    "properties": {
        "fromAllOf": {
            "type": "string",
            "$comment": "Example of allOf."
        }
    }
}
With the following data, the validation will fail because the property myNewProperty is not defined neither the properties part nor the allOf part.
{
    "myProperty": "My property",
    "fromAllOf" : 10,
    "myNewProperty": "another one" //Not valid
}
20.1.3. How are JSON Schema used in Unomi
JSON Schema is used in Unomi to validate the data coming from the two public endpoints /contextRequest and /eventCollector. Both endpoints have a custom deserializer which will begin by validating the payload of the request, then will filter invalid events present in this payload. If an event is not valid it will not be processed by the system. The internal events are not validated by JSON schema as they are not sent through the public endpoints.
In Unomi, each event type must have an associated JSON schema. To validate an event, Unomi will search for a schema in which the target of the schema is events, and with the name of the schema matching the event type.
A custom keyword named self has to be present in the JSON schemas to store the information related to each schema. The following example is the self part of the view event JSON schema. Having the target set to events and the name set to view, this schema will be used to validate the events of type view.
…
"self":{
    "vendor":"org.apache.unomi",
    "target" : "events",
    "name": "view",
    "format":"jsonschema",
    "version":"1-0-0"
},
…
Link to the schema on github: view.json.
A set of predefined schema are present in Unomi, these schemas can be found under the folder : extensions/json-schema/services/src/main/resources/META-INF/cxs/schemas.
These schemas will be loaded in memory at startup. Each schema where the target value is set to events, will be used to validate events. The others are simply used as part of JSON schema or can be used in additional JSON schemas.
It’s possible to add JSON schemas to validate your own event by using the API, the explanations to manage JSON schema through the API are in the Create / update a JSON schema to validate an event section.
Contrary to the predefined schemas, the schemas added through the API will be persisted in Elasticsearch in the jsonSchema index. Schemas persisted in Elasticsearch do not require a restart of the platform to reflect changes.
Process of creation of schemas:
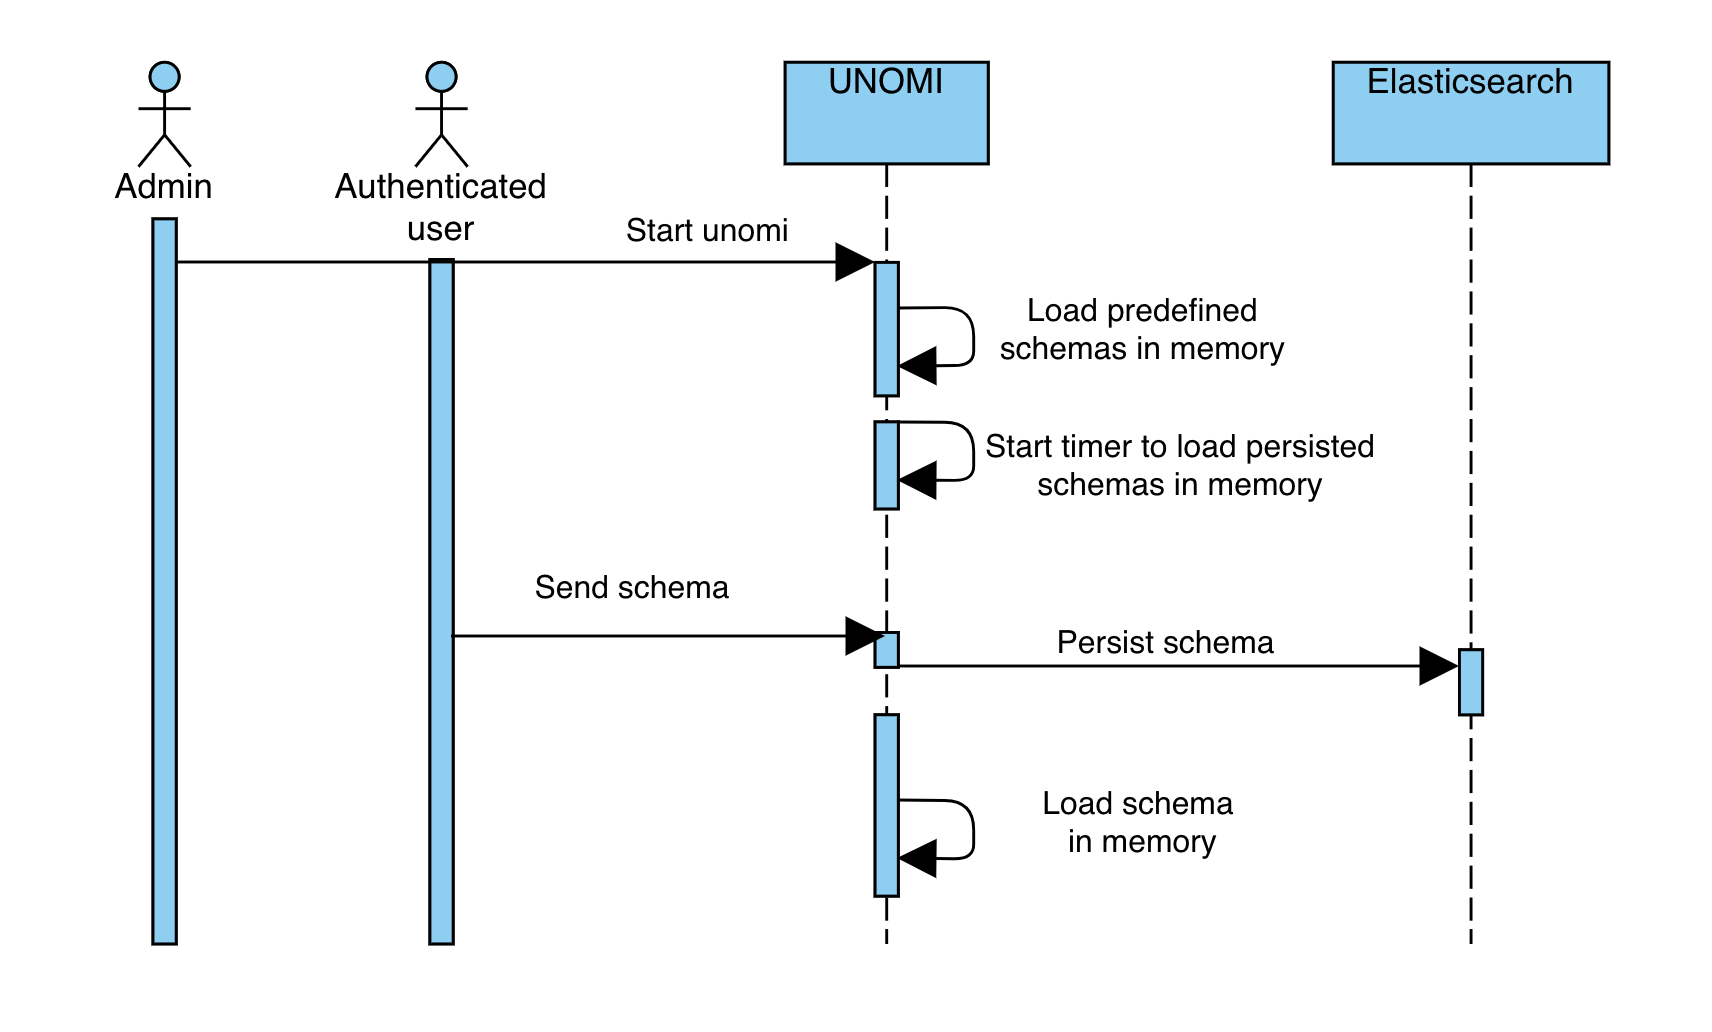
20.2. JSON schema API
The JSON schema endpoints are private, so the user has to be authenticated to manage the JSON schema in Unomi.
|
Important
|
JSON schema endpoints require tenant authentication using Basic Auth with tenantId:privateKey. Only the Tenant API (/cxs/tenants) uses system administrator authentication (karaf:karaf).
|
20.2.1. List existing schemas
The REST endpoint GET {{url}}/cxs/jsonSchema allows to get all ids of available schemas and subschemas.
List of predefined schemas:
[
    "https://unomi.apache.org/schemas/json/events/modifyConsent/properties/1-0-0",
    "https://unomi.apache.org/schemas/json/item/1-0-0",
    "https://unomi.apache.org/schemas/json/events/login/1-0-0",
    "https://unomi.apache.org/schemas/json/events/modifyConsent/1-0-0",
    "https://unomi.apache.org/schemas/json/consentType/1-0-0",
    "https://unomi.apache.org/schemas/json/items/page/properties/1-0-0",
    "https://unomi.apache.org/schemas/json/items/page/properties/attributes/1-0-0",
    "https://unomi.apache.org/schemas/json/events/incrementInterest/1-0-0",
    "https://unomi.apache.org/schemas/json/events/view/flattenProperties/1-0-0",
    "https://unomi.apache.org/schemas/json/interests/1-0-0",
    "https://unomi.apache.org/schemas/json/items/site/1-0-0",
    "https://unomi.apache.org/schemas/json/items/page/properties/pageInfo/1-0-0",
    "https://unomi.apache.org/schemas/json/rest/requestIds/1-0-0",
    "https://unomi.apache.org/schemas/json/rest/eventscollectorrequest/1-0-0",
    "https://unomi.apache.org/schemas/json/events/view/properties/1-0-0",
    "https://unomi.apache.org/schemas/json/items/page/1-0-0",
    "https://unomi.apache.org/schemas/json/URLParameters/1-0-0",
    "https://unomi.apache.org/schemas/json/event/1-0-0",
    "https://unomi.apache.org/schemas/json/timestampeditem/1-0-0",
    "https://unomi.apache.org/schemas/json/events/updateProperties/1-0-0",
    "https://unomi.apache.org/schemas/json/consent/1-0-0",
    "https://unomi.apache.org/schemas/json/events/incrementInterest/flattenProperties/1-0-0",
    "https://unomi.apache.org/schemas/json/events/view/1-0-0"
]
Custom schemas will also be present in this list once added.
20.2.2. Read a schema
It’s possible to get a schema by its id by calling the endpoint POST {{url}}/cxs/jsonSchema/query with the id of the schema in the payload of the query.
Example:
curl --location --request POST 'http://localhost:8181/cxs/jsonSchema/query' \
--user 'TENANT_ID:PRIVATE_KEY' \
--header 'Content-Type: text/plain' \
--data-raw 'https://unomi.apache.org/schemas/json/event/1-0-0'|
Note
|
Replace TENANT_ID and PRIVATE_KEY with your actual tenant ID and private API key. You can obtain these when creating a tenant via the Tenant API (which requires system administrator authentication).
|
20.2.3. Create / update a JSON schema to validate an event
It’s possible to add or update JSON schema by calling the endpoint POST {{url}}/cxs/jsonSchema with the JSON schema in the payload of the request.
If the JSON schema exists it will be updated with the new one.
Example of creation:
curl --location --request POST 'http://localhost:8181/cxs/jsonSchema' \
--user 'TENANT_ID:PRIVATE_KEY' \
--header 'Content-Type: application/json' \
--data-raw '{
    "$id": "https://vendor.test.com/schemas/json/events/dummy/1-0-0",
    "$schema": "https://json-schema.org/draft/2019-09/schema",
    "self": {
        "vendor": "com.vendor.test",
        "name": "dummy",
        "format": "jsonschema",
        "target": "events",
        "version": "1-0-0"
    },
    "title": "DummyEvent",
    "type": "object",
    "allOf": [
        {
            "$ref": "https://unomi.apache.org/schemas/json/event/1-0-0"
        }
    ],
    "properties": {
        "properties": {
            "$ref": "https://vendor.test.com/schemas/json/events/dummy/properties/1-0-0"
        }
    },
    "unevaluatedProperties": false
}'
20.2.4. Deleting a schema
To delete a schema, call the endpoint POST {{url}}/cxs/jsonSchema/delete with the id of the schema into the payload of the request
Example:
curl --location --request POST 'http://localhost:8181/cxs/jsonSchema/delete' \
--user 'TENANT_ID:PRIVATE_KEY' \
--header 'Content-Type: text/plain' \
--data-raw 'https://vendor.test.com/schemas/json/events/dummy/1-0-0'|
Note
|
Replace TENANT_ID and PRIVATE_KEY with your actual tenant ID and private API key.
|
20.2.5. Error Management
When calling an endpoint with invalid data, such as an invalid value for the sessionId property in the contextRequest object or eventCollectorRequest object, the server would respond with a 400 error code and the message Request rejected by the server because: Invalid received data.
20.2.6. Details on invalid events
If it’s an event which is incorrect the server will continue to process the request but will exclude the invalid events.
20.3. Develop with Unomi and JSON Schemas
Schemas can be complex to develop, and sometimes, understanding why an event is rejected can be challenging.
This section of the documentation details mechanisms put in place to facilitate the development when working around JSON Schemas (when creating a new schema, when modifying an existing event, …etc).
20.3.1. Logs in debug mode
Running Apache Unomi with the logs in debug level will add to the logs the reason why events are rejected. You can set the log level of the class validating the events to debug by using the following karaf command:
log:set DEBUG org.apache.unomi.schema.impl.SchemaServiceImplDoing so will output logs similar to this:
08:55:28.128 DEBUG [qtp1422628821-128] Schema validation found 2 errors while validating against schema: https://unomi.apache.org/schemas/json/events/view/1-0-0
08:55:28.138 DEBUG [qtp1422628821-128] Validation error: There are unevaluated properties at following paths $.source.properties
08:55:28.140 DEBUG [qtp1422628821-128] Validation error: There are unevaluated properties at following paths $.source.itemId, $.source.itemType, $.source.scope, $.source.properties
08:55:28.142 ERROR [qtp1422628821-128] An event was rejected - switch to DEBUG log level for more information
20.3.2. validateEvent endpoint
A dedicated endpoint (requires tenant authentication), accessible at: cxs/jsonSchema/validateEvent, was created to validate events against JSON Schemas loaded in Apache Unomi.
For example, sending an event not matching a schema:
curl --request POST \
  --url http://localhost:8181/cxs/jsonSchema/validateEvent \
  --user 'TENANT_ID:PRIVATE_KEY' \
  --header 'Content-Type: application/json' \
  --data '{
    "eventType": "no-event",
    "scope": "unknown_scope",
    "properties": {
        "workspace": "no_workspace",
        "path": "some/path"
    }
}'
Would return the following:
Request rejected by the server because: Unable to validate event: Schema not found for event type: no-eventAnd if we were to submit a valid event type but make a typo in one of the properties name, the endpoint will point us towards the incorrect property:
[
	{
		"error": "There are unevaluated properties at following paths $.source.scopee"
	}
]
20.3.3. validateEvents endpoint
A dedicated endpoint (requires tenant authentication), accessible at: cxs/jsonSchema/validateEvents, was created to validate a list of event at once against JSON Schemas loaded in Apache Unomi.
For example, sending a list of event not matching a schema:
curl --request POST \
  --url http://localhost:8181/cxs/jsonSchema/validateEvents \
  --user 'TENANT_ID:PRIVATE_KEY' \
  --header 'Content-Type: application/json' \
  --data '[{
    "eventType": "view",
    "scope": "scope",
    "properties": {
        "workspace": "no_workspace",
        "path": "some/path",
        "unknowProperty": "not valid"
    }, {
    "eventType": "view",
    "scope": "scope",
    "properties": {
        "workspace": "no_workspace",
        "path": "some/path",
        "unknowProperty": "not valid",
        "secondUnknowProperty": "also not valid"
    }, {
    "eventType": "notKnownEvent",
    "scope": "scope",
    "properties": {
        "workspace": "no_workspace",
        "path": "some/path"
    }
}]'
Would return the errors grouped by event type as the following:
{
    "view": [
        {
            "error": "There are unevaluated properties at following paths $.properties.unknowProperty"
        },
        {
            "error": "There are unevaluated properties at following paths $.properties.secondUnknowProperty"
        }
    ],
    "notKnownEvent": [
        {
            "error": "No Schema found for this event type"
        }
    ]
}
If several events have the same issue, only one message is returned for this issue.
20.4. Extend an existing schema
20.4.1. When a extension is needed?
Apache Unomi provides predefined schemas to validate some known events such as a view event.
The Apache Unomi JSON schemas are designed to consider invalid any properties which are not defined in the JSON schema. So if an unknown property is part of the event, the event will be considered as invalid.
This means that if your events include additional properties, you will need extensions to describe these.
20.4.2. Understanding how extensions are merged in unomi
An extension schema is a JSON schema whose id will be overridden and be defined by a keyword named extends in the self part of the extension.
When sending an extension through the API, it will be persisted in the search engine then will be merged to the targeted schema.
What does “merge a schema” mean? The merge will simply add in the allOf keyword of the targeted schema a reference to the extensions. It means that to be valid, an event should be valid against the base schema and against the ones added in the allOf.
Example of an extension to allow to add a new property in the view event properties:
{
    "$id": "https://vendor.test.com/schemas/json/events/dummy/extension/1-0-0",
    "$schema": "https://json-schema.org/draft/2019-09/schema",
    "self":{
        "vendor":"com.vendor.test",
        "name":"dummyExtension",
        "format":"jsonschema",
        "extends": "https://unomi.apache.org/schemas/json/events/view/properties/1-0-0",
        "version":"1-0-0"
    },
    "title": "DummyEventExtension",
    "type": "object",
    "properties": {
        "myNewProp": {
            "type": "string"
        }
    }
}
When validating the events of type view, the extension will be added to the schema with the id https://unomi.apache.org/schemas/json/events/view/properties/1-0-0 like the following:
"allOf": [{
    "$ref": "https://vendor.test.com/schemas/json/events/dummy/extension/1-0-0"
}]
With this extension the property myNewProp can now be added to the event.
…
"properties": {
    "myNewProp" : "newValue"
},
…
Process when adding extension:
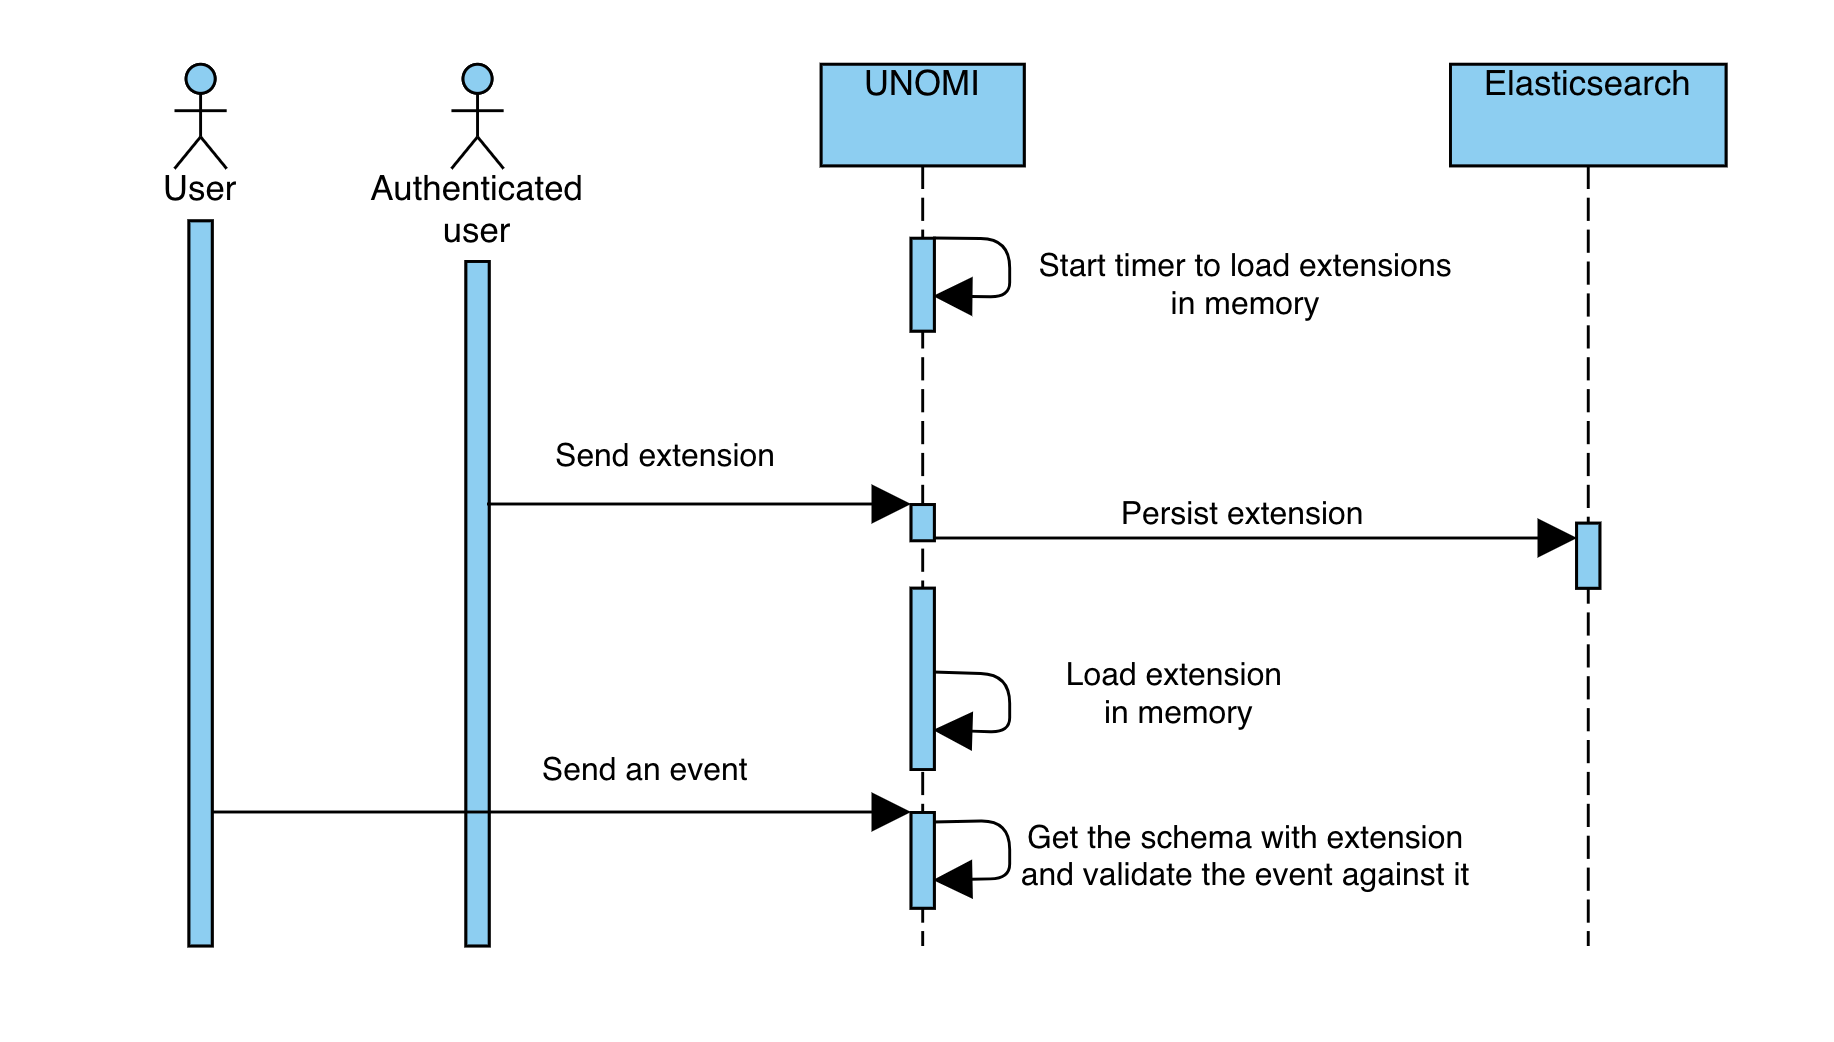
20.4.3. How to add an extension through the API
Since an extension is also a JSON schema, it is possible to add extensions by calling the endpoint to add a JSON schema.
By calling POST {{url}}/cxs/jsonSchema with the JSON schema in the payload of the request, the extension will be persisted and will be merged to the targeted schema.
21. GraphQL API
21.1. Introduction
First introduced in Apache Unomi 2.0, a GraphQL API is available as an alternative to REST for interacting with the platform. Disabled by default, the GraphQL API is currently considered a beta feature.
We look forward for this new GraphQL API to be used, feel free to open discussion on Unomi Slack channel or create tickets on Jira
21.2. Enabling the API
The GraphQL API must be enabled using the related distribution (unomi-distribution-elasticsearch-graphql or unomi-distribution-opensearch-graphql) or use the dedicated feature (cdp-graphql-feature) in your own.
21.3. Endpoints
Two endpoints were introduced for Apache Unomi 2 GraphQL API:
* /graphql is the primary endpoint for interacting programatically with the API and aims at receiving POST requests.
* /graphql-ui provides access to the GraphQL UI and aims at being accessed by a Web Browser.
21.4. GraphQL Schema
Thanks to GraphQL introspection, there is no dedicated documentation per-se as the Schema itself serves as documentation.
You can easily view the schema by navigrating to /graphql-ui, depending on your setup (localhost, public host, …),
you might need to adjust the URL to point GraphQL UI to the /graphql endpoint.
21.4.1. Authentication
GraphQL requests follow the same tenant security model as REST:
-
Public read operations on the
cdproot field: sendX-Unomi-Api-Keywith a tenant public API key. -
Mutations and administrative queries: HTTP Basic authentication with
tenantId:privateApiKey, or JAAS credentials plus optionalX-Unomi-Tenant-Id. -
Introspection (
IntrospectionQuery): allowed without credentials for schema discovery.
See Multi-tenancy for key management.
21.5. Multi-Tenancy Support
The GraphQL API includes comprehensive multi-tenancy support, allowing different tenants to have customized GraphQL schemas based on their specific data models and property types.
21.5.1. Overview
The GraphQL schema provider automatically creates and manages tenant-specific schemas, ensuring:
-
Each tenant has its own GraphQL schema that reflects only their specific property types
-
Changes to property types trigger automatic schema updates
-
Proper tenant isolation is maintained throughout the GraphQL API
21.5.2. Architecture
The multi-tenancy support is built on these key components:
Schema Cache
Each tenant’s GraphQL schema is created on demand and cached for performance:
private final ConcurrentMap<String, GraphQL> tenantSchemas = new ConcurrentHashMap<>();Tenant Context Detection
When processing a GraphQL request, the system automatically detects the current tenant from the execution context:
String tenantId = executionContextManager.getCurrentContext() != null ?
    executionContextManager.getCurrentContext().getTenantId() : null;
Dynamic Schema Creation
Each tenant’s schema is built dynamically based on its specific property types and configurations:
GraphQL graphQL = graphQLSchemaUpdater.getGraphQLForTenant(tenantId);Schema Invalidation
When property types change, the affected tenant’s schema is automatically invalidated:
public void invalidateTenantSchema(String tenantId) {
    tenantSchemas.remove(tenantId);
}
21.5.3. Schema Lifecycle
Tenant schemas follow this lifecycle:
-
Creation: Schemas are created on-demand when first requested
-
Caching: Created schemas are cached for performance
-
Invalidation: When property types change, the affected schemas are invalidated
-
Regeneration: Invalid schemas are regenerated on the next request
21.5.4. Performance Considerations
-
Schemas are created lazily on first request to avoid unnecessary overhead
-
Schema creation can be resource-intensive, so caching is essential
-
Property type changes trigger selective schema invalidation to minimize rebuilding
-
Only the affected tenant’s schema is invalidated when property types change
21.5.5. Benefits
This tenant-aware design provides several advantages:
-
Isolation: Each tenant has access only to their own data model
-
Customization: Tenants can define custom property types that appear in their schema
-
Performance: Schema caching improves response times
-
Consistency: Changes to property types are immediately reflected in the API
21.5.6. Troubleshooting
If tenant-specific schemas aren’t working as expected:
-
Check that the tenant context is properly set
-
Verify property types have correct tenant IDs
-
Review logs for schema creation and invalidation events
-
Try explicitly invalidating the tenant schema to force regeneration
21.6. Graphql request examples
You can use embedded GraphiQL interface available at http://localhost:8181/graphql-ui or use any other GraphQL client using that url for requests.
21.6.1. Retrieving your first profile
Profile can be retrieved using getProfile query
query($profileID: CDP_ProfileIDInput!, $createIfMissing: Boolean) {
  cdp {
    getProfile(profileID: $profileID, createIfMissing: $createIfMissing) {
      firstName
      lastName
      gender
      cdp_profileIDs {
        client {
          ID
          title
        }
        id
      }
    }
  }
}
This query accepts two variables that need to be provided in the Query variables section:
{
  "profileID": {
    "client":{
      "id": "defaultClientId"
    },
    "id": 1001
  },
  "createIfMissing": true
}|
Note
|
If you don’t want profile to be created if missing, set createIfMissing to false.
|
The response will look like this:
{
  "data": {
    "cdp": {
      "getProfile": {
        "firstName": null,
        "lastName": null,
        "gender": null,
        "cdp_profileIDs": [
          {
            "client": {
              "ID": "defaultClientId",
              "title": "Default Client"
            },
            "id": "1001"
          }
        ]
      }
    }
  }
}
21.6.2. Updating profile
Now let’s update our profile with some data.
It can be done using processEvents mutation:
mutation($events: [CDP_EventInput]!) {
  cdp {
    processEvents(events: $events)
  }
}
This mutation accepts one variable that needs to be provided in the Query variables section:
{
  "events": [
    {
      "cdp_objectID": 1001,
      "cdp_profileID": {
        "client": {
          "id": "defaultClientId"
        },
        "id": 1001
      },
      "cdp_profileUpdateEvent": {
        "firstName": "John",
        "lastName": "Doe",
        "gender": "Male"
      }
    }
  ]
}
The response will have the number of processed events:
{
  "data": {
    "cdp": {
      "processEvents": 1
    }
  }
}|
Note
|
processEvents accepts a number of other event types that are listed on CDP_EventInput type.
|
If you run the getProfile query again, you will see that the profile has been updated.
21.6.3. Restricted methods
Some methods are restricted to authenticated users only.
One example is findProfiles query:
query {
  cdp {
    findProfiles {
      totalCount
       edges {
        node {
          cdp_profileIDs {
            client{
              title
              ID
            }
            id
          }
        }
      }
    }
  }
}
And if you run it now, you will get an error.
To make this query work you need to supply authorization token in the HTTP headers section:
{
  "authorization": "Basic a2FyYWY6a2FyYWY="
}|
Note
|
When using curl, you can use the --user option instead of manually encoding credentials. For example, --user karaf:karaf automatically handles Base64 encoding for Basic authentication.
|
The result will now show the list of profiles:
{
  "data": {
    "cdp": {
      "findProfiles": {
        "totalCount": 1,
        "edges": [
          {
            "node": {
              "cdp_profileIDs": [
                {
                  "client": {
                    "title": "Default Client",
                    "ID": "defaultClientId"
                  },
                  "id": "1001"
                }
              ]
            }
          }
        ]
      }
    }
  }
}
21.6.4. Deleting profile
Profile can be deleted using deleteProfile mutation:
mutation($profileID: CDP_ProfileIDInput!) {
  cdp {
    deleteProfile(profileID: $profileID)
  }
}
This mutation accepts one variable that needs to be provided in the Query variables section:
{
  "profileID": {
    "client":{
      "id": "defaultClientId"
    },
    "id": 1001
  }
}
The response will show the result of the operation:
{
  "data": {
    "cdp": {
      "deleteProfile": true
    }
  }
}
21.6.5. Where to go from here
-
You can find more useful Apache Unomi URLs that can be used in the same way as the above examples.
-
Read GraphQL documentation to learn more about GraphQL syntax.
22. Migrations
This section contains information and steps to migrate between major Unomi versions.
22.1. Writing migration scripts
This section is for contributors who add or change Groovy migration scripts shipped in the shell-commands module.
Operators upgrading a cluster should follow the version-specific guides in this chapter instead.
Migration scripts run with Apache Unomi stopped, via unomi:migrate (see SSH Shell Commands).
They talk directly to Elasticsearch or OpenSearch over HTTP and transform persisted data in place.
22.1.1. Script location and naming
Bundled scripts live under:
tools/shell-commands/src/main/resources/META-INF/cxs/migration/Each file must match:
migrate-<version>-<priority>-<name>.groovy-
<version>— three-part version the script belongs to (for example3.1.0) -
<priority>— two-digit order within that version (00,01,05, …) -
<name>— short camelCase label (for exampletenantDocumentIds)
Example: migrate-3.1.0-01-tenantDocumentIds.groovy.
Scripts are sorted by version, then priority, then name.
Use gaps in priority (00, 05, 10) when you may need to insert a step later.
Operators can also drop scripts under {karaf.data}/migration/scripts/ for one-off fixes; the same naming rules apply.
22.1.2. Use performMigrationStep for every resumable unit of work
MigrationContext.performMigrationStep(stepKey, closure) is the idempotency and crash-recovery mechanism:
-
Each
stepKeyis persisted in{karaf.data}/migration/history.json. -
If a step is already
COMPLETED, it is skipped on the next run. -
If a run fails mid-step, only steps not yet marked complete are executed again.
Rules:
-
One logical outcome per step key — for example “configure session rollover alias”, not “do everything in one giant step”.
-
Step keys must be stable — changing a key after release makes resume behaviour confusing for operators who already have history files.
-
Prefer many small steps over one large step — especially when a step can take a long time (reindex, scroll, bulk update).
MigrationUtils.reIndex(…) already registers its own sub-steps (clone, recreate index, delete clone, refresh).
You do not need to wrap those again unless you add work outside reIndex.
22.1.3. Pitfall: do not nest performMigrationStep inside another step
This was the root cause of UNOMI-943.
If step B is registered inside the closure of step A, then:
-
B is only evaluated while A runs.
-
When A is already marked
COMPLETEDin history, A’s closure is never entered again. -
B is never registered and never runs — even if B never completed.
Real impact: rollover write aliases for event/session indices were skipped after a failed/resumed migration, so new writes failed silently.
Wrong — alias configuration hidden inside get-all-indices:
context.performMigrationStep("3.1.0-get-all-indices", () -> {
// ... reindex each index ...
context.performMigrationStep("3.1.0-configure-rollover-aliases", () -> {
// configure aliases — NEVER REACHED on resume if outer step completed
})
})Right — each tracked step at script top level:
context.performMigrationStep("3.1.0-get-all-indices", () -> {
// ... reindex each index ...
})
context.performMigrationStep("3.1.0-configure-rollover-aliases", () -> {
// configure aliases — runs independently on resume
})22.1.4. Pitfall: make data transforms safe to re-run
Step history prevents re-running a whole step, but partial failure inside a step can still leave mixed state. Design Painless scripts and update queries so a second application does not corrupt data.
Good patterns:
-
Check before mutate — skip documents that already have the target shape (tenant prefix on
_id,tenantIdset, legacy field already renamed). -
Copy-once fields — only copy
nbOfVisits→totalNbOfVisitswhentotalNbOfVisitsis null. -
Existence guards — create an index or tenant document only when
MigrationUtils.indexExists(…)is false. -
Scoped queries — limit
update_by_queryto documents that still match the old state (wildcard on legacyqueryBuilderIDs, etc.).
Example guard (document ID already tenant-prefixed):
if (!ctx._id.startsWith(params.tenantId + '_') && !ctx._id.startsWith(params.systemTenantId + '_')) {
// transform ...
}22.1.5. Pitfall: bundled resources must exist and fail clearly
Scripts load JSON and Painless from the bundle via:
-
MigrationUtils.resourceAsString(bundleContext, "requestBody/…") -
MigrationUtils.getFileWithoutComments(bundleContext, "requestBody/…/script.painless")
Both throw RuntimeException("Resource not found: …") when the path is wrong.
A missing file used to surface as an opaque NullPointerException in getFileWithoutComments (fixed in UNOMI-943).
Keep request bodies under tools/shell-commands/src/main/resources/requestBody/<version>/.
After adding a file, run unit tests or a dry migration in a staging cluster — do not rely on compile-only checks.
22.1.6. Configuration keys
Prefer constants from MigrationConfig instead of raw string literals:
import static org.apache.unomi.shell.migration.service.MigrationConfig.*
String esAddress = context.getConfigString(CONFIG_ES_ADDRESS)
String indexPrefix = context.getConfigString(INDEX_PREFIX)
String tenantId = context.getConfigString(TENANT_ID)Legacy scripts may still use "esAddress" and "indexPrefix"; new scripts should use the constants.
Optional settings and prompts are documented in org.apache.unomi.migration.cfg (see shell command help for unomi:migrate).
22.1.7. Destructive operations
Reindex and index deletion are intentional but risky:
-
MigrationUtils.reIndexclones the source index, deletes the original, recreates mappings, then copies data back. -
Always confirm the index name is not a
-clonedsuffix (the helper rejects reindexing clones). -
For rollover indices, configure aliases in a separate top-level step after all reindex work finishes.
Log progress with context.printMessage(…) so operators can correlate Karaf console output with history.json.
22.1.8. Testing
| Test | Module | What it validates |
|---|---|---|
|
|
Painless comment stripping, missing resource errors |
|
|
Step history recovery ( |
|
|
Full chain from 1.6.x snapshot through all bundled scripts (Elasticsearch only) |
When you add or change a 3.x script, extend Migrate16xToCurrentVersionIT if the change affects observable data (tenant IDs, aliases, queryBuilder IDs, profile fields, etc.).
Run locally before opening a PR:
mvn -pl tools/shell-commands -am test -Dtest=MigrationUtilsTestFull migration ITs run in CI on the integration matrix (~2 h); they are required for script changes that affect persisted data shape.
22.1.9. Pre-merge checklist
Use this before submitting a migration PR:
-
❏ File name matches
migrate-<version>-<priority>-<name>.groovy -
❏ Every resumable unit uses its own top-level
performMigrationStep(no nesting) -
❏ Step keys are stable and describe one outcome
-
❏ Painless / update logic is safe if applied twice inside a step
-
❏ New
requestBody/assets are committed and referenced with correct paths -
❏
indexExists/ query filters guard create-only work -
❏ Unit or IT coverage updated where behaviour is testable
-
❏ Version-specific operator doc updated if the upgrade path changes (
migrate--to-.adoc)
22.2. V2/V3 API Compatibility Guide
23. Apache Unomi V2/V3 API Differences Guide
This document explains the key differences between Apache Unomi 2.x and 3.x versions from an API perspective.
24. Overview
Apache Unomi 3.x introduces comprehensive multi-tenancy support, enabling complete data isolation between different tenants. This fundamental architectural change requires a new tenant-based authentication model while keeping all API endpoints unchanged.
24.1. Multi-Tenancy in V3
The key innovation in V3 is the introduction of tenant isolation for all data:
-
Profiles, events, segments, rules, and schemas are now tenant-specific
-
Complete data separation between tenants - no cross-tenant data access
-
Tenant-specific API keys for secure access control
-
Backward compatibility with system administrator access for management operations
This multi-tenancy support necessitates the authentication changes described below, as the system must now identify which tenant context to operate in for every request.
25. Key Differences Between V2 and V3
25.1. Authentication Model
| Aspect | Unomi V2 | Unomi V3 |
|---|---|---|
Authentication Method |
System Administrator Authentication (karaf/karaf) |
Tenant-based API Keys + System Administrator Authentication |
Public API Endpoints |
No authentication required |
Public API Key required (via X-Unomi-Api-Key header) |
Private API Endpoints |
System Administrator Authentication |
Tenant Authentication (tenantId/privateKey) OR System Administrator Authentication |
Tenant Administration |
System Administrator Authentication (karaf/karaf) |
System Administrator Authentication (karaf/karaf) |
25.2. API Key Types (V3 Only)
V3 introduces two types of API keys per tenant:
-
Public Key: Used for public endpoints (event collection via
/context.json) -
Private Key: Used with tenantId for tenant-specific administrative operations
25.3. Authentication Requirements by Endpoint Type
| Endpoint Category | V2 Authentication | V3 Authentication |
|---|---|---|
Event Collection ( |
None |
Public API Key only |
Administrative Operations |
System Admin (karaf/karaf) |
Tenant Auth (tenantId/privateKey) OR System Admin (karaf/karaf) |
Tenant Administration ( |
System Admin (karaf/karaf) |
System Admin (karaf/karaf) |
26. Authentication Flow (V3)
The AuthenticationFilter in V3 follows this resolution order:
-
Tenant endpoints (
/cxs/tenants): Requires system administrator authentication only -
Public endpoints (e.g.,
/context.json): Requires public API key viaX-Unomi-Api-Keyheader -
Private endpoints: Tries tenant authentication first, then falls back to system administrator authentication:
-
Tenant Authentication: Basic Auth with
tenantId:privateKey -
System Administrator Authentication: Basic Auth with
karaf:karaf(or configured admin credentials)
-
27. Code Examples
27.1. V2 Authentication
// Global system administrator authentication for all endpoints
RestAssured.authentication = RestAssured.preemptive()
.basic("karaf", "karaf");
// Context requests require no authentication
RestAssured.given()
.auth().none()
.contentType(ContentType.JSON)
.body(contextJson)
.post("/context.json");27.2. V3 Authentication
// For public endpoints (event collection)
given()
.header("X-Unomi-Api-Key", publicKey)
.contentType(ContentType.JSON)
.body(contextJson)
.post("/context.json");
// For private endpoints using tenant authentication
given()
.auth().preemptive().basic(tenantId, privateKey)
.contentType(ContentType.JSON)
.body(payload)
.post("/cxs/profiles");
// For private endpoints using system administrator authentication
given()
.auth().preemptive().basic("karaf", "karaf")
.contentType(ContentType.JSON)
.body(payload)
.post("/cxs/profiles");
// For tenant administration (system admin only)
given()
.auth().preemptive().basic("karaf", "karaf")
.contentType(ContentType.JSON)
.body(tenantPayload)
.post("/cxs/tenants");28. Implementation Strategy
28.1. Client Factory Pattern
public class UnomiConfiguration {
public UnomiClient createClient(String baseUrl) {
String version = System.getProperty("unomi.version", "3");
if ("3".equals(version)) {
return new UnomiV3Client(baseUrl);
} else {
return new UnomiV2Client(baseUrl);
}
}
}28.2. Version-Specific Authentication
// V2 Client
public void init() {
RestAssured.baseURI = baseUrl;
RestAssured.authentication = RestAssured.preemptive()
.basic("karaf", "karaf");
}
// V3 Client
public void init() {
RestAssured.baseURI = baseUrl;
}
public void updateKeys(String publicKey, String privateKey) {
this.publicKey = publicKey;
this.privateKey = privateKey;
}29. Migration Guidelines
29.1. From V2 to V3
-
Understand Multi-Tenancy Impact
-
All data (profiles, events, segments, rules, schemas) becomes tenant-specific
-
Each tenant operates in complete isolation with their own data space
-
Tenant context must be established for every API operation
-
-
Update Authentication Configuration
-
Remove global system administrator authentication
-
Configure tenant-specific public and private API keys
-
Implement endpoint-specific authentication logic
-
-
Endpoint-Specific Changes
-
Add
X-Unomi-Api-Keyheader with public key for event collection -
Use tenant authentication (tenantId/privateKey) for tenant-specific administrative operations
-
Keep system administrator authentication as fallback for administrative operations
-
Continue using system administrator authentication for tenant administration
-
-
No API Contract Changes
-
All endpoints remain the same
-
Request/response payloads are unchanged
-
Only authentication mechanism differs
-
29.2. Benefits of Multi-Tenancy in V3
-
Data Isolation: Complete separation ensures tenant data never crosses boundaries
-
Scalability: Support for multiple customers/organizations in a single Unomi instance
-
Security: Tenant-specific API keys prevent unauthorized cross-tenant access
-
Compliance: Easier to meet data privacy regulations with clear tenant boundaries
-
Cost Efficiency: Shared infrastructure with isolated data reduces operational costs
30. Conclusion
The fundamental difference between Unomi V2 and V3 is the introduction of comprehensive multi-tenancy support:
-
V2: Single-tenant architecture with system administrator authentication for all operations
-
V3: Multi-tenant architecture with complete data isolation and tenant-specific authentication
-
API Endpoints: Identical between versions - no breaking changes to existing integrations
-
Data Model: All entities (profiles, events, segments, rules, schemas) become tenant-specific in V3
-
Authentication: New tenant-based authentication model with system administrator authentication as fallback
The authentication changes in V3 are driven by the need to establish tenant context for every operation, ensuring complete data isolation while maintaining backward compatibility for administrative operations.
30.1. V2 compatibility mode
This document explains how to use the V2 compatibility mode in Apache Unomi V3, which allows V2 client applications to work with Unomi V3 without requiring API keys.
31. Overview
The V2 compatibility mode is designed to ease the migration from Unomi V2 to V3 by allowing V2 clients to continue working without immediate changes to their authentication logic. This mode provides backward compatibility while still leveraging the multi-tenant architecture of V3.
31.1. How It Works
When V2 compatibility mode is enabled:
-
Public endpoints (like
/context.json) require no authentication (like V2) -
Protected events (like
login,updateProperties) require IP + X-Unomi-Peer (like V2) -
Private endpoints require system administrator authentication (like V2)
-
A default tenant is automatically used for all operations
-
No authentication is required for non-protected events (like V2)
This allows V2 clients to work with Unomi V3 immediately after migration, giving you time to gradually update client applications to use the new V3 authentication model.
32. Prerequisites
Before enabling V2 compatibility mode, ensure that:
-
Data Migration Completed: Your V2 data has been migrated to a tenant using the migration scripts
-
Default Tenant Exists: A default tenant exists that will be used for all operations
-
V3 Installation: Unomi V3 is properly installed and configured
33. Configuration
33.1. Enable V2 Compatibility Mode
You can also set the environment variable UNOMI_REST_AUTHENTICATION_V2COMPATIBILITYMODEENABLED=true (maps to org.apache.unomi.rest.authentication.v2CompatibilityModeEnabled in custom.system.properties).
-
Edit the configuration file:
bash # Edit the configuration file vi etc/org.apache.unomi.rest.authentication.cfg -
Enable V2 compatibility mode: ```properties # Enable V2 compatibility mode v2.compatibilitymode.enabled = true
# Set the default tenant ID (should match the tenant ID used during migration) v2.compatibilitymode.defaultTenantId = your-migration-tenant-id ```
-
Restart the server to apply the configuration changes: ```bash # Stop the server ./bin/stop
# Start the server ./bin/start ```
33.2. Configuration Management
V2 compatibility mode is managed through configuration files only. This approach is safer and prevents accidental changes to authentication settings.
34. Migration Workflow
34.1. Step 1: Migrate Data
First, migrate your V2 data to V3 using the migration scripts:
# Run the migration scripts
unomi:migrate-3.1.0-00-tenantDocumentIds
unomi:migrate-3.1.0-10-tenantInitializationThe migrate-3.1.0-10-tenantInitialization script creates a default tenant that will be used for V2 compatibility mode.
34.2. Step 2: Enable V2 Compatibility Mode
Enable V2 compatibility mode by updating the configuration file:
# Edit the configuration file
vi etc/org.apache.unomi.rest.authentication.cfg
# Set v2.compatibilitymode.enabled = true
# Set v2CompatibilityDefaultTenantId = your-tenant-id
# Restart the server to apply changes
./bin/stop
./bin/start34.3. Step 3: Test V2 Clients
Your V2 clients should now work without any changes:
// V2-style authentication still works
RestAssured.authentication = RestAssured.preemptive()
.basic("karaf", "karaf");
// Context requests work without API keys
RestAssured.given()
.auth().none()
.contentType(ContentType.JSON)
.body(contextJson)
.post("/context.json");34.4. Step 4: Gradual Migration
Over time, gradually update your clients to use V3 authentication:
-
Update client applications to use API keys
-
Test with V3 authentication while keeping V2 compatibility mode enabled
-
Disable V2 compatibility mode once all clients are updated
35. Client Migration Examples
35.1. From V2 to V3 (with V2 Compatibility Mode)
V2 Client (continues to work):
// This continues to work in V2 compatibility mode
RestAssured.authentication = RestAssured.preemptive()
.basic("karaf", "karaf");
RestAssured.given()
.auth().none()
.contentType(ContentType.JSON)
.body(contextJson)
.post("/context.json");V3 Client (new implementation):
// New V3 client using API keys
given()
.header("X-Unomi-Api-Key", publicKey)
.contentType(ContentType.JSON)
.body(contextJson)
.post("/context.json");35.2. Gradual Migration Strategy
-
Phase 1: Enable V2 compatibility mode, V2 clients continue working
-
Phase 2: Develop and test V3 clients alongside V2 clients
-
Phase 3: Migrate clients one by one to V3 authentication
-
Phase 4: Disable V2 compatibility mode once all clients are migrated
36. Security Considerations
36.1. V2 Compatibility Mode Security
When V2 compatibility mode is enabled:
-
Public endpoints are accessible without authentication (same as V2)
-
Protected events require IP + X-Unomi-Peer authentication (same as V2)
-
Private endpoints require system administrator authentication (same as V2)
-
All operations use the default tenant context
-
Non-protected events require no authentication (same as V2)
36.2. Protected Events in V2 Compatibility Mode
In V2 compatibility mode, protected event types are configured dynamically using the V2 third-party configuration file. By default, the following event types are protected:
-
login- User authentication events -
updateProperties- Profile property updates
Additional event types can be configured as protected by editing the V2 third-party configuration file.
For protected events, clients must:
1. Send the request from an authorized IP address (configured in the V2 third-party configuration)
2. Include the X-Unomi-Peer header with the third-party ID (e.g., "provider1")
All other event types are considered non-protected and require no authentication.
36.3. V2 Third-Party Configuration
The protected events and third-party providers are configured in the original V2 configuration file etc/org.apache.unomi.thirdparty.cfg. The system dynamically detects any number of providers using the pattern thirdparty.{providerName}.{property}:
# Provider 1 Configuration (default provider)
thirdparty.provider1.key=${org.apache.unomi.thirdparty.provider1.key:-670c26d1cc413346c3b2fd9ce65dab41}
thirdparty.provider1.ipAddresses=${org.apache.unomi.thirdparty.provider1.ipAddresses:-127.0.0.1,::1}
thirdparty.provider1.allowedEvents=${org.apache.unomi.thirdparty.provider1.allowedEvents:-login,updateProperties}
# Additional providers can be added dynamically
thirdparty.myapp.key=${org.apache.unomi.thirdparty.myapp.key:-my-secret-key}
thirdparty.myapp.ipAddresses=${org.apache.unomi.thirdparty.myapp.ipAddresses:-192.168.1.0/24}
thirdparty.myapp.allowedEvents=${org.apache.unomi.thirdparty.myapp.allowedEvents:-login,updateProperties,sessionCreated}This uses the exact same configuration format as V2, ensuring complete compatibility with existing V2 setups. The system automatically detects and configures any provider that has a valid key.
36.4. Configuration Management
The V2 third-party configuration supports dynamic updates:
-
Edit the configuration file:
bash # Edit the V2 third-party configuration vi etc/org.apache.unomi.thirdparty.cfg -
Update protected events:
properties # Add more protected event types thirdparty.provider1.allowedEvents=${org.apache.unomi.thirdparty.provider1.allowedEvents:-login,updateProperties,sessionCreated,profileUpdated} -
Add additional providers: ```properties # Configure additional providers (any name is supported) thirdparty.myapp.key=${org.apache.unomi.thirdparty.myapp.key:-your-secret-key-here} thirdparty.myapp.ipAddresses=${org.apache.unomi.thirdparty.myapp.ipAddresses:-192.168.1.0/24,10.0.0.1} thirdparty.myapp.allowedEvents=${org.apache.unomi.thirdparty.myapp.allowedEvents:-login,updateProperties}
thirdparty.analytics.key=${org.apache.unomi.thirdparty.analytics.key:-analytics-secret} thirdparty.analytics.ipAddresses=${org.apache.unomi.thirdparty.analytics.ipAddresses:-10.0.0.0/8} thirdparty.analytics.allowedEvents=${org.apache.unomi.thirdparty.analytics.allowedEvents:-login,updateProperties,sessionCreated} ``` -
Restart the server to apply changes:
bash ./bin/stop ./bin/start
36.5. Recommendations
-
Use V2 compatibility mode temporarily during migration
-
Plan for gradual migration to V3 authentication
-
Monitor access patterns during the transition
-
Disable V2 compatibility mode once migration is complete
37. Troubleshooting
37.1. Common Issues
V2 clients still not working:
- Check configuration file: etc/org.apache.unomi.rest.authentication.cfg
- Verify v2.compatibilitymode.enabled = true
- Ensure v2CompatibilityDefaultTenantId matches the tenant ID used during migration
- Ensure the tenant exists and is accessible
Authentication errors: - Verify system administrator credentials (karaf/karaf) - Check that the server is running properly - Review logs for authentication errors
Tenant context issues: - Ensure the default tenant ID matches your migrated tenant - Verify tenant exists in the tenant index - Check tenant configuration in the migration scripts
37.2. Debugging
Enable debug logging for authentication:
# Enable debug logging
log:set DEBUG org.apache.unomi.rest.authenticationCheck authentication filter logs:
# View recent logs
log:display | grep AuthenticationFilter38. Disabling V2 Compatibility Mode
Once all clients are migrated to V3 authentication:
-
Update configuration:
properties v2.compatibilitymode.enabled = false -
Restart the server:
bash ./bin/stop ./bin/start -
Verify all clients work with V3 authentication
-
Monitor for any issues and address them before final deployment
39. Testing V2 Compatibility Mode
The existing test framework supports testing V2 compatibility mode using system properties.
39.1. Running Tests in V2 Compatibility Mode
To run tests with V2 compatibility mode enabled:
# Enable V2 compatibility mode for tests
mvn test -Dunomi.v2.compatibility.mode=true
# Or set the property in your test environment
export UNOMI_V2_COMPATIBILITY_MODE=true
mvn test39.2. Test Framework Integration
The test framework automatically detects V2 compatibility mode and uses the appropriate client:
-
V2 Compatibility Mode Enabled: Uses
UnomiV2Clientfor all tests -
V2 Compatibility Mode Disabled: Uses normal V2/V3 detection logic
This allows you to test both V2 compatibility mode and normal V3 mode using the same test suite.
39.3. Example Test Execution
# Test with V2 compatibility mode (server should be configured for V2 compatibility)
mvn test -Dunomi.v2.compatibility.mode=true -Dunomi.url=http://localhost:8181
# Test with normal V3 mode
mvn test -Dunomi.url=http://localhost:818140. Conclusion
The V2 compatibility mode provides a smooth migration path from Unomi V2 to V3, allowing you to:
-
Maintain existing V2 clients during migration
-
Gradually migrate to V3 authentication
-
Leverage V3 features while maintaining backward compatibility
-
Minimize downtime during the migration process
-
Test both modes using the existing test framework
Use this mode as a temporary solution during your migration journey, and plan to disable it once all clients are updated to use V3 authentication.
40.1. From version 3.0 to 3.1
40.2. Migration Overview
Apache Unomi 3.1 introduces comprehensive multi-tenancy support, enabling complete data isolation between different tenants. This fundamental architectural change requires a new tenant-based authentication model while keeping all API endpoints unchanged.
The key innovation in 3.1 is the introduction of tenant isolation for all data: - Profiles, events, segments, rules, and schemas are now tenant-specific - Complete data separation between tenants - no cross-tenant data access - Tenant-specific API keys for secure access control - Backward compatibility with system administrator access for management operations
40.3. Updating applications consuming Unomi
40.3.1. Authentication Model Changes
The main change in 3.1 is the introduction of tenant-based authentication. The system must now identify which tenant context to operate in for every request.
| Aspect | Unomi 3.0 | Unomi 3.1 |
|---|---|---|
Authentication Method |
System Administrator Authentication (karaf/karaf) |
Tenant-based API Keys + System Administrator Authentication |
Public API Endpoints |
No authentication required |
Public API Key required (via X-Unomi-Api-Key header) |
Private API Endpoints |
System Administrator Authentication |
Tenant Authentication (tenantId/privateKey) OR System Administrator Authentication |
Tenant Administration |
System Administrator Authentication (karaf/karaf) |
System Administrator Authentication (karaf/karaf) |
40.3.2. API Key Types (3.1 Only)
3.1 introduces two types of API keys per tenant:
-
Public Key: Used for public endpoints (event collection via
/context.json) -
Private Key: Used with tenantId for tenant-specific administrative operations
40.3.3. Authentication Requirements by Endpoint Type
| Endpoint Category | 3.0 Authentication | 3.1 Authentication |
|---|---|---|
Event Collection ( |
None |
Public API Key only |
Administrative Operations |
System Admin (karaf/karaf) |
Tenant Auth (tenantId/privateKey) OR System Admin (karaf/karaf) |
Tenant Administration ( |
System Admin (karaf/karaf) |
System Admin (karaf/karaf) |
40.3.4. Authentication Flow (3.1)
The AuthenticationFilter in 3.1 follows this resolution order:
-
Tenant endpoints (
/cxs/tenants): Requires system administrator authentication only -
Public endpoints (e.g.,
/context.json): Requires public API key viaX-Unomi-Api-Keyheader -
Private endpoints: Tries tenant authentication first, then falls back to system administrator authentication:
-
Tenant Authentication: Basic Auth with
tenantId:privateKey -
System Administrator Authentication: Basic Auth with
karaf:karaf(or configured admin credentials)
-
40.3.5. Code Examples
3.0 Authentication
// Global system administrator authentication for all endpoints
RestAssured.authentication = RestAssured.preemptive()
.basic("karaf", "karaf");
// Context requests require no authentication
RestAssured.given()
.auth().none()
.contentType(ContentType.JSON)
.body(contextJson)
.post("/context.json");3.1 Authentication
// For public endpoints (event collection)
given()
.header("X-Unomi-Api-Key", publicKey)
.contentType(ContentType.JSON)
.body(contextJson)
.post("/context.json");
// For private endpoints using tenant authentication
given()
.auth().preemptive().basic(tenantId, privateKey)
.contentType(ContentType.JSON)
.body(payload)
.post("/cxs/profiles");
// For private endpoints using system administrator authentication
given()
.auth().preemptive().basic("karaf", "karaf")
.contentType(ContentType.JSON)
.body(payload)
.post("/cxs/profiles");
// For tenant administration (system admin only)
given()
.auth().preemptive().basic("karaf", "karaf")
.contentType(ContentType.JSON)
.body(tenantPayload)
.post("/cxs/tenants");40.3.6. Implementation Strategy
Client Factory Pattern
public class UnomiConfiguration {
public UnomiClient createClient(String baseUrl) {
String version = System.getProperty("unomi.version", "3.1");
if ("3.1".equals(version)) {
return new UnomiV31Client(baseUrl);
} else {
return new UnomiV30Client(baseUrl);
}
}
}Version-Specific Authentication
// 3.0 Client
public void init() {
RestAssured.baseURI = baseUrl;
RestAssured.authentication = RestAssured.preemptive()
.basic("karaf", "karaf");
}
// 3.1 Client
public void init() {
RestAssured.baseURI = baseUrl;
}
public void updateKeys(String publicKey, String privateKey) {
this.publicKey = publicKey;
this.privateKey = privateKey;
}40.3.7. No API Contract Changes
All API endpoints remain the same between 3.0 and 3.1. The only differences are in the authentication mechanism and tenant resolution. Request/response payloads are unchanged.
40.4. Migrating your existing data
40.4.1. Multi-Tenancy Impact
When migrating to 3.1, you need to understand that:
-
All data (profiles, events, segments, rules, schemas) becomes tenant-specific
-
Each tenant operates in complete isolation with their own data space
-
Tenant context must be established for every API operation
40.4.2. Migration Steps
-
Understand Multi-Tenancy Impact
-
All data (profiles, events, segments, rules, schemas) becomes tenant-specific
-
Each tenant operates in complete isolation with their own data space
-
Tenant context must be established for every API operation
-
-
Update Authentication Configuration
-
Remove global system administrator authentication
-
Configure tenant-specific public and private API keys
-
Implement endpoint-specific authentication logic
-
-
Endpoint-Specific Changes
-
Add
X-Unomi-Api-Keyheader with public key for event collection -
Use tenant authentication (tenantId/privateKey) for tenant-specific administrative operations
-
Keep system administrator authentication as fallback for administrative operations
-
Continue using system administrator authentication for tenant administration
-
-
No API Contract Changes
-
All endpoints remain the same
-
Request/response payloads are unchanged
-
Only authentication mechanism differs
-
40.4.3. Benefits of Multi-Tenancy in 3.1
-
Data Isolation: Complete separation ensures tenant data never crosses boundaries
-
Scalability: Support for multiple customers/organizations in a single Unomi instance
-
Security: Tenant-specific API keys prevent unauthorized cross-tenant access
-
Compliance: Easier to meet data privacy regulations with clear tenant boundaries
-
Cost Efficiency: Shared infrastructure with isolated data reduces operational costs
40.5. Migration Checklist
Before starting the migration, please ensure that:
-
You do have a backup of your data
-
You did practice the migration in a staging environment, NEVER migrate a production environment without prior validation
-
You verified your applications were operational with Apache Unomi 3.1 (authentication updated, client applications updated, …)
-
You are currently running Apache Unomi 3.0 (or a later 3.0.x version)
-
You understand the multi-tenancy impact on your data model
-
You have configured tenant-specific API keys for your applications
40.6. Migration Process
The migration from 3.0 to 3.1 is primarily a configuration and authentication update:
Contributors maintaining the Groovy scripts that implement this upgrade should follow Writing migration scripts (step tracking, idempotency, and common pitfalls).
-
Shutdown your Apache Unomi 3.0 cluster
-
Update your client applications to use the new authentication model
-
Configure tenant-specific API keys for your applications
-
Start your Apache Unomi 3.1 cluster
-
Test your applications with the new authentication model
40.7. Transitional authentication options
Unomi 3.1 does not provide a separate "3.0 compatibility mode" system property. Use one of the following approaches while migrating clients:
40.7.1. Option 1: Update clients to 3.1 authentication (recommended)
Adopt tenant public API keys for public endpoints and tenant private keys or JAAS for administrative work. See Multi-tenancy and the authentication examples in this guide.
40.7.2. Option 2: V2 compatibility mode (2.x clients only)
If you are migrating from Unomi 2.x (not 3.0), you can enable V2 compatibility mode so legacy clients work without API keys during a phased rollout:
# etc/org.apache.unomi.rest.authentication.cfg
v2.compatibilitymode.enabled = true
v2.compatibilitymode.defaultTenantId = defaultEnvironment variable equivalent: UNOMI_REST_AUTHENTICATION_V2COMPATIBILITYMODEENABLED=true
|
Warning
|
V2 compatibility mode is intended for migration from 2.x only. It bypasses tenant API key requirements on public endpoints. Disable it once all clients use 3.1 authentication. |
40.8. Post Migration
Once the migration has been completed, you will be able to start Apache Unomi 3.1 with full multi-tenancy support.
Remember that all data operations now require proper tenant context, either through tenant authentication or system administrator authentication.
The fundamental difference between Unomi 3.0 and 3.1 is the introduction of comprehensive multi-tenancy support:
-
3.0: Single-tenant architecture with system administrator authentication for all operations
-
3.1: Multi-tenant architecture with complete data isolation and tenant-specific authentication
-
API Endpoints: Identical between versions - no breaking changes to existing integrations
-
Data Model: All entities (profiles, events, segments, rules, schemas) become tenant-specific in 3.1
-
Authentication: New tenant-based authentication model with system administrator authentication as fallback
The authentication changes in 3.1 are driven by the need to establish tenant context for every operation, ensuring complete data isolation while maintaining backward compatibility for administrative operations.
40.8.1. Migrating from Elasticsearch to OpenSearch
Overview
This guide describes how to migrate your Apache Unomi data from Elasticsearch to OpenSearch. The migration process involves using the OpenSearch Replication Tool, which is designed to handle large-scale migrations efficiently while maintaining data consistency.
Prerequisites
Before starting the migration, ensure you have:
-
Running Elasticsearch cluster with your Unomi data
-
Target OpenSearch cluster set up and running
-
Sufficient disk space on the target cluster
-
Java 17 or later installed
-
Network connectivity between source and target clusters
Migration Options
Option 1: OpenSearch Replication Tool (Recommended)
The OpenSearch Replication Tool is the recommended approach for production environments, especially for large datasets.
Installation
git clone https://github.com/opensearch-project/opensearch-migrations.git
cd opensearch-migrations/replication-tool
./gradlew buildConfiguration
Create a configuration file config.yml:
source:
hosts: ["source-elasticsearch-host:9200"]
user: "elastic_user" # if authentication is enabled
password: "elastic_pass" # if authentication is enabled
destination:
hosts: ["target-opensearch-host:9200"]
user: "opensearch_user" # if authentication is enabled
password: "opensearch_pass" # if authentication is enabled
indices:
- name: "context-*" # Unomi context indices
- name: "segment-*" # Unomi segment indices
- name: "profile-*" # Unomi profile indices
- name: "session-*" # Unomi session indicesRunning the Migration
./bin/replication-tool --config config.ymlThe tool provides progress updates and ensures data consistency during the migration.
Option 2: Logstash Pipeline
For smaller deployments or when more control over the migration process is needed, you can use Logstash.
Logstash Configuration
Create a file named logstash-migration.conf:
input {
elasticsearch {
hosts => ["source-elasticsearch-host:9200"]
index => "context-*" # Repeat for other indices
size => 5000
scroll => "5m"
docinfo => true
user => "elastic_user" # if authentication is enabled
password => "elastic_pass" # if authentication is enabled
}
}
output {
opensearch {
hosts => ["target-opensearch-host:9200"]
index => "%{[@metadata][_index]}"
document_id => "%{[@metadata][_id]}"
user => "opensearch_user" # if authentication is enabled
password => "opensearch_pass" # if authentication is enabled
}
}Running Logstash Migration
logstash -f logstash-migration.confPost-Migration Steps
-
Verify Data Integrity
# Check document counts curl -X GET "source-elasticsearch-host:9200/_cat/indices/context-*?v" curl -X GET "target-opensearch-host:9200/_cat/indices/context-*?v" -
Update Unomi Configuration
Edit
etc/custom.system.properties:# Comment out or remove Elasticsearch properties #org.apache.unomi.elasticsearch.addresses=localhost:9200 #org.apache.unomi.elasticsearch.cluster.name=contextElasticSearch # Add OpenSearch properties org.apache.unomi.opensearch.addresses=localhost:9200 org.apache.unomi.opensearch.cluster.name=contextOpenSearch org.apache.unomi.opensearch.sslEnable=false org.apache.unomi.opensearch.username=admin org.apache.unomi.opensearch.password=admin -
Restart Apache Unomi
./bin/stop ./bin/start
Troubleshooting
Common Issues
-
Connection Timeouts
-
Increase the timeout settings in your configuration
-
Check network connectivity between clusters
-
-
Memory Issues
-
Adjust JVM heap size for the migration tool
-
Consider reducing batch sizes
-
-
Missing Indices
-
Verify index patterns in configuration
-
Check source cluster health
-
Monitoring Progress
The OpenSearch Replication Tool provides progress information during migration:
-
Documents copied
-
Time elapsed
-
Current transfer rate
-
Estimated completion time
Best Practices
-
Testing
-
Always test the migration process in a non-production environment first
-
Verify all Unomi features work with migrated data
-
-
Performance
-
Run migration during off-peak hours
-
Monitor system resources during migration
-
Use appropriate batch sizes based on document size
-
-
Backup
-
Create backups of your Elasticsearch indices before migration
-
Keep source cluster running until verification is complete
-
-
Validation
-
Compare document counts between source and target
-
Verify index mappings and settings
-
Test Unomi functionality with migrated data
-
Support
For additional support:
-
OpenSearch Replication Tool: https://github.com/opensearch-project/opensearch-migrations
-
Apache Unomi Community: https://unomi.apache.org/community.html
-
OpenSearch Forum: https://forum.opensearch.org/
40.9. From version 2.x to 3.0
40.9.1. Migration Overview
Apache Unomi 3.0 is a major release that introduces several breaking changes. This document details the steps required to successfully migrate your environment from Apache Unomi 2.x to Apache Unomi 3.0.
40.9.2. Prerequisites
Before migrating to Apache Unomi 3.0, ensure you meet the following requirements:
Java Version Requirements
Apache Unomi 3.0 requires Java 17 or later. This is a breaking change from previous versions that supported Java 11.
-
Minimum Java Version: Java 17
-
Recommended: Java 17 LTS
-
Tested Versions: Java 17 (most tested), Java 21
Search Engine Compatibility
Apache Unomi 3.0 supports the following search engine versions:
-
Elasticsearch: Version 9.x (upgraded from 7.17.5)
-
OpenSearch: Version 3.x (new support)
|
Note
|
OpenSearch support is introduced in Apache Unomi 3.1. If you plan to use OpenSearch, first migrate to 3.0 and then follow the 3.0 → 3.1 migration guide. |
Karaf Version Upgrade
Apache Unomi 3.0 includes an upgrade of the underlying Karaf framework:
-
Previous Version: Karaf 4.2.15
-
New Version: Karaf 4.4.11
This upgrade brings improved stability and support for the latest dependencies.
40.9.3. Elasticsearch Client Upgrade
Apache Unomi 3.0 includes a major upgrade to the Elasticsearch client:
-
Previous: REST client (deprecated and no longer supported)
-
New: Official Elasticsearch Java client
This change provides: - Better performance and reliability - Full compatibility with Elasticsearch 9.x - Improved error handling and connection management - Future-proof client that follows Elasticsearch’s official client roadmap
The new client is automatically used when connecting to Elasticsearch - no configuration changes are required.
40.9.4. QueryBuilder ID Changes
In Apache Unomi 3.0, all queryBuilder IDs have been renamed to remove ElasticSearch-specific references and make them more generic. This change affects custom condition definitions that reference built-in query builders.
Impact on Custom Condition Definitions
If you have custom condition definitions that reference built-in query builders using the queryBuilderId parameter, you will need to update these references to use the new queryBuilder IDs.
QueryBuilder ID Mapping Table
The following table shows the mapping between old and new queryBuilder IDs:
| Condition Type | Old QueryBuilder ID | New QueryBuilder ID |
|---|---|---|
IDs Condition |
|
|
Geo Location by Point Session Condition |
|
|
Past Event Condition |
|
|
Boolean Condition |
|
|
Not Condition |
|
|
Match All Condition |
|
|
Property Condition |
|
|
Source Event Property Condition |
|
|
Nested Condition |
|
|
Migration Steps
-
Identify Custom Condition Definitions: Review your custom condition definitions to find any that reference the old queryBuilder IDs listed in the table above.
-
Update QueryBuilder References: Replace the old queryBuilder IDs with the new ones according to the mapping table.
-
Test Your Conditions: After updating the references, test your custom conditions to ensure they continue to work as expected.
Example Migration
Before (Apache Unomi 2.x):
{
"id": "customIdsCondition",
"name": "Custom IDs Condition",
"conditionType": "idsCondition",
"queryBuilderId": "idsConditionESQueryBuilder",
"parameters": [
{
"id": "ids",
"type": "string",
"multivalued": true
}
]
}After (Apache Unomi 3.0):
{
"id": "customIdsCondition",
"name": "Custom IDs Condition",
"conditionType": "idsCondition",
"queryBuilderId": "idsConditionQueryBuilder",
"parameters": [
{
"id": "ids",
"type": "string",
"multivalued": true
}
]
}Important Notes
-
This change affects both ElasticSearch and OpenSearch persistence implementations
-
The functionality of the query builders remains unchanged; only the IDs have been renamed
-
Built-in condition definitions provided by Apache Unomi have been automatically updated
-
If you are using only built-in conditions without custom queryBuilder references, no migration is required
Backward Compatibility
Apache Unomi 3.0 includes a configurable mapping system that provides backward compatibility for legacy queryBuilder IDs. This means that existing custom condition definitions using the old queryBuilder IDs will continue to work without modification.
The mapping system automatically translates legacy queryBuilder IDs to their new equivalents:
-
Automatic Translation: Legacy IDs are automatically mapped to new IDs at runtime
-
Optimized Performance: New queryBuilder IDs are checked first, legacy mapping lookup only occurs when needed
-
Warning System: Legacy ID usage triggers warning logs with specific condition type information
-
Deprecation Notices: Clear warnings indicate that legacy mappings are deprecated
Built-in Mappings: The legacy mappings for built-in queryBuilder IDs are provided as hardcoded defaults in the dispatcher implementations (for both Elasticsearch and OpenSearch). These defaults cannot be modified at runtime:
-
idsConditionESQueryBuilder→idsConditionQueryBuilder -
geoLocationByPointSessionConditionESQueryBuilder→geoLocationByPointSessionConditionQueryBuilder -
pastEventConditionESQueryBuilder→pastEventConditionQueryBuilder -
booleanConditionESQueryBuilder→booleanConditionQueryBuilder -
notConditionESQueryBuilder→notConditionQueryBuilder -
matchAllConditionESQueryBuilder→matchAllConditionQueryBuilder -
propertyConditionESQueryBuilder→propertyConditionQueryBuilder -
sourceEventPropertyConditionESQueryBuilder→sourceEventPropertyConditionQueryBuilder -
nestedConditionESQueryBuilder→nestedConditionQueryBuilder
For custom query builder implementations, migrate to the new naming convention and provide both Elasticsearch and OpenSearch implementations as documented in the plugin guide.
IMPORTANT WARNING FOR PLUGIN DEVELOPERS:
If you have custom query builder implementations, you should NOT rely on legacy mappings for your custom query builders. Instead, you should:
-
Rename your custom query builders to follow the new naming convention (remove "ES" references, use generic "QueryBuilder" suffix)
-
Provide separate implementations for Elasticsearch and OpenSearch:
-
Create separate bundles for Elasticsearch (
ConditionESQueryBuilder) and OpenSearch (ConditionOSQueryBuilder) implementations -
Use separate Karaf features for each implementation
-
Configure the appropriate feature in your start configuration based on the selected search engine
-
-
Update your condition type definitions to use the new query builder IDs
-
Use proper OSGi service registration to ensure your query builders are only active when the corresponding search engine is in use
This approach ensures: - Better maintainability: No dependency on legacy mapping system - Search engine compatibility: Proper support for both Elasticsearch and OpenSearch - Cleaner architecture: Separate concerns for different search engines - Future-proof: No risk of legacy mapping removal affecting your plugins
Warning System: When legacy queryBuilder IDs are used, Apache Unomi will log warning messages that include: - The legacy queryBuilder ID being used - The specific condition type that needs to be updated - The new queryBuilder ID that should be used - A deprecation notice indicating that legacy mappings may be removed in future versions
Example Warning Log:
WARN - DEPRECATED: Using legacy queryBuilderId 'idsConditionESQueryBuilder' for condition type 'customIdsCondition'.
Please update your condition definition to use the new queryBuilderId 'idsConditionQueryBuilder'.
Legacy mappings are deprecated and may be removed in future versions.Migration Strategy: While the mapping system provides backward compatibility, it is recommended to update your custom condition definitions to use the new queryBuilder IDs for better maintainability and to prepare for future versions where legacy support may be removed. The warning system will help you identify which condition definitions need to be updated.
40.9.5. Configuration Changes
OpenSearch Security Configuration
When using OpenSearch 3.x with Apache Unomi 3.1, security is enabled by default and requires specific configuration:
# OpenSearch security settings (required by default since OpenSearch 3)
org.apache.unomi.opensearch.ssl.enable=true
org.apache.unomi.opensearch.username=admin
org.apache.unomi.opensearch.password=${env:OPENSEARCH_INITIAL_ADMIN_PASSWORD:-admin}
org.apache.unomi.opensearch.sslTrustAllCertificates=trueImportant Notes:
- Security is enabled by default in OpenSearch 3.x
- The default admin username is 'admin'
- The initial admin password can be set via OPENSEARCH_INITIAL_ADMIN_PASSWORD environment variable
- SSL/TLS is required for OpenSearch connections
Docker Configuration Changes
When using Docker, you can specify the search engine backend using the distribution environment variable UNOMI_DISTRIBUTION.:
-
For Elasticsearch:
UNOMI_DISTRIBUTION=unomi-distribution-elasticsearch -
For OpenSearch:
UNOMI_DISTRIBUTION=unomi-distribution-opensearch -
For custom configurations:
UNOMI_DISTRIBUTION=your-custom-distribution-name
40.9.6. Elasticsearch to OpenSearch Migration
Apache Unomi 3.1 introduces official support for OpenSearch as an alternative to Elasticsearch. If you want to migrate from Elasticsearch to OpenSearch, you can use the dedicated migration guide located in the 3.0 → 3.1 migration section.
For detailed instructions on migrating your data from Elasticsearch to OpenSearch, please refer to the Elasticsearch to OpenSearch migration guide.
40.9.7. Migration Checklist
Before upgrading to Apache Unomi 3.0, complete the following checklist:
Pre-Migration Requirements
-
❏ Java 17+: Ensure Java 17 or later is installed and configured
-
❏ Search Engine: Upgrade Elasticsearch to version 9.x
-
❏ Backup: Create a complete backup of your current Apache Unomi 2.x installation and data
-
❏ Test Environment: Test the migration in a non-production environment first
Custom Configuration Review
-
❏ QueryBuilder IDs: Review and update any custom condition definitions that reference old queryBuilder IDs
-
❏ OpenSearch Security: If migrating to OpenSearch in 3.1, configure security settings as required
-
❏ Docker Configuration: Update Docker environment variables if using containerized deployment
Post-Migration Verification
-
❏ Functionality: Test all custom conditions and plugins
-
❏ Performance: Monitor system performance and adjust resources if needed
-
❏ Security: Verify security configurations are working correctly
-
❏ Data Integrity: Confirm all data has been migrated successfully
40.9.8. Other Breaking Changes
For information about other breaking changes in Apache Unomi 3.0, please refer to the What’s new section of the documentation.
40.9.9. Migrate from Elasticsearch 7 to Elasticsearch 9
You can use the remote reindex API to upgrade directly from Elasticsearch 7 to Elasticsearch 9. This approach runs both clusters in parallel and uses Elasticsearch’s remote reindex feature.
To execute the migration, you should have one Elasticsearch 7 running (your source) and one Elasticsearch 9 running (your target).
This upgrade relies on a script. If you are sharing the Elasticsearch instance with other projects, it might need to be adjusted.
The script migration_es7-es9.sh at the root of the project and handles: * Regular indices and rollover indices with their aliases * ILM policies migration * Data reindexing from ES7 to ES9 * Validation and comparison reporting
Prerequisites
-
bashshell -
jqcommand-line JSON processor -
curlfor HTTP requests -
Access to both ES7 (source) and ES9 (destination) clusters
-
ES9 must have
reindex.remote.whitelistconfigured (see configuration below) -
Ensure the machine where ES9 is running have access to the ES7 environment
Install jq if not already installed:
# macOS
brew install jq
# Linux
apt-get install jq
# or
yum install jqElasticsearch 9 Remote Reindex Configuration
Before running the script, you must configure the remote reindex whitelist on your ES9 cluster. Add this to your elasticsearch.yml configuration file:
reindex.remote.whitelist: "your-es7-host:9200"Script Configuration
The script uses environment variables for configuration. Export variables before running the script:
export ES7_HOST="http://your-es7-host:9200"
export ES7_USER="elastic"
export ES7_HOST_FROM_ES9="http://your-es7-host-viewed-from-es9:9200"
export ES7_PASSWORD="your-es7-password"
export ES9_HOST="http://your-es9-host:9200"
export ES9_USER="elastic"
export ES9_PASSWORD="your-es9-password"
export INDEX_PREFIX="context-"
export BATCH_SIZE="1000"Configuration Variables
| Variable | Description | Default |
|---|---|---|
ES7_HOST |
Elasticsearch 7 URL |
|
ES7_HOST_FROM_ES9 |
Elasticsearch 7 URL visible from Elasticsearch 9 |
(value of ES7_HOST) |
ES7_USER |
ES7 username |
elastic |
ES7_PASSWORD |
ES7 password |
password |
ES9_HOST |
Elasticsearch 9 URL |
|
ES9_USER |
ES9 username |
elastic |
ES9_PASSWORD |
ES9 password |
password |
INDEX_PREFIX |
Prefix for index names |
context- |
BATCH_SIZE |
Reindex batch size |
1000 |
40.9.10. Execution
Make the script executable and run it:
chmod +x migration_es7-es9.sh
./migration_es7-es9.shWhat the Script Does
-
Discovers indices matching the configured patterns on ES7
-
Collects source statistics (document count, size) for each index
-
Migrates ILM policies from ES7 to ES9 if they exist
-
Creates indices on ES9 with the same settings and mappings
-
Recreates aliases with proper write index flags for rollover indices
-
Reindexes data from ES7 to ES9 using the remote reindex API
-
Collects destination statistics after migration
-
Displays a comparison report showing document counts and any mismatches
Output
The script provides detailed logging with timestamps and a final comparison report:
========================================== MIGRATION COMPARISON REPORT ========================================== Index | Source Docs | Dest Docs | Difference | Status -----------------------------------------+----------------+----------------+----------------+----------- context-profile | 15420 | 15420 | +0 | ✓ OK context-session-000001 | 3420 | 3420 | +0 | ✓ OK ========================================== ✓ All indices migrated successfully! ==========================================
40.10. From version 1.6 to 2.0
40.11. Migration Overview
Apache Unomi 2.0 is a major release, and as such it does introduce breaking changes. This portion of the document detail the various steps we recommend following to successfully migrate your environment from Apache Unomi 1.6 to Apache Unomi 2.0.
There are two main steps in preparing your migration to Apache Unomi 2.0: - Updating applications consuming Unomi - Migrating your existing data
40.12. Updating applications consuming Unomi
Since Apache Unomi is an engine, you’ve probably built multiple applications consuming its APIs, you might also have built extensions directly running in Unomi.
As you begin updating applications consuming Apache Unomi, it is generally a good practice to enable debug mode. Doing so will display any errors when processing events (such as JSON Schema validations), and will provide useful indications towards solving issues.
40.12.1. Data Model changes
There has been changes to Unomi Data model, please make sure to review those in the What’s new section of the user manual.
40.12.2. Create JSON schemas
Once you updated your applications to align with Unomi 2 data model, the next step will be to create the necessary JSON Schemas.
Any event (and more generally, any object) received through Unomi public endpoints do require a valid JSON schema. Apache Unomi ships, out of the box, with all of the necessary JSON Schemas for its own operation as well as all event types generated from the Apache Unomi Web Tracker but you will need to create schemas for any custom event you may be using.
When creating your new schemas, there are multiple ways of testing them:
-
Using a the event validation API endpoint available at the URL :
/cxs/jsonSchema/validateEvent -
Using debug logs when sending events using the usual ways (using the
/context.jsonor/eventcollectorendpoints)
Note that in both cases it helps to activate the debug logs, that may be activated either:
-
Through the ssh Karaf console command :
log:set DEBUG org.apache.unomi.schema.impl.SchemaServiceImpl -
Using the UNOMI_LOGS_JSONSCHEMA_LEVEL=DEBUG environment variable and then restarting Apache Unomi. This is especially useful when using Docker Containers.
Once the debug logs are active, you will see detailed error messages if your events are not matched with any deployed JSON schema.
Note that it is currently not possible to modify or surcharge an existing system-deployed JSON schema via the REST API. It is however possible to deploy new schemas and manage them through the REST API on the /cxs/jsonSchema endpoint.
If you are currently using custom properties on an Apache Unomi-provided event type,
you will need to either change to use a new custom eventType and create the corresponding schema or to create a Unomi schema extension. You can find more details in the JSON Schema section of this documentation.
You can use, as a source of inspiration for creating new schemas, Apache Unomi 2.0 schema located at: extensions/json-schema/services/src/main/resources/META-INF/cxs/schemas.
Finally, and although it is technically feasible, we recommend against creating permissive JSON Schemas allowing any event payload. This requires making sure that you don’t allow undeclared properties by setting JSON schema keywords such as unevaluated properties to false.
40.13. Migrating your existing data
40.13.1. Elasticsearch version and capacity
While still using Unomi 1.6, the first step will be to upgrade your Elasticsearch to 7.17.5. Documentation is available on Elasticsearch’s website.
Your Elasticsearch cluster must have enough capacity to handle the migration. At a minimum, the required capacity storage capacity must be greater than the size of the dataset in production + the size of the largest index. Any other settings should at least be as big as the source setup (preferably higher).
40.13.2. Migrate custom data
Apache Unomi 2.0 knows how to migrate its own data from the new model to the old one, but it does not know how to migrate custom events you might be using in your environment.
It relies on a set of groovy scripts to perform its data migration, located in tools/shell-commands/src/main/resources/META-INF/cxs/migration, these scripts are sorted alphabetically and executed sequentially when migration is started. You can use these scripts as a source of inspiration for creating your own.
In most cases, migration steps consist of an Elasticsearch painless script that will handle the data changes.
Depending of the volume of data, migration can be lengthy. By paying attention to when re-indexation is happening (triggered in the groovy scripts by MigrationUtils.reIndex()),
you can find the most appropriate time for your scritps to be executed and avoid re-indexing the same indices multiple times.
For example if you wanted to update profiles with custom data (currently migrated by migrate-2.0.0-10-profileReindex.groovy), you could create a script in position "09" that would only contain painless scripts without a reindexing step.
The script in position "10" will introduce its own painless script, then trigger the re-indexation. This way you don’t have to re-index the same indices twice.
You can find existing painless scripts in tools/shell-commands/src/main/resources/requestBody/2.0.0
At runtime, and when starting the migration, Unomi 2.0 will take its own scripts, any additional scripts located in data/migration/scripts, will sort the resulting list alphabetically and execute each migration script sequentially.
40.13.3. Perform the migration
Checklist
Before starting the migration, please ensure that:
-
You do have a backup of your data
-
You did practice the migration in a staging environment, NEVER migrate a production environment without prior validation
-
You verified your applications were operational with Apache Unomi 2.0 (JSON schemas created, client applications updated, …)
-
You are running Elasticsearch 7.17.5 (or a later 7.x version)
-
Your Elasticsearch cluster has enough capacity to handle the migration
-
You are currently running Apache Unomi 1.6 (or a later 1.x version)
-
You will be using the same Apache Unomi instance for the entire migration progress. Do not start the migration on one node, and resume an interrupted migration on another node.
Migration process overview
The migration is performed by means of a dedicated Apache Unomi 2.0 node started in a particular migration mode.
In a nutshell, the migration process will consist in the following steps:
-
Shutdown your Apache Unomi 1.6 cluster
-
Start one Apache Unomi 2.0 node that will perform the migration (upon startup)
-
Wait for data migration to complete
-
Start your Apache Unomi 2.0 cluster
-
(optional) Import additional JSON Schemas
Each migration step maintains its execution state, meaning if a step fails you can fix the issue, and resume the migration from the failed step.
Configuration
The following environment variables are used for the migration:
| Environment Variable | Unomi Setting | Default |
|---|---|---|
UNOMI_ELASTICSEARCH_ADDRESSES |
org.apache.unomi.elasticsearch.addresses |
localhost:9200 |
UNOMI_ELASTICSEARCH_SSL_ENABLE |
org.apache.unomi.elasticsearch.sslEnable |
false |
UNOMI_ELASTICSEARCH_USERNAME |
org.apache.unomi.elasticsearch.username |
|
UNOMI_ELASTICSEARCH_PASSWORD |
org.apache.unomi.elasticsearch.password |
|
UNOMI_ELASTICSEARCH_SSL_TRUST_ALL_CERTIFICATES |
org.apache.unomi.elasticsearch.sslTrustAllCertificates |
false |
UNOMI_ELASTICSEARCH_INDEXPREFIX |
org.apache.unomi.elasticsearch.index.prefix |
context |
UNOMI_MIGRATION_RECOVER_FROM_HISTORY |
org.apache.unomi.migration.recoverFromHistory |
true |
If there is a need for advanced configuratiion, the configuration file used by Apache Unomi 2.0 is located in: etc/org.apache.unomi.migration.cfg
Migrate manually
You can migrate manually using the Karaf console.
After having started Apache Unomi 2.0 with the ./karaf command, you will be presented with the Karaf shell.
From there you have two options:
-
The necessary configuration variables (see above) have already been set, you can start the migration using the command:
unomi:migrate 1.6.0 -
Or, you want to provide the configuration settings interactively via the terminal, in that case you can start the migration in interactive mode using:
unomi:migrate 1.6.0
The parameter of the migrate command (1.6.0 in the example above) corresponds to the version you’re migrating from.
At the end of the migration, you can start Unomi 2.0 as usual using: unomi:start.
Migrate with Docker
The migration can also be performed using Docker images, the migration itself can be started by passing a specific value to the KARAF_OPTS environment variable.
In the context of this migration guide, we will asssume that:
-
Custom migration scripts are located in
/home/unomi/migration/scripts/ -
Painless scripts, or more generally any migration assets are located in
/home/unomi/migration/assets/, these scripts will be mounted under/tmp/assets/inside the Docker container.
docker run \
-e UNOMI_ELASTICSEARCH_ADDRESSES=localhost:9200 \
-e KARAF_OPTS="-Dunomi.autoMigrate=1.6.0" \
--v /home/unomi/migration/scripts/:/opt/apache-unomi/data/migration/scripts \
--v /home/unomi/migration/assets/:/tmp/assets/ \
apache/unomi:2.0.0You might need to provide additional variables (see table above) depending of your environment.
If the migration fails, you can simply restart this command.
Using the above command, Unomi 2.0 will not start automatically at the end of the migration. You can start Unomi automatically at the end of the migration by passing: -e KARAF_OPTS="-Dunomi.autoMigrate=1.6.0 -Dunomi.autoStart=true".
Step by step migration with Docker
Once your cluster is shutdown, performing the migration will be as simple as starting a dedicated docker container.
Post Migration
Once the migration has been executed, you will be able to start Apache Unomi 2.0
Remember you still need to submit JSON schemas corresponding to your events, you can do so using the API.
40.14. From version 1.5 to 1.6
Migration from Unomi 1.5x to 1.6x does not require any particular steps, simply restart your cluster in the new version.
40.15. From version 1.4 to 1.5
40.15.1. Migration from Apache Unomi 1.4 to 1.5
Data model and ElasticSearch 7
Since Apache Unomi version 1.5.0 we decided to upgrade the supported ElasticSearch version to the 7.4.2.
To be able to do so, we had to rework the way the data was stored inside ElasticSearch.
Previously every items was stored inside the same ElasticSearch index but this is not allowed anymore in recent ElasticSearch versions.
Since Apache Unomi version 1.5.0 every type of items (see section: Items) is now stored in a dedicated separated index.
API changes
To be able to handle the multiple indices the Persistence API implementation (ElasticSearchPersistenceServiceImpl) have been adapted and simplified.
The good news is that there is no API changes, the persistence API interface didn’t changed.
Any custom Apache Unomi plugins or extensions should continue to work on Apache Unomi 1.5.0.
The only notable changes are located at the ElasticSearchPersistenceServiceImpl Java class. This class should not be use directly, instead you should use OSGI service dependency injection using the interface PersistenceService.
But if you are interested in the implementation changes:
-
The property
index.namehave been renamed toindex.prefix. Previously used for the single one index name, now every index is prefixed using this property. (context-by default) -
We removed the property
index.namesoriginally used to create additional indices (used by the geonames DB for exemple). This property is not needed anymore because the index is automatically created by the peristence service when the mapping configuration is loaded. Example of mapping configuration file: (geoname index mapping)
Because of this changes the geonames DB index name is now respecting the index naming with prefix like any other item type.
Previously named: geonames is now using the index name context-geonameentry
(see: Documentation about geonames extension).
Migration steps
In order to migrate the data from ElasticSearch 5 to 7, Unomi provides a migration tool that is directly integrated.
In this migration the following is assumed:
-
the ElasticSearch 5 cluster installation is referred to as the
source -
the ElasticSearch 7 cluster installation is referred to as the
target -
the Unomi 1.4 cluster installation is completely stopped
-
the Unomi 1.5 cluster installation has never been started (just uncompressed)
-
the Unomi 1.5 cluster installation has been configured to connect to the
target(ElasticSearch 7) cluster
It is HIGHLY RECOMMENDED to perform a full cluster backup/snapshot of the source clusters (including ElasticSearch and
Unomi clusters), and ideally to perform the migration on a restored snapshot of the source cluster. For more information
on ElasticSearch 5 snapshots and restore you can find it here:
https://www.elastic.co/guide/en/elasticsearch/reference/5.6/modules-snapshots.html
The way the migration works is that both ElasticSearch 5 AND an ElasticSearch 7 clusters (or just single nodes) will
be started at the same time, and data will be migrated from the ES 5 to the ES 7 cluster. Note that it is possible to use
a single node for both the source and the target clusters to - for example - perform the migration on a single
machine. If you choose to do that you will have to adjust port numbers on either the source or target cluster node.
Changing ports requires a restart of the ES cluster you are modifying. In this example we will illustrate how to migrate
by modifying the source cluster node ports.
So in the source 's ElasticSearch 5 config/elasticsearch.yml file we have modified the default ports to:
transport.tcp.port: 9310 http.port: 9210
Make SURE you change the ports out of the default 9200-9205 and 9300-9305 range (or whatever your cluster uses) otherwise both clusters will attempt to merge!
On the target ElasticSearch 7 cluster configuration you will need to add the following setting in the config/elasticsearch.yml:
reindex.remote.whitelist: "localhost:9210"
Replace "localhost:9210" which whatever location your source cluster is available at. Restart or start your
target ElasticSearch 7 cluster.
Important: Make sure you haven’t started Apache Unomi before (using the unomi:start command or the autostart command
line parameter) otherwise you will need to restart your Apache Unomi installation from scratch. The best way to be sure
of that is to start a new Unomi install by uncompressing the archive and not launching it.
You can then start both instances of ElasticSearch 5 and ElasticSearch 7 and finally start Apache Unomi using:
./karaf
Once in the console launch the migration using the following command:
migrate 1.4.0
Note: the 1.4.0 version is the starting version. If you are starting from a different version (for example a fork), make sure that you know what official version of Apache Unomi it corresponds to and you can use the official version number as a start version for the migration.
Follow the instructions and answer the prompts. If you used the above configuration as an example you can simply use the default values.
Be careful because the first address that the tool will ask for is the target (ElasticSearch 7) cluster, not the
ES 5 one.
Note that it is also possible to change the index prefix to be different from the default context value
so that you could host multiple Apache Unomi instances on the same ElasticSearch cluster.
Important note: only the data that Apache Unomi manages will be migrated. If you have any other data (for example Kibana or ElasticSearch monitoring indices) they will not be migrated by this migration tool.
Once the migration has completed, you can start the new Unomi instance using:
unomi:start
You should then validate that all the data has been properly migrated. For example you could issue a command to list the profiles:
profile-list
40.16. Important changes in public servlets since version 1.5.5 and 2.0.0
What used to be dedicated servlets are now part of the REST endpoints. Prior to version 1.5.5 the following servlets were used:
-
/context.js /context.json
-
/eventcollector
-
/client
In version 2.0.0 and 1.5.5 and later you have to use the new cxs REST endpoints:
-
/cxs/context.js /cxs/context.json
-
/cxs/eventcollector
-
/cxs/client
The old servlets have been deprecated and will be removed in a future major version, so make sure to update your client applications.
41. Conditions
41.1. Conditions guide
Conditions are the building blocks of segmentation, personalization, rules, queries, campaigns, and goals in Apache Unomi. This guide walks from simple property checks to advanced behavioral conditions with diagrams and REST examples.
See also:
-
Built-in condition types — full catalog
-
Condition validation — save-time checks and parameter rules
-
Condition evaluation system — runtime architecture
-
Past event conditions — deep dive on behavioral conditions
-
Queries and aggregations — using conditions in search APIs
-
Debugging conditions — tracing and troubleshooting
41.1.1. Concepts
-
Condition type — a reusable definition (JSON descriptor) registered at startup, for example
profilePropertyCondition. -
Condition instance — a JSON object with
typeandparameterValuesused in segments, rules, or queries. -
Evaluation context — profile, session, and/or current event, depending on where the condition runs.
41.1.2. Condition instance JSON shape
Every condition instance uses the same structure:
{
"type": "CONDITION_TYPE_ID",
"parameterValues": {
"parameterName": "value"
}
}Nested conditions use the Condition parameter type (for example subConditions on booleanCondition).
41.1.3. Comparison operators
Property conditions (profilePropertyCondition, sessionPropertyCondition, eventPropertyCondition) accept a comparisonOperator parameter.
Common values include:
equals, notEquals, lessThan, greaterThan, lessThanOrEqualTo, greaterThanOrEqualTo, between, exists, missing, contains, notContains, startsWith, endsWith, matchesRegex, in, notIn, all, hasSomeOf, hasNoneOf, isDay, isNotDay, distance.
Use the typed value parameter that matches your data (propertyValue, propertyValueInteger, propertyValues, and so on).
41.1.4. Level 1 — Profile property check
Match profiles where a property equals a value. Used in segments and query counts.
{
"type": "profilePropertyCondition",
"parameterValues": {
"propertyName": "properties.country",
"comparisonOperator": "equals",
"propertyValue": "US"
}
}Test with the query count API:
curl -X POST http://localhost:8181/cxs/query/profile/count \
--user "TENANT_ID:PRIVATE_KEY" \
-H "Content-Type: application/json" \
-d '{
"type": "profilePropertyCondition",
"parameterValues": {
"propertyName": "properties.country",
"comparisonOperator": "equals",
"propertyValue": "US"
}
}'41.1.5. Level 2 — Event type in a rule
Rules evaluate event conditions against the incoming event. eventTypeCondition is a shortcut over eventPropertyCondition on eventType.
{
"type": "eventTypeCondition",
"parameterValues": {
"eventTypeId": "view"
}
}Use this in a rule condition to fire when a view event arrives.
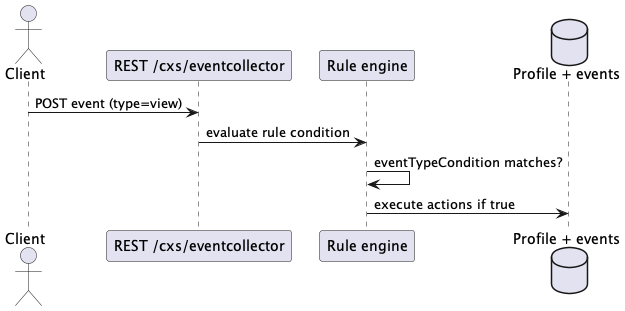
41.1.6. Level 3 — Boolean AND / OR
Combine conditions with booleanCondition. This is the main way to build segment definitions.
{
"type": "booleanCondition",
"parameterValues": {
"operator": "and",
"subConditions": [
{
"type": "profilePropertyCondition",
"parameterValues": {
"propertyName": "properties.nbOfVisits",
"comparisonOperator": "greaterThan",
"propertyValueInteger": 1
}
},
{
"type": "profilePropertyCondition",
"parameterValues": {
"propertyName": "properties.country",
"comparisonOperator": "equals",
"propertyValue": "US"
}
}
]
}
}Negate a sub-condition with notCondition:
{
"type": "notCondition",
"parameterValues": {
"subCondition": {
"type": "profileSegmentCondition",
"parameterValues": {
"segments": ["opt-out-segment"],
"matchType": "in"
}
}
}
}41.1.7. Level 4 — Segment membership and session properties
profileSegmentCondition checks whether a profile belongs to other segments (useful for segment hierarchies).
{
"type": "profileSegmentCondition",
"parameterValues": {
"segments": ["high-value-customers"],
"matchType": "in"
}
}sessionPropertyCondition evaluates session-scoped properties during event processing:
{
"type": "sessionPropertyCondition",
"parameterValues": {
"propertyName": "properties.referringCampaign",
"comparisonOperator": "exists"
}
}41.1.8. Level 5 — Past events (behavioral)
pastEventCondition checks whether events occurred in a time window. See Past event conditions for caching, auto-rules, and performance notes.
{
"type": "pastEventCondition",
"parameterValues": {
"numberOfDays": 30,
"operator": "eventsOccurred",
"minimumEventCount": 3,
"eventCondition": {
"type": "eventTypeCondition",
"parameterValues": {
"eventTypeId": "purchase"
}
}
}
}41.1.9. Level 6 — Scoring, geo, and nested data
Scoring — compare a profile score from a scoring plan:
{
"type": "scoringCondition",
"parameterValues": {
"scoringPlanId": "engagement",
"comparisonOperator": "greaterThan",
"scoreValue": 50
}
}Geo (session) — geoLocationSessionCondition filters on country/region/city; geoLocationByPointSessionCondition uses map coordinates.
Nested properties — nestedCondition evaluates a sub-condition on a nested path (for example list items inside profile properties).
41.1.10. Using conditions in segments and rules
Segments store a condition on the segment definition. Rules store a condition that is evaluated for each incoming event.
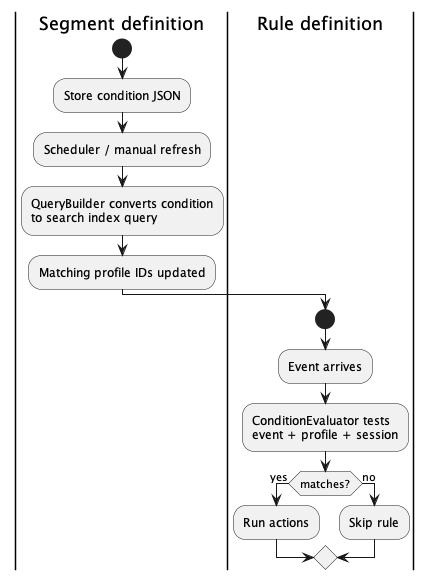
41.1.11. Testing conditions
Query count — verify how many profiles match (see Level 1 example).
Segment membership — after creating a segment with your condition, test a profile:
curl -X GET "http://localhost:8181/cxs/segments/SEGMENT_ID/match/PROFILE_ID" \
--user "TENANT_ID:PRIVATE_KEY"41.1.12. Discovering available condition types
List registered condition types (admin or tenant private key):
curl -X GET http://localhost:8181/cxs/definitions/conditions \
--user "TENANT_ID:PRIVATE_KEY"Each entry includes parameter definitions, evaluators, and query builder IDs (Unomi 3.0+ uses engine-neutral *QueryBuilder names).
41.1.13. Custom condition types
To add new condition types, implement a ConditionEvaluator and search-engine-specific query builders. See Writing plugins and plugin registration example.
Add validation metadata on parameters so invalid instances are rejected at save time — see Condition validation.
41.1.14. Debugging conditions
When a segment or rule does not behave as expected, use these approaches in order.
Test segment membership
Check whether a specific profile matches a segment condition:
curl -X GET "http://localhost:8181/cxs/segments/SEGMENT_ID/match/PROFILE_ID" \
--user "TENANT_ID:PRIVATE_KEY"Count matching profiles
Use a query with your condition and read the total hit count (see Level 1 in this guide).
Request tracing with explain
For runtime debugging — which rules fired, which conditions matched, how long each step took — add explain=true to context or event-collector requests.
You need an ADMINISTRATOR or TENANT_ADMINISTRATOR role.
curl -X POST "http://localhost:8181/cxs/context.json?sessionId=1234&explain=true" \
-H "X-Unomi-Api-Key: YOUR_PUBLIC_API_KEY" \
-H "Content-Type: application/json" \
-d @- <<'EOF'
{
"source": { "itemId": "homepage", "itemType": "page", "scope": "mydigital" },
"requireSegments": true
}
EOFThe response includes a requestTracing tree with nodes such as condition-evaluation, rule-evaluation, and event-validation.
Validation steps during processing appear as condition-validation or rule-condition-validation children.
Full documentation, sample trace JSON, and sequence diagrams:
|
Tip
|
Use explain only when debugging. It adds overhead and exposes internal processing detail to admin users. |
Fix save-time validation errors
If creating or updating a segment or rule fails with Invalid … condition, the condition JSON does not match its type definition.
Read the error list in the response, fix the parameter values, and retry.
Common causes:
-
Missing
requiredparameter -
Wrong value type (string instead of integer)
-
Two parameters set in the same
exclusiveGroup -
Nested condition missing a required tag (for example
eventConditioninsidepastEventCondition)
See Condition validation for the full rule set and plugin author guide.
41.2. Condition validation
Apache Unomi validates condition instances against their condition type definitions when you save segments, rules, queries, goals, and related items. This catches missing parameters, wrong value types, and invalid nested conditions before they reach runtime evaluation.
|
Note
|
This is separate from JSON Schema event validation. JSON schemas validate incoming events on public endpoints. Condition validation checks the structure of condition JSON used in segments, rules, and queries. |
See also:
-
Conditions guide — hands-on introduction
-
Built-in condition types — descriptor format and catalog
-
Request tracing with explain — see validation results in trace output
41.2.1. When validation runs
Validation runs on the server when a condition is saved or resolved, not on every profile lookup or event.
Typical entry points:
-
Segments — saving or updating a segment condition (
SegmentServiceImpl) -
Rules — saving or updating a rule condition (
RulesServiceImpl) -
Queries — saving queries used in profiles, events, goals, and campaigns
-
Goals — start and target event conditions
-
Condition type resolution — when
DefinitionsServiceresolves a condition tree (deprecated path still used in some flows)
There is no standalone REST endpoint such as /cxs/conditions/validate.
To test a condition, save it on a segment or rule and read the error response, or use debugging with explain when the condition is evaluated at runtime.
41.2.2. Validation metadata on condition types
Each parameter in a condition type descriptor can include a validation object.
The base plugin ships examples in plugins/baseplugin/src/main/resources/META-INF/cxs/conditions/*.json.
Supported fields:
| Field | Purpose | Example use |
|---|---|---|
|
Parameter must have a literal value at save time |
|
|
Parameter is optional but advised; produces a warning, not a blocking error |
|
|
String value must be one of the listed values |
|
|
Only one parameter in the group may have a value |
|
|
Nested condition must carry at least one of these system tags |
|
|
Nested condition type ID must not be in this list |
Restrict which sub-conditions a composite type accepts |
Example from pastEventCondition:
{
"id": "eventCondition",
"type": "Condition",
"validation": {
"required": true,
"allowedConditionTags": ["eventCondition"]
}
}Example of mutually exclusive value parameters from profilePropertyCondition:
{
"id": "propertyValue",
"type": "string",
"validation": {
"exclusive": true,
"exclusiveGroup": "propertyValue"
}
},
{
"id": "propertyValueInteger",
"type": "integer",
"validation": {
"exclusive": true,
"exclusiveGroup": "propertyValue"
}
}41.2.3. Parameter type checks
Before rule-specific checks, the validation service verifies that each literal value matches the parameter type and multivalued flag.
Built-in type validators cover:
-
string,integer,long,float,double,boolean,date -
condition— nested condition instances (validated recursively) -
comparisonOperator— custom validator for comparison operators
Plugins can register additional ValueTypeValidator OSGi services for custom parameter types.
41.2.4. Contextual parameters (partial validation)
Parameters whose values start with parameter:: or script:: are resolved at evaluation time, not at save time.
The validation service skips most checks on these values because the final value is unknown when the item is saved.
Exceptions:
-
A required parameter that uses a contextual reference still produces a warning (
MISSING_RECOMMENDED_PARAMETER) advising that static validation was skipped. -
Nested conditions inside contextual values are not validated until runtime.
This lets rules and segments use dynamic values while still validating fully literal condition trees.
41.2.5. Error types
Validation returns a list of ValidationError objects.
Each error has a type, a human-readable message, the parameterName, and optional context (location, allowed values, actual value).
| Type | Meaning | Blocks save? |
|---|---|---|
|
Required parameter is absent or an empty collection |
Yes |
|
Value has wrong type, shape, or is not in |
Yes |
|
Unknown condition type, or nested condition fails tag/type rules |
Yes |
|
More than one parameter in an exclusive group has a value |
Yes |
|
Recommended parameter is missing, or required parameter uses a contextual reference |
No (logged as warning) |
41.2.6. Save-time behavior
On save, services separate errors from warnings:
-
Errors — any type except
MISSING_RECOMMENDED_PARAMETER— cause the save to fail with anIllegalArgumentExceptionor domain-specific exception (for exampleBadSegmentConditionExceptionfor segments). -
Warnings —
MISSING_RECOMMENDED_PARAMETERonly — are written to the server log but do not block the save.
Example error message when saving a segment with a missing required parameter:
Invalid segment condition:
- Required parameter is missing (parameter: propertyName, condition: profilePropertyCondition, location: condition[profilePropertyCondition].propertyName)REST clients receive this text in the error response body when the save fails.
41.2.7. Rules and invalid conditions
By default, a rule with validation errors cannot be saved.
During bundle deployment or when a rule references a missing plugin, Unomi may save the rule with allowInvalidRules semantics: validation errors are logged and the rule is marked invalid instead of rejected.
This supports gradual plugin rollout without blocking server startup.
41.2.8. Validation in request tracing
When explain=true is set on context or event-collector requests, validation steps appear in the requestTracing tree.
Look for operation types such as:
-
condition-validation— validation during condition type resolution -
segment-condition-validation— segment save path (when triggered in that flow) -
rule-condition-validation— rule condition checks
Trace nodes include validation messages and whether validation passed. See Using the explain parameter for request tracing for full examples.
41.2.9. Adding validation to custom condition types
When you define a new condition type in a plugin:
-
Declare parameters with correct
typeandmultivaluedflags. -
Add a
validationblock on parameters that need constraints. -
Use
allowedConditionTagson nestedConditionparameters to restrict which sub-types users can pick. -
Use
exclusive/exclusiveGroupwhen several parameters represent alternative value shapes (string vs integer vs date). -
Register a custom
ValueTypeValidatorOSGi service if you introduce a new parameter type ID.
Condition type descriptors are loaded at startup. After deployment, list types to confirm your validation metadata is present:
curl -X GET http://localhost:8181/cxs/definitions/conditions \
--user "TENANT_ID:PRIVATE_KEY"Each condition type entry in the response includes parameter definitions with their validation objects, which UIs and integrators can use to guide authors before save.
41.2.10. Relation to JSON Schema validation
| Condition validation | JSON Schema validation | |
|---|---|---|
What is validated |
Condition instances in segments, rules, queries |
Event payloads on |
When |
Save time (server-side) |
Request time (public endpoints) |
Defined in |
Condition type JSON descriptors ( |
JSON schema definitions ( |
REST test endpoint |
None (save the parent item instead) |
|
Both systems can appear in the same explain=true trace: event schema validation under event-validation, condition checks under condition-evaluation or condition-validation.
41.3. Condition Evaluation System
For examples and progressive tutorials, see Conditions guide.
The condition evaluation system in Apache Unomi provides flexible and efficient evaluation of conditions across different storage backends.
41.3.1. Architecture Overview
41.4. Condition Evaluation Architecture
41.4.1. Key Components
-
ConditionDispatcher
-
Routes conditions to appropriate evaluators
-
Determines evaluation strategy (direct vs query-based)
-
Handles caching and optimization
-
-
ConditionEvaluator
-
Performs direct condition evaluation
-
Handles boolean logic and property comparisons
-
Evaluates nested conditions
-
-
QueryBuilders
-
Convert conditions to search engine queries
-
Handle search engine specific syntax
-
Optimize query performance
-
41.4.2. Evaluation Strategies
-
Direct Evaluation
-
Used for simple conditions
-
Evaluates against in-memory data
-
No storage queries required
-
Fastest evaluation path
-
-
Query-Based Evaluation
-
Used for complex conditions
-
Converts conditions to storage queries
-
Supports different search engines
-
Handles large data sets efficiently
-
41.4.3. Query Builder Implementation
Query builders provide storage-specific implementations:
-
ElasticSearch Implementation
-
Optimized for ES query syntax
-
Handles ES-specific mappings
-
Supports ES versioning
-
-
OpenSearch Implementation
-
Compatible with OS API
-
Maintains OS-specific features
-
Handles OS security model
-
41.4.4. Best Practices
-
Performance Optimization
-
Use direct evaluation when possible
-
Leverage caching for frequent queries
-
Consider query complexity impact
-
-
Implementation Guidelines
-
Implement storage-specific query builders
-
Handle version compatibility
-
Consider security implications
-
41.5. Past Event Conditions in Apache Unomi
41.5.1. Introduction
Past event conditions are a powerful feature in Apache Unomi that allows both segments and rules to be defined based on events that occurred within a specific time window. This document explains how past event conditions work, their different usage patterns, and performance implications.
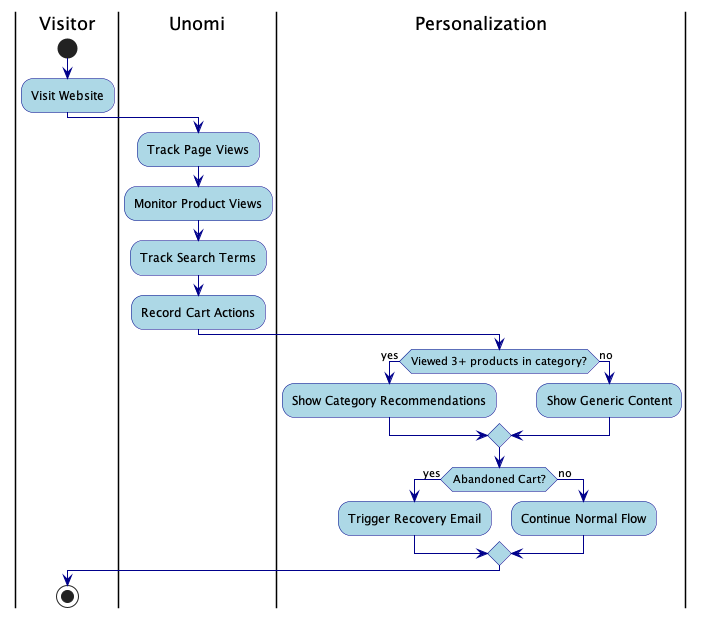
{
"metadata": {
"id": "electronics_enthusiast",
"name": "Electronics Category Interest"
},
"condition": {
"type": "pastEventCondition",
"parameterValues": {
"eventType": "view",
"numberOfDays": 30,
"minimumCount": 3,
"propertyConditions": {
"type": "propertyCondition",
"parameterValues": {
"propertyName": "target.properties.category",
"comparisonOperator": "equals",
"propertyValue": "electronics"
}
}
}
}
}Common website scenarios include:
-
Shopping Cart Abandonment
-
Track cart additions and checkout starts
-
Identify abandoned carts after time threshold
-
Trigger recovery campaigns
-
-
Content Engagement
-
Monitor article views and time spent
-
Track topic interests
-
Personalize content recommendations
-
{
"type": "pastEventCondition",
"parameterValues": {
"eventType": "articleView",
"numberOfDays": 30,
"minimumCount": 5,
"propertyConditions": {
"type": "propertyCondition",
"parameterValues": {
"propertyName": "topic",
"comparisonOperator": "equals",
"propertyValue": "technology"
}
}
}
}41.6. Mobile Application Engagement
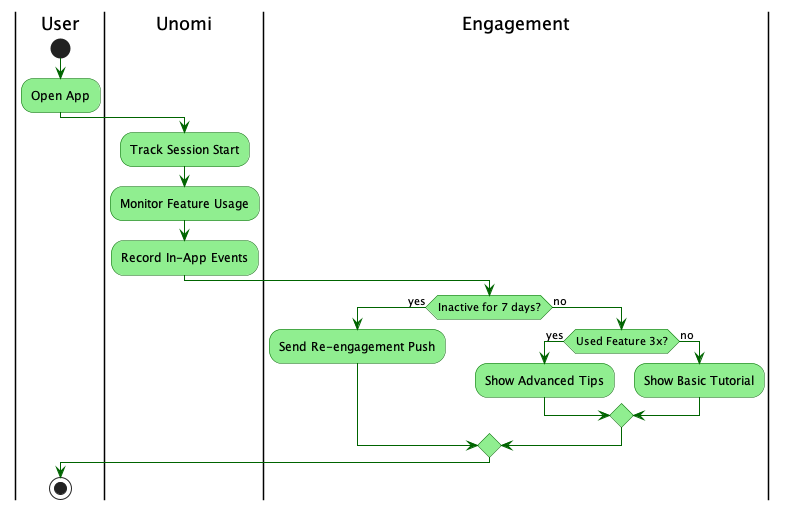
Common mobile scenarios include:
-
User Activation
-
Track feature discovery and usage
-
Identify activation milestones
-
Guide user onboarding
-
-
Retention Campaigns
-
Monitor app opens and session frequency
-
Detect usage patterns
-
Trigger re-engagement actions
-
{
"type": "pastEventCondition",
"parameterValues": {
"eventType": "featureUsed",
"numberOfDays": 7,
"minimumCount": 3,
"propertyConditions": {
"type": "propertyCondition",
"parameterValues": {
"propertyName": "featureId",
"comparisonOperator": "equals",
"propertyValue": "core_feature"
}
}
}
}{
"type": "pastEventCondition",
"parameterValues": {
"eventType": "appOpen",
"numberOfDays": 7,
"maximumCount": 0,
"operator": "eventsNotOccurred"
}
}41.7. Customer Data Platform (CDP) Integration
Common CDP scenarios include:
-
Cross-Channel Customer Journey
-
Track interactions across touchpoints
-
Build unified customer view
-
Trigger omnichannel campaigns
-
-
Customer Support Optimization
-
Monitor support interactions
-
Track issue resolution
-
Identify high-value customers
-
{
"type": "booleanCondition",
"parameterValues": {
"operator": "and",
"subConditions": [
{
"type": "pastEventCondition",
"parameterValues": {
"eventType": "websiteView",
"numberOfDays": 30,
"minimumCount": 1
}
},
{
"type": "pastEventCondition",
"parameterValues": {
"eventType": "mobileAppOpen",
"numberOfDays": 30,
"minimumCount": 1
}
}
]
}
}{
"type": "pastEventCondition",
"parameterValues": {
"eventType": "supportTicket",
"numberOfDays": 90,
"minimumCount": 3,
"propertyConditions": {
"type": "propertyCondition",
"parameterValues": {
"propertyName": "priority",
"comparisonOperator": "equals",
"propertyValue": "high"
}
}
}
}41.8. B2B Use Cases
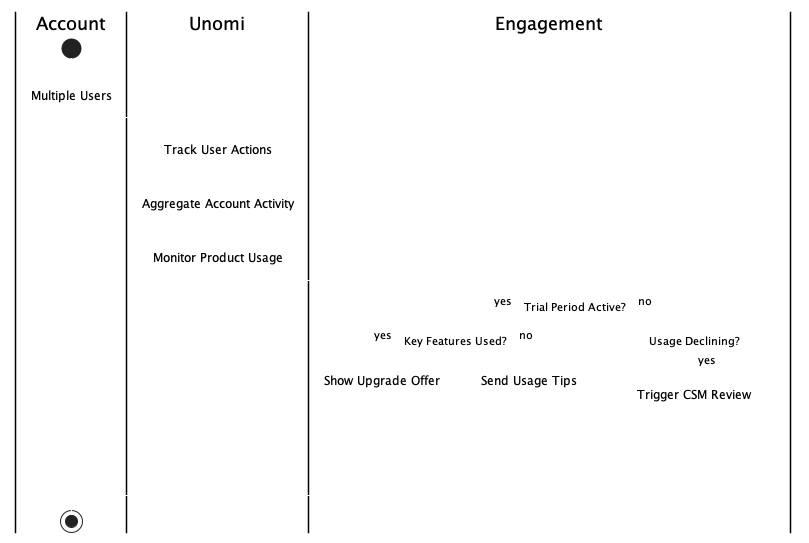
Common B2B scenarios include:
-
Account Health Monitoring
-
Track usage across account users
-
Monitor feature adoption
-
Predict churn risk
-
-
Product Adoption Tracking
-
Monitor feature usage frequency
-
Track user onboarding progress
-
Identify power users
-
{
"type": "pastEventCondition",
"parameterValues": {
"eventType": "login",
"numberOfDays": 30,
"maximumCount": 5,
"propertyConditions": {
"type": "propertyCondition",
"parameterValues": {
"propertyName": "accountId",
"comparisonOperator": "exists"
}
}
}
}{
"type": "pastEventCondition",
"parameterValues": {
"eventType": "featureUsed",
"numberOfDays": 30,
"minimumCount": 10,
"propertyConditions": {
"type": "propertyCondition",
"parameterValues": {
"propertyName": "featureTier",
"comparisonOperator": "equals",
"propertyValue": "premium"
}
}
}
}42. Architecture Overview
42.1. Query Strategy Selection
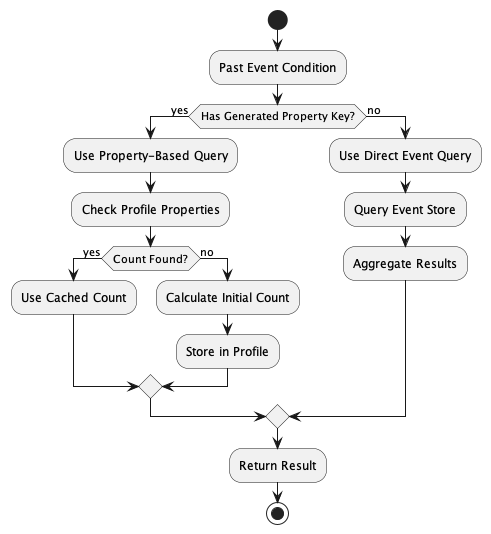
42.1.1. Performance Implications
-
Property-Based Evaluation
-
Uses cached counts from profile properties
-
Minimal query overhead
-
Suitable for high-frequency conditions
-
Recommended for segments
-
-
Direct Query Evaluation
-
Queries event store directly
-
Higher latency and resource usage
-
No caching mechanism
-
Use with caution in rules
-
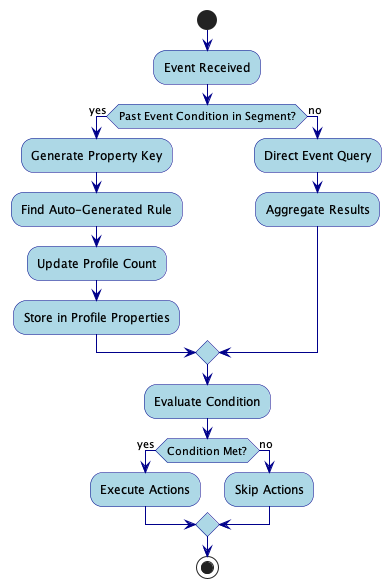
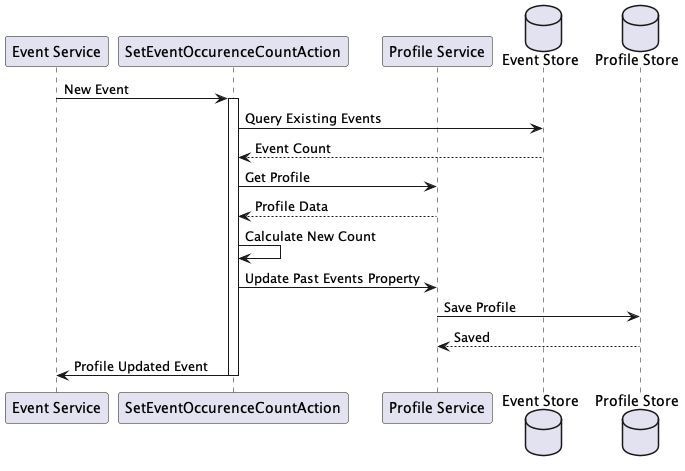
47. Usage Patterns
47.1. In Segments
When used in segments, past event conditions automatically generate optimization rules that maintain cached event counts on profiles. This is the recommended approach for optimal performance.
{
"metadata": {
"id": "activeUsers",
"name": "Active Users",
"scope": "systemscope"
},
"condition": {
"type": "pastEventCondition",
"parameterValues": {
"eventType": "view",
"numberOfDays": 30,
"minimumCount": 10
}
}
}When this segment is created: 1. The system generates a unique property key for the condition 2. An auto-generated rule is created to maintain event counts 3. Initial profile counts are calculated and stored 4. Subsequent events update the cached counts in real-time
47.2. In Rules
Past event conditions can also be used directly in rules, but with important performance considerations:
{
"metadata": {
"id": "directPastEventRule",
"name": "Direct Past Event Rule"
},
"condition": {
"type": "pastEventCondition",
"parameterValues": {
"eventType": "purchase",
"numberOfDays": 7,
"minimumCount": 1
}
},
"actions": [
{
"type": "sendEventAction",
"parameterValues": {
"eventType": "directRuleTriggered"
}
}
]
}Performance Implications: 1. No automatic optimization rules are generated 2. Each evaluation requires a direct query to the event store 3. No caching of event counts occurs 4. Higher latency and resource usage 5. Not recommended for high-frequency conditions
48. Auto-Generated Rules
The system automatically generates rules for past event conditions through SegmentServiceImpl:
-
Rule Creation
-
Generated when segments with past event conditions are created/updated
-
Uses
evaluateProfileSegments.jsontemplate -
Includes
EvaluateProfileSegmentsActionfor segment membership updates
-
-
Rule Structure
{
"metadata": {
"id": "evaluateProfileSegments",
"name": "Evaluate segments",
"description": "Evaluate segments when a profile is modified",
"readOnly": true
},
"condition": {
"type": "profileUpdatedEventCondition"
},
"actions": [
{
"type": "evaluateProfileSegmentsAction"
}
]
}
+ 3. Profile Storage Format
{
"properties": {
"pastEvents": {
"past_event_count_abc123_30d_v1": {
"count": 15,
"lastUpdated": "2024-03-15T10:30:00Z"
}
}
}
}49. Core Components
The past event condition system consists of four main components:
-
SetEventOccurenceCountAction- Handles real-time event processing and updates profile event counts -
PastEventConditionEvaluator- Manages condition evaluation with optimized caching -
pastEventConditionQueryBuilder- Constructs optimized search index queries -
SegmentServiceImpl- Manages segments and auto-generated rules
50. Condition Parameters
Past event conditions support the following parameters as defined in pastEventCondition.json:
-
Time Window Parameters
-
numberOfDays(integer) - Rolling window of N days from current time -
fromDate(date) - Explicit start date for the time window -
toDate(date) - Explicit end date for the time window
-
-
Count Parameters
-
minimumEventCount(integer) - Minimum number of events required -
maximumEventCount(integer) - Maximum number of events allowed -
operator(string) - Either "eventsOccurred" or "eventsNotOccurred"
-
-
Event Filter
-
eventCondition(Condition) - The condition defining which events to count
-
|
Important
|
The If you need to combine multiple event conditions, you have two options:
This pattern works because the condition type system is hierarchical - a condition type can define a |
51. Event Processing System
51.1. Real-Time Event Processing
When an event occurs in Unomi, the SetEventOccurenceCountAction processes it in real-time through the following steps:
-
Extracts the past event condition from the action parameters
-
Builds a compound condition for event matching that includes:
-
The original event condition
-
Time window constraints
-
Profile filters
-
-
Queries existing matching events using optimized search index queries
-
Updates the profile’s past event count in system properties
-
Triggers profile update events if configured
The action is defined in setEventOccurenceCountAction.json with the following metadata:
{
"metadata": {
"id": "setEventOccurenceCountAction",
"systemTags": [
"profileTags",
"demographic"
]
}
}51.2. Time Window Processing
The SetEventOccurenceCountAction implements time window processing using the following logic:
private boolean inTimeRange(LocalDateTime eventTime, Integer numberOfDays,
LocalDateTime fromDate, LocalDateTime toDate) {
boolean inTimeRange = true;
if (numberOfDays != null) {
LocalDateTime now = LocalDateTime.now(ZoneId.of("UTC"));
if (eventTime.isAfter(now)) {
inTimeRange = false;
}
long daysDiff = Duration.between(eventTime, now).toDays();
if (daysDiff > numberOfDays) {
inTimeRange = false;
}
}
if (fromDate != null && fromDate.isAfter(eventTime)) {
inTimeRange = false;
}
if (toDate != null && toDate.isBefore(eventTime)) {
inTimeRange = false;
}
return inTimeRange;
}51.3. Profile Storage Format
Past event counts are stored efficiently in the profile’s system properties under a pastEvents list. Each entry contains:
-
key- A generated unique identifier for the condition using MD5 hashing -
count- The number of matching events for that condition
The update process is handled by:
private boolean updatePastEvents(Event event, String generatedPropertyKey, long count) {
List<Map<String, Object>> existingPastEvents =
(List<Map<String, Object>>) event.getProfile().getSystemProperties().get("pastEvents");
if (existingPastEvents == null) {
existingPastEvents = new ArrayList<>();
event.getProfile().getSystemProperties().put("pastEvents", existingPastEvents);
}
// Update or add count
for (Map<String, Object> pastEvent : existingPastEvents) {
if (generatedPropertyKey.equals(pastEvent.get("key"))) {
if (pastEvent.containsKey("count") && pastEvent.get("count").equals(count)) {
return false;
}
pastEvent.put("count", count);
return true;
}
}
Map<String, Object> newPastEvent = new HashMap<>();
newPastEvent.put("key", generatedPropertyKey);
newPastEvent.put("count", count);
existingPastEvents.add(newPastEvent);
return true;
}51.4. Evaluation Process
The evaluation process involves multiple components working together to efficiently evaluate past event conditions:
-
Condition Evaluator (
PastEventConditionEvaluator)-
Primary evaluation logic for past event conditions
-
Two-phase evaluation strategy:
-
First checks profile properties for cached counts using
generatedPropertyKey -
Falls back to direct event queries only if cached data is unavailable
-
-
Count validation logic:
-
For
eventsOccurred: Verifies count is betweenminimumEventCountandmaximumEventCount -
For
eventsNotOccurred: Verifies count is exactly 0
-
-
-
Query Builder (
pastEventConditionQueryBuilder)-
Responsible for constructing optimized search index queries
-
Supports two query strategies:
-
Property-based queries: Uses cached counts from profile properties
-
Event-based queries: Aggregates events directly when needed
-
-
Partitioned processing support:
-
Configurable through
pastEventsDisablePartitions -
Uses
aggregateQueryBucketSizefor partition sizing -
Handles large datasets efficiently
-
-
-
Action Executor (
ActionExecutorDispatcherImpl)-
Manages the execution of past event condition actions
-
Features:
-
Contextual parameter resolution for dynamic values
-
Performance metrics collection for monitoring
-
Script execution support for complex logic
-
Error handling and logging
-
-
Execution flow:
-
Resolves action parameters using context
-
Validates action configuration
-
Executes action with performance tracking
-
Handles results and updates profiles
-
-
Implementation details:
-
public boolean eval(Condition condition, Item item, Map<String, Object> context,
ConditionEvaluatorDispatcher dispatcher) {
final Map<String, Object> parameters = condition.getParameterValues();
long count;
// Try to get count from profile properties first
if (parameters.containsKey("generatedPropertyKey")) {
String key = (String) parameters.get("generatedPropertyKey");
Profile profile = (Profile) item;
List<Map<String, Object>> pastEvents =
(ArrayList<Map<String, Object>>) profile.getSystemProperties().get("pastEvents");
if (pastEvents != null) {
Number l = (Number) pastEvents
.stream()
.filter(pastEvent -> pastEvent.get("key").equals(key))
.findFirst()
.map(pastEvent -> pastEvent.get("count")).orElse(0L);
count = l.longValue();
} else {
count = 0;
}
} else {
// Legacy fallback: direct event query
count = persistenceService.queryCount(
pastEventConditionPersistenceQueryBuilder.getEventCondition(
condition, context, item.getItemId(), definitionsService, scriptExecutor
),
Event.ITEM_TYPE
);
}
// Evaluate count against condition parameters
boolean eventsOccurred = pastEventConditionPersistenceQueryBuilder
.getStrategyFromOperator((String) condition.getParameter("operator"));
if (eventsOccurred) {
int minimumEventCount = parameters.get("minimumEventCount") == null ?
0 : (Integer) parameters.get("minimumEventCount");
int maximumEventCount = parameters.get("maximumEventCount") == null ?
Integer.MAX_VALUE : (Integer) parameters.get("maximumEventCount");
return count > 0 && (count >= minimumEventCount && count <= maximumEventCount);
} else {
return count == 0;
}
}
52. Rule Generation
52.1. Auto-Generated Rules
The system automatically generates rules for past event conditions through SegmentServiceImpl:
-
Rule Creation
-
Generated when segments with past event conditions are created/updated
-
Uses
evaluateProfileSegments.jsontemplate -
Includes
EvaluateProfileSegmentsActionfor segment membership updates
-
-
Rule Structure
{
"metadata": {
"id": "evaluateProfileSegments",
"name": "Evaluate segments",
"description": "Evaluate segments when a profile is modified",
"readOnly": true
},
"condition": {
"type": "profileUpdatedEventCondition"
},
"actions": [
{
"type": "evaluateProfileSegmentsAction"
}
]
}
52.2. Performance Configuration
Key configuration parameters from SegmentServiceImpl:
# Maximum number of IDs to return in a single query
maximumIdsQueryCount = 5000
# Size of each partition for aggregation queries
aggregateQueryBucketSize = 5000
# Whether to disable partitioned processing
pastEventsDisablePartitions = false
# Segment update batch size
segmentUpdateBatchSize = 1000
# Maximum retries for profile segment updates
maxRetriesForUpdateProfileSegment = 3
# Delay between retries (seconds)
secondsDelayForRetryUpdateProfileSegment = 1
# Whether to send profile update events
sendProfileUpdateEventForSegmentUpdate = true53. Best Practices
53.1. Implementation Guidelines
-
Time Window Selection
-
Use
numberOfDaysfor rolling windows -
Use explicit dates for fixed periods
-
Consider data retention policies
-
Account for timezone handling (UTC)
-
-
Performance Optimization
-
Enable partitioning for large datasets
-
Configure appropriate batch sizes
-
Monitor memory usage
-
Use property-based evaluation when possible
-
-
Error Handling
-
Configure appropriate retries
-
Monitor failed updates
-
Implement proper logging
-
Plan for recovery scenarios
-
53.2. Example Configurations
-
Rolling Window
{
"type": "pastEventCondition",
"parameterValues": {
"eventCondition": {
"type": "eventTypeCondition",
"parameterValues": {
"eventTypeId": "purchase"
}
},
"numberOfDays": 30
}
}
+ 2. Date Range
{
"type": "pastEventCondition",
"parameterValues": {
"eventCondition": {
"type": "eventTypeCondition",
"parameterValues": {
"eventTypeId": "campaign-click"
}
},
"fromDate": "2024-01-01T00:00:00Z",
"toDate": "2024-12-31T23:59:59Z"
}
}54. Common Use Cases and Examples
54.1. Basic Past Event Condition
{
"type": "pastEventCondition",
"parameterValues": {
"eventType": "view",
"numberOfDays": 7,
"minimumCount": 5,
"maximumCount": null
}
}54.2. Time-Based Conditions
{
"type": "pastEventCondition",
"parameterValues": {
"eventType": "purchase",
"fromDate": "2024-01-01T00:00:00Z",
"toDate": "2024-03-31T23:59:59Z",
"minimumCount": 1
}
}54.3. Complex Event Conditions
{
"type": "pastEventCondition",
"parameterValues": {
"eventType": "view",
"numberOfDays": 30,
"minimumCount": 3,
"propertyConditions": {
"type": "booleanCondition",
"parameterValues": {
"operator": "and",
"subConditions": [
{
"type": "propertyCondition",
"parameterValues": {
"propertyName": "target.properties.category",
"comparisonOperator": "equals",
"propertyValue": "electronics"
}
},
{
"type": "propertyCondition",
"parameterValues": {
"propertyName": "target.properties.price",
"comparisonOperator": "greaterThan",
"propertyValue": 100
}
}
]
}
}
}
}54.4. Segment Definition
{
"metadata": {
"id": "activeUsers",
"name": "Active Users",
"scope": "systemscope"
},
"condition": {
"type": "booleanCondition",
"parameterValues": {
"operator": "and",
"subConditions": [
{
"type": "pastEventCondition",
"parameterValues": {
"eventType": "view",
"numberOfDays": 30,
"minimumCount": 10
}
},
{
"type": "pastEventCondition",
"parameterValues": {
"eventType": "purchase",
"numberOfDays": 90,
"minimumCount": 1
}
}
]
}
}
}54.5. Auto-Generated Rule
{
"metadata": {
"id": "auto_past_event_count_rule_12345",
"name": "Past Event Count Rule for Segment activeUsers",
"hidden": true
},
"condition": {
"type": "eventTypeCondition",
"parameterValues": {
"eventTypeId": "view"
}
},
"actions": [
{
"type": "setEventOccurenceCountAction",
"parameterValues": {
"pastEventCondition": {
"eventType": "view",
"numberOfDays": 30
}
}
}
]
}54.6. Property Storage Format
{
"properties": {
"pastEvents": {
"past_event_count_abc123_30d_v1": {
"count": 15,
"lastUpdated": "2024-03-15T10:30:00Z"
},
"past_event_count_def456_90d_v1": {
"count": 3,
"lastUpdated": "2024-03-15T10:30:00Z"
}
}
}
}54.7. Integration Examples
54.7.1. REST API Usage
curl -X POST http://localhost:8181/cxs/profiles/query \
-H 'Content-Type: application/json' \
-d '{
"condition": {
"type": "pastEventCondition",
"parameterValues": {
"eventType": "view",
"numberOfDays": 7,
"minimumCount": 5
}
}
}'54.7.2. Batch Update Configuration
# Batch processing configuration
segment.pastEventCondition.batchSize=1000
segment.pastEventCondition.threadsCount=4
segment.pastEventCondition.timeoutInSeconds=3600
# Monitoring configuration
segment.pastEventCondition.monitoringEnabled=true
segment.pastEventCondition.alertThreshold=10000055. Troubleshooting
55.1. Common Issues
-
Performance Problems
-
Partition Size Issues
-
Symptom: Slow query performance or high memory usage
-
Check
aggregateQueryBucketSizeconfiguration (default: 5000) -
Monitor Elasticsearch heap usage during queries
-
Consider enabling partitioned processing for large datasets
-
-
Query Optimization
-
Verify proper index settings for event timestamps
-
Check if property-based queries are being used when possible
-
Monitor query execution times through metrics
-
Analyze Elasticsearch query patterns
-
-
-
Incorrect Counts
-
Time Window Configuration
-
Verify UTC timezone handling in date calculations
-
Check
numberOfDayscalculation logic -
Validate
fromDate/toDateformat (ISO-8601)
-
-
Event Processing
-
Verify events are being properly persisted
-
Check event type matching in conditions
-
Validate profile ID associations
-
Monitor event indexing status
-
-
Profile Updates
-
Verify
pastEventsproperty structure -
Check property key generation
-
Monitor profile update events
-
Validate segment evaluation timing
-
-
55.2. Debugging Tips
-
Query Verification
-
Elasticsearch Query Analysis
-
Use Elasticsearch _explain API to analyze queries
-
Monitor query performance through metrics
-
Check query routing and shard distribution
-
Verify index mappings for event fields
-
-
-
Cache Validation
-
Property Storage
-
Verify
pastEventslist structure in profiles -
Check property key consistency
-
Monitor cache hit/miss ratios
-
Validate property update timestamps
-
-
Profile Updates
-
Monitor profile update events
-
Check segment evaluation triggers
-
Verify rule execution flow
-
Validate condition evaluation results
-
-
56. Integration Points
56.1. Event Flow
The complete event processing flow for past event conditions:
-
Event Reception
-
Event arrives through REST API or other channels
-
Event is validated and enriched
-
Profile association is verified
-
Event type is matched against conditions
-
-
Real-time Processing
-
SetEventOccurenceCountActionis triggered -
Event conditions are evaluated
-
Time windows are calculated
-
Counts are updated in profile
-
-
Profile Update
-
Profile properties are updated
-
Cache entries are invalidated if needed
-
Update events are triggered if configured
-
Optimistic locking handles concurrent updates
-
-
Segment Evaluation
-
Profile segments are re-evaluated
-
New segment memberships are calculated
-
Profile is updated with new segments
-
Related rules are triggered
-
56.2. Segment Evaluation Flow
The detailed segment evaluation process:
-
Condition Evaluation
-
Past event conditions are extracted
-
Property-based evaluation is attempted first
-
Falls back to event queries if needed
-
Results are cached when possible
-
-
Query Building
-
Appropriate query strategy is selected
-
Time constraints are applied
-
Partitioning is configured if enabled
-
Optimizations are applied based on context
-
-
Result Aggregation
-
Event counts are aggregated
-
Results are partitioned if needed
-
Memory usage is optimized
-
Results are validated
-
-
Profile Update
-
Profile properties are updated atomically
-
Segment memberships are recalculated
-
Update events are triggered
-
Changes are persisted to storage
-
57. Security Considerations
57.1. Data Access Controls
-
Profile Data Protection
-
Event data access is controlled through permissions
-
Profile properties are protected by scope definitions
-
Sensitive data is filtered from event properties
-
Access to past event counts follows profile permissions
-
-
Query Security
-
Elasticsearch queries are sanitized
-
Input parameters are validated
-
Time ranges are bounded
-
Resource limits are enforced
-
57.2. Resource Protection
-
Query Limits
-
Maximum time window restrictions
-
Aggregation bucket size limits
-
Query timeout configurations
-
Memory usage thresholds
-
-
Rate Limiting
-
Profile update frequency limits
-
Event processing rate controls
-
Segment evaluation throttling
-
Cache invalidation controls
-
57.3. Data Integrity
-
Event Data
-
Event timestamps are validated
-
Event type verification
-
Profile association validation
-
Property value sanitization
-
-
Profile Updates
-
Optimistic locking for concurrent updates
-
Transaction boundaries
-
Update validation
-
Rollback procedures
-
57.4. Audit Trail
-
Event Processing
-
Event processing logs
-
Profile update tracking
-
Segment evaluation history
-
Rule execution records
-
-
Error Handling
-
Failed update logging
-
Security violation tracking
-
Resource limit violations
-
Data integrity issues
-
58. Configuration Parameters
58.1. Core Settings
# Segment Service Configuration
segment.pastEventCondition.aggregateQueryBucketSize=5000
segment.pastEventCondition.maxRetriesForUpdateProfileSegment=3
segment.pastEventCondition.updateBatchSize=1000
# Event Processing
event.pastCondition.maxTimeWindow=365
event.pastCondition.defaultTimeUnit=day
# Query Optimization
query.pastEvent.usePropertyBasedEvaluation=true
query.pastEvent.enablePartitioning=true
query.pastEvent.partitionSize=1000058.2. Performance Tuning
# Cache Configuration
cache.pastEventCount.timeToLiveInSeconds=3600
cache.pastEventCount.maxEntries=10000
# Query Timeouts
query.pastEvent.timeout=30
query.pastEvent.scrollTimeout=60
query.pastEvent.scrollSize=1000
# Batch Processing
batch.pastEventUpdate.threadPoolSize=4
batch.pastEventUpdate.queueSize=100058.3. Monitoring Configuration
# Metrics Collection
metrics.pastEventCondition.enabled=true
metrics.pastEventCondition.detailed=false
# Logging
logging.pastEventCondition.level=INFO
logging.pastEventCondition.detailed=false
# Alerts
alerts.pastEventCondition.slowQueryThreshold=5000
alerts.pastEventCondition.errorThreshold=10059. Best Practices
59.1. Performance Optimization
-
Query Optimization
-
Use property-based evaluation when possible
-
Enable partitioning for large datasets
-
Configure appropriate cache sizes
-
Monitor and tune query timeouts
-
-
Resource Management
-
Configure appropriate batch sizes
-
Set reasonable time windows
-
Monitor memory usage
-
Use partitioned processing
-
59.2. Maintenance
-
Regular Tasks
-
Monitor cache hit rates
-
Review query performance
-
Check error logs
-
Validate configuration
-
-
Troubleshooting
-
Use detailed logging when needed
-
Monitor metrics
-
Review audit trails
-
Check resource usage
-
59.3. Scaling Considerations
-
Horizontal Scaling
-
Configure cluster settings
-
Balance load across nodes
-
Monitor node health
-
Optimize resource allocation
-
-
Vertical Scaling
-
Tune JVM settings
-
Configure memory limits
-
Optimize thread pools
-
Monitor CPU usage
-
60. Evaluation Strategies
The system uses different evaluation strategies depending on how the past event condition is used:
60.1. Property-Based Evaluation
Used when a past event condition is part of a segment:
-
Evaluation Process
-
Checks for cached count in profile’s
pastEventsproperty -
Uses the generated property key to locate the count
-
Compares count against condition parameters
-
No direct event store query needed
-
if (parameters.containsKey("generatedPropertyKey")) {
String key = (String) parameters.get("generatedPropertyKey");
Profile profile = (Profile) item;
List<Map<String, Object>> pastEvents =
(ArrayList<Map<String, Object>>) profile.getSystemProperties().get("pastEvents");
if (pastEvents != null) {
Number count = (Number) pastEvents
.stream()
.filter(pastEvent -> pastEvent.get("key").equals(key))
.findFirst()
.map(pastEvent -> pastEvent.get("count")).orElse(0L);
// Evaluate count against condition parameters
}
}60.2. Direct Event Query Evaluation
Used when a past event condition is used directly in a rule:
-
Evaluation Process
-
Constructs Elasticsearch query for matching events
-
Queries event store directly
-
Aggregates results
-
No caching occurs
-
// Direct event store query (less efficient)
count = persistenceService.queryCount(
pastEventConditionPersistenceQueryBuilder.getEventCondition(
condition, context, item.getItemId(), definitionsService, scriptExecutor
),
Event.ITEM_TYPE
);61. Performance Considerations
61.1. Segment vs Direct Rule Usage
-
Segment Usage (Recommended)
-
Cached event counts in profile properties
-
Real-time updates through auto-generated rules
-
Minimal query overhead during evaluation
-
Efficient for high-frequency conditions
-
Suitable for large-scale segment memberships
-
-
Direct Rule Usage (Use with Caution)
-
No caching mechanism
-
Direct event store queries on each evaluation
-
Higher latency and resource usage
-
Can impact system performance
-
Suitable only for low-frequency rules
-
61.2. Query Optimization
-
Property-Based Queries
-
Used when
generatedPropertyKeyis available -
Fast profile property lookups
-
Minimal resource usage
-
Example:
-
if (generatedPropertyKey != null) {
// Use property-based query (efficient)
return dispatcher.buildFilter(
getProfileConditionForCounter(
generatedPropertyKey,
minimumEventCount,
maximumEventCount,
eventsOccurred
),
context
);
}
+ 2. Event-Based Queries * Used for direct rule conditions * Requires event store access * Higher resource usage * Example:
// Fall back to event-based query (less efficient)
Condition eventCondition = getEventCondition(condition, context, null);
Set<String> ids = getProfileIdsMatchingEventCount(
eventCondition, minimumEventCount, maximumEventCount
);61.3. Resource Usage
-
Memory Impact
-
Segment usage: Minimal (only stores count in profile)
-
Direct rule usage: Higher (query results in memory)
-
-
CPU Impact
-
Segment usage: Low (simple property lookup)
-
Direct rule usage: Higher (query execution and aggregation)
-
-
Storage Impact
-
Segment usage: Small profile property overhead
-
Direct rule usage: No additional storage
-
61.4. Best Practices for Performance
-
Use Segments When Possible
-
Prefer segments over direct rule usage
-
Let the system generate optimization rules
-
Benefit from built-in caching
-
-
Optimize Time Windows
-
Use reasonable time windows
-
Consider data retention policies
-
Balance accuracy vs performance
-
-
Query Optimization
-
Enable partitioning for large datasets
-
Configure appropriate batch sizes
-
Monitor query performance
-
-
Cache Management
-
Monitor cache hit rates
-
Configure appropriate cache sizes
-
Regular cache maintenance
-
61.5. Resolution Steps
-
Initial Analysis
-
Verify configuration
-
Check query patterns
-
Analyze resource usage
-
Review error logs
-
-
Detailed Investigation
-
Analyze query execution plans
-
Review cache statistics
-
Check system metrics
-
Examine log patterns
-
-
Solution Implementation
-
Apply configuration changes
-
Optimize queries
-
Adjust cache settings
-
Update monitoring rules
-
-
Validation
-
Verify improvements
-
Monitor performance
-
Check error rates
-
Document changes
-
62. Maintenance and Monitoring
62.1. Regular Maintenance Tasks
-
Event Count Recalculation
-
Periodic recalculation of past event counts
-
Updates stale or incorrect counts
-
Example:
-
// Recalculate past event conditions segmentService.recalculatePastEventConditions();
+ 2. Cache Management * Monitor cache hit rates * Clean up expired entries * Optimize cache sizes
+ 3. Performance Monitoring * Track query execution times * Monitor resource usage * Identify bottlenecks
62.2. Monitoring Metrics
-
Query Performance
-
Average query execution time
-
Query count by type (property vs direct)
-
Cache hit/miss ratios
-
-
Resource Usage
-
Memory consumption
-
CPU utilization
-
Storage growth
-
62.3. Troubleshooting
-
Common Issues
-
Slow query performance
-
High memory usage
-
Incorrect event counts
-
Cache inconsistencies
-
-
Diagnostic Tools
-
Elasticsearch query analysis
-
Performance metrics
-
Log analysis
-
Cache statistics
-
-
Resolution Steps
-
Verify configuration
-
Check query patterns
-
Analyze resource usage
-
Review error logs
-
63. Queries and aggregations
Apache Unomi contains a query endpoint that is quite powerful. It provides ways to perform queries that can quickly
get result counts, apply metrics such as sum/min/max/avg or even use powerful aggregations.
Conditions used in queries follow the same JSON shape described in Conditions guide.
In this section we will show examples of requests that may be built using this API.
63.1. Query counts
Query counts are highly optimized queries that will count the number of objects that match a certain condition without retrieving the results. This can be used for example to quickly figure out how many objects will match a given condition before actually retrieving the results. It uses search engine optimizations (ElasticSearch/OpenSearch) to avoid the cost of loading all the resulting objects.
Here’s an example of a query:
curl -X POST http://localhost:8181/cxs/query/profile/count \
--user "TENANT_ID:PRIVATE_KEY" \
-H "Content-Type: application/json" \
-d @- <<'EOF'
{
"parameterValues": {
"subConditions": [
{
"type": "profilePropertyCondition",
"parameterValues": {
"propertyName": "systemProperties.isAnonymousProfile",
"comparisonOperator": "missing"
}
},
{
"type": "profilePropertyCondition",
"parameterValues": {
"propertyName": "properties.nbOfVisits",
"comparisonOperator": "equals",
"propertyValueInteger": 1
}
}
],
"operator": "and"
},
"type": "booleanCondition"
}
EOFThe above result will return the profile count of all the profiles
Result will be something like this:
2084
63.2. Metrics
Metric queries make it possible to apply functions to the resulting property. The supported metrics are:
-
sum
-
avg
-
min
-
max
These metrics are supported by both ElasticSearch and OpenSearch backends.
It is also possible to request more than one metric in a single request by concatenating them with a "/" in the URL.
Here’s an example request that uses the sum and avg metrics:
curl -X POST http://localhost:8181/cxs/query/session/profile.properties.nbOfVisits/sum/avg \
--user "TENANT_ID:PRIVATE_KEY" \
-H "Content-Type: application/json" \
-d @- <<'EOF'
{
"parameterValues": {
"subConditions": [
{
"type": "sessionPropertyCondition",
"parameterValues": {
"comparisonOperator": "equals",
"propertyName": "scope",
"propertyValue": "digitall"
}
}
],
"operator": "and"
},
"type": "booleanCondition"
}
EOFThe result will look something like this:
{
"_avg":1.0,
"_sum":9.0
}63.3. Aggregations
Aggregations are a very powerful way to build queries in Apache Unomi that will collect and aggregate data by filtering on certain conditions.
Aggregations are composed of: - an object type and a property on which to aggregate - an aggregation setup (how data will be aggregated, by date, by numeric range, date range or ip range) - a condition (used to filter the data set that will be aggregated)
63.3.1. Aggregation types
Aggregations may be of different types. They are listed here below.
Date
Date aggregations make it possible to automatically generate "buckets" by time periods. The format is compatible with both ElasticSearch and OpenSearch. For more information about the format, you can refer to: - ElasticSearch documentation: https://www.elastic.co/guide/en/elasticsearch/reference/7.17/search-aggregations-bucket-datehistogram-aggregation.html - OpenSearch documentation: https://opensearch.org/docs/latest/aggregations/bucket/datehistogram/
Here’s an example of a request to retrieve a histogram of by day of all the session that have been create by newcomers (nbOfVisits=1)
curl -X POST http://localhost:8181/cxs/query/session/timeStamp \
--user "TENANT_ID:PRIVATE_KEY" \
-H "Content-Type: application/json" \
-d @- <<'EOF'
{
"aggregate": {
"type": "date",
"parameters": {
"interval": "1d",
"format": "yyyy-MM-dd"
}
},
"condition": {
"type": "booleanCondition",
"parameterValues": {
"operator": "and",
"subConditions": [
{
"type": "sessionPropertyCondition",
"parameterValues": {
"propertyName": "scope",
"comparisonOperator": "equals",
"propertyValue": "acme"
}
},
{
"type": "sessionPropertyCondition",
"parameterValues": {
"propertyName": "profile.properties.nbOfVisits",
"comparisonOperator": "equals",
"propertyValueInteger": 1
}
}
]
}
}
}
EOFThe above request will produce a similar that looks like this:
{
"_all": 8062,
"_filtered": 4085,
"2018-10-02": 3,
"2018-10-03": 17,
"2018-10-04": 18,
"2018-10-05": 19,
"2018-10-06": 23,
"2018-10-07": 18,
"2018-10-08": 20
}You can see that we retrieve the count of newcomers aggregated by day.
Date range
Date ranges make it possible to "bucket" dates, for example to regroup profiles by their birth date as in the example below:
curl -X POST http://localhost:8181/cxs/query/profile/properties.birthDate \
--user "TENANT_ID:PRIVATE_KEY" \
-H "Content-Type: application/json" \
-d @- <<'EOF'
{
"aggregate": {
"property": "properties.birthDate",
"type": "dateRange",
"dateRanges": [
{
"key": "After 2009",
"from": "now-10y/y",
"to": null
},
{
"key": "Between 1999 and 2009",
"from": "now-20y/y",
"to": "now-10y/y"
},
{
"key": "Between 1989 and 1999",
"from": "now-30y/y",
"to": "now-20y/y"
},
{
"key": "Between 1979 and 1989",
"from": "now-40y/y",
"to": "now-30y/y"
},
{
"key": "Between 1969 and 1979",
"from": "now-50y/y",
"to": "now-40y/y"
},
{
"key": "Before 1969",
"from": null,
"to": "now-50y/y"
}
]
},
"condition": {
"type": "matchAllCondition",
"parameterValues": {}
}
}
EOFThe resulting JSON response will look something like this:
{
"_all":4095,
"_filtered":4095,
"Before 1969":2517,
"Between 1969 and 1979":353,
"Between 1979 and 1989":336,
"Between 1989 and 1999":337,
"Between 1999 and 2009":35,
"After 2009":0,
"_missing":517
}You can find more information about the date range formats here: - ElasticSearch documentation: https://www.elastic.co/guide/en/elasticsearch/reference/7.17/search-aggregations-bucket-daterange-aggregation.html - OpenSearch documentation: https://opensearch.org/docs/latest/aggregations/bucket/daterange/
Numeric range
Numeric ranges make it possible to use "buckets" for the various ranges you want to classify.
Here’s an example of a using numeric range to regroup profiles by number of visits:
curl -X POST http://localhost:8181/cxs/query/profile/properties.nbOfVisits \
--user "TENANT_ID:PRIVATE_KEY" \
-H "Content-Type: application/json" \
-d @- <<'EOF'
{
"aggregate": {
"property": "properties.nbOfVisits",
"type": "numericRange",
"numericRanges": [
{
"key": "Less than 5",
"from": null,
"to": 5
},
{
"key": "Between 5 and 10",
"from": 5,
"to": 10
},
{
"key": "Between 10 and 20",
"from": 10,
"to": 20
},
{
"key": "Between 20 and 40",
"from": 20,
"to": 40
},
{
"key": "Between 40 and 80",
"from": 40,
"to": 80
},
{
"key": "Greater than 100",
"from": 100,
"to": null
}
]
},
"condition": {
"type": "matchAllCondition",
"parameterValues": {}
}
}
EOFThis will produce an output that looks like this:
{
"_all":4095,
"_filtered":4095,
"Less than 5":3855,
"Between 5 and 10":233,
"Between 10 and 20":7,
"Between 20 and 40":0,
"Between 40 and 80":0,
"Greater than 100":0
}63.4. Scroll Queries
Scroll queries are useful when you need to retrieve large result sets efficiently. Instead of retrieving all results at once, which could be memory intensive, scroll queries allow you to retrieve results in batches while maintaining consistency between requests.
63.4.1. Initial Scroll Query
To start a scroll query, use the search endpoint with the following parameters:
# Initial scroll query
curl -X POST http://localhost:8181/cxs/profiles/search \
--user "TENANT_ID:PRIVATE_KEY" \
-H "Content-Type: application/json" \
-d @- <<'EOF'
{
"condition": { // Optional filtering condition
"type": "matchAllCondition",
"parameterValues": {}
},
"offset": 0, // Starting position
"limit": 50, // Number of items per batch
"sortby": "property:asc", // Optional sorting
"scrollTimeValidity": "1m", // How long to keep scroll context alive
"forceRefresh": false // Whether to force index refresh
}
EOFThe response will include:
- scrollIdentifier: A unique identifier for continuing the scroll
- list: The first batch of results
- totalSize: Total number of matching items
- offset: Current position in the result set
- pageSize: Size of the current batch
63.4.2. Continue Scroll Query
To retrieve subsequent batches, only the scroll identifier and validity are needed:
# Retrieve next batch
curl -X POST http://localhost:8181/cxs/profiles/search \
--user "TENANT_ID:PRIVATE_KEY" \
-H "Content-Type: application/json" \
-d @- <<'EOF'
{
"scrollIdentifier": "YOUR_SCROLL_ID", // Required: the scroll ID from previous response
"scrollTimeValidity": "1m" // Required: extends scroll context lifetime
}
EOF|
Important
|
When continuing a scroll query, you do not need to resend other query parameters (condition, sortby, etc.). The scroll context maintains the original query state. |
63.4.3. Query Parameters
Initial query parameters:
- condition: The filtering condition (optional)
- offset: Starting position in results
- limit: Number of results per batch
- sortby: Property and direction for sorting (optional)
- scrollTimeValidity: How long to keep the scroll context alive (e.g., "1m")
- forceRefresh: Whether to force an index refresh before query (default: false)
Continuation query parameters:
- scrollIdentifier: The scroll ID returned from the previous request
- scrollTimeValidity: How long to extend the scroll context
64. Profile import & export
The profile import and export feature in Apache Unomi is based on configurations and consumes or produces CSV files that contain profiles to be imported and exported.
64.1. Importing profiles
Only ftp, sftp, ftps and file are supported in the source path. For example:
file:///tmp/?fileName=profiles.csv&move=.done&consumer.delay=25s
Where:
-
fileNameCan be a pattern, for exampleinclude=.*.csvinstead offileName=…to consume all CSV files. By default the processed files are moved to.camelfolder you can change it using themoveoption. -
consumer.delayIs the frequency of polling in milliseconds. For example, 20000 milliseconds is 20 seconds. This frequency can also be 20s. Other possible format are: 2h30m10s = 2 hours and 30 minutes and 10 seconds.
See http://camel.apache.org/ftp.html and http://camel.apache.org/file2.html to build more complex source path. Also be
careful with FTP configuration as most servers no longer support plain text FTP and you should use SFTP or FTPS
instead, but they are a little more difficult to configure properly. It is recommended to test the connection with an
FTP client first before setting up these source paths to ensure that everything works properly. Also on FTP
connections most servers require PASSIVE mode so you can specify that in the path using the passiveMode=true parameter.
Here are some examples of FTPS and SFTP source paths:
sftp://USER@HOST/PATH?password=PASSWORD&include=.*.csv ftps://USER@HOST?password=PASSWORD&fileName=profiles.csv&passiveMode=true
Where:
-
USERis the user name of the SFTP/FTPS user account to login with -
PASSWORDis the password for the user account -
HOSTis the host name (or IP address) of the host server that provides the SFTP / FTPS server -
PATHis a path to a directory inside the user’s account where the file will be retrieved.
64.1.1. Import API
Apache Unomi provides REST endpoints to manage import configurations:
GET /cxs/importConfiguration
GET /cxs/importConfiguration/{configId}
POST /cxs/importConfiguration
DELETE /cxs/importConfiguration/{configId}
This is how a oneshot import configuration looks like:
{
"itemId": "importConfigId",
"itemType": "importConfig",
"name": "Import Config Sample",
"description": "Sample description",
"configType": "oneshot", //Config type can be 'oneshot' or 'recurrent'
"properties": {
"mapping": {
"email": 0, //<Apache Unomi Property Id> : <Column Index In the CSV>
"firstName": 2,
...
}
},
"columnSeparator": ",", //Character used to separate columns
"lineSeparator": "\\n", //Character used to separate lines (\n or \r)
"multiValueSeparator": ";", //Character used to separate values for multivalued columns
"multiValueDelimiter": "[]", //Character used to wrap values for multivalued columns
"status": "SUCCESS", //Status of last execution
"executions": [ //(RETURN) Last executions by default only last 5 are returned
...
],
"mergingProperty": "email", //Apache Unomi Property Id used to check duplicates
"overwriteExistingProfiles": true, //Overwrite profiles that have duplicates
"propertiesToOverwrite": "firstName, lastName, ...", //If last is set to true, which property to overwrite, 'null' means overwrite all
"hasHeader": true, //CSV file to import contains a header line
"hasDeleteColumn": false //CSV file to import doesn't contain a TO DELETE column (if it contains, will be the last column)
}
A recurrent import configuration is similar to the previous one with some specific information to add to the JSON like:
{
...
"configType": "recurrent",
"properties": {
"source": "ftp://USER@SERVER[:PORT]/PATH?password=xxx&fileName=profiles.csv&move=.done&consumer.delay=20000",
// Only 'ftp', 'sftp', 'ftps' and 'file' are supported in the 'source' path
// eg. file:///tmp/?fileName=profiles.csv&move=.done&consumer.delay=25s
// 'fileName' can be a pattern eg 'include=.*.csv' instead of 'fileName=...' to consume all CSV files
// By default the processed files are moved to '.camel' folder you can change it using the 'move' option
// 'consumer.delay' is the frequency of polling. '20000' (in milliseconds) means 20 seconds. Can be also '20s'
// Other possible format are: '2h30m10s' = 2 hours and 30 minutes and 10 seconds
"mapping": {
...
}
},
...
"active": true, //If true the polling will start according to the 'source' configured above
...
}
64.2. Exporting profiles
Only ftp, sftp, ftps and `file are supported in the source path. For example:
file:///tmp/?fileName=profiles-export-${date:now:yyyyMMddHHmm}.csv&fileExist=Append)
sftp://USER@HOST/PATH?password=PASSWORD&binary=true&fileName=profiles-export-${date:now:yyyyMMddHHmm}.csv&fileExist=Append
ftps://USER@HOST?password=PASSWORD&binary=true&fileName=profiles-export-${date:now:yyyyMMddHHmm}.csv&fileExist=Append&passiveMode=true
As you can see in the examples above, you can inject variables in the produced file name ${date:now:yyyyMMddHHmm} is
the current date formatted with the pattern yyyyMMddHHmm. fileExist option put as Append will tell the file writer
to append to the same file for each execution of the export configuration. You cam omit this option to write a profile
per file.
See http://camel.apache.org/ftp.html and http://camel.apache.org/file2.html to build more complex destination path.
64.2.1. Export API
Apache Unomi provides REST endpoints to manage export configurations:
GET /cxs/exportConfiguration
GET /cxs/exportConfiguration/{configId}
POST /cxs/exportConfiguration
DELETE /cxs/exportConfiguration/{configId}
This is how a oneshot export configuration looks like:
{
"itemId": "exportConfigId",
"itemType": "exportConfig",
"name": "Export configuration sample",
"description": "Sample description",
"configType": "oneshot",
"properties": {
"period": "2m30s",
"segment": "contacts",
"mapping": {
"0": "firstName",
"1": "lastName",
...
}
},
"columnSeparator": ",",
"lineSeparator": "\\n",
"multiValueSeparator": ";",
"multiValueDelimiter": "[]",
"status": "RUNNING",
"executions": [
...
]
}
A recurrent export configuration is similar to the previous one with some specific information to add to the JSON like:
{
...
"configType": "recurrent",
"properties": {
"destination": "sftp://USER@SERVER:PORT/PATH?password=XXX&fileName=profiles-export-${date:now:yyyyMMddHHmm}.csv&fileExist=Append",
"period": "2m30s", //Same as 'consumer.delay' option in the import source path
"segment": "contacts", //Segment ID to use to collect profiles to export
"mapping": {
...
}
},
...
"active": true, //If true the configuration will start polling upon save until the user deactivate it
...
}
64.3. Configuration in details
First configuration you need to change would be the configuration type of your import / export feature (code name
router) in the etc/unomi.custom.system.properties file (creating it if necessary):
#Configuration Type values {'nobroker', 'kafka'}
org.apache.unomi.router.config.type=nobroker
By default the feature is configured (as above) to use no external broker, which means to handle import/export data it will use in memory queues (In the same JVM as Apache Unomi). If you are clustering Apache Unomi, most important thing to know about this type of configuration is that each Apache Unomi will handle the import/export task by itself without the help of other nodes (No Load-Distribution).
Changing this property to kafka means you have to provide the Apache Kafka configuration, and in the opposite of the nobroker option import/export data will be handled using an external broker (Apache Kafka), this will lighten the burden on the Apache Unomi machines.
You may use several Apache Kafka instance, 1 per N Apache Unomi nodes for better application scaling.
To enable using Apache Kafka you need to configure the feature as follows:
#Configuration Type values {'nobroker', 'kafka'}
org.apache.unomi.router.config.type=kafka
Uncomment and update Kafka settings to use Kafka as a broker
#Kafka org.apache.unomi.router.kafka.host=localhost org.apache.unomi.router.kafka.port=9092 org.apache.unomi.router.kafka.import.topic=import-deposit org.apache.unomi.router.kafka.export.topic=export-deposit org.apache.unomi.router.kafka.import.groupId=unomi-import-group org.apache.unomi.router.kafka.export.groupId=unomi-import-group org.apache.unomi.router.kafka.consumerCount=10 org.apache.unomi.router.kafka.autoCommit=true
There is couple of properties you may want to change to fit your needs, one of them is the import.oneshot.uploadDir which will tell Apache Unomi where to store temporarily the CSV files to import in Oneshot mode, it’s a technical property to allow the choice of the convenient disk space where to store the files to be imported. It defaults to the following path under the Apache Unomi Karaf (It is recommended to change the path to a more convenient one).
#Import One Shot upload directory
org.apache.unomi.router.import.oneshot.uploadDir=${karaf.data}/tmp/unomi_oneshot_import_configs/
Next two properties are max sizes for executions history and error reports, for some reason you don’t want Apache Unomi to report all the executions history and error reports generated by the executions of an import/export configuration. To change this you have to change the default values of these properties.
#Import/Export executions history size org.apache.unomi.router.executionsHistory.size=5
#errors report size org.apache.unomi.router.executions.error.report.size=200
Final one is about the allowed endpoints you can use when building the source or destionation path, as mentioned above
we can have a path of type file, ftp, ftps, sftp. You can make it less if you want to omit some endpoints (eg.
you don’t want to permit the use of non secure FTP).
#Allowed source endpoints org.apache.unomi.router.config.allowedEndpoints=file,ftp,sftp,ftps
65. Consent management
65.1. Consent API
Starting with Apache Unomi 1.3, a new API for consent management is now available. This API is designed to be able to store/retrieve/update visitor consents in order to comply with new privacy regulations such as the GDPR.
65.1.1. Profiles with consents
Visitor profiles now contain a new Consent object that contains the following information:
-
a scope
-
a type identifier for the consent. This can be any key to reference a consent. Note that Unomi does not manage consent definitions, it only stores/retrieves consents for each profile based on this type
-
a status : GRANT, DENY or REVOKED
-
a status date (the date at which the status was updated)
-
a revocation date, in order to comply with GDPR this is usually set at two years
Consents are stored as a sub-structure inside a profile. To retrieve the consents of a profile you can simply retrieve a profile with the following request:
curl -X POST http://localhost:8181/cxs/context.json?sessionId=1234 \
-H "Content-Type: application/json" \
-H "X-Unomi-Api-Key: YOUR_PUBLIC_API_KEY" \
-d @- <<'EOF'
{
"source": {
"itemId":"homepage",
"itemType":"page",
"scope":"example"
}
}
EOFHere is an example of a response with a Profile with a consent attached to it:
{
"profileId": "18afb5e3-48cf-4f8b-96c4-854cfaadf889",
"sessionId": "1234",
"profileProperties": null,
"sessionProperties": null,
"profileSegments": null,
"filteringResults": null,
"personalizations": null,
"trackedConditions": [],
"anonymousBrowsing": false,
"consents": {
"example/newsletter": {
"scope": "example",
"typeIdentifier": "newsletter",
"status": "GRANTED",
"statusDate": "2018-05-22T09:27:09Z",
"revokeDate": "2020-05-21T09:27:09Z"
}
}
}It is of course possible to have multiple consents defined for a single visitor profile.
65.1.2. Consent type definitions
Apache Unomi does not manage consent definitions, it leaves that to an external system (for example a CMS) so that it can handle user-facing UIs to create, update, internationalize and present consent definitions to end users.
The only thing that is import to Apache Unomi to manage visitor consents is a globally unique key, that is called the consent type.
65.1.3. Creating / update a visitor consent
A new built-in event type called "modifyConsent" can be sent to Apache Unomi to update a consent for the current profile.
Here is an example of such an event:
{
"events": [
{
"scope": "example",
"eventType": "modifyConsent",
"source": {
"itemType": "page",
"scope": "example",
"itemId": "anItemId"
},
"target": {
"itemType": "anyType",
"scope": "example",
"itemId": "anyItemId"
},
"properties": {
"consent": {
"typeIdentifier": "newsletter",
"scope": "example",
"status": "GRANTED",
"statusDate": "2018-05-22T09:27:09.473Z",
"revokeDate": "2020-05-21T09:27:09.473Z"
}
}
}
]
}You could send it using the following curl request:
curl -X POST http://localhost:8181/cxs/context.json?sessionId=1234 \
-H "Content-Type: application/json" \
-H "X-Unomi-Api-Key: YOUR_PUBLIC_API_KEY" \
-d @- <<'EOF'
{
"source":{
"itemId":"homepage",
"itemType":"page",
"scope":"example"
},
"events": [
{
"scope":"example",
"eventType":"modifyConsent",
"source":{
"itemType":"page",
"scope":"example",
"itemId":"anItemId"
},
"target":{
"itemType":"anyType",
"scope":"example",
"itemId":"anyItemId"},
"properties":{
"consent":{
"typeIdentifier":"newsletter",
"scope":"example",
"status":"GRANTED",
"statusDate":"2018-05-22T09:27:09.473Z",
"revokeDate":"2020-05-21T09:27:09.473Z"
}
}
}
]
}
EOF65.1.4. How it works (internally)
Upon receiving this event, Apache Unomi will trigger the modifyAnyConsent rule that has the following definition:
{
"metadata" : {
"id": "modifyAnyConsent",
"name": "Modify any consent",
"description" : "Modify any consent and sets the consent in the profile",
"readOnly":true
},
"condition" : {
"type": "modifyAnyConsentEventCondition",
"parameterValues": {
}
},
"actions" : [
{
"type": "modifyConsentAction",
"parameterValues": {
}
}
]
}As we can see this rule is pretty simple it will simply execute the modifyConsentAction that is implemented by the ModifyConsentAction Java class
This class will update the current visitor profile to add/update/revoke any consents that are included in the event.
66. Privacy management
Apache Unomi provides an endpoint to manage visitor privacy. You will find in this section information about what it includes as well as how to use it.
66.1. Setting up access to the privacy endpoint
The privacy endpoint is a bit special, because despite being protected by basic authentication as the rest of the REST API is is actually designed to be available to end-users.
So in effect it should usually be proxied so that public internet users can access the endpoint but the proxy should also check if the profile ID wasn’t manipulated in some way.
Apache Unomi doesn’t provide (for the moment) such a proxy, but basically it should do the following:
-
check for potential attack activity (could be based on IDS policies or even rate detection), and at the minimum check that the profile ID cookie seems authentic (for example by checking that it is often coming from the same IP or the same geographic location)
-
proxy to /cxs/privacy
66.2. Anonymizing a profile
It is possible to anonymize a profile, meaning it will remove all "identifying" property values from the profile.
Basically all properties with the tag personalIdentifierProperties will be purged from the profile.
|
Note
|
In Unomi 3.1+, /cxs/privacy/* endpoints require tenant or administrator authentication. The examples below use a tenant private key; you may also proxy these endpoints and validate the profile cookie server-side as described above.
|
Here’s an example of a request to anonymize a profile:
curl -X POST http://localhost:8181/cxs/privacy/profiles/{profileID}/anonymize?scope=ASCOPE \
--user "TENANT_ID:PRIVATE_KEY"where {profileID} must be replaced by the actual identifier of a profile
and ASCOPE must be replaced by a scope identifier.
66.3. Downloading profile data
It is possible to download the profile data of a user. This will only download the profile for a user using the specified ID as a cookie value.
Warning: this operation can also be sensitive so it would be better to protected with a proxy that can perform some validation on the requests to make sure no one is trying to download a profile using some kind of "guessing" of profile IDs.
curl -X GET http://localhost:8181/cxs/client/myprofile.[json,csv,yaml,text] \
--cookie "context-profile-id=PROFILE-ID"where PROFILE-ID is the profile identifier for which to download the profile.
66.4. Deleting a profile
It is possible to delete a profile, but this works a little differently than you might expect. In all cases the data
contained in the profile will be completely erased. If the withData optional flag is set to true, all past event and
session data will also be detached from the current profile and anonymized.
curl -X DELETE http://localhost:8181/cxs/privacy/profiles/{profileID}?withData=false \
--user "TENANT_ID:PRIVATE_KEY"|
Note
|
Replace TENANT_ID and PRIVATE_KEY with your actual tenant ID and private API key. Only the Tenant API (/cxs/tenants) uses system administrator authentication (karaf:karaf).
|
where {profileID} must be replaced by the actual identifier of a profile
and the withData specifies whether the data associated with the profile must be anonymized or not
66.5. Related
You might also be interested in the Consent API section that describe how to manage profile consents.
67. Cluster setup
67.1. Cluster setup
Apache Unomi runs as one or more Karaf nodes that share the same Elasticsearch or OpenSearch backend.
Since Unomi 3.0, cluster coordination uses the persistence layer (UNOMI-877): each node registers a
ClusterNode record, publishes periodic heartbeats, and reads peer state from the search index.
Karaf Cellar / Hazelcast are no longer required.
This design also supports the task scheduler (cluster-wide locks, executor nodes) and the health-check cluster provider.
67.1.1. Required settings
Configure each node in etc/unomi.custom.system.properties (or via environment variables):
org.apache.unomi.cluster.public.address=${env:UNOMI_CLUSTER_PUBLIC_ADDRESS:-http://localhost:8181}
org.apache.unomi.cluster.internal.address=${env:UNOMI_CLUSTER_INTERNAL_ADDRESS:-https://localhost:9443}
org.apache.unomi.cluster.nodeId=${env:UNOMI_CLUSTER_NODEID:-unomi-node-1}
org.apache.unomi.cluster.nodeStatisticsUpdateFrequency=${env:UNOMI_CLUSTER_NODESTATISTICS_UPDATEFREQUENCY:-10000}-
public.address — URL other nodes and operators use to reach this node (HTTP, port 8181 by default).
-
internal.address — HTTPS URL for the private REST API (port 9443 by default).
-
nodeId — Must be unique on every node in the cluster (for example
unomi-node-1,unomi-node-2). -
nodeStatisticsUpdateFrequency — Interval in milliseconds between heartbeat / statistics updates (default 10 seconds).
If nodeId is missing or duplicate, cluster registration fails at startup.
67.1.2. How it works
On startup the cluster service:
-
Registers this node in persistence (
ClusterNodeitem). -
Schedules a recurring task to update CPU, load, and uptime statistics.
-
Schedules stale-node cleanup (nodes with no heartbeat for roughly three times the update interval are removed).
Other nodes see the same registry through the shared search backend. The health-check extension reports
cluster size and per-node status when you call /health/check (see Health Check extension).
67.1.3. Scheduler and executor nodes
Background tasks can be marked persistent (stored in the index, visible on all nodes) or local (single node only). Only nodes that run the task executor process scheduled work.
-
Use the Karaf command
unomi:task-executorto see or toggle executor mode on a node. -
See Task scheduler for REST and shell operations on tasks.
In a typical cluster you run multiple Unomi nodes with distinct nodeId values, all pointing at the
same search backend, and enable the executor on every node that should run background jobs (or on a subset
for dedicated worker nodes).
67.1.4. Operations
-
Inspect nodes —
GET /cxs/cluster(private API, system administrator credentials). Listed in Useful Apache Unomi URLs. -
Health —
GET /health/checkincludes aclusterprovider when the health-check feature is installed. -
Stale nodes — Removed automatically when heartbeats stop; adjust
nodeStatisticsUpdateFrequencyif your network is slow or nodes are under heavy load.
67.1.5. Migration from Unomi 2.x / Cellar
If you previously used Karaf Cellar for clustering, plan a full migration to persistence-based clustering as part of your Unomi 3 upgrade. See JIRA reference (UNOMI-877) and Karaf upgrade for platform constraints.
68. Task scheduler
68.1. Cluster-aware task scheduler
Apache Unomi 3.1 introduces a built-in task scheduler for background work that must run reliably in single-node and clustered deployments.
Use it when you need to:
-
Run maintenance jobs on a timer (cache refresh, purge, segment recalculation).
-
Offload heavy work from a request or rule action (for example profile merge follow-up).
-
Coordinate work across cluster nodes with locks, recovery, and optional persistence.
-
Inspect, retry, or cancel tasks through the REST API or Karaf shell.
Tasks are identified by a task type string. Each type is handled by a registered TaskExecutor implementation (in core services or in a plugin).
68.1.1. Quick example: periodic cache refresh
Core services already use the scheduler for in-memory cache refresh. The pattern looks like this:
schedulerService.newTask("cache-refresh-segment")
.nonPersistent() // local to this node; not stored in OpenSearch/Elasticsearch
.withPeriod(1, TimeUnit.SECONDS)
.withFixedDelay() // wait for completion before next run
.disallowParallelExecution() // skip overlapping runs
.withSimpleExecutor(() -> refreshSegmentCache())
.schedule();
68.1.3. Task lifecycle
A ScheduledTask moves through well-defined states. Operators usually see SCHEDULED, RUNNING, COMPLETED, FAILED, CANCELLED, or CRASHED.
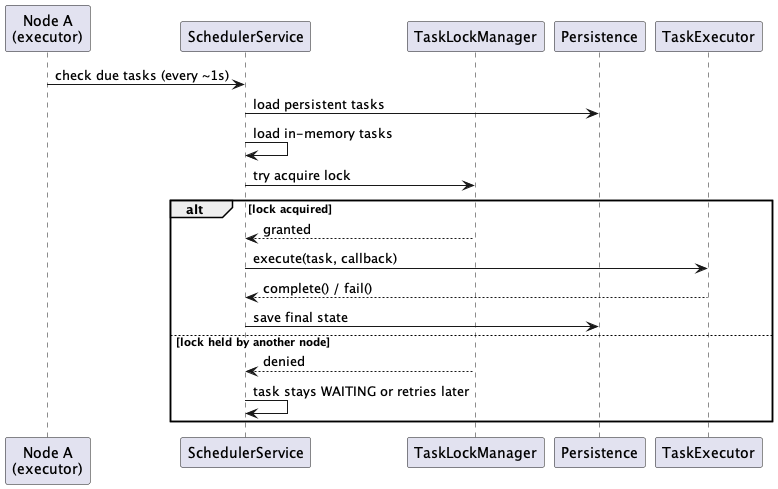
68.2. Core concepts
| Concept | Description |
|---|---|
|
Logical name of the work (for example |
|
Java component that runs the work. Plugins register executors at activation time. |
|
Stored in the persistence layer ( |
In-memory task |
Exists only on the node that created it ( |
Executor node |
A node configured with |
|
When |
Lock |
Prevents duplicate execution of the same task (or task type when parallel execution is disallowed) across the cluster. |
Checkpoint / resume |
Long tasks can save progress and be resumed after a |
68.3. Task model
Tasks are ScheduledTask items (itemType = scheduledTask). Important fields:
| Field | Meaning |
|---|---|
|
Executor lookup key |
|
JSON-serializable map passed to the executor |
|
|
|
|
|
Run once then stop |
|
Recurrence interval (0 means one-shot) |
|
|
|
|
|
Automatic retry policy after failure |
|
Task IDs that must complete first |
|
Progress for resumable work |
|
Cluster coordination metadata |
{
"itemId": "a1b2c3d4-e5f6-7890-abcd-ef1234567890",
"itemType": "scheduledTask",
"taskType": "merge-profiles-reassign-data",
"status": "COMPLETED",
"persistent": true,
"oneShot": true,
"allowParallelExecution": false,
"fixedRate": false,
"period": 0,
"timeUnit": "MILLISECONDS",
"initialDelay": 1000,
"failureCount": 0,
"successCount": 1,
"maxRetries": 3,
"retryDelay": 60000,
"parameters": {
"tenantId": "mytenant",
"masterProfileId": "profile-123",
"mergedProfileIds": ["profile-456", "profile-789"],
"anonymousBrowsing": false
},
"lastExecutedBy": "unomi-node-1",
"lastExecutionDate": "2026-07-12T10:15:30.000Z"
}68.4. Configuration
Scheduler settings live in etc/org.apache.unomi.services.cfg (OSGi PID org.apache.unomi.services).
| Property | Default | Description |
|---|---|---|
|
|
Thread pool size for task execution |
|
|
Unique ID for this node in scheduler logs and task metadata. Set a stable value per node in production clusters. |
|
|
Whether this node runs tasks. Set |
|
|
Lock timeout in milliseconds |
|
|
Enables the built-in periodic purge of old completed tasks |
|
|
Age in days after which completed tasks may be purged |
# Node 1 and 2: REST + task execution
scheduler.executorNode=true
scheduler.nodeId=unomi-executor-1
# Node 3: API only, no task execution
scheduler.executorNode=false
scheduler.nodeId=unomi-api-3After changing configuration, restart the Unomi bundle or the Karaf container.
68.5. REST API
Base path: {unomi}/cxs/tasks
Requires role ROLE_UNOMI_ADMIN or ROLE_UNOMI_TENANT_ADMIN (same as other administrative REST endpoints).
|
Note
|
The REST API is for monitoring and operations (list, inspect, cancel, retry, resume). Creating tasks is done from Java code (SchedulerService) inside services or plugins, not via a public REST POST /tasks endpoint.
|
68.5.1. List tasks
curl -s -u karaf:karaf \
"http://localhost:8181/cxs/tasks?offset=0&limit=20"curl -s -u karaf:karaf \
"http://localhost:8181/cxs/tasks?status=FAILED&limit=50"Valid status values: SCHEDULED, WAITING, RUNNING, COMPLETED, FAILED, CANCELLED, CRASHED.
curl -s -u karaf:karaf \
"http://localhost:8181/cxs/tasks?type=cache-refresh-segment&limit=10"{
"list": [
{
"itemId": "task-uuid-here",
"taskType": "cache-refresh-segment",
"status": "SCHEDULED",
"persistent": false,
"nextScheduledExecution": "2026-07-12T10:16:01.000Z"
}
],
"offset": 0,
"pageSize": 20,
"totalSize": 42,
"totalSizeRelation": "EQUAL"
}68.5.2. Get one task
curl -s -u karaf:karaf \
"http://localhost:8181/cxs/tasks/TASK_ID"68.5.3. Cancel a task
Cancellation stops future runs and marks the task CANCELLED. The task record remains in storage.
curl -s -u karaf:karaf -X DELETE \
"http://localhost:8181/cxs/tasks/TASK_ID"Returns HTTP 204 No Content on success.
68.5.4. Retry a failed task
# Retry keeping failure count
curl -s -u karaf:karaf -X POST \
"http://localhost:8181/cxs/tasks/TASK_ID/retry"
# Retry and reset failure count to zero
curl -s -u karaf:karaf -X POST \
"http://localhost:8181/cxs/tasks/TASK_ID/retry?resetFailureCount=true"68.5.5. Resume a crashed task
Use when status is CRASHED and the executor supports checkpoint resume.
curl -s -u karaf:karaf -X POST \
"http://localhost:8181/cxs/tasks/TASK_ID/resume"68.6. Karaf shell commands
Connect to the shell (ssh -p 8102 karaf@localhost) and use the unomi:task-* commands.
| Command | Description |
|---|---|
|
List tasks. Options: |
|
Detailed view including parameters and checkpoint data |
|
Cancel a task |
|
Retry a failed task ( |
|
Delete old |
|
Show whether this node is an executor node and its |
# List running tasks
unomi:task-list -s RUNNING
# Show tasks created by profile merge follow-up
unomi:task-list -t merge-profiles-reassign-data
# Inspect a single task
unomi:task-show a1b2c3d4-e5f6-7890-abcd-ef1234567890
# Retry after fixing upstream data
unomi:task-retry a1b2c3d4-e5f6-7890-abcd-ef1234567890 --reset
# Purge completed tasks older than 14 days
unomi:task-purge --days 14 --force
# Check executor configuration on this node
unomi:task-executor68.7. Using the scheduler in plugins
Plugins schedule work by:
-
Injecting
SchedulerService(OSGi reference). -
Registering a
TaskExecutorfor a uniquetaskType. -
Creating tasks with
newTask(…),createRecurringTask(…), orcreateTask(…).
68.7.1. Pattern A: one-shot async work (real example)
The mergeProfilesOnProperty action in baseplugin reassigns events and sessions in the background after a profile merge:
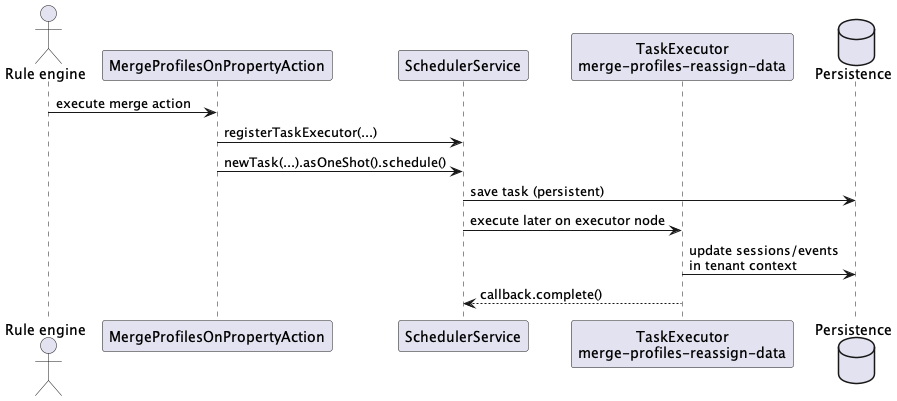
@Reference
private SchedulerService schedulerService;
@Reference
private ExecutionContextManager executionContextManager;
private static final String TASK_TYPE = "merge-profiles-reassign-data";
public void activate() {
schedulerService.registerTaskExecutor(new TaskExecutor() {
@Override
public String getTaskType() {
return TASK_TYPE;
}
@Override
public void execute(ScheduledTask task, TaskStatusCallback callback) {
try {
String tenantId = (String) task.getParameters().get("tenantId");
executionContextManager.executeAsTenant(tenantId, () -> {
// ... reassign sessions/events ...
return null;
});
callback.complete();
} catch (Exception e) {
callback.fail(e.getMessage());
}
}
});
}
public void scheduleReassign(String tenantId, String masterId, List<String> mergedIds) {
schedulerService.newTask(TASK_TYPE)
.withParameters(Map.of(
"tenantId", tenantId,
"masterProfileId", masterId,
"mergedProfileIds", mergedIds,
"anonymousBrowsing", false
))
.withInitialDelay(1, TimeUnit.SECONDS)
.asOneShot()
.disallowParallelExecution()
.schedule();
}|
Important
|
When task parameters include a tenantId, always run the work inside executionContextManager.executeAsTenant(…) (or set the security subject explicitly) so persistence queries respect tenant isolation.
|
68.7.2. Pattern B: simple recurring maintenance
For straightforward periodic code without a custom executor class:
schedulerService.createRecurringTask(
"my-plugin-daily-cleanup",
24, TimeUnit.HOURS,
() -> cleanupStaleLocalCache(),
false // non-persistent: each node runs its own copy if executor
);68.7.3. Pattern C: fluent builder (recommended)
The builder covers most scheduling options in one place.
schedulerService.newTask("export-tenant-snapshot")
.withParameters(Map.of("tenantId", "mytenant", "destination", "/tmp/export"))
.withInitialDelay(5, TimeUnit.SECONDS)
.asOneShot()
.withMaxRetries(3)
.withRetryDelay(2, TimeUnit.MINUTES)
.disallowParallelExecution()
.withExecutor(myExportExecutor)
.schedule();schedulerService.newTask("refresh-external-lookup")
.withPeriod(15, TimeUnit.MINUTES)
.withFixedDelay()
.disallowParallelExecution()
.nonPersistent()
.withSimpleExecutor(() -> refreshLookupTable())
.schedule();schedulerService.newTask("local-temp-file-cleanup")
.withPeriod(1, TimeUnit.HOURS)
.withFixedDelay()
.runOnAllNodes()
.nonPersistent()
.withSimpleExecutor(() -> deleteStaleTempFiles())
.schedule();ScheduledTask extract = schedulerService.newTask("etl-extract")
.asOneShot()
.withExecutor(extractExecutor)
.schedule();
schedulerService.newTask("etl-load")
.asOneShot()
.withDependencies(extract.getItemId())
.withExecutor(loadExecutor)
.schedule();68.7.4. Pattern D: resumable long-running executor
For work that may run longer than a node failover window, save checkpoints and implement canResume / resume:
public class BulkReindexExecutor implements TaskExecutor {
@Override
public String getTaskType() {
return "bulk-reindex";
}
@Override
public void execute(ScheduledTask task, TaskStatusCallback callback) {
runFromOffset(task, callback, 0);
}
@Override
public boolean canResume(ScheduledTask task) {
return task.getCheckpointData() != null
&& task.getCheckpointData().containsKey("lastOffset");
}
@Override
public void resume(ScheduledTask task, TaskStatusCallback callback) {
int offset = ((Number) task.getCheckpointData().get("lastOffset")).intValue();
runFromOffset(task, callback, offset);
}
private void runFromOffset(ScheduledTask task, TaskStatusCallback callback, int start) {
try {
for (int i = start; i < total; i += batchSize) {
reindexBatch(i, batchSize);
callback.updateStep("reindex", Map.of("lastOffset", i + batchSize));
callback.checkpoint(Map.of("lastOffset", i + batchSize));
}
callback.complete();
} catch (Exception e) {
callback.fail(e.getMessage());
}
}
}After a crash, operators can call POST /cxs/tasks/{id}/resume or unomi:task-retry depending on the failure mode.
68.7.5. OSGi Declarative Services wiring
Inject SchedulerService with @Reference in your plugin component.
New plugins use Declarative Services — not Blueprint XML (see Writing plugins).
@Component(service = MyPluginService.class)
public class MyPluginService {
private SchedulerService schedulerService;
private TaskExecutor registeredExecutor;
@Reference
public void setSchedulerService(SchedulerService schedulerService) {
this.schedulerService = schedulerService;
}
@Activate
public void activate() {
registeredExecutor = new MyTaskExecutor();
schedulerService.registerTaskExecutor(registeredExecutor);
}
@Deactivate
public void deactivate() {
if (schedulerService != null && registeredExecutor != null) {
schedulerService.unregisterTaskExecutor(registeredExecutor);
}
}
}Register the executor in activate() and unregister in deactivate() when possible.
Pattern A above uses the same @Reference injection style for SchedulerService.
68.8. Built-in tasks you will see in production
Unomi core and plugins already create scheduler tasks. These are normal and expected:
| Task type (examples) | Purpose |
|---|---|
|
Reload segments, rules, property types, scopes, etc. from persistence into memory |
|
System task that purges old completed scheduler tasks |
|
Async session/event reassignment after profile merge ( |
Use unomi:task-list or GET /cxs/tasks?type=… to inspect them.
68.9. Metrics
SchedulerService exposes counters useful for monitoring:
Map<String, Long> metrics = schedulerService.getAllMetrics();
// keys include:
// tasks.completed, tasks.failed, tasks.crashed, tasks.running,
// tasks.lock.conflicts, tasks.recovery.attempts, ...In custom code:
long failures = schedulerService.getMetric("tasks.failed");68.10. Choosing persistence and execution settings
| Need | persistent? | runOnAllNodes? | Notes |
|---|---|---|---|
Cluster-wide job (ETL, merge follow-up) |
yes |
no |
Survives restart; one executor runs it |
Per-node cache refresh |
no |
no or yes |
|
Fire-and-forget after HTTP request |
yes or no |
no |
One-shot; tune |
Must never overlap |
any |
any |
|
68.11. Troubleshooting
| Symptom | What to check |
|---|---|
Task stays |
Is this node an executor ( |
Task stays |
Another run may hold the lock, or a dependency task is not |
Task |
Read |
Task |
Node failure during run; use resume if checkpoints exist |
Duplicate cache refresh tasks |
Use |
Tenant data wrong in background job |
Missing |
68.12. Related documentation
-
Tenant REST examples — creating tenants whose data background tasks will process
-
Karaf shell — operational commands including
unomi:task-* -
Writing plugins — DS plugin registration and
META-INF/cxs/layout -
Multitenancy — tenant isolation rules
69. Health check
The health check endpoint and providers are documented in the Configuration chapter: Health check extension.
70. Reference
70.2. High-Level Architecture
|
Note
|
Unomi 3.1 adds multi-tenancy, task scheduling, and persistence-based clustering. The diagram below focuses on core request processing. |
70.4. Condition Evaluation Architecture
70.4.1. Key Components
-
ConditionDispatcher
-
Routes conditions to appropriate evaluators
-
Determines evaluation strategy (direct vs query-based)
-
Handles caching and optimization
-
-
ConditionEvaluator
-
Performs direct condition evaluation
-
Handles boolean logic and property comparisons
-
Evaluates nested conditions
-
-
QueryBuilders
-
Convert conditions to search engine queries
-
Handle search engine specific syntax
-
Optimize query performance
-
70.5. Data Flow
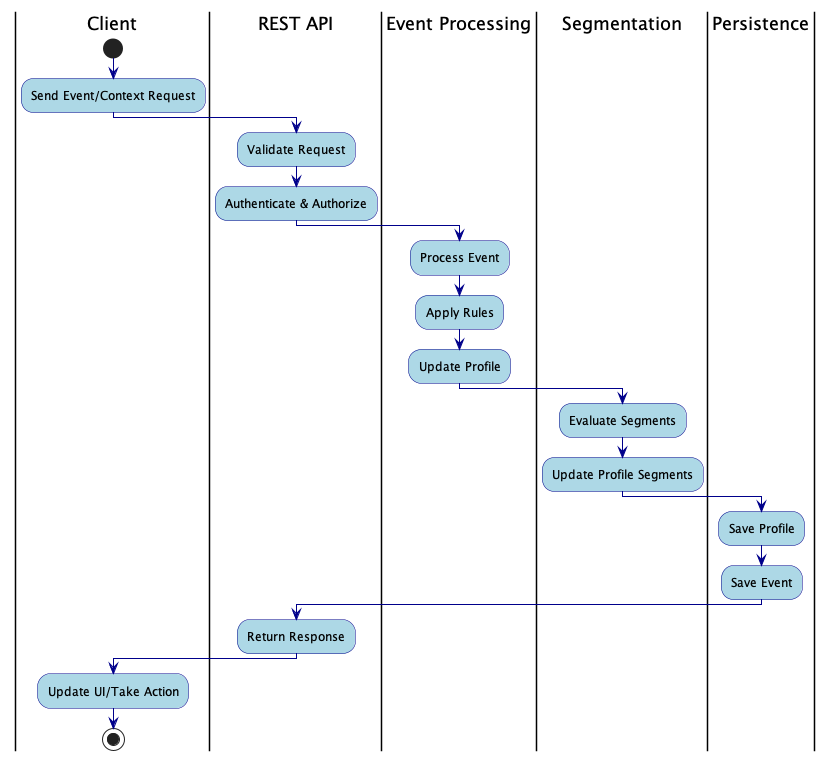
70.5.3. Base Types
All major entities in Apache Unomi inherit from two base classes that provide essential functionality:
70.5.4. Core Entities and Their Relationships
This diagram shows the key data structures in Apache Unomi and their relationships:
70.5.5. Key Relationships
-
Profile is the central entity representing a visitor/customer
-
Properties are fully extensible via Map structure
-
Segments are dynamically evaluated and stored as Set
-
Scores track numeric metrics per profile
-
Consents manage user permissions and preferences
-
System properties store internal data
-
-
Event represents any interaction or activity
-
Always associated with both profile and session
-
Can be persistent (stored) or transient
-
Carries properties and context attributes
-
Timestamp tracks occurrence time
-
Can trigger rules and goals
-
-
Session represents a time-bounded interaction period
-
Belongs to a single profile
-
Tracks duration and last activity
-
Maintains size counter for events
-
Properties store session-specific state
-
-
Rule defines automated behavior
-
Processes events using conditions
-
Executes actions when conditions match
-
Priority controls execution order
-
Can limit event generation:
-
Once per profile
-
Once per session
-
Once globally
-
-
-
Segment groups profiles dynamically
-
Uses conditions to determine membership
-
Profiles can belong to multiple segments
-
Automatically maintained by the system
-
-
Goal tracks objective completion
-
Defined by start and target conditions
-
Can be part of a campaign
-
Triggered by specific events
-
-
Campaign organizes marketing activities
-
Contains multiple goals
-
Tracks costs and timeframes
-
Associates profiles with marketing efforts
-
Supports timezone-aware scheduling
-
-
Consent manages user permissions
-
Scoped to specific areas/features
-
Tracks status and dates
-
Supports revocation
-
Linked to profiles
-
All these entities inherit from MetadataItem which provides:
- Metadata (name, description, scope, tags)
- Enabled/disabled status
- Hidden/visible status
- Read-only protection
- Version tracking
70.5.6. Detailed Structure Definitions
The following sections provide detailed diagrams for each major component:
70.5.7. Condition Structure
Conditions are the fundamental building blocks used across many Unomi components. They evaluate to true/false and can be composed.
70.5.8. Segment Structure
Segments group profiles based on conditions. They are dynamic - profiles can enter/exit based on condition evaluation.
70.5.11. Campaign Structure
Campaigns organize marketing activities with goals, timeframes and costs.
70.5.12. Integration Flow
This diagram shows how these components work together in practice.
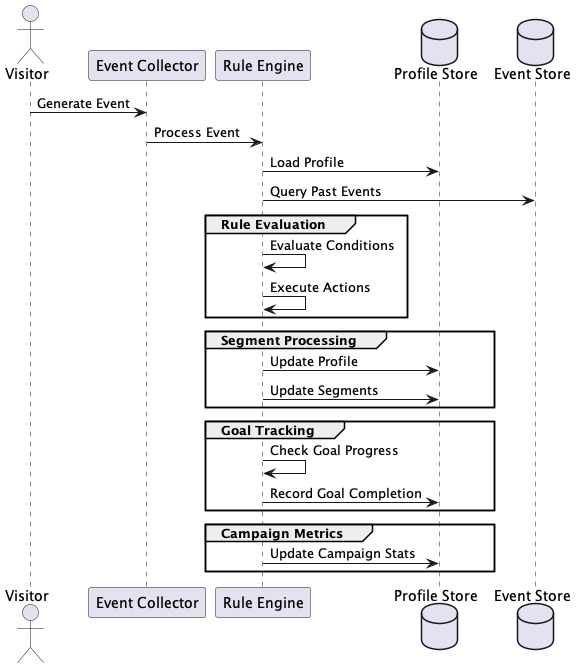
The diagrams above illustrate the key data structures in Apache Unomi and how they work together to enable personalization and marketing automation. Each component builds on the foundational concept of conditions to create increasingly sophisticated targeting and tracking capabilities.
70.5.13. Condition Composition Structure
The following diagram illustrates how conditions can be nested and composed to create complex matching logic:
Past Event Condition Structure
Past event conditions have a special structure that allows for complex temporal matching:
These diagrams show how conditions can be: 1. Nested using BooleanCondition to create complex logical expressions 2. Combined with PastEventCondition to match historical behavior 3. Enhanced with property constraints at any level 4. Used to create sophisticated temporal and behavioral matching rules
70.5.17. Security Architecture
For tenant API keys, roles (ROLE_UNOMI_TENANT_USER, ROLE_UNOMI_TENANT_ADMIN, system administrator), and operation permissions, see Multi-tenancy.
70.5.18. Authentication overview
Unomi 3.1 uses a layered authentication model:
-
Public endpoints (for example
/cxs/context.json,/cxs/eventcollector): require a tenant public API key via theX-Unomi-Api-Keyheader. -
Private REST endpoints: require tenant
tenantId:privateApiKeybasic authentication, or JAAS credentials with theX-Unomi-Tenant-Idheader. -
System administrator: Karaf JAAS user (for example
karaf:karaf) for tenant management and cluster operations.
Configuration keys live in etc/org.apache.unomi.rest.authentication.cfg and custom.system.properties. Tenant API key settings are in etc/org.apache.unomi.tenant.cfg.
For endpoint lists, auth examples, and migration from 2.x/3.0, see Multi-tenancy, Tenant management in Configuration, and V2 compatibility mode.
70.5.19. Request tracing
Administrators with the appropriate roles can enable request tracing with explain=true on context and event-collector requests. See Using the explain parameter for request tracing.
70.6. Useful Apache Unomi URLs
In this section we will list some useful URLs that can be used to quickly access parts of Apache Unomi that can help you understand or diagnose what is going on in the system.
You can of course find more information about the REST API in the related section in the Apache Unomi website.
For these requests it can be nice to use a browser (such as Firefox) that understands JSON to make it easier to view the results as the returned JSON is not beautified (another possiblity is a tool such as Postman).
Important : all URLs are relative to the private Apache Unomi URL, by default: https://localhost:9443
| Path | Method | Description |
|---|---|---|
/cxs/profiles/properties |
GET |
Listing deployed properties |
/cxs/definitions/conditions |
GET |
Listing deployed conditions |
/cxs/definitions/actions |
GET |
Listing deployed actions |
/cxs/profiles/PROFILE_ID |
GET |
Dumping a profile in JSON |
/cxs/profiles/PROFILE_ID/sessions |
GET |
Listing sessions for a profile |
/cxs/profiles/sessions/SESSION_ID |
GET |
Dumping a session in JSON |
/cxs/profiles/sessions/SESSION_ID/events |
GET |
Listing events for a session. This query can have additional such as eventTypes, q (query), offset, size, sort. See the related section in the REST API for details. |
/cxs/events/search |
POST |
Listing events for a profile. You will need to provide a query in the body of the request that looks something like this (and documentation is available in the REST API) : { "offset" : 0, "limit" : 20, "condition" : { "type": "eventPropertyCondition", "parameterValues" : { "propertyName" : "profileId", "comparisonOperator" : "equals", "propertyValue" : "PROFILE_ID" } } } where PROFILE_ID is a profile identifier. This will indeed retrieve all the events for a given profile. |
/cxs/rules/statistics |
GET |
Get all rule execution statistics |
/cxs/rules/statistics |
DELETE |
Reset all rule execution statistics to 0 |
/cxs/tasks |
GET |
Listing scheduled background tasks (see Task scheduler) (filter with |
/cxs/tasks/{taskId} |
GET |
View a single scheduled task |
/cxs/tasks/{taskId} |
DELETE |
Cancel a scheduled task |
/cxs/tasks/{taskId}/retry |
POST |
Retry a failed task ( |
/cxs/tasks/{taskId}/resume |
POST |
Resume a crashed task from checkpoint |
/cxs/tenants |
GET |
List all tenants (system administrator only). See Multi-tenancy. |
/cxs/tenants/{tenantId} |
GET |
Get one tenant (system administrator or tenant administrator for that tenant). |
/cxs/tenants |
POST |
Create a tenant (system administrator). Returns generated public and private API keys. |
/cxs/tenants/{tenantId}/apikeys |
POST |
Generate a new API key ( |
/cxs/tenants/{tenantId}/usage |
GET |
Tenant usage snapshot ( |
/cxs/tenants/{tenantId}/purge/events |
POST |
Purge events older than |
/cxs/cluster |
GET |
List cluster nodes and statistics. See Cluster setup. |
/health/check |
GET |
Health check JSON (role |
/cxs/context.json?explain=true |
POST |
Context request with request tracing (admin roles). See Using the explain parameter for request tracing. |
70.7. How profile tracking works
In this section you will learn how Apache Unomi keeps track of visitors and processes context requests.
70.7.1. Overview
When a visitor interacts with a website that uses Apache Unomi, a single request to the /cxs/context.json or /cxs/context.js endpoint can perform multiple operations:
-
Automatically create or load a visitor profile
-
Automatically create or load a visitor session
-
Process events (if provided)
-
Execute rules triggered by those events
-
Resolve personalization (if requested)
-
Set a cookie with the profile ID for future requests
All of this happens in a single request-response cycle, making Apache Unomi efficient and easy to integrate.
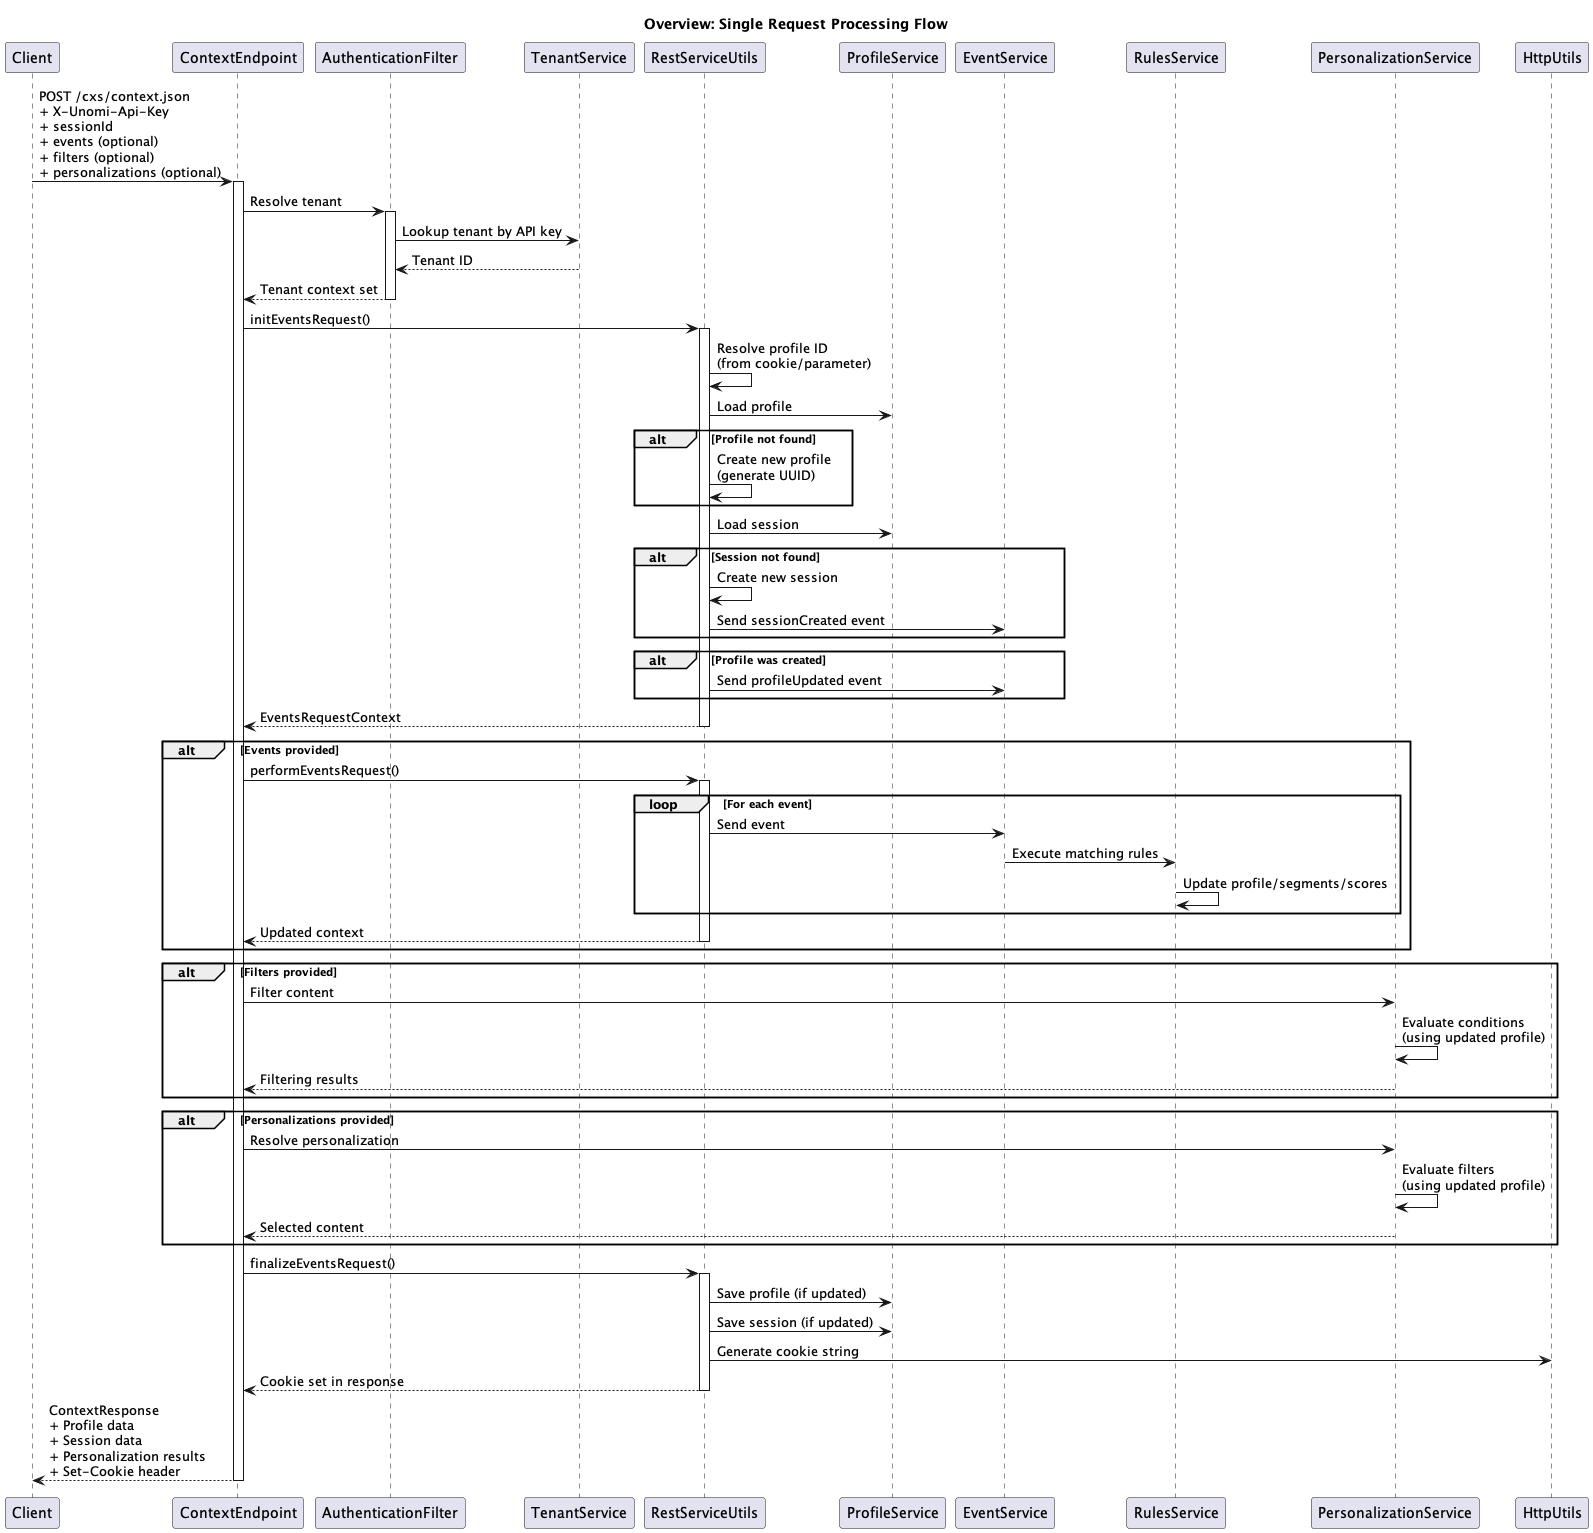
70.7.2. Detailed Request Flow
When a request is made to /cxs/context.json or /cxs/context.js, Apache Unomi processes it through the following steps:
|
Important
|
Tenant Resolution (Version 3.1+) Starting with Apache Unomi 3.1, tenant resolution is mandatory for all requests to
If no tenant can be resolved, the request will fail with an |
Example: Tenant Resolution
Here are examples of how to authenticate and resolve the tenant:
Example 1: Using Public API Key (Recommended)
curl -X POST http://localhost:8181/cxs/context.json?sessionId=1234 \
-H "X-Unomi-Api-Key: public-key-abc123..." \
-H "Content-Type: application/json" \
-d '{
"source": {
"itemId": "homepage",
"itemType": "page",
"scope": "mydigital"
}
}'The tenant is automatically resolved from the public API key. No additional headers needed.
Example 2: Using Basic Auth with Private API Key
curl -X POST http://localhost:8181/cxs/context.json?sessionId=1234 \
--user "mytenant:private-key-xyz789..." \
-H "Content-Type: application/json" \
-d '{
"source": {
"itemId": "homepage",
"itemType": "page",
"scope": "mydigital"
}
}'The tenant is resolved from the Basic Auth credentials (mytenant is the tenant ID).
Example 3: Using JAAS Auth with Tenant Header
curl -X POST http://localhost:8181/cxs/context.json?sessionId=1234 \
--user "karaf:karaf" \
-H "X-Unomi-Tenant-Id: mytenant" \
-H "Content-Type: application/json" \
-d '{
"source": {
"itemId": "homepage",
"itemType": "page",
"scope": "mydigital"
}
}'The tenant is resolved from the X-Unomi-Tenant-Id header when using JAAS authentication.
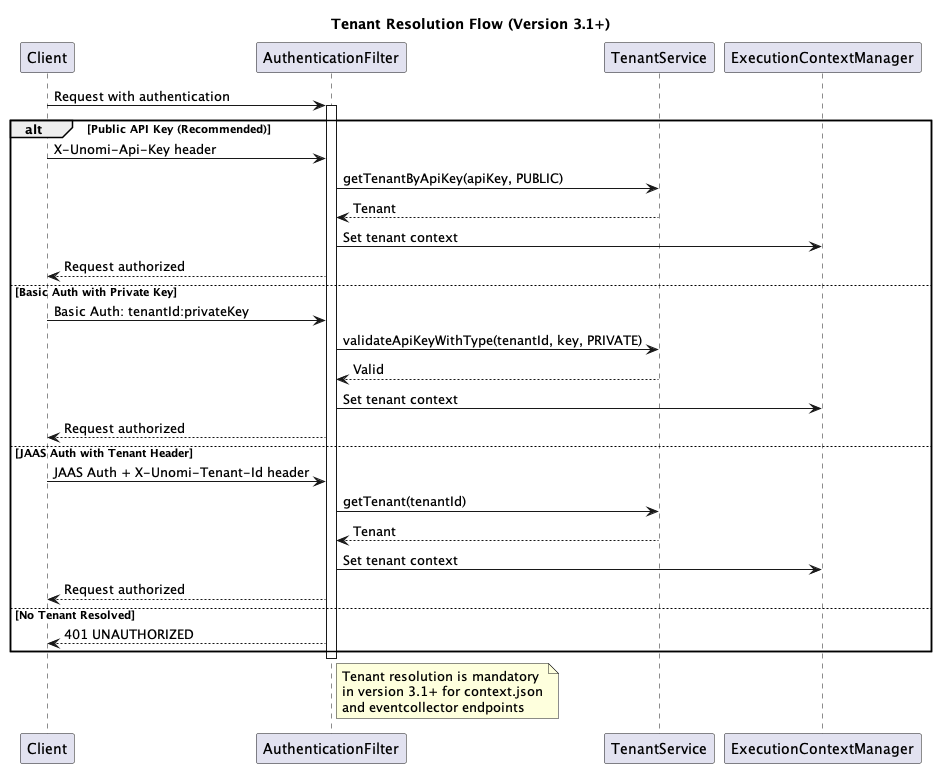
Step 1: Profile Identification and Creation
|
Important
|
At least one of the following must be provided in the request: |
Apache Unomi attempts to identify the visitor’s profile through the following process:
-
Profile ID Resolution:
-
First checks for a
profileIdparameter in the request -
If not found, looks for a cookie named
context-profile-id(configurable viaorg.apache.unomi.profile.cookie.name) -
Cookie values are validated against a JSON schema - invalid values (e.g., containing script tags) will cause a
400 Bad Requesterror -
The resolved profile ID is used to attempt loading the profile from the database
-
-
Session Profile Override (if session exists):
-
If a session is found (see Step 2) and contains a profile ID that differs from the cookie/profileId parameter
-
Apache Unomi uses the session’s profile ID instead (this handles cases where a user switches accounts)
-
The profile is reloaded from the database using the session’s profile ID
-
-
Profile Creation: If no profile ID is found or the profile doesn’t exist:
-
If a profile ID was provided (from parameter or cookie) but doesn’t exist in the database, creates a new profile with that ID
-
If no profile ID was found, generates a new UUID as the profile ID and creates a new profile
-
Sets the
firstVisitproperty to the current timestamp -
Marks the profile for persistence
-
Note: The
profileUpdatedevent is sent after session creation (if a session is created) to ensure proper event ordering
-
This ensures that profiles are always available for processing, even for first-time visitors or after database resets.
|
Important
|
The profile ID is always server-generated (UUID format). Even if a client sends a custom profile ID in a cookie or parameter, Apache Unomi validates it exists in the database. If it doesn’t exist, a new profile is created (potentially with that ID if provided via parameter, or with a newly generated UUID). This makes profile IDs secure and prevents profile ID manipulation. |
Example: Profile Identification
Example 1: First-Time Visitor (No Cookie)
# Request (no cookie sent)
curl -X POST http://localhost:8181/cxs/context.json?sessionId=1234 \
-H "X-Unomi-Api-Key: YOUR_PUBLIC_API_KEY" \
-H "Content-Type: application/json" \
-d '{
"source": {
"itemId": "homepage",
"itemType": "page",
"scope": "mydigital"
}
}'Response Headers:
Set-Cookie: context-profile-id=a1b2c3d4-e5f6-7890-abcd-ef1234567890; Path=/; Max-Age=31536000; SameSite=LaxResponse Body:
{
"profileId": "a1b2c3d4-e5f6-7890-abcd-ef1234567890",
"sessionId": "1234"
}Apache Unomi generated a new UUID (a1b2c3d4-e5f6-7890-abcd-ef1234567890) and created a new profile. The profile ID is returned in both the response body and the Set-Cookie header.
Example 2: Returning Visitor (With Cookie)
# Request (browser automatically sends cookie)
curl -X POST http://localhost:8181/cxs/context.json?sessionId=1234 \
-H "X-Unomi-Api-Key: YOUR_PUBLIC_API_KEY" \
-H "Cookie: context-profile-id=a1b2c3d4-e5f6-7890-abcd-ef1234567890" \
-H "Content-Type: application/json" \
-d '{
"source": {
"itemId": "homepage",
"itemType": "page",
"scope": "mydigital"
}
}'Response:
{
"profileId": "a1b2c3d4-e5f6-7890-abcd-ef1234567890",
"sessionId": "1234"
}Apache Unomi loaded the existing profile using the profile ID from the cookie.
Example 3: Using profileId Parameter
# Request with explicit profileId parameter
curl -X POST "http://localhost:8181/cxs/context.json?sessionId=1234&profileId=a1b2c3d4-e5f6-7890-abcd-ef1234567890" \
-H "X-Unomi-Api-Key: YOUR_PUBLIC_API_KEY" \
-H "Content-Type: application/json" \
-d '{
"source": {
"itemId": "homepage",
"itemType": "page",
"scope": "mydigital"
}
}'The profileId parameter takes precedence over the cookie value.
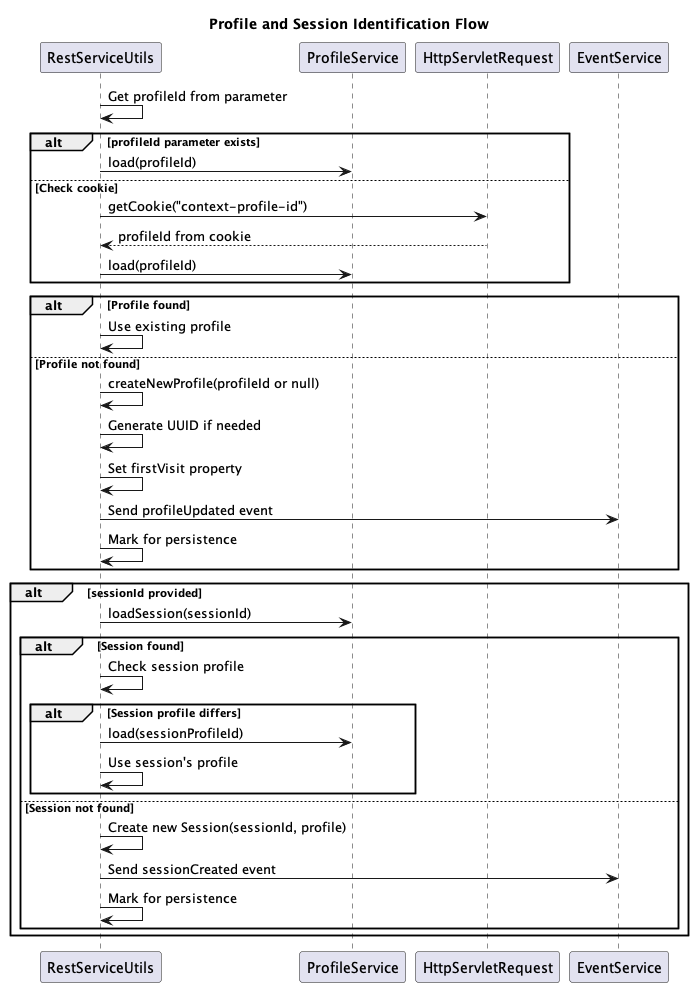
Step 2: Session Identification and Creation
If a sessionId is provided in the request:
-
Session Loading: Apache Unomi attempts to load the existing session from the database
-
Profile Association: If a session is found, it may contain a profile ID that takes precedence over the cookie/profileId parameter
-
Session Creation: If no session is found or the session is invalidated:
-
Creates a new session with the provided
sessionId -
Associates the session with the current profile (or anonymous profile if privacy settings require it)
-
Sends a
sessionCreatedevent (this happens before theprofileUpdatedevent if both profile and session are created) -
Marks the session for persistence
-
After session creation, if a new profile was created, sends a
profileUpdatedevent (non-persistent) to mark the profile creation
-
If no sessionId is provided, a transient (non-persisted) session may be used for the request.
Example: Session Creation
Example: Creating a New Session
# First request with a new sessionId
curl -X POST http://localhost:8181/cxs/context.json?sessionId=abc-123-xyz \
-H "X-Unomi-Api-Key: YOUR_PUBLIC_API_KEY" \
-H "Content-Type: application/json" \
-d '{
"source": {
"itemId": "homepage",
"itemType": "page",
"scope": "mydigital"
}
}'Apache Unomi will:
1. Check if session abc-123-xyz exists
2. If not found, create a new session with ID abc-123-xyz
3. Associate it with the current profile
4. Send a sessionCreated event
5. Save the session to the database
Subsequent Request with Same Session:
# Request with existing sessionId
curl -X POST http://localhost:8181/cxs/context.json?sessionId=abc-123-xyz \
-H "X-Unomi-Api-Key: YOUR_PUBLIC_API_KEY" \
-H "Cookie: context-profile-id=a1b2c3d4-e5f6-7890-abcd-ef1234567890" \
-H "Content-Type: application/json" \
-d '{
"source": {
"itemId": "product-page",
"itemType": "page",
"scope": "mydigital"
}
}'Apache Unomi loads the existing session abc-123-xyz and uses the profile associated with it.
Step 3: Event Processing
If events are provided in the request body:
-
Event Validation: Each event is validated against its JSON schema
-
Event Authorization:
-
Events are checked for tenant authorization (the tenant must be authorized to send the event type)
-
Events are filtered based on privacy settings (if the profile has opted out of certain event types)
-
Events are checked against IP address restrictions if configured
-
-
Event Execution: For each valid event:
-
The event is sent to the event service
-
All matching rules are automatically executed (this happens synchronously during the request)
-
Rules can trigger actions that modify the profile, session, or trigger other events
-
Profile segments and scores are recalculated based on rule execution
-
If the profile is updated during rule execution, the updated profile is used for subsequent events in the same request
-
-
Profile Updates: If events cause profile changes, the profile is marked for persistence
This is where the power of Apache Unomi’s rule engine comes into play - events automatically trigger rules, which can perform complex logic, update profiles, add segments, calculate scores, and more. All of this happens within the same request, ensuring that personalization and subsequent operations use the most up-to-date profile state.
Example: Event Processing with Rule Execution
Example: Sending a View Event
curl -X POST http://localhost:8181/cxs/context.json?sessionId=1234 \
-H "X-Unomi-Api-Key: YOUR_PUBLIC_API_KEY" \
-H "Cookie: context-profile-id=a1b2c3d4-e5f6-7890-abcd-ef1234567890" \
-H "Content-Type: application/json" \
-d '{
"source": {
"itemId": "product-page",
"itemType": "page",
"scope": "mydigital"
},
"events": [
{
"eventType": "view",
"scope": "mydigital",
"source": {
"itemType": "site",
"scope": "mydigital",
"itemId": "mysite"
},
"target": {
"itemType": "product",
"scope": "mydigital",
"itemId": "product-123",
"properties": {
"name": "Awesome Product",
"category": "electronics",
"price": 99.99
}
}
}
]
}'What Happens:
-
The
viewevent is validated against its schema -
The event is checked for tenant authorization
-
The event is sent to the event service
-
All rules matching the
viewevent are executed:-
Rules might increment a
pageViewCountproperty -
Rules might add the profile to a "product-viewers" segment
-
Rules might calculate a score based on product category
-
Rules might trigger additional events
-
-
The profile is updated with any changes from rule execution
-
The updated profile is used for personalization (if requested)
Response:
{
"profileId": "a1b2c3d4-e5f6-7890-abcd-ef1234567890",
"sessionId": "1234",
"processedEvents": 1
}The processedEvents field indicates that 1 event was successfully processed. The profile may have been updated by rules triggered by this event.
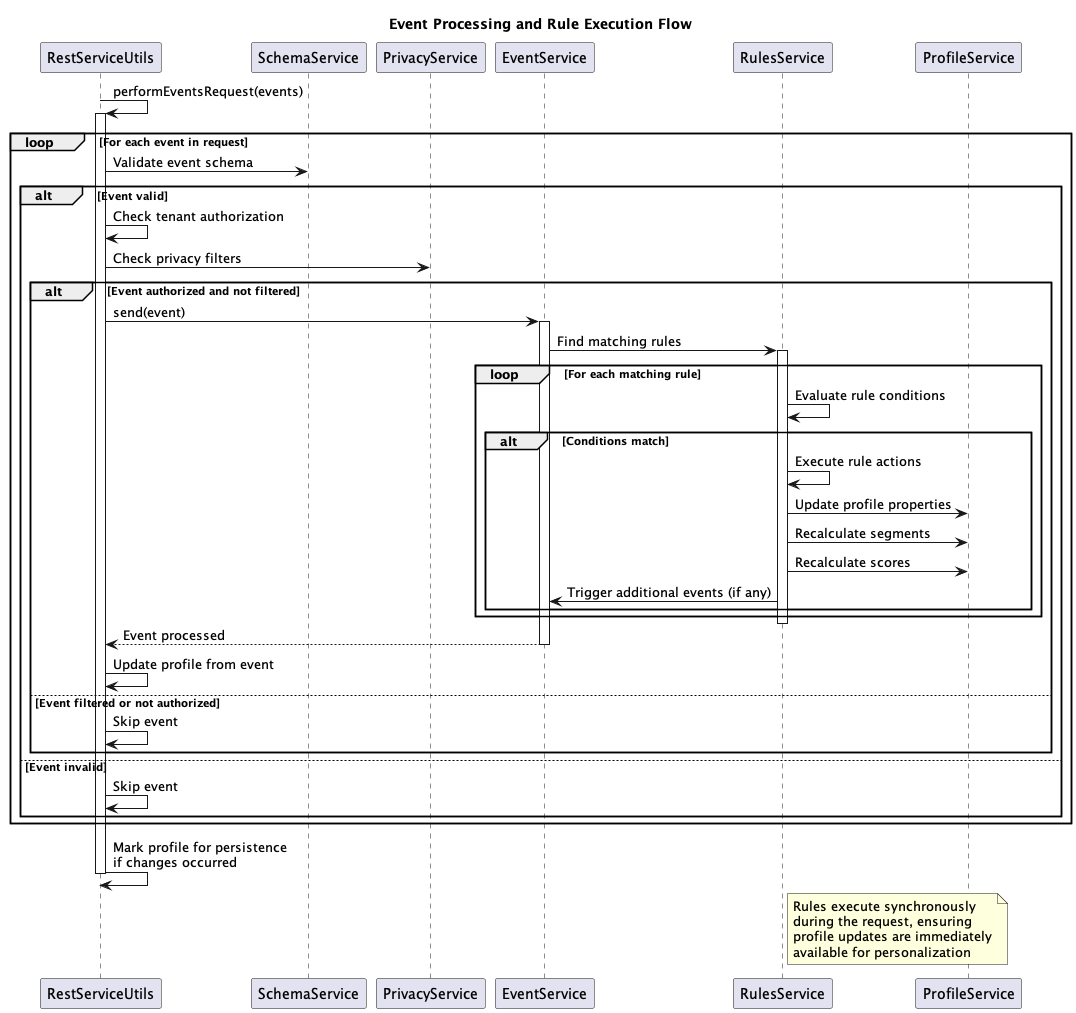
Step 4: Content Filtering and Personalization Resolution
If filters or personalization requests are provided in the request body:
-
Content Filtering (if
filtersare provided):-
For each filter node, evaluates conditions against the current profile and session
-
Returns filtering results indicating which content variants match
-
Results are added to the response’s
filteringResultsobject
-
-
Personalization Resolution (if
personalizationsare provided):-
For each personalization request:
-
Evaluates content filters against the current profile and session (which may have been updated by events in Step 3)
-
Filters use conditions to determine which content variants match
-
Applies the personalization strategy (e.g., "matching-first", "random", etc.)
-
Content Selection: Selects the appropriate content based on:
-
Filter condition evaluation results
-
Personalization strategy
-
Fallback content (if no filters match)
-
Results are added to both
personalizationResults(detailed results) andpersonalizations(selected content IDs) in the response
-
Note that personalization uses the profile state after event processing, ensuring that events can influence which content is selected.
Example: Personalization Resolution
Example: Request with Events and Personalization
curl -X POST http://localhost:8181/cxs/context.json?sessionId=1234 \
-H "X-Unomi-Api-Key: YOUR_PUBLIC_API_KEY" \
-H "Cookie: context-profile-id=a1b2c3d4-e5f6-7890-abcd-ef1234567890" \
-H "Content-Type: application/json" \
-d '{
"source": {
"itemId": "homepage",
"itemType": "page",
"scope": "mydigital"
},
"events": [
{
"eventType": "view",
"scope": "mydigital",
"target": {
"itemType": "page",
"scope": "mydigital",
"itemId": "homepage"
}
}
],
"personalizations": [
{
"id": "homepage-hero",
"strategy": "matching-first",
"strategyOptions": {
"fallback": "default-hero"
},
"contents": [
{
"id": "premium-user-hero",
"content": "Welcome, Premium Member!",
"filters": [
{
"condition": {
"type": "profileSegmentCondition",
"parameterValues": {
"segments": ["premium-users"]
}
}
}
]
},
{
"id": "new-visitor-hero",
"content": "Welcome! Sign up today!",
"filters": [
{
"condition": {
"type": "profilePropertyCondition",
"parameterValues": {
"propertyName": "properties.firstVisit",
"comparisonOperator": "exists"
}
}
}
]
}
]
}
],
"requireSegments": true
}'Processing Flow:
-
Event Processing: The
viewevent is processed first, which may trigger rules that:-
Add the profile to segments
-
Update profile properties
-
Calculate scores
-
-
Personalization Resolution: After events are processed, personalization is evaluated:
-
For a first-time visitor: The
new-visitor-herocontent matches (becausefirstVisitexists) -
For a premium user: The
premium-user-herocontent matches (if the profile is in the "premium-users" segment) -
The
matching-firststrategy selects the first matching content
-
-
Response: The response includes the selected content
Response:
{
"profileId": "a1b2c3d4-e5f6-7890-abcd-ef1234567890",
"sessionId": "1234",
"processedEvents": 1,
"profileSegments": ["new-visitors"],
"personalizations": {
"homepage-hero": "new-visitor-hero"
},
"personalizationResults": {
"homepage-hero": {
"selectedContentId": "new-visitor-hero",
"strategy": "matching-first"
}
}
}The personalizations object shows the selected content ID for each personalization request. The personalizationResults provides detailed information about the selection process.
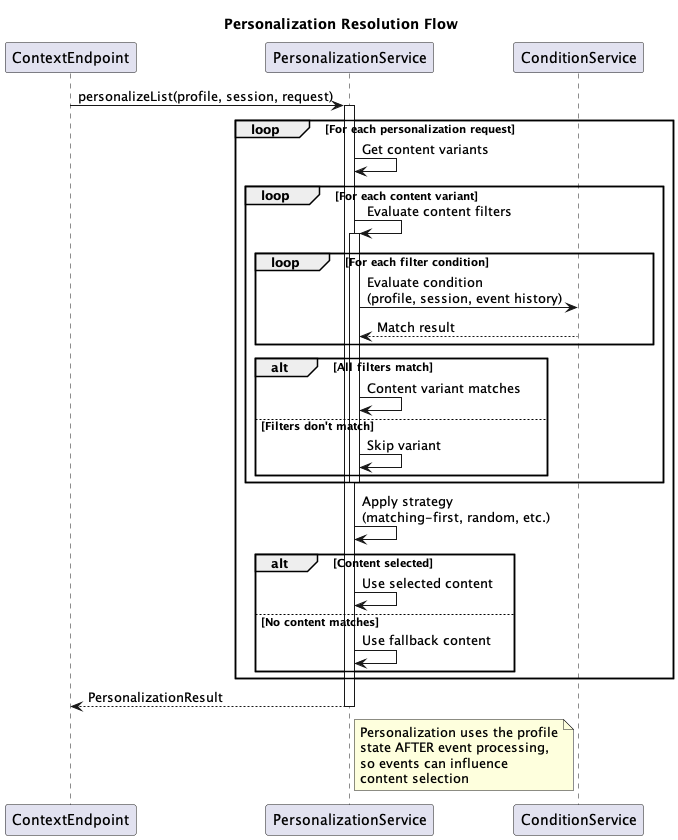
Step 5: Response Preparation
The response is built with the following information (based on what was requested in the ContextRequest):
-
Profile Information:
-
Profile ID (always included)
-
Profile properties (if
requiredProfilePropertiesis specified, with"*"for all properties) -
Profile segments (if
requireSegmentsistrue) -
Profile scores (if
requireScoresistrue) -
Anonymous browsing status
-
Consent information
-
Session Information:
-
Session ID (if session exists)
-
Session properties (if
requiredSessionPropertiesis specified) -
Event Processing Results:
-
Count of processed events (
processedEvents) -
Personalization Results:
-
personalizations: Map of personalization ID to selected content IDs -
personalizationResults: Detailed results for each personalization request -
Filtering Results:
-
filteringResults: Results of content filtering operations (iffilterswere provided) -
Tracked Conditions:
-
Conditions that are being tracked for the current source (if not using a Persona)
Step 6: Cookie Setting
After processing, Apache Unomi sets a cookie in the HTTP response header (Set-Cookie) with:
|
Note
|
Cookies are only set for regular profiles, not for Personas. If a |
-
Cookie Name:
context-profile-id(configurable, default:context-profile-id) -
Cookie Value: The profile ID (UUID)
-
Cookie Attributes:
-
Path=/- Available for all paths on the domain -
Max-Age=31536000- Valid for 1 year by default (configurable viaorg.apache.unomi.profile.cookie.maxAgeInSeconds) -
SameSite=Lax- CSRF protection -
Secure- Set if the request is over HTTPS (configurable) -
HttpOnly- Configurable viaorg.apache.unomi.profile.cookie.httpOnly(default: false) -
Domain- Configurable viaorg.apache.unomi.profile.cookie.domain
This cookie allows the browser to automatically send the profile ID on subsequent requests, enabling Apache Unomi to load the existing profile.
Example: Cookie Setting
Example: Cookie in Response Headers
When you make a request, Apache Unomi sets a cookie in the response. Here’s what the cookie looks like:
Response Headers:
HTTP/1.1 200 OK
Content-Type: application/json;charset=UTF-8
Set-Cookie: context-profile-id=a1b2c3d4-e5f6-7890-abcd-ef1234567890; Path=/; Max-Age=31536000; SameSite=LaxCookie Breakdown:
* context-profile-id - Cookie name (configurable)
* a1b2c3d4-e5f6-7890-abcd-ef1234567890 - Profile ID (UUID)
* Path=/ - Available for all paths on the domain
* Max-Age=31536000 - Valid for 1 year (31,536,000 seconds)
* SameSite=Lax - CSRF protection
Subsequent Requests:
On the next request, the browser automatically includes the cookie:
# Browser automatically sends cookie
GET /cxs/context.json?sessionId=1234 HTTP/1.1
Host: localhost:8181
X-Unomi-Api-Key: YOUR_PUBLIC_API_KEY
Cookie: context-profile-id=a1b2c3d4-e5f6-7890-abcd-ef1234567890Apache Unomi reads the cookie and loads the existing profile, maintaining continuity across requests.
Step 7: Persistence
Finally, Apache Unomi persists any changes:
-
Profile Persistence: If the profile was created or updated, it is saved to the database
-
Session Persistence: If the session was created or updated, it is saved to the database
70.7.3. First-Time Visitor Flow
For a first-time visitor making their first request:
-
No
context-profile-idcookie exists -
No
profileIdparameter is provided -
Apache Unomi generates a new UUID and creates a new profile
-
If a
sessionIdis provided, a new session is created -
The profile ID is returned in a cookie
-
The browser stores the cookie
-
On subsequent requests, the browser automatically sends the cookie
-
Apache Unomi loads the existing profile using the cookie value
Complete Example: First-Time Visitor Journey
Request 1: First Visit (No Cookie)
curl -X POST http://localhost:8181/cxs/context.json?sessionId=visitor-123 \
-H "X-Unomi-Api-Key: YOUR_PUBLIC_API_KEY" \
-H "Content-Type: application/json" \
-d '{
"source": {
"itemId": "homepage",
"itemType": "page",
"scope": "mydigital"
},
"events": [
{
"eventType": "view",
"scope": "mydigital",
"target": {
"itemType": "page",
"scope": "mydigital",
"itemId": "homepage"
}
}
],
"requiredProfileProperties": ["properties.firstVisit"]
}'Response Headers:
Set-Cookie: context-profile-id=7f8e9d0c-1b2a-3456-7890-abcdef123456; Path=/; Max-Age=31536000; SameSite=LaxResponse Body:
{
"profileId": "7f8e9d0c-1b2a-3456-7890-abcdef123456",
"sessionId": "visitor-123",
"processedEvents": 1,
"profileProperties": {
"firstVisit": "2024-01-15T10:30:00Z"
}
}What Happened:
* New profile created with UUID 7f8e9d0c-1b2a-3456-7890-abcdef123456
* firstVisit property set to current timestamp
* New session created with ID visitor-123
* sessionCreated event sent (triggers any matching rules)
* profileUpdated event sent (triggers any matching rules)
* view event processed (may have triggered rules)
* Cookie set in response header
* Profile and session saved to database
Request 2: Second Visit (Cookie Present)
# Browser automatically includes the cookie from Request 1
curl -X POST http://localhost:8181/cxs/context.json?sessionId=visitor-123 \
-H "X-Unomi-Api-Key: YOUR_PUBLIC_API_KEY" \
-H "Cookie: context-profile-id=7f8e9d0c-1b2a-3456-7890-abcdef123456" \
-H "Content-Type: application/json" \
-d '{
"source": {
"itemId": "product-page",
"itemType": "page",
"scope": "mydigital"
},
"events": [
{
"eventType": "view",
"scope": "mydigital",
"target": {
"itemType": "product",
"scope": "mydigital",
"itemId": "product-456"
}
}
],
"requiredProfileProperties": ["properties.firstVisit", "properties.pageViewCount"]
}'Response:
{
"profileId": "7f8e9d0c-1b2a-3456-7890-abcdef123456",
"sessionId": "visitor-123",
"processedEvents": 1,
"profileProperties": {
"firstVisit": "2024-01-15T10:30:00Z",
"pageViewCount": 2
}
}What Happened:
* Existing profile loaded using cookie value 7f8e9d0c-1b2a-3456-7890-abcdef123456
* Existing session loaded using visitor-123
* view event processed, which may have triggered a rule that incremented pageViewCount
* Cookie refreshed in response (expiration extended)
* Updated profile saved to database
The profile is now being tracked across multiple requests, and any rules triggered by events can build up a profile of the visitor’s behavior.
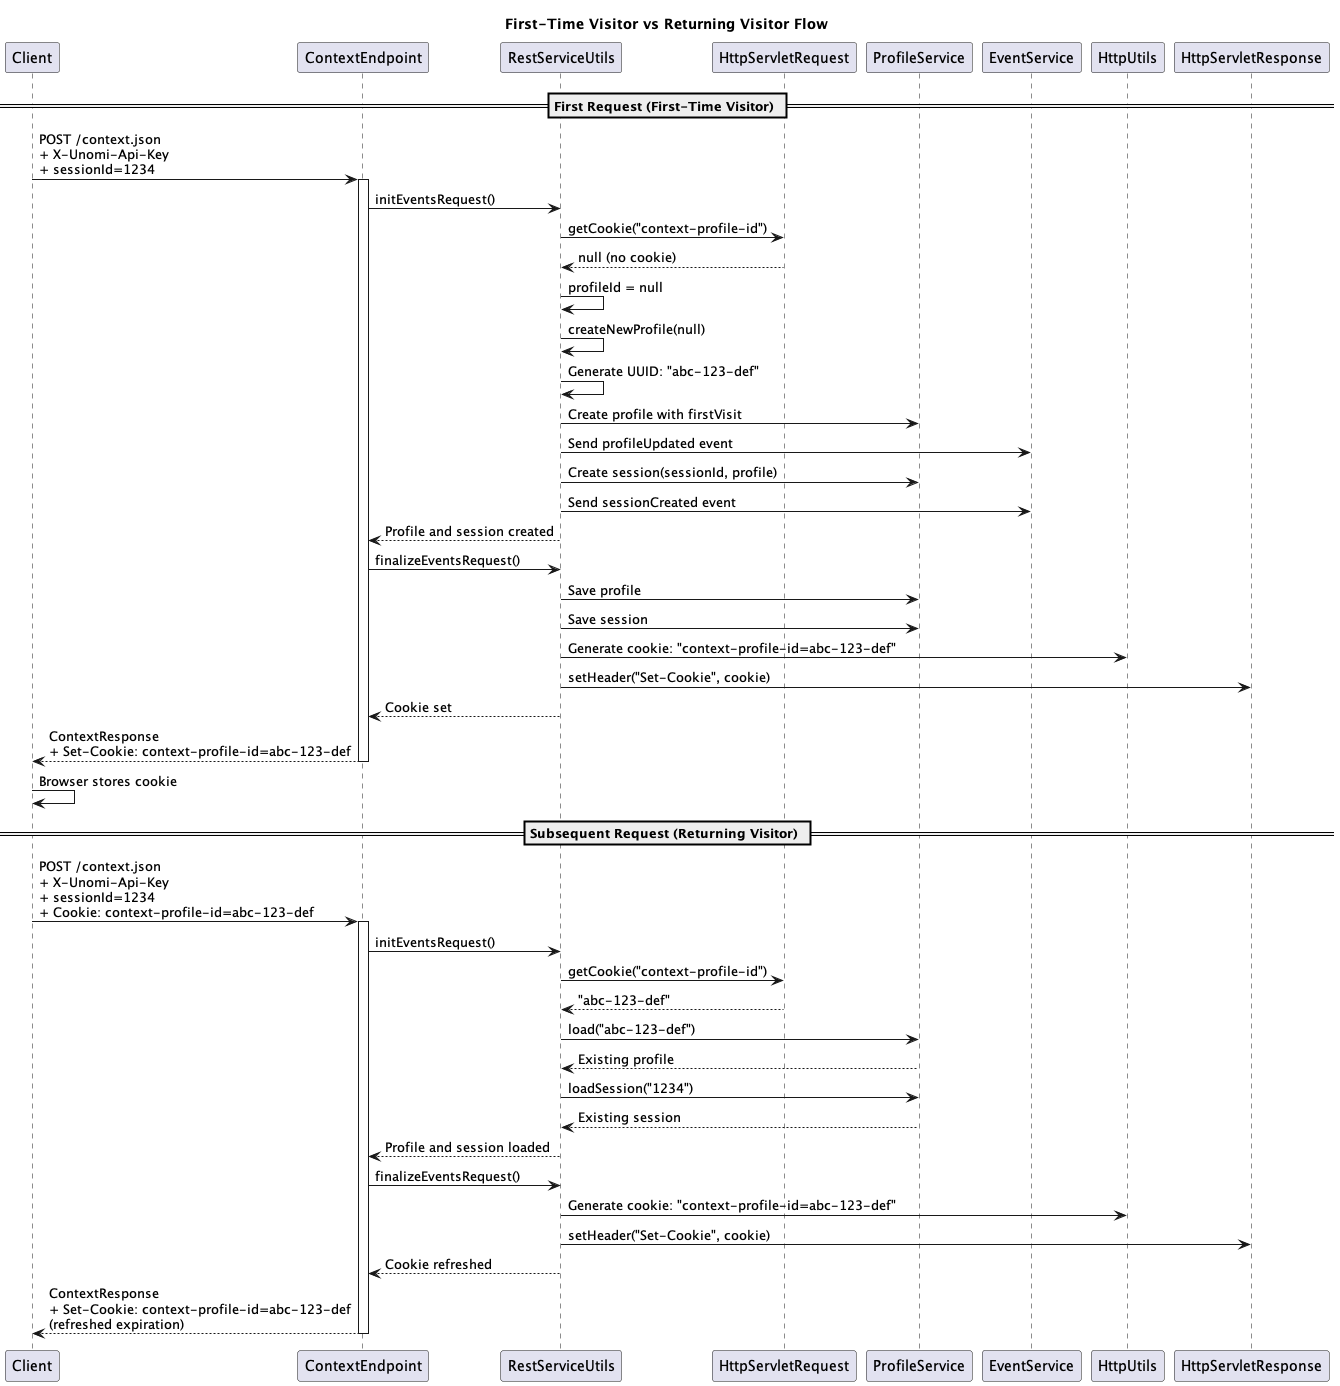
70.7.4. Complete Example: Full Request Flow
Here’s a complete example showing all aspects of a context request:
Request:
curl -X POST http://localhost:8181/cxs/context.json?sessionId=example-session \
-H "X-Unomi-Api-Key: YOUR_PUBLIC_API_KEY" \
-H "Cookie: context-profile-id=existing-profile-uuid" \
-H "Content-Type: application/json" \
-d '{
"source": {
"itemId": "checkout-page",
"itemType": "page",
"scope": "mydigital"
},
"events": [
{
"eventType": "view",
"scope": "mydigital",
"target": {
"itemType": "page",
"scope": "mydigital",
"itemId": "checkout-page"
}
}
],
"personalizations": [
{
"id": "checkout-banner",
"strategy": "matching-first",
"strategyOptions": {
"fallback": "default-banner"
},
"contents": [
{
"id": "discount-banner",
"content": "Use code SAVE10 for 10% off!",
"filters": [
{
"condition": {
"type": "profileSegmentCondition",
"parameterValues": {
"segments": ["frequent-buyers"]
}
}
}
]
}
]
}
],
"requiredProfileProperties": ["*"],
"requireSegments": true,
"requireScores": true
}'Processing Steps:
-
Tenant Resolution: Resolved from
X-Unomi-Api-Keyheader -
Profile Loading: Loaded existing profile
existing-profile-uuidfrom cookie -
Session Loading: Loaded existing session
example-session -
Event Processing:
-
viewevent validated and processed -
Rules executed (may update profile, segments, scores)
-
Profile updated if rules triggered changes
-
-
Personalization:
-
Evaluated using updated profile state
-
Selected content based on segment membership
-
-
Response Building: Constructed with all requested data
-
Cookie Setting: Cookie refreshed in response header
-
Persistence: Profile and session saved if updated
Response:
{
"profileId": "existing-profile-uuid",
"sessionId": "example-session",
"processedEvents": 1,
"profileProperties": {
"firstName": "John",
"lastName": "Doe",
"email": "john.doe@example.com",
"pageViewCount": 15
},
"profileSegments": ["frequent-buyers", "premium-customers"],
"profileScores": {
"loyalty": 85,
"engagement": 92
},
"personalizations": {
"checkout-banner": "discount-banner"
},
"personalizationResults": {
"checkout-banner": {
"selectedContentId": "discount-banner",
"strategy": "matching-first"
}
}
}Response Headers:
Set-Cookie: context-profile-id=existing-profile-uuid; Path=/; Max-Age=31536000; SameSite=LaxThis example demonstrates how a single request can: * Load an existing profile and session * Process events that trigger rules * Update the profile based on rule execution * Resolve personalization using the updated profile state * Return comprehensive profile data * Maintain tracking via cookies
70.7.5. Summary
A single request to /cxs/context.json or /cxs/context.js performs the following operations in sequence:
-
Tenant Resolution (mandatory in 3.1+): Identifies which tenant’s data to use
-
Profile/Session Management: Creates or loads profiles and sessions automatically
-
Event Processing: Processes events and executes matching rules (synchronously)
-
Content Filtering: Evaluates filter conditions (if
filtersare provided) -
Personalization: Resolves personalization requests (if
personalizationsare provided) -
Response Building: Constructs the response with requested data (properties, segments, scores, etc.)
-
Persistence: Saves any changes to the database (profile and session)
-
Cookie Setting: Sets the profile ID cookie for future requests
This integrated approach ensures that: * Profiles and sessions are always available, even for first-time visitors * Events immediately trigger rules, updating profiles in real-time * Personalization uses the most up-to-date profile state * The browser automatically tracks the visitor across requests via cookies
70.7.6. Configuration
The following configuration properties control profile tracking behavior:
-
org.apache.unomi.profile.cookie.name- Cookie name (default:context-profile-id) -
org.apache.unomi.profile.cookie.maxAgeInSeconds- Cookie expiration time (default:31536000= 1 year) -
org.apache.unomi.profile.cookie.httpOnly- Whether cookie is HTTP-only (default:false) -
org.apache.unomi.profile.cookie.domain- Cookie domain (optional)
These can be configured in the org.apache.unomi.web.cfg configuration file.
70.8. Context Request Flow
Here is an overview of how Unomi processes incoming requests to the ContextServlet.
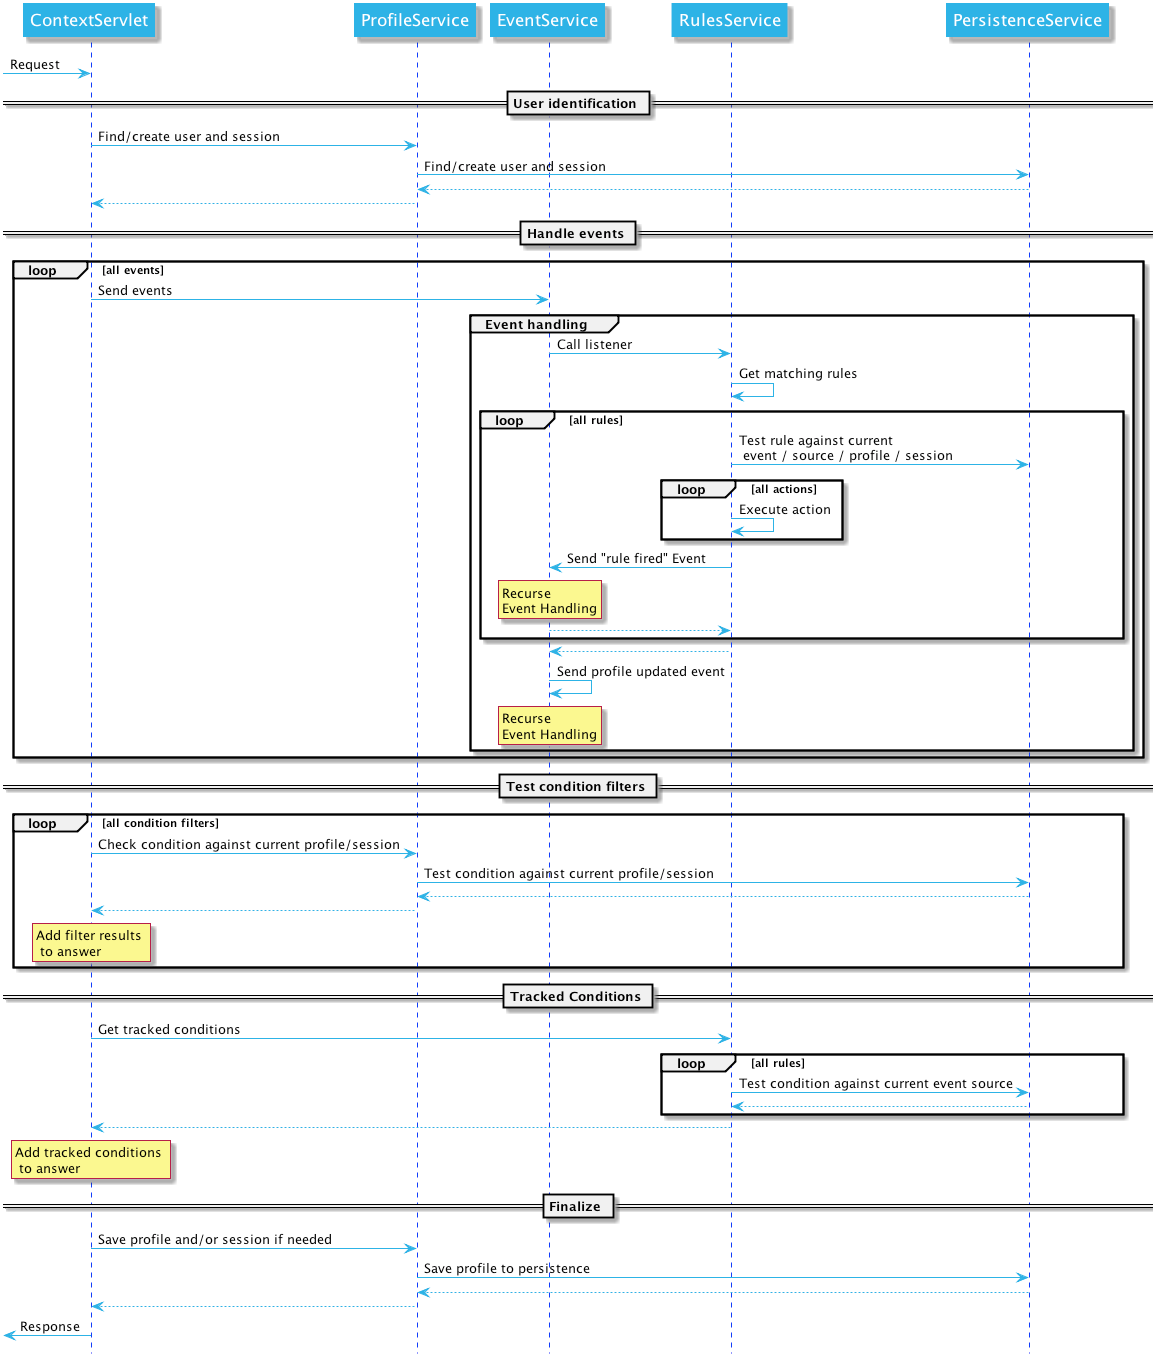
70.9. Data Model Overview
Apache Unomi gathers information about users actions, information that is processed and stored by Unomi services. The collected information can then be used to personalize content, derive insights on user behavior, categorize the user profiles into segments along user-definable dimensions or acted upon by algorithms.
The following data model only contains the classes and properties directly related to the most important objects of Apache Unomi. There are other classes that are less central to the functionality but all the major ones are represented in the diagram below:
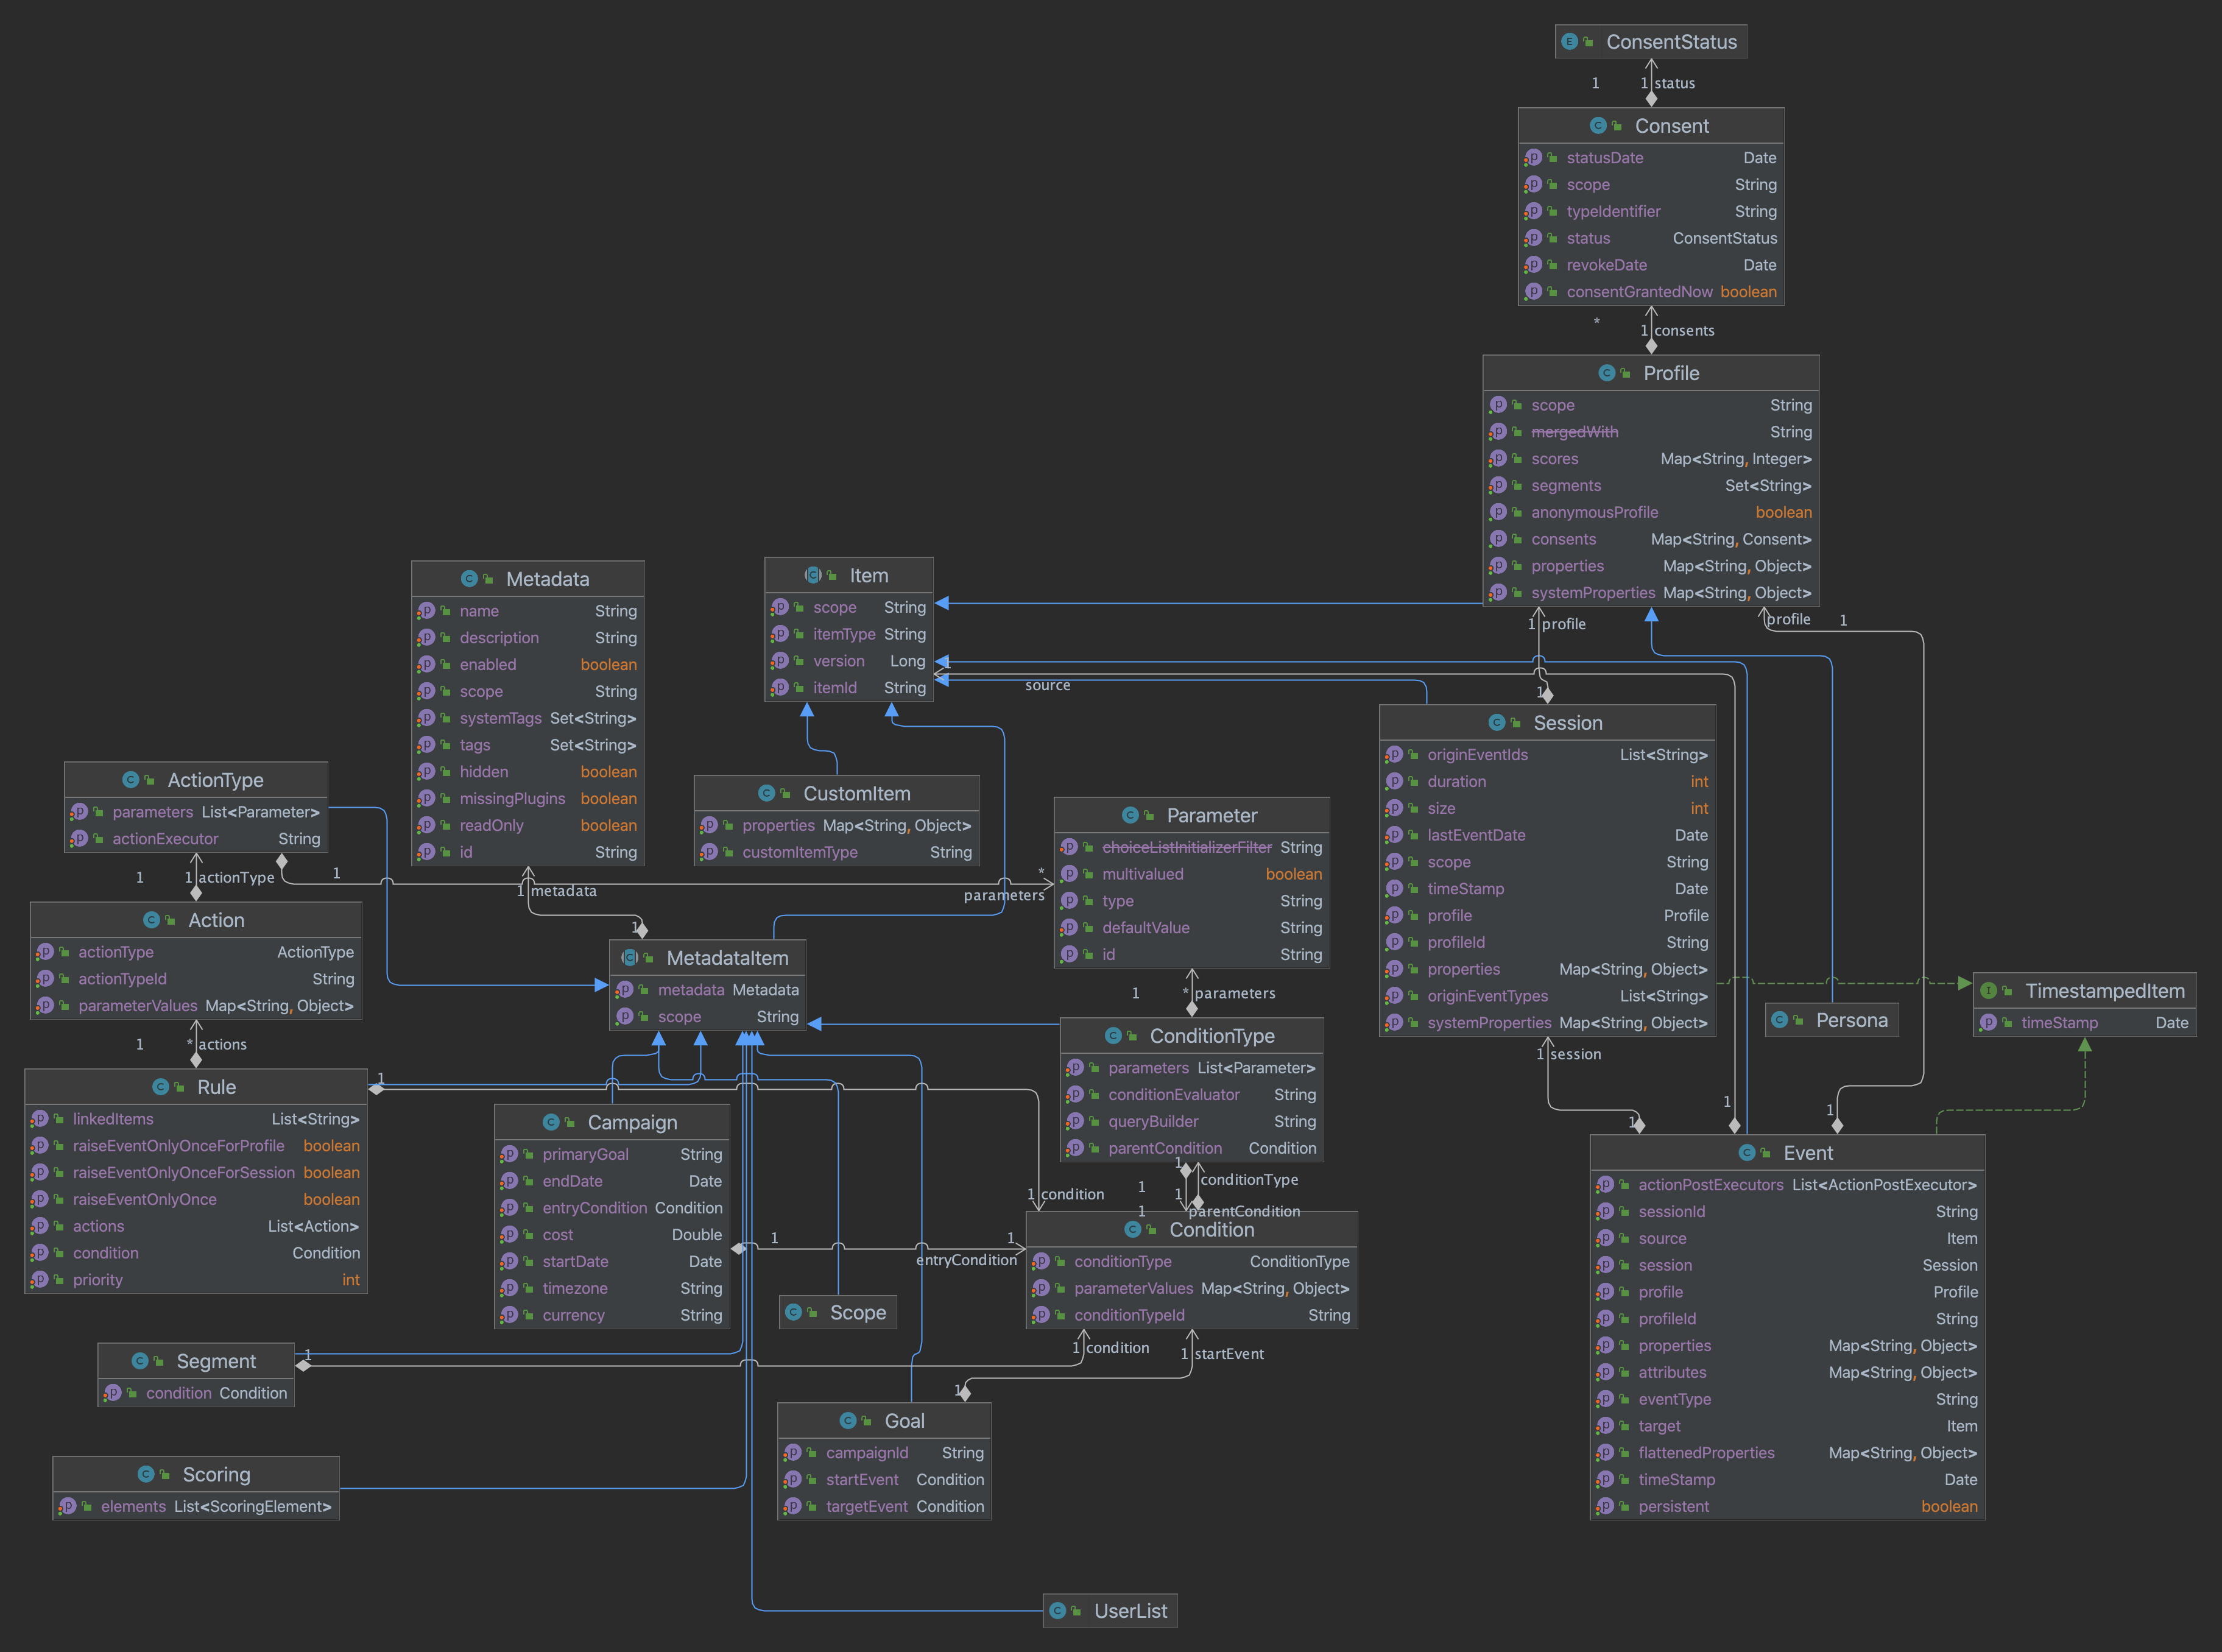
We will detail many of these classes in the document below.
70.10. Scope
Scopes are objects which simply contains unique strings that are used to "classify" objects. For example, when using scopes with a web content management system, a scope could be associated with a site identifier or even a host name.
In events, scopes are used to validate event. Events with scope which are unknown by the system will be considered as invalid
Unomi defines a built-in scope (called
systemscope) that clients can use to share data across scopes.
70.10.1. Example
In the following example, the scope uses the unique identifier of a web site called “digitall”.
{
... other fields of an object type ...
“scope”: “digitall”
... other fields of an object type ...
}70.11. Item
Unomi structures the information it collects using the concept of Item which provides the base information (an identifier and a type) the context server needs to process and store the data.
Items are persisted according to their type (structure) and identifier (identity).
This base structure can be extended, if needed, using properties in the form of key-value pairs.
These properties are further defined by the Item’s type definition which explicits the Item’s structure and semantics.
By defining new types, users specify which properties (including the type of values they accept) are available to items of that specific type.
70.12. Tenant (Unomi 3.1+)
A tenant is the top-level isolation boundary in Unomi 3.1. Each tenant owns its own profiles, events, segments, rules, property types, and JSON schemas. Tenant metadata is stored as an Item with itemType tenant.
Most persisted items carry a tenantId (or inherit tenant scope through the execution context). Client requests must establish tenant context through:
-
X-Unomi-Api-Key(public key resolves the tenant), or -
Basic authentication
tenantId:privateApiKey, or -
JAAS administrator credentials with
X-Unomi-Tenant-Id.
See Multi-tenancy for management and authentication.
Unomi defines default value types: date, email, integer and string, all pretty self-explanatory.
While you can think of these value types as "primitive" types, it is possible to extend Unomi by providing additional value types.
Additionally, most items are also associated to a scope, which is a concept that Unomi uses to group together related items. A given scope is represented in Unomi by a simple string identifier and usually represents an application or set of applications from which Unomi gathers data, depending on the desired analysis granularity. In the context of web sites, a scope could, for example, represent a site or family of related sites being analyzed. Scopes allow clients accessing the context server to filter data to only see relevant data.
Items are a generic object, that is common to many objects in the data model. It contains the following fields, that are inherited by other objects that inherit from it.
70.12.1. Structure definition
Inherits all the fields from: n/a
| Field | Type | Description |
|---|---|---|
itemId |
String |
This field contains a unique identifier (usually a UUID) that uniquely identifies the item in the whole system. It should be unique to a Unomi installation |
itemType |
String |
A string containing the subtype of this item. Examples are : event, profile, session, … any class that inherits from the Item class will have a unique and different itemType value. |
scope |
String (optional) |
If present, this will contain a scope identifier. A scope is just a way to regroup objects notably for administrative purposes. For example, when integrating with a CMS a scope could be mapped to a website. The “system” scope value is reserved for values that are used internally by Apache Unomi |
70.13. Metadata
The Metadata object is an object that contains additional information about an object. It is usually associated with an Item object (see MetadataItem below).
70.13.1. Structure definition
Inherits all the fields from: n/a
| Field | Type | Description |
|---|---|---|
id |
String |
This field contains a unique identifier (UUID) for the object the metadata object is attached to. It is usually a copy of the itemId field on an Item object. |
name |
String |
A name for the associated object. Usually, this name will be displayed on the user interface |
description |
String (optional) |
A description of the associated object. Will also usually be used in user interfaces |
scope |
String |
The scope for the associated object. |
tags |
String array |
A list of tags for the associated object, this list may be edited through a UI. |
systemTags |
String array |
A (reserved) list of tags for the associated object. This is usually populated through JSON descriptors and is not meant to be modified by end users. These tags may include values such as “profileProperties” that help classify associated objects. |
enabled |
Boolean |
Indicates whether the associated is enabled or not. For example, a rule may be disabled using this field. |
missingPlugins |
Boolean |
This is used for associated objects that require plugins to be deployed to work. If the plugin is not deployed, this object will not perform its function. For example if a rule is registered but the condition or actions it needs are not installed, the rule will not be used. |
hidden |
Boolean |
Specifies whether the associated object should be visible in UIs or not |
readOnly |
Boolean |
Specifies whether editing of the associated object should be allowed or not. |
70.13.2. Example
This example of a Metadata object structure was taken from a List associated object. See the MetadataItem to understand how the two fit together.
{
"id": "firstListId",
"name": "First list",
"description": "Description of the first list.",
"scope": "digitall",
"tags": [],
"systemTags": [],
"enabled": true,
"missingPlugins": false,
"hidden": false,
"readOnly": false
}70.14. MetadataItem
70.14.1. Structure definition
Inherits all the fields from: Item
| Field | Type | Description |
|---|---|---|
metadata |
Metadata |
This object contains just one field, of type Metadata as define just before this object type. |
70.14.2. Example
The following example is actually the definition of a List object, which is simply a MetadataItem sub-type with no additional fields. We can see here the “itemId” and “itemType” fields that come from the Item parent class and the “metadata” field that contains the object structure coming from the Metadata object type.
{
"itemId": "userListId",
"itemType": "userList",
"metadata": {
"id": "userListId",
"name": "First list",
"description": "Description of the first list.",
"scope": "digitall",
"tags": [],
"systemTags": [],
"enabled": true,
"missingPlugins": false,
"hidden": false,
"readOnly": false
}
}70.15. Event
Events represent something that is happening at a specific time (they are timestamped). They can be used to track visitor behavior, or even for back-channel system-to-system (as for example for a login) communication. Examples of events may include a click on a link on a web page, a login, a form submission, a page view or any other time-stamped action that needs to be tracked.
Events are persisted and immutable, and may be queried or aggregated to produce powerful reports.
Events can also be triggered as part of Unomi’s internal processes for example when a rule is triggered.
70.15.1. Fields
Inherits all the fields from: Item
| Field | Type | Description |
|---|---|---|
eventType |
String |
Contains an identifier for the event type, which may be any value as Apache Unomi does not come with strict event type definitions and accepts custom events types. The system comes with built-in event types such as “view”, “form”, “login”, “updateProperties” but additional event types may of course be used by developers integrating with Apache Unomi. |
sessionId |
String |
The unique identifier of a Session object |
profileId |
String |
The unique identifier of a Profile object |
timestamp |
Date |
The precise date at which the Event was received by Unomi. This date is in the ISO 8601 format. |
scope |
String |
(Optional, event type specific) An identifier for a scope |
persistent |
Boolean |
Defines if the event should be persisted or not (default: true) |
source |
An Item that is the source of the event. For example a web site, an application name, a web page |
|
target |
An Item that is the target of the event. For example a button, a link, a file or a page |
|
properties |
Map<String,Object> |
Properties for the event. These will change depending on the event type. |
flattenedProperties |
Map<String,Object> |
Properties that will be persisted as flattened. These will change depending on the event type. |
70.15.2. Event types
Event types are completely open, and any new event type will be accepted by Apache Unomi.
Apache Unomi also comes with an extensive list of built-in event types you can find in the reference section of this manual.
70.16. Profile
By processing events, Unomi progressively builds a picture of who the user is and how they behave. This knowledge is
embedded in Profile object. A profile is an Item with any number of properties and optional segments and scores.
Unomi provides default properties to cover common data (name, last name, age, email, etc.) as well as default segments
to categorize users. Unomi users are, however, free and even encouraged to create additional properties and segments to
better suit their needs.
Contrary to other Unomi items, profiles are not part of a scope since we want to be able to track the associated user across applications. For this reason, data collected for a given profile in a specific scope is still available to any scoped item that accesses the profile information.
It is interesting to note that there is not necessarily a one to one mapping between users and profiles as users can be captured across applications and different observation contexts. As identifying information might not be available in all contexts in which data is collected, resolving profiles to a single physical user can become complex because physical users are not observed directly. Rather, their portrait is progressively patched together and made clearer as Unomi captures more and more traces of their actions. Unomi will merge related profiles as soon as collected data permits positive association between distinct profiles, usually as a result of the user performing some identifying action in a context where the user hadn’t already been positively identified.
70.16.1. Structure definition
Inherits all the fields from: Item
| Field name | Type | Description |
|---|---|---|
properties |
Map<String,Object> |
All the (user-facing) properties for the profile |
systemProperties |
Map<String,Object> |
Internal properties used to track things such as goals reached, merges with other profiles, lists the profile belongs to. |
segments |
String set |
A set of Segment identifiers that profile is (currently) associated with |
scores |
Map<String,Integer> |
A map of scores with the score identifier as the key and the score total value as the value. |
@Deprecated mergedWith |
String |
If merged with another profile, the profile identifier to the master profile is stored here |
consents |
Map<String,Consent> |
The consents for the profile, as a map with the consent identifier as a key and the Consent object type as a value. |
70.16.2. Example
In the example below, a profile for a visitor called “Bill Galileo” is detailed. A lot of user properties (such as first name, last name, gender, job title and more) were copied over from the CMS upon initial login. The profile is also part of 4 segments (leads, contacts, gender_male, age_60_70) and has a lot of different scores as well. It is also part of a list (systemProperties.lists), and has granted two consents for receiving newsletters. It has also been engaged in some goals (systemProperties.goals.*StartReached) and completed some goals (systemProperties.goals.*TargetReached)
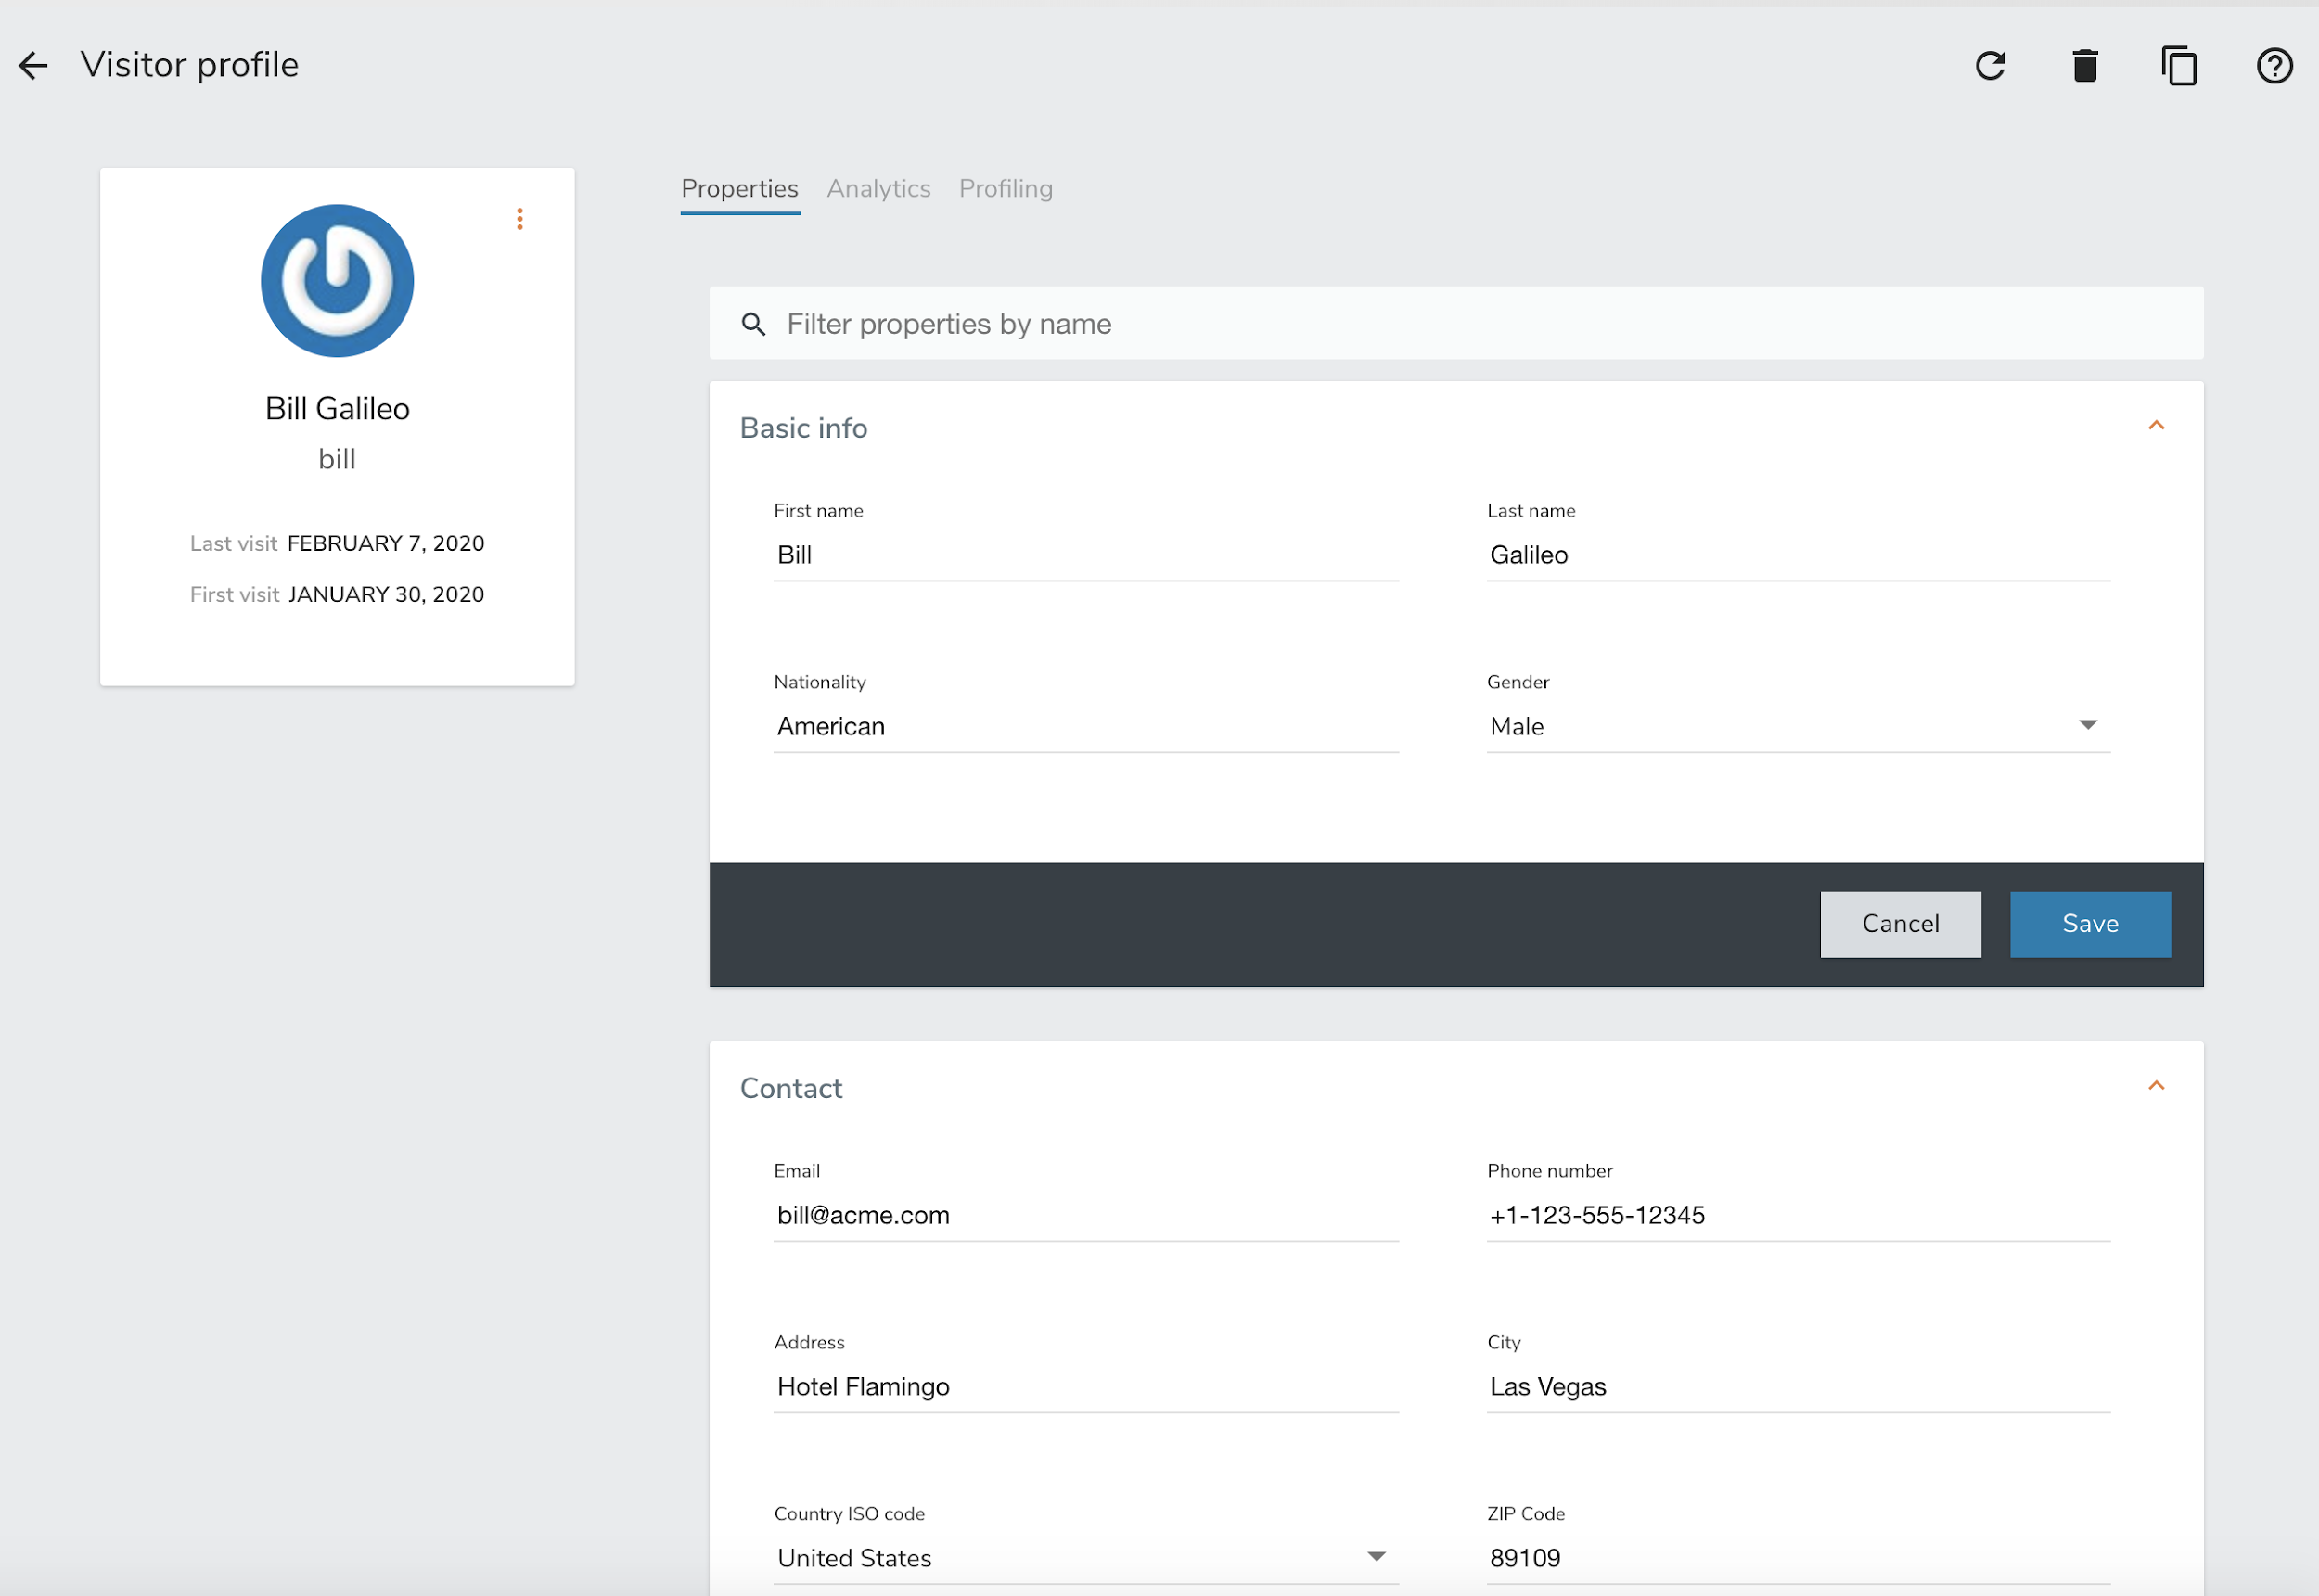
{
"itemId": "f7d1f1b9-4415-4ff1-8fee-407b109364f7",
"itemType": "profile",
"properties": {
"lastName": "Galileo",
"preferredLanguage": "en",
"nbOfVisits": 2,
"totalNbOfVisits": 5,
"gender": "male",
"jobTitle": "Vice President",
"lastVisit": "2020-01-31T08:41:22Z",
"j:title": "mister",
"j:about": "<p> Lorem Ipsum dolor sit amet,consectetur adipisicing elit, sed doeiusmod tempor incididunt ut laboreet dolore magna aliqua. Ut enim adminim veniam, quis nostrudexercitation ullamco laboris nisi utaliquip ex ea commodo consequat.Duis aute irure dolor inreprehenderit in coluptate velit essecillum dolore eu fugiat nulla pariatur.Excepteur sint occaecat cupidatatnon proident, sunt in culpa quiofficia deserunt mollit anim id estlaborum.</p> ",
"firstName": "Bill",
"pageViewCount": {
"digitall": 19
},
"emailNotificationsDisabled": "true",
"company": "Acme Space",
"j:nodename": "bill",
"j:publicProperties": "j:about,j:firstName,j:function,j:gender,j:lastName,j:organization,j:picture,j:title",
"firstVisit": "2020-01-30T21:18:12Z",
"phoneNumber": "+1-123-555-12345",
"countryName": "US",
"city": "Las Vegas",
"address": "Hotel Flamingo",
"zipCode": "89109",
"email": "bill@acme.com",
"maritalStatus": "Married",
"birthDate": "1959-08-12T23:00:00.000Z",
"kids": 2,
"age": 60,
"income": 1000000,
"facebookId": "billgalileo",
"twitterId": "billgalileo",
"linkedInId": "billgalileo",
"leadAssignedTo": "Important Manager",
"nationality": "American"
},
"systemProperties": {
"mergeIdentifier": "bill",
"lists": [
"userListId"
],
"goals": {
"viewLanguagePageGoalTargetReached": "2020-02-10T19:30:31Z",
"downloadGoalExampleTargetReached": "2020-02-10T15:22:41Z",
"viewLandingPageGoalStartReached": "2020-02-10T19:30:27Z",
"downloadGoalExampleStartReached": "2020-02-10T19:30:27Z",
"optimizationTestGoalStartReached": "2020-02-10T19:30:27Z"
}
},
"segments": [
"leads",
"age_60_70",
"gender_male",
"contacts"
],
"scores": {
"scoring_9": 10,
"scoring_8": 0,
"scoring_1": 10,
"scoring_0": 10,
"_s02s6220m": 0,
"scoring_3": 10,
"_27ir92oa2": 0,
"scoring_2": 10,
"scoring_5": 10,
"scoring_4": 10,
"scoring_7": 10,
"scoring_6": 10,
"_86igp9j1f": 1,
"_ps8d573on": 0
},
"mergedWith": null,
"consents": {
"digitall/newsletter1": {
"scope": "digitall",
"typeIdentifier": "newsletter1",
"status": "GRANTED",
"statusDate": "2019-05-15T14:47:28Z",
"revokeDate": "2021-05-14T14:47:28Z"
},
"digitall/newsletter2": {
"scope": "digitall",
"typeIdentifier": "newsletter2",
"status": "GRANTED",
"statusDate": "2019-05-15T14:47:28Z",
"revokeDate": "2021-05-14T14:47:28Z"
}
}
}70.17. Profile aliases
Profile aliases make it possible to reference profiles using multiple identifiers.
The profile alias object basically contains a link between the alias ID and the profile ID. The itemId of a profile alias is the actual alias ID, which the profileID field contains the reference to the aliased profile.
70.17.1. Structure definition
Inherits all the fields from: Item
| Field name | Type | Description |
|---|---|---|
profileID |
String |
The identifier of the profile this aliases points to |
creationTime |
DateTime |
The date and time of creation of the alias |
modifiedTime |
DateTime |
The date and time of last modification of the alias |
70.17.2. Example
In the following example we show an alias ID facebook_johndoe for the profile with ID f72242d2-3145-43b1-8be7-d1d47cf4ad0e
{
"profileID": "f72242d2-3145-43b1-8be7-d1d47cf4ad0e",
"itemId" : "facebook_johndoe",
"creationTime" : "2022-09-16T19:23:51Z",
"modifiedTime" : "2022-09-16T19:23:51Z"
}70.18. Persona
A persona is a specialized version of a Profile object. It basically represents a "typical" profile and can be used notably to simulate personalized for a type of profiles. Usually personas are created from Profile data and then edited to represent a specific marketing persona.
70.18.1. Structure definition
Inherits all the fields from: Profile
There are no fields specific to a Persona.
70.18.2. Example
In the following example a Persona represents a visitor from Europe, that can be used to match by location.
{
"itemId": "europeanVisitor",
"itemType": "persona",
"properties": {
"description": "Represents a visitor browsing from Europe",
"firstName": "European",
"lastName": "Visitor",
"continent": "Europe"
},
"systemProperties": {},
"segments": [],
"scores": null,
"consents": {}
}70.19. Consent
A consent represents a single instance of a consent granted/refused or revoked by a profile. A profile will contain multiple instances of consent identified by unique identifiers.
70.19.1. Structure definition
Inherits all the fields from: n/a
| Field name | Type | Description |
|---|---|---|
scope |
String |
The scope this consent is associated with. In the case of a website this might be the unique identifier for the site. |
typeIdentifier |
String |
This is a unique consent type identifier, basically a unique name for the consent. Example of such types might include: “newsletter”, “personalization”, “tracking”. |
status |
GRANTED / DENIED / REVOKED |
The type of status for this consent |
statusDate |
Date |
The date (in ISO 8601 format) at which the current status was set |
revokeDate |
Date |
The date (in ISO 8106 format) at which time the current status is automatically revoked. |
70.19.2. Example
In this example, the consent called “newsletter” was given on the “digitall” website.
{
"scope": "digitall",
"typeIdentifier": "newsletter",
"status": "GRANTED",
"statusDate": "2019-05-15T14:47:28Z",
"revokeDate": "2021-05-14T14:47:28Z"
}70.20. Session
A session represents a period of time during which a visitor/profile has been active. It makes it possible to gather data and then use it for reporting and further analysis by regrouping all the events that occurred during the session.
70.20.1. Structure definition
Inherits all the fields from: Item
| Field name | Type | Description |
|---|---|---|
properties |
Map<String,Object> |
All the properties for the session. These contain information such as the browser, operating system and device used, as well as information about the location of the visitor. |
systemProperties |
Map<String,Object> |
Not used (empty) |
profileId |
String |
The identifier of the profile that generated the session |
profile |
A copy of the profile associated with the session |
|
size |
Integer |
The number of view event types received during this session |
duration |
Integer |
The duration of the session in milliseconds |
lastEventDate |
Date |
The date of the last event that occurred in the session, in ISO 8601 format. |
70.20.2. Example
In this example the session contains a copy of the profile of the visitor. It is a visitor that has previously authentified in a CMS and who’se information was copied at the time of login from the CMS user account to the profile. You can also notice that the session contains the information coming from the browser’s user agent which contains the browser type, version as well as the operating system used. The visitor’s location is also resolve based on the IP address that was used to send events.
{
"itemId": "4dcb5b74-6923-45ae-861a-6399ef88a209",
"itemType": "session",
"scope": "digitall",
"profileId": "f7d1f1b9-4415-4ff1-8fee-407b109364f7",
"profile": {
"itemId": "f7d1f1b9-4415-4ff1-8fee-407b109364f7",
"itemType": "profile",
"properties": {
"preferredLanguage": "en",
"nbOfVisits": 2,
"totalNbOfVisits": 5,
"gender": "male",
"jobTitle": "Vice President",
"lastVisit": "2020-01-31T08:41:22Z",
"j:title": "mister",
"j:about": "<p> Lorem Ipsum dolor sit amet,consectetur adipisicing elit, sed doeiusmod tempor incididunt ut laboreet dolore magna aliqua. Ut enim adminim veniam, quis nostrudexercitation ullamco laboris nisi utaliquip ex ea commodo consequat.Duis aute irure dolor inreprehenderit in coluptate velit essecillum dolore eu fugiat nulla pariatur.Excepteur sint occaecat cupidatatnon proident, sunt in culpa quiofficia deserunt mollit anim id estlaborum.</p> ",
"pageViewCount": {
"digitall": 19
},
"emailNotificationsDisabled": "true",
"company": "Acme Space",
"j:publicProperties": "j:about,j:firstName,j:function,j:gender,j:lastName,j:organization,j:picture,j:title",
"firstVisit": "2020-01-30T21:18:12Z",
"countryName": "US",
"city": "Las Vegas",
"zipCode": "89109",
"maritalStatus": "Married",
"birthDate": "1959-08-12T23:00:00.000Z",
"kids": 25,
"age": 60,
"income": 1000000,
"leadAssignedTo": "Important Manager"
},
"systemProperties": {
"mergeIdentifier": "bill",
"lists": [
"_xb2bcm4wl"
]
},
"segments": [
"leads",
"age_60_70",
"gender_male",
"contacts"
],
"scores": {
"scoring_9": 10,
"scoring_8": 0,
"scoring_1": 10,
"scoring_0": 10,
"_s02s6220m": 0,
"scoring_3": 10,
"_27ir92oa2": 0,
"scoring_2": 10,
"scoring_5": 10,
"scoring_4": 10,
"scoring_7": 10,
"scoring_6": 10,
"_86igp9j1f": 1,
"_ps8d573on": 0
},
"mergedWith": null,
"consents": {}
},
"properties": {
"sessionCity": "Geneva",
"operatingSystemFamily": "Desktop",
"userAgentNameAndVersion": "Firefox@@72.0",
"countryAndCity": "Switzerland@@Geneva@@2660645@@6458783",
"userAgent": "Mozilla/5.0 (Macintosh; Intel Mac OS X 10.15; rv:72.0) Gecko/20100101 Firefox/72.0",
"userAgentName": "Firefox",
"sessionCountryCode": "CH",
"deviceName": null,
"sessionCountryName": "Switzerland",
"referringURL": "null",
"deviceCategory": "Apple Macintosh",
"pageReferringURL": "http://localhost:8080/sites/digitall/home/corporate-responsibility.html",
"userAgentVersion": "72.0",
"sessionAdminSubDiv2": 6458783,
"sessionAdminSubDiv1": 2660645,
"location": {
"lon": 6.1282508,
"lat": 46.1884341
},
"sessionIsp": "Cablecom",
"operatingSystemName": "Mac OS X",
"deviceBrand": "Apple"
},
"systemProperties": {},
"timeStamp": "2020-01-31T08:41:22Z",
"lastEventDate": "2020-01-31T08:53:32Z",
"size": 19,
"duration": 730317
}70.21. Segment
Segments are used to group profiles together, and are based on conditions that are executed on profiles to determine if they are part of a segment or not.
This also means that a profile may enter or leave a segment based on changes in their properties, making segments a highly dynamic concept.
70.21.1. Structure definition
Inherits all the fields from: MetadataItem
| Field name | Type | Description |
|---|---|---|
condition |
The root condition for the segment. Conditions may be composed by using built-in condition types such as |
70.21.2. Example
{
"itemId": "age_20_30",
"itemType": "segment",
"condition": {
"parameterValues": {
"subConditions": [
{
"parameterValues": {
"propertyName": "properties.age",
"comparisonOperator": "greaterThanOrEqualTo",
"propertyValueInteger": 20
},
"type": "profilePropertyCondition"
},
{
"parameterValues": {
"propertyName": "properties.age",
"comparisonOperator": "lessThan",
"propertyValueInteger": 30
},
"type": "profilePropertyCondition"
}
],
"operator": "and"
},
"type": "booleanCondition"
},
"metadata": {
"id": "age_20_30",
"name": "age_20_30",
"description": null,
"scope": "digitall",
"tags": [],
"enabled": true,
"missingPlugins": false,
"hidden": false,
"readOnly": false
}
}Here is an example of a simple segment definition registered using the REST API:
curl -X POST http://localhost:8181/cxs/segments \
--user "TENANT_ID:PRIVATE_KEY" \
-H "Content-Type: application/json" \
-d @- <<'EOF'
{
"metadata": {
"id": "leads",
"name": "Leads",
"scope": "systemscope",
"description": "You can customize the list below by editing the leads segment.",
"readOnly":true
},
"condition": {
"type": "booleanCondition",
"parameterValues": {
"operator" : "and",
"subConditions": [
{
"type": "profilePropertyCondition",
"parameterValues": {
"propertyName": "properties.leadAssignedTo",
"comparisonOperator": "exists"
}
}
]
}
}
}
EOFFor more details on the conditions and how they are structured using conditions, see the next section.
70.22. Condition
Conditions are a very useful notion inside of Apache Unomi, as they are used as the basis for multiple other objects. Conditions may be used as parts of:
-
Segments
-
Rules
-
Queries
-
Campaigns
-
Goals
-
Profile filters (using to search for profiles)
The result of a condition is always a boolean value of true or false.
Apache Unomi provides quite a lot of built-in condition types, including boolean types that make it possible to compose conditions using operators such as and, or or not.
Composition is an essential element of building more complex conditions.
For tutorials and examples, see Conditions guide. For the full catalog, see Built-in condition types.
70.22.1. Structure definition
Inherits all the fields from: n/a
| Field name | Type | Description |
|---|---|---|
conditionTypeId |
String |
A condition type identifier is a string that contains a unique identifier for a condition
type. Example condition types may include |
parameterValues |
Map<String,Object> |
The parameter values are simply key-value paris that may be used to configure the condition.
In the case of a |
70.22.2. Example
Here is an example of a complex condition:
{
"condition": {
"type": "booleanCondition",
"parameterValues": {
"operator":"or",
"subConditions":[
{
"type": "eventTypeCondition",
"parameterValues": {
"eventTypeId": "sessionCreated"
}
},
{
"type": "eventTypeCondition",
"parameterValues": {
"eventTypeId": "sessionReassigned"
}
}
]
}
}
}As we can see in the above example we use the boolean or condition to check if the event type is of type sessionCreated
or sessionReassigned.
70.23. Rule
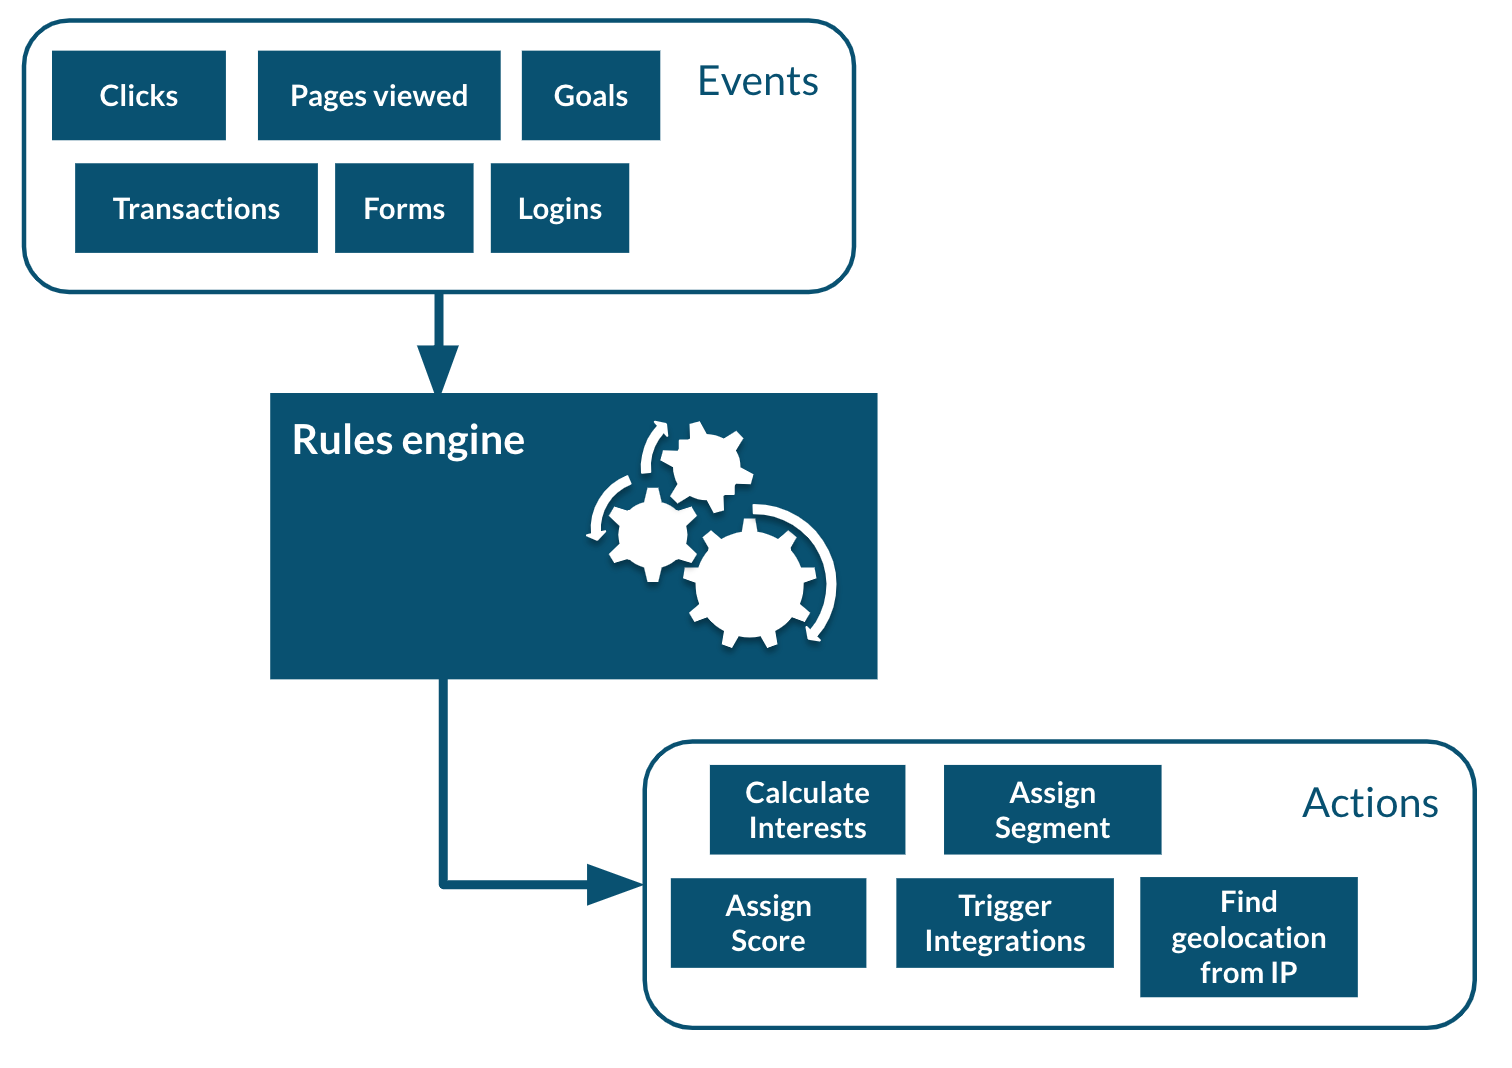
Apache Unomi has a built-in rule engine that is one of the most important components of its architecture. Every time an event is received by the server, it is evaluated against all the rules and the ones matching the incoming event will be executed. You can think of a rule as a structure that looks like this:
when
conditions
then
actions
Basically when a rule is evaluated, all the conditions in the when part are evaluated and if the result matches (meaning it evaluates to true) then the actions will be executed in sequence.
The real power of Apache Unomi comes from the fact that conditions and actions are fully pluggeable and that plugins may implement new conditions and/or actions to perform any task.
You can imagine conditions checking incoming event data against third-party systems or even against authentication systesm, and actions actually pulling or pushing data to third-party systems.
For example the Salesforce CRM connector is simply a set of actions that pull and push data into the CRM. It is then just a matter of setting up the proper rules with the proper conditions to determine when and how the data will be pulled or pushed into the third-party system.
70.23.1. Structure definition
Inherits all the fields from: MetadataItem
| Field name | Type | Description |
|---|---|---|
condition |
The root condition for the rule. Conditions may be composed by using built-in condition types such as |
|
action |
Action array |
A list of Action object that will be executed if the condition is true. |
linkedItems |
String array |
A list of references to objects that may have generated this rule. Goals and segments dynamically generate rules to react to incoming events. It is not recommend to manipulate rules that have linkedItems as it may break functionality. |
raiseEventOnlyOnce |
Boolean |
If true, the rule will only be executed once for a given event. |
raiseEventOnlyOnceForProfile |
Boolean |
If true, the rule will only be executed once for a given profile and a matching event. Warning: this functionality has a performance impact since it looks up past events. |
raiseEventOnlyOnceForSession |
Boolean |
If true, the rule will only be executed once for a given session and a matching event. Warning: this functionality has a performance impact since it looks up past events. |
priority |
Integer |
The priority for the rule. The lower the priority value the higher the effective priority (they are sorted by ascending order of priority) |
70.23.2. Example
In this example we can see the default updateProperties built-in rule that matches the updateProperties event and
executes the built-in updatePropertiesAction
{
"itemId": "updateProperties",
"itemType": "rule",
"condition": {
"parameterValues": {},
"type": "updatePropertiesEventCondition"
},
"actions": [
{
"parameterValues": {},
"type": "updatePropertiesAction"
}
],
"linkedItems": null,
"raiseEventOnlyOnceForProfile": false,
"raiseEventOnlyOnceForSession": false,
"priority": 0,
"metadata": {
"id": "updateProperties",
"name": "Update profile/persona properties",
"description": "Update profile/persona properties",
"scope": "systemscope",
"tags": [],
"systemTags": [],
"enabled": true,
"missingPlugins": false,
"hidden": false,
"readOnly": true
}
}70.24. Action
Actions are executed by rules in a sequence, and an action is only executed once the previous action has finished executing. If an action generates an exception, it will be logged and the execution sequence will continue unless in the case of a Runtime exception (such as a NullPointerException).
Action use Action types that are implemented as Java classes, and as such may perform any kind of tasks that may include calling web hooks, setting profile properties, extracting data from the incoming request (such as resolving location from an IP address), or even pulling and/or pushing data to third-party systems such as a CRM server.
Apache Unomi also comes with built-in action types. You may find the list of built-in action types in the Built-in action types section.
70.24.1. Structure definition
Inherits all the fields from: n/a
| Field name | Type | Description |
|---|---|---|
actionTypeId |
String |
An action type identifier is a string that contains a unique identifier for a action type. |
parameterValues |
Map<String,Object> |
The parameter values are simply key-value paris that may be used to configure the action. |
70.24.2. Example
In this example of an action, taking from the form-mapping-example.json rule, the setPropertyAction action is used
to set the properties.firstName profile property to a value read from the event properties called properties.firstName.
The setPropertyStrategy is a parameter specific to this action that allows to define if existing values should be
overridden or not.
{
"type": "setPropertyAction",
"parameterValues": {
"setPropertyName": "properties(firstName)",
"setPropertyValue": "eventProperty::properties(firstName)",
"setPropertyStrategy": "alwaysSet"
}
}70.25. List
Lists are a “manual” way to organize profiles, whereas Segments are a dynamic way to regroup them. List objects actually only define the list in terms of name, description and other metadata but the list of members is actually not represented in the object. The profiles contain references to the lists in their “systemProperties.lists” property. This property is an array of list identifiers so in order to retrieve all the list names for a given profile, a lookup of List objects is required using the identifiers.
70.25.1. Structure definition
Inherits all the fields from: MetadataItem
| Field name | Description |
|---|---|
No additional fields are present in this object type |
70.25.2. Example
Here’s an example of a list called “First list”, along with its description, its scope, tags, etc.. . As a List object is basically a MetadataItem sub-class it simply has all the fields defined in that parent class. Note that the List does not contain Profiles, it is Profiles that reference the Lists, not the reverse.
{
"itemId": "userListId",
"itemType": "userList",
"metadata": {
"id": "userListId",
"name": "First list",
"description": "Description of the first list.",
"scope": "digitall",
"tags": [],
"systemTags": [],
"enabled": true,
"missingPlugins": false,
"hidden": false,
"readOnly": false
}
}70.26. Goal
A goal can be defined with two conditions: a start event condition and an target event condition. Basically the goal will be “active” when its start event condition is satisfied, and “reached” when the target event condition is true. Goals may also (optionally) be associated with Campaigns. Once a goal is “reached”, a “goal” event triggered and the profile that is currently interacting with the system will see its system properties updated to indicate which goal has been reached.
70.26.1. Structure definition
Inherits all the fields from: MetadataItem
| Field name | Type | Description |
|---|---|---|
startEvent |
Condition |
The condition that will be used to determine if this goal was activated by the current profile |
targetEvent |
Condition |
The condition that will be used to determine if the current profile has reached the goal. |
campaignId |
String |
If this goal was setup as part of a Campaign, the unique identifier for the campaign is stored in this field. |
70.26.2. Example
In the following example, a goal called “downloadGoalExample” is started when a new session is created (we use the “sessionCreatedEventCondition” for that) and is reached when a profile downloads a file called “ACME_WP.pdf” (that’s what the “downloadEventCondition” means).
{
"itemId": "downloadGoalExample",
"itemType": "goal",
"startEvent": {
"parameterValues": {},
"type": "sessionCreatedEventCondition"
},
"targetEvent": {
"parameterValues": {
"filePath": "/sites/digitall/files/PDF/Publications/ACME_WP.pdf"
},
"type": "downloadEventCondition"
},
"campaignId": "firstCampaignExample",
"metadata": {
"id": "downloadGoalExample",
"name": "downloadGoalExample",
"description": null,
"scope": "digitall",
"enabled": true,
"missingPlugins": false,
"hidden": false,
"readOnly": false,
"systemTags": [
"goal",
"downloadGoal"
]
}
}70.27. Campaign
A Campaign object represents a digital marketing campaign, along with conditions to enter the campaign and a specific duration, target and costs.
70.27.1. Structure definition
Inherits all the fields from: MetadataItem
| Field name | Type | Description |
|---|---|---|
startDate |
Date |
The start date of the Campaign (in ISO 8601 format) |
endDate |
Date |
The end date of the Campaign (in ISO 8601 format) |
entryCondition |
The condition that must be satisfied for a profile to become a participant in the campaign |
|
cost |
Double |
An indicative cost for the campaign |
currency |
String |
The currency code (3-letter) for the cost of the campaign |
primaryGoal |
String |
A unique identifier of the primary Goal for the campaign. |
timezone |
String |
The timezone of the campaign identified by the TZ database name (see https://en.wikipedia.org/wiki/List_of_tz_database_time_zones) |
70.27.2. Example
In the following example a campaign that starts January 1st 31, 2020 at 8:38am and finished on February 29th, 2020 at the same time has the following entry condition: the session duration must be less or equal to 3000 milliseconds (3 seconds) and the profile has viewed the “about” page on the “digitall” website. The cost of the campaign is USD 1’000’000 and the timezone is Europe/Zurich. The primary goal for the campaign is the goal we should have as an example in the Goal section.
{
"itemId": "firstCampaignExample",
"itemType": "campaign",
"startDate": "2020-01-31T08:38:00Z",
"endDate": "2020-02-29T08:38:00Z",
"entryCondition": {
"parameterValues": {
"subConditions": [
{
"parameterValues": {
"propertyName": "duration",
"comparisonOperator": "lessThanOrEqualTo",
"propertyValueInteger": 3000
},
"type": "sessionPropertyCondition"
},
{
"parameterValues": {
"pagePath": "/sites/digitall/home/about"
},
"type": "pageViewEventCondition"
}
],
"operator": "and"
},
"type": "booleanCondition"
},
"cost": 1000000,
"currency": "USD",
"primaryGoal": "downloadGoalExample",
"timezone": "Europe/Zurich",
"metadata": {
"id": "firstCampaignExample",
"name": "firstCampaign",
"description": "Example of a campaign",
"scope": "digitall",
"tags": [],
"systemTags": [
"landing",
"campaign"
],
"enabled": true,
"missingPlugins": false,
"hidden": false,
"readOnly": false
}
}70.28. Scoring plan
Scoring plans make it possible to define scores that will be tracked for profiles and use conditions to increment a score when the conditions are met. This makes it possible to then use threshold conditions on profiles when they reach a certain score.
70.28.1. Structure definition
Inherits all the fields from: MetadataItem
| Field name | Type | Description |
|---|---|---|
elements |
ScoringElement array |
A ScoringElement is composed of: a Condition and a score value to increment. Each element defines a separate condition (tree) that will increment the defined score for this scoring plan, making it possible to have completely different conditions to augment a score. |
70.28.2. Example
In this example a scoring plan contains a single element that will increment a score with an increment one 1 once the profile has viewed at least 3 pages (using the “hasSeenNPagesCondition” condition).
{
"itemId": "viewMoreThan3PagesId",
"itemType": "scoring",
"elements": [
{
"condition": {
"parameterValues": {
"value": 3,
"scope": "digitall",
"comparisonOperator": "greaterThanOrEqualTo"
},
"type": "hasSeenNPagesCondition"
},
"value": 1
}
],
"metadata": {
"id": "viewMoreThan3PagesId",
"name": "Viewed more than 3 pages",
"description": null,
"scope": "digitall",
"tags": [],
"systemTags": [
"st:behavioral"
],
"enabled": true,
"missingPlugins": false,
"hidden": false,
"readOnly": false
}
}71. Property Types
Property types define the structure and metadata for properties that can be used in profiles and sessions within Apache Unomi. They specify the data type, display hints (ranges, constraints), default values, and other metadata that help inform UIs and enable rich querying capabilities.
|
Important
|
Property types are primarily designed for UI purposes - they inform user interfaces about what properties should be editable, how they should be displayed, and what constraints apply. Property types are dynamically created and updated at runtime and do not enforce strict validation on the server side. For actual data validation, Apache Unomi uses JSON Schemas, which are used exclusively for validating events sent through public endpoints. |
71.1. Quick Reference: Property Types vs JSON Schemas
| Aspect | Property Types | JSON Schemas |
|---|---|---|
Primary Purpose |
UI metadata and display hints |
Server-side validation |
Used For Objects |
Profiles (editing), Sessions (editing) |
Events (validation only) |
Storage |
Stored as PropertyType items, accessible via REST API |
Stored in Elasticsearch/OpenSearch |
Dynamic Creation |
Yes, can be created/updated at runtime via REST API |
Yes, can be added via API but primarily for events |
Validation |
No server-side validation (informational only) |
Yes, enforces strict validation |
Event Support |
Not applicable - property types are for profiles and sessions only |
Required for all events sent through public endpoints |
Accessibility |
Accessible via |
Accessible via JSON schema API |
71.2. Overview
Property types serve as informational schemas for properties, primarily used by UIs to:
-
The data type (string, integer, date, boolean, etc.)
-
Whether the property can have multiple values
-
Default values
-
Validation constraints (ranges, date ranges, IP ranges) - primarily for UI hints
-
Which object types the property applies to (profiles or sessions)
-
How properties should be merged when profiles are combined
-
Whether the property is protected (read-only)
-
Display metadata (names, descriptions, tags, ranks) for UI organization
71.3. Property Type Targets
Property types are organized by their target, which indicates which type of object the property applies to:
-
profilesorprofile- Properties for Profile objects (primary use case: editing profile data in UIs) -
sessionsorsession- Properties for Session objects (primary use case: editing session data in UIs)
The target is typically determined automatically from the file path when property types are loaded from JSON files:
-
Files in
/META-INF/cxs/properties/profiles/…→ target ="profiles" -
Files in
/META-INF/cxs/properties/sessions/…→ target ="sessions"
|
Note
|
Property types are only used for profiles and sessions. Events are immutable records and should not be edited through property type-based UIs. Event validation is handled by JSON schemas, not property types. |
71.4. Property Type Structure
A property type is defined using the following structure:
71.4.1. Structure Definition
Inherits all the fields from: MetadataItem
| Field name | Type | Description |
|---|---|---|
target |
String |
The type of object this property type applies to (e.g., "profiles", "sessions"). Determined automatically from file path if not explicitly set. The target is extracted from the directory name immediately following "properties" in the file path (e.g., |
type / valueTypeId |
String |
The identifier of the value type constraining values for properties using this PropertyType (e.g., "string", "integer", "date", "boolean", "set"). |
defaultValue |
String |
The default value that properties using this PropertyType will use if no value is specified explicitly. |
multivalued |
Boolean |
Whether properties using this property type are multi-valued (a vector of values as opposed to a scalar value). |
protected / protekted |
Boolean |
Whether properties with this type are marked as protected. Protected properties can be displayed but their value cannot be changed. Note: In JSON files, use |
rank |
Double |
The rank of this PropertyType for ordering purposes. Used to control the display order of properties in UIs. |
mergeStrategy |
String |
The identifier of the PropertyMergeStrategyType to be used when profiles with properties using this PropertyType are being merged. |
dateRanges |
List<DateRange> |
Optional list of date ranges that can be used for UI categorization and hints. Note: These are informational for UIs, not enforced server-side validation. |
numericRanges |
List<NumericRange> |
Optional list of numeric ranges that can be used for UI categorization and hints (e.g., age groups). Note: These are informational for UIs, not enforced server-side validation. |
ipRanges |
List<IpRange> |
Optional list of IP ranges that can be used for UI categorization and hints. Note: These are informational for UIs, not enforced server-side validation. |
automaticMappingsFrom |
Set<String> |
Set of property names from which properties of this type would be automatically initialized from (legacy feature). |
childPropertyTypes |
Set<PropertyType> |
For nested/complex properties, this contains the child property types that define the structure. |
71.4.2. Metadata Fields
Property types inherit from MetadataItem, which provides:
| Field name | Type | Description |
|---|---|---|
id |
String |
Unique identifier for the property type (usually matches the property name). |
name |
String |
Display name for the property type. |
description |
String |
Description of what the property represents. |
scope |
String |
The scope for the property type. |
tags |
Set<String> |
User-editable tags for categorization. |
systemTags |
Set<String> |
System-reserved tags for categorization (e.g., "profileProperties", "sessionProperties", "personalIdentifierProperties"). |
enabled |
Boolean |
Whether the property type is enabled. |
hidden |
Boolean |
Whether the property type should be hidden in UIs. |
readOnly |
Boolean |
Whether the property type definition can be edited. |
71.5. Value Types
Property types use value types to define the primitive data type. Common value types include:
-
string- Text values -
integer- Whole numbers -
long- Large integers -
float- Floating point numbers -
date- Date and time values -
boolean- True/false values -
set- Collections of values (for multi-valued or nested properties) -
email- Email addresses -
geoPoint- Geographic coordinates
71.6. Examples
71.6.1. Profile Property Type Example
This example shows a profile property type for storing a person’s age with numeric ranges:
{
"metadata": {
"id": "age",
"name": "Age",
"systemTags": [
"properties",
"profileProperties",
"personalProfileProperties"
]
},
"type": "integer",
"defaultValue": "",
"numericRanges": [
{"key": "*_10", "to": 10},
{"key": "10_20", "from": 10, "to": 20},
{"key": "20_30", "from": 20, "to": 30},
{"key": "30_40", "from": 30, "to": 40},
{"key": "40_50", "from": 40, "to": 50},
{"key": "50_*", "from": 50}
],
"automaticMappingsFrom": [],
"rank": "501.0"
}71.6.2. Session Property Type Example
This example shows a session property type for storing geographic information:
{
"metadata": {
"id": "sessionCity",
"name": "City",
"systemTags": [
"properties",
"sessionProperties",
"geographicSessionProperties"
]
},
"type": "string",
"defaultValue": "",
"automaticMappingsFrom": [],
"rank": "3.0"
}71.6.3. Simple Profile Property Type Example
This example shows a basic profile property type for storing a first name:
{
"metadata": {
"id": "firstName",
"name": "First name",
"systemTags": [
"properties",
"profileProperties",
"basicProfileProperties",
"personalIdentifierProperties"
]
},
"type": "string",
"defaultValue": "",
"automaticMappingsFrom": [
"j:firstName"
],
"rank": "101.0"
}71.7. Dynamic Creation and Management
Property types are designed to be dynamically created and updated at runtime. This makes them ideal for scenarios where property definitions need to change without code deployments or server restarts.
71.7.1. Key Characteristics
-
Runtime Creation: Property types can be created, updated, and deleted via REST API or GraphQL without restarting the server
-
No Code Deployment Required: Changes to property types take effect immediately
-
UI-Driven: Primarily used to inform UIs about property structure and constraints
-
Flexible: Can be modified to adapt to changing business requirements
-
Multi-tenant: Property types can be scoped to specific tenants
71.7.2. Use Cases for Dynamic Property Types
-
Custom Fields: Allow users to define custom profile or session properties through a UI
-
A/B Testing: Quickly add or modify property definitions for testing
-
Configuration-Driven UIs: Build forms and property editors that adapt to property type definitions
-
Integration Flexibility: Add properties for new integrations without code changes
-
Business Rule Changes: Update property constraints and metadata as business rules evolve
71.8. Creating Property Types
Property types can be created in several ways:
71.8.1. Via JSON Files in Plugins
The most common way is to include property type definitions as JSON files in your plugin bundle:
-
Create JSON files in your plugin’s resources directory:
-
Profile properties:
META-INF/cxs/properties/profiles/… -
Session properties:
META-INF/cxs/properties/sessions/…
-
-
The target is automatically determined from the directory structure:
-
Files in
properties/profiles/→ target ="profiles" -
Files in
properties/sessions/→ target ="sessions"
-
-
Subdirectories can be used for organization (e.g.,
profiles/personal/,profiles/contact/)
71.8.2. Via REST API
Property types can be created or updated using the REST API:
POST /cxs/profiles/properties
Content-Type: application/json
{
"metadata": {
"id": "customProperty",
"name": "Custom Property",
"systemTags": ["properties", "profileProperties"]
},
"type": "string",
"defaultValue": "",
"target": "profiles",
"rank": "100.0"
}71.8.3. Via GraphQL API
Property types can also be managed through the GraphQL API using property type mutations and queries.
71.9. Querying Property Types
71.9.1. Get All Property Types by Target
Retrieve all property types for a specific target:
GET /cxs/profiles/properties/targets/profilesResponse:
[
{
"metadata": {
"id": "firstName",
"name": "First name",
...
},
"type": "string",
...
},
...
]71.9.2. Get All Property Types
Retrieve all property types grouped by target:
GET /cxs/profiles/propertiesResponse:
{
"profiles": [...],
"sessions": [...]
// Note: Event property types are NOT included here as they are not stored as PropertyType items
}71.9.3. Get Property Type by ID
Retrieve a specific property type:
GET /cxs/profiles/properties/firstName71.9.4. Get Property Types by Tag
Retrieve property types with specific tags:
GET /cxs/profiles/properties/tags/profileProperties,personalProfileProperties71.9.5. Get Property Types by System Tag
Retrieve property types with specific system tags:
GET /cxs/profiles/properties/systemTags/profileProperties71.10. Property Type Features
71.10.1. Multi-valued Properties
Set multivalued to true to allow a property to contain multiple values:
{
"metadata": {
"id": "interests",
"name": "Interests"
},
"type": "string",
"multivalued": true,
"rank": "200.0"
}71.10.2. Protected Properties
Set protected to true to make a property read-only (note: use "protected" in JSON, not "protekted"):
{
"metadata": {
"id": "systemId",
"name": "System ID"
},
"type": "string",
"protected": true,
"rank": "1.0"
}71.10.3. Numeric Ranges
Define ranges for numeric properties to enable categorization:
{
"metadata": {
"id": "income",
"name": "Income"
},
"type": "integer",
"numericRanges": [
{"key": "low", "to": 30000},
{"key": "medium", "from": 30000, "to": 100000},
{"key": "high", "from": 100000}
]
}71.10.4. Date Ranges
Define ranges for date properties:
{
"metadata": {
"id": "registrationDate",
"name": "Registration Date"
},
"type": "date",
"dateRanges": [
{"key": "recent", "from": "2024-01-01"},
{"key": "old", "to": "2023-12-31"}
]
}71.10.5. Merge Strategies
Specify how properties should be merged when profiles are combined:
{
"metadata": {
"id": "lastLoginDate",
"name": "Last Login Date"
},
"type": "date",
"mergeStrategy": "mostRecentMergeStrategy",
"rank": "300.0"
}Common merge strategies include:
* defaultMergeStrategy - Default merge behavior (typically uses the first non-null value)
* mostRecentMergeStrategy - Use the most recent value (for dates and timestamps)
* oldestMergeStrategy - Use the oldest value (for dates and timestamps)
* addMergeStrategy - Add values together (for numeric types)
* nonEmptyMergeStrategy - Prefer non-empty values
|
Note
|
The merge strategy identifier in property type JSON files should match the id field from the merge strategy definition JSON files located in the META-INF/cxs/mergers/ directory (this is a file system path within plugin bundles, not an API endpoint).
|
71.10.6. Nested Properties
For complex objects, use childPropertyTypes to define nested structures:
{
"metadata": {
"id": "address",
"name": "Address"
},
"type": "set",
"childPropertyTypes": [
{
"metadata": {
"id": "street",
"name": "Street"
},
"type": "string"
},
{
"metadata": {
"id": "city",
"name": "City"
},
"type": "string"
},
{
"metadata": {
"id": "zipCode",
"name": "Zip Code"
},
"type": "string"
}
]
}71.11. Tags and System Tags
Property types support two types of tags for categorization: tags and systemTags. Understanding the difference between them is important for organizing and filtering property types in UIs.
71.11.1. Tags vs System Tags
Tags (tags field):
* User-editable tags that can be modified through UIs
* Intended for custom categorization and organization
* Can be added, removed, or changed by end users
* Perfect for creating custom groupings for UI display
* Example use cases: grouping properties by department, project, or custom business logic
System Tags (systemTags field):
* Reserved tags typically populated through JSON descriptors
* Not meant to be modified by end users
* Used for system-level categorization and filtering
* Help classify properties for internal system logic
* Example: profileProperties, sessionProperties, personalIdentifierProperties
71.11.2. Using Tags to Group Properties in UIs
Tags provide a flexible way to organize property types for display and editing in user interfaces. Here’s how you can leverage tags:
UI Grouping Strategy
-
Create Custom Tags: Assign custom tags to property types based on how you want to group them in your UI
-
Query by Tags: Use the REST API to retrieve property types filtered by specific tags
-
Display in Groups: Organize properties in tabs, sections, or accordions based on their tags
Example: Grouping Properties by Department
Suppose you want to group profile properties by department in your UI:
// Marketing properties
{
"metadata": {
"id": "marketingSource",
"name": "Marketing Source",
"tags": ["marketing", "acquisition"]
},
"type": "string"
}
// Sales properties
{
"metadata": {
"id": "salesRep",
"name": "Sales Representative",
"tags": ["sales", "account-management"]
},
"type": "string"
}
// Support properties
{
"metadata": {
"id": "supportTier",
"name": "Support Tier",
"tags": ["support", "customer-service"]
},
"type": "string"
}Then in your UI, you can fetch and display properties grouped by tag:
# Get all marketing properties
GET /cxs/profiles/properties/tags/marketing
# Get all sales properties
GET /cxs/profiles/properties/tags/sales
# Get all support properties
GET /cxs/profiles/properties/tags/supportExample: Multi-Tag Filtering
Properties can have multiple tags, allowing for flexible filtering:
{
"metadata": {
"id": "vipCustomer",
"name": "VIP Customer",
"tags": ["customer-tier", "priority", "billing"]
},
"type": "boolean"
}You can query by multiple tags (comma-separated):
# Get properties with any of these tags
GET /cxs/profiles/properties/tags/customer-tier,priority,billing71.11.3. Creating and Assigning Tags
Creating Tags
Tags don’t need to be pre-registered. Simply assign a tag string to a property type, and it becomes available for filtering. Tags are created implicitly when first used.
Assigning Tags via JSON Files
When defining property types in JSON files, include tags in the metadata:
{
"metadata": {
"id": "customProperty",
"name": "Custom Property",
"tags": ["my-custom-tag", "another-tag"],
"systemTags": ["properties", "profileProperties"]
},
"type": "string",
"rank": "100.0"
}Assigning Tags via REST API
You can add or modify tags when creating or updating a property type:
POST /cxs/profiles/properties
Content-Type: application/json
{
"metadata": {
"id": "newProperty",
"name": "New Property",
"tags": ["custom-group", "editable"],
"systemTags": ["properties", "profileProperties"]
},
"type": "string",
"target": "profiles"
}Updating Tags on Existing Property Types
To add tags to an existing property type, retrieve it, modify the tags, and save it:
# 1. Get the existing property type
GET /cxs/profiles/properties/existingProperty
# 2. Update it with new tags
POST /cxs/profiles/properties
Content-Type: application/json
{
"metadata": {
"id": "existingProperty",
"name": "Existing Property",
"tags": ["existing-tag", "new-tag", "another-tag"],
"systemTags": ["properties", "profileProperties"]
},
"type": "string"
}Assigning Tags via GraphQL
Tags can also be managed through the GraphQL API when creating or updating property types.
71.11.4. Tag-Based UI Organization Examples
Example 1: Tabbed Interface
Organize properties into tabs based on tags:
// Fetch properties grouped by tags
const marketingProps: PropertyType[] = await fetch('/cxs/profiles/properties/tags/marketing')
.then(res => res.json());
const salesProps: PropertyType[] = await fetch('/cxs/profiles/properties/tags/sales')
.then(res => res.json());
const supportProps: PropertyType[] = await fetch('/cxs/profiles/properties/tags/support')
.then(res => res.json());
// Display in tabs (pseudo-rendering - in real UI framework, this would be JSX/TSX)
console.log('Tabs:');
console.log(' Tab: Marketing');
console.log(' PropertyEditor with', marketingProps.length, 'properties');
console.log(' Tab: Sales');
console.log(' PropertyEditor with', salesProps.length, 'properties');
console.log(' Tab: Support');
console.log(' PropertyEditor with', supportProps.length, 'properties');Example 2: Accordion Sections
Group properties in collapsible sections:
const allProps: PropertyType[] = await fetch('/cxs/profiles/properties/targets/profiles')
.then(res => res.json());
// Group properties by tag
function groupByTag(propertyTypes: PropertyType[]): Record<string, PropertyType[]> {
const grouped: Record<string, PropertyType[]> = {};
for (const pt of propertyTypes) {
const tags = pt.metadata.tags || [];
for (const tag of tags) {
if (!grouped[tag]) {
grouped[tag] = [];
}
grouped[tag].push(pt);
}
}
return grouped;
}
const grouped = groupByTag(allProps);
// Display in accordion (pseudo-rendering - in real UI framework, this would be JSX/TSX)
console.log('Accordion:');
for (const [tag, properties] of Object.entries(grouped)) {
console.log(` AccordionItem: ${tag}`);
console.log(` PropertyEditor with ${properties.length} properties`);
}Example 3: Filterable List
Allow users to filter properties by tag:
let selectedTag: string | null = null;
const allProps: PropertyType[] = await fetch('/cxs/profiles/properties/targets/profiles')
.then(res => res.json());
// Extract unique tags
function extractUniqueTags(propertyTypes: PropertyType[]): string[] {
const tags: string[] = [];
for (const pt of propertyTypes) {
const propertyTags = pt.metadata.tags || [];
for (const tag of propertyTags) {
if (!tags.includes(tag)) {
tags.push(tag);
}
}
}
return tags;
}
const uniqueTags = extractUniqueTags(allProps);
// Filter properties based on selected tag
const filteredProps: PropertyType[] = selectedTag
? await fetch(`/cxs/profiles/properties/tags/${selectedTag}`).then(res => res.json())
: allProps;
// Display (pseudo-rendering - in real UI framework, this would be JSX/TSX)
console.log('Select dropdown:');
console.log(' Option: All Properties');
for (const tag of uniqueTags) {
console.log(` Option: ${tag}`);
}
console.log(`PropertyList with ${filteredProps.length} properties`);71.11.5. Best Practices for Tags
-
Use Descriptive Tag Names: Choose clear, meaningful tag names (e.g.,
marketing,sales,supportrather thanm,s,sup) -
Create Hierarchical Tags: Use dot notation for hierarchical organization (e.g.,
department.marketing,department.sales) -
Use Consistent Tagging: Establish a tagging convention and apply it consistently across all property types
-
Combine Tags and System Tags: Use system tags for system-level categorization and tags for UI-level organization
-
Document Tag Conventions: Maintain documentation about your tagging conventions so team members use tags consistently
-
Avoid Over-Tagging: Don’t assign too many tags to a single property type - 2-4 tags is usually sufficient
-
Use Tags for Permissions: Consider using tags to control which properties are visible or editable by different user roles
71.12. System Tags
System tags are used to categorize property types. Common system tags include:
-
properties- General property tag -
profileProperties- Properties for profiles -
sessionProperties- Properties for sessions -
basicProfileProperties- Basic profile information -
personalProfileProperties- Personal information -
contactProfileProperties- Contact information -
workProfileProperties- Work-related information -
socialProfileProperties- Social media identifiers -
systemProfileProperties- System-managed properties (automatically maintained by Unomi) -
leadProfileProperties- Lead management properties -
personalIdentifierProperties- Properties that identify individuals (may be subject to privacy regulations) -
geographicSessionProperties- Geographic session information -
technicalSessionProperties- Technical session information
71.13. Validation and Property Types
|
Important
|
Property types provide informational metadata for UIs but do not enforce server-side validation. The ranges, types, and constraints defined in property types are hints for UI components, not strict validation rules. |
71.13.1. What Property Types Do
-
Inform UIs: Tell user interfaces what properties exist, their types, and how to display them
-
Provide Hints: Give UI components information about expected data formats and constraints
-
Enable Dynamic Forms: Allow UIs to generate forms and property editors automatically
-
Organize Display: Help organize properties in UIs using tags, ranks, and categories
71.13.2. What Property Types Don’t Do
-
Server-Side Validation: Property types do not validate data on the server
-
Enforce Constraints: Ranges and constraints are informational, not enforced
-
Prevent Invalid Data: Invalid data can still be stored if not validated elsewhere
-
Type Safety: Property types don’t guarantee type safety at the storage level
71.13.3. When Validation Happens
-
JSON Schemas: Used exclusively for server-side validation of events sent through
/context.jsonand/eventcollectorendpoints -
Property Types: Provide no server-side validation - they are informational only
-
UI Validation: Implement client-side validation in your UI based on property type hints (recommended for profiles and sessions)
-
Application Logic: Add validation in your application code if needed for profiles and sessions
-
Database Constraints: Use database-level constraints if your persistence layer supports them
71.13.4. Best Practice: Property Types for Profiles/Sessions, JSON Schemas for Events
Property types and JSON schemas serve different purposes for different objects:
For Profiles and Sessions: * Use property types to build UIs for editing profile/session properties * Implement client-side validation in your UI based on property type hints * Property types provide no server-side validation - data is stored as-is
For Events:
* Use JSON schemas to validate events sent through /context.json or /eventcollector
* Event property types are not accessible via REST API (they’re generated internally)
* To understand event structure, query actual events or use JSON schemas
71.14. Best Practices
-
Use descriptive names: Property type IDs should be clear and descriptive (e.g.,
firstNamerather thanfn). -
Set appropriate ranks: Use the
rankfield to control display order in UIs. Lower numbers appear first. -
Use system tags: Apply appropriate system tags to help categorize and filter property types.
-
Organize with subdirectories: Use subdirectories in your plugin structure to organize related property types.
-
Define ranges for categorization: Use numeric ranges, date ranges, or IP ranges to enable automatic categorization of values.
-
Mark sensitive properties: Use
personalIdentifierPropertiessystem tag for properties that identify individuals. -
Set merge strategies: Define appropriate merge strategies for properties that may need to be merged when profiles are combined.
-
Use appropriate value types: Choose the correct value type (string, integer, date, etc.) for your data.
71.15. Built-in Property Types
Apache Unomi comes with a comprehensive set of built-in property types that cover common use cases. These are organized by category and target type.
71.15.1. Built-in Profile Property Types
Basic Profile Properties
These properties store basic identifying information about profiles:
-
firstName(string) - First name of the profile -
lastName(string) - Last name of the profile -
gender(string) - Gender -
nationality(string) - Nationality
All basic profile properties are tagged with basicProfileProperties. firstName and lastName are also tagged with personalIdentifierProperties.
Personal Profile Properties
These properties store personal information:
-
age(integer) - Age with numeric ranges (0-10, 10-20, 20-30, 30-40, 40-50, 50+) -
birthDate(date) - Birth date with date ranges -
kids(integer) - Number of children -
maritalStatus(string) - Marital status
All personal profile properties are tagged with personalProfileProperties.
Contact Profile Properties
These properties store contact information:
-
email(email) - Email address -
phoneNumber(string) - Phone number -
address(string) - Street address -
city(string) - City -
zipCode(string) - Zip/postal code -
countryName(string) - Country name
All contact profile properties are tagged with contactProfileProperties. Email, address, and phoneNumber are also tagged with personalIdentifierProperties.
Work Profile Properties
These properties store work-related information:
-
company(string) - Company name -
jobTitle(string) - Job title -
income(integer) - Income
All work profile properties are tagged with workProfileProperties.
Social Profile Properties
These properties store social media identifiers:
-
facebookId(string) - Facebook ID -
twitterId(string) - Twitter ID -
linkedInId(string) - LinkedIn ID -
googleId(string) - Google ID
All social profile properties are tagged with socialProfileProperties.
System Profile Properties
These properties are automatically managed by Unomi and are typically protected (read-only):
-
firstVisit(date) - Date of first visit (protected, usesoldestMergeStrategy) -
lastVisit(date) - Date of last visit (protected, usesmostRecentMergeStrategy) -
previousVisit(date) - Date of previous visit (protected, usesmostRecentMergeStrategy) -
nbOfVisits(integer) - Number of visits with ranges (protected, usesaddMergeStrategy) -
totalNbOfVisits(integer) - Total number of visits (protected, usesaddMergeStrategy)
All system profile properties are tagged with systemProfileProperties.
Lead Profile Properties
-
leadAssignedTo(string) - Person assigned to the lead
All lead profile properties are tagged with leadProfileProperties.
71.15.2. Built-in Session Property Types
Geographic Session Properties
These properties store geographic information about the session:
-
sessionCity(string) - City where the session occurred -
sessionCountryName(string) - Country name -
sessionCountryCode(string) - Country code -
sessionAdminSubDiv1(string) - First-level administrative subdivision (e.g., state, province) -
sessionAdminSubDiv2(string) - Second-level administrative subdivision (e.g., county) -
latitude(string) - Latitude coordinate -
longitude(string) - Longitude coordinate
All geographic session properties are tagged with geographicSessionProperties.
Technical Session Properties
These properties store technical information about the session:
-
deviceCategory(string) - Device category (e.g., desktop, mobile, tablet) -
operatingSystemName(string) - Operating system name -
operatingSystemFamily(string) - Operating system family -
userAgentName(string) - User agent name (browser name) -
userAgentVersion(string) - User agent version (browser version) -
pageReferringURL(string) - URL of the referring page
All technical session properties are tagged with technicalSessionProperties.
71.15.3. Property Type Organization
Built-in property types are organized in the following directory structure:
META-INF/cxs/properties/
profiles/
basic/ # Basic identifying information
personal/ # Personal information
contact/ # Contact information
work/ # Work-related information
social/ # Social media identifiers
system/ # System-managed properties
lead/ # Lead management
sessions/
geographic/ # Geographic information
technical/ # Technical informationThe directory structure helps organize property types, and the target is automatically determined from the parent directory (profiles or sessions).
71.15.4. Viewing Built-in Property Types
You can view all built-in property types using the REST API:
# Get all profile property types
GET /cxs/profiles/properties/targets/profiles
# Get all session property types
GET /cxs/profiles/properties/targets/sessions
# Get property types by system tag
GET /cxs/profiles/properties/systemTags/profileProperties
GET /cxs/profiles/properties/systemTags/sessionProperties71.16. Property Types vs JSON Schemas
Property types and JSON schemas serve complementary but distinct roles in Apache Unomi:
71.16.1. Property Types: UI-Focused Metadata
Property types are: * Primarily for UIs: Inform user interfaces about property structure, display names, types, and constraints * Dynamically managed: Can be created, updated, and deleted at runtime via REST API or GraphQL * Informational: Provide metadata about properties but don’t enforce strict server-side validation * Flexible: Allow UIs to adapt to changing property definitions without code changes * Target-specific: Organized by target (profiles and sessions)
Use property types when you need to: * Build dynamic forms and property editors in UIs * Display property information to users * Organize properties by tags or categories * Control property visibility and editability in interfaces * Provide hints about data types and constraints to UI components
71.16.2. JSON Schemas: Server-Side Validation
JSON schemas are:
* For validation: Enforce strict data validation on the server side
* Event-only: Used exclusively to validate events sent through public endpoints (/context.json and /eventcollector)
* Standard-based: Use the JSON Schema standard for validation
* Persistent: Stored in Elasticsearch/OpenSearch and loaded at startup
* Required for events: Each event type must have an associated JSON schema with target "events"
|
Note
|
While JSON schemas technically support targets like "profiles", "sessions", "rules", and "segments", in practice they are only used for event validation. The validation code only processes schemas with target "events" when validating incoming requests through the public endpoints.
|
Use JSON schemas when you need to: * Validate incoming events from external sources * Ensure event data integrity and type safety * Enforce business rules and constraints on events * Validate event structures before processing
71.16.3. How They Work Together
Property types and JSON schemas complement each other:
Example Workflow:
-
Property Type Definition: A property type defines
emailas a string with description "Email address" for profiles -
UI Generation: The UI uses the property type to render an email input field with appropriate validation hints for profile editing
-
User Input: User enters an email address in the UI
-
Data Storage: Data is stored in the profile (property types don’t validate, but UI can implement client-side validation)
-
Event Validation (separate): When events are sent through
/context.jsonor/eventcollector, JSON schemas validate the event structure (not profile properties)
71.16.4. When to Use Each
Use Property Types for: * Building dynamic property editors * Organizing properties in UIs (tabs, sections, filters) * Providing type hints to form builders * Controlling property visibility and editability * GraphQL schema generation
Use JSON Schemas for: * Validating incoming events from external sources (the only actual use case) * Enforcing event data type constraints * Validating complex nested event structures * Ensuring event data integrity on the server
Use Both When: * You want UI hints for profiles/sessions (property types) AND need to validate events (JSON schemas) * Building UIs that display profile/session data (property types) while also handling event validation (JSON schemas)
71.17. Property Types for Events
Property types are not used for events. Events are immutable records of user interactions and should not be edited through property type-based UIs.
If you need to understand event structure for display purposes:
* Query actual events to see their structure
* Use JSON schemas (with target "events") to understand the expected structure of events
* JSON schemas define the validation rules for events sent through public endpoints
Event validation is performed by JSON schemas (with target "events") when events are sent through the public endpoints (/context.json and /eventcollector).
71.18. Building UIs with Property Types
Property types are designed to enable dynamic UI generation. Here’s how to use them effectively:
71.18.1. Step 1: Fetch Property Types
Retrieve property types for your target (profiles or sessions):
# Fetch all profile property types
GET /cxs/profiles/properties/targets/profiles
# Fetch session property types
GET /cxs/profiles/properties/targets/sessions
# Fetch by tag for grouping
GET /cxs/profiles/properties/tags/marketingTypeScript example:
// Fetch property types from REST API
const propertyTypes: PropertyType[] = await fetch('/cxs/profiles/properties/targets/profiles')
.then(res => res.json());
// Or fetch by tag
const marketingProps: PropertyType[] = await fetch('/cxs/profiles/properties/tags/marketing')
.then(res => res.json());71.18.2. Step 2: Generate Form Fields
Use property type metadata to generate appropriate form fields:
interface FormField {
id: string;
name: string;
description?: string;
inputType: string;
multivalued: boolean;
defaultValue: string;
readOnly: boolean;
tags: string[];
}
function generateFormField(propertyType: PropertyType): FormField {
// Extract property type information
const id = propertyType.metadata.id;
const name = propertyType.metadata.name;
const description = propertyType.metadata.description;
const valueType = propertyType.type;
const isMultivalued = propertyType.multivalued || false;
const defaultValue = propertyType.defaultValue || '';
const isProtected = propertyType.protected || false;
// Determine input type based on value type
let inputType: string;
if (valueType === 'integer' || valueType === 'long') {
inputType = 'number';
} else if (valueType === 'date') {
inputType = 'date';
} else if (valueType === 'boolean') {
inputType = 'checkbox';
} else if (valueType === 'email') {
inputType = 'email';
} else {
inputType = 'text';
}
// Return field configuration
return {
id,
name,
description,
inputType,
multivalued: isMultivalued,
defaultValue,
readOnly: isProtected,
tags: propertyType.metadata.tags || []
};
}
// Generate form fields for all property types
const formFields: FormField[] = propertyTypes.map(generateFormField);71.18.3. Step 3: Render Dynamic Forms
Use the generated fields to render your form:
interface PropertyFormProps {
propertyTypes: PropertyType[];
onSubmit: (values: Record<string, any>) => void;
}
function renderPropertyForm({ propertyTypes, onSubmit }: PropertyFormProps): void {
// Initialize form values
const values: Record<string, any> = {};
// Generate form fields
const fields: FormField[] = propertyTypes.map(generateFormField);
// Group fields by tags
const groupedFields: Record<string, FormField[]> = {};
for (const field of fields) {
const tag = field.tags[0] || 'other';
if (!groupedFields[tag]) {
groupedFields[tag] = [];
}
groupedFields[tag].push(field);
}
// Render form (pseudo-rendering logic)
for (const [tag, tagFields] of Object.entries(groupedFields)) {
// Render fieldset with legend
console.log(`Fieldset: ${tag}`);
for (const field of tagFields) {
// Render label
console.log(`Label: ${field.name}`);
if (field.description) {
// Render help-text
console.log(`Help: ${field.description}`);
}
if (field.multivalued) {
// Render multi-value-input
const currentValue = values[field.id] || [];
// onChange handler would update values[field.id] = newValue
console.log(`Multi-value input: ${field.inputType}`, currentValue);
} else {
// Render single input
const currentValue = values[field.id] ?? field.defaultValue;
// onChange handler would update values[field.id] = newValue
console.log(`Input: ${field.inputType}`, currentValue, `readOnly: ${field.readOnly}`);
}
}
}
// Render submit button
console.log('Submit button: Save');
}71.18.4. Step 4: Handle Numeric Ranges
For properties with numeric ranges, you can provide range-based inputs:
interface NumericRange {
key: string;
from?: number;
to?: number;
}
function renderNumericRangeInput(
propertyType: PropertyType,
value: string,
onChange: (value: string) => void
): void {
const numericRanges = propertyType.numericRanges;
if (numericRanges && numericRanges.length > 0) {
// Render as select dropdown with range options
console.log('Select dropdown:');
console.log(' Option: Select range');
for (const range of numericRanges) {
const label = formatRange(range);
console.log(` Option: ${label} (value: ${range.key})`);
}
} else {
// Fallback to regular number input
console.log(`Number input: ${value}`);
}
}
function formatRange(range: NumericRange): string {
if (range.from !== undefined && range.to !== undefined) {
return `${range.from} - ${range.to}`;
} else if (range.from !== undefined) {
return `${range.from}+`;
} else if (range.to !== undefined) {
return `up to ${range.to}`;
} else {
return range.key;
}
}71.18.5. Step 5: Sort by Rank
Use the rank field to control display order:
// Sort property types by rank (lower numbers first)
function sortByRank(propertyTypes: PropertyType[]): PropertyType[] {
return [...propertyTypes].sort((a, b) => {
const rankA = a.rank ?? 999; // Default rank for items without rank
const rankB = b.rank ?? 999;
return rankA - rankB;
});
}
const sortedPropertyTypes: PropertyType[] = sortByRank(propertyTypes);71.18.6. Complete Example: Dynamic Property Editor
Here’s a complete example of a dynamic property editor:
interface PropertyType {
metadata: {
id: string;
name: string;
description?: string;
tags?: string[];
systemTags?: string[];
};
type: string;
defaultValue?: string;
multivalued?: boolean;
protected?: boolean;
rank?: number;
numericRanges?: NumericRange[];
}
interface DynamicPropertyEditorState {
propertyTypes: PropertyType[];
values: Record<string, any>;
selectedTag: string | null;
}
async function createDynamicPropertyEditor(
target: string,
onSave: (values: Record<string, any>) => void
): Promise<DynamicPropertyEditorState> {
// Initialize state
let propertyTypes: PropertyType[] = [];
const values: Record<string, any> = {};
let selectedTag: string | null = null;
// Fetch property types from REST API
propertyTypes = await fetch(`/cxs/profiles/properties/targets/${target}`)
.then(res => res.json());
// Initialize values with defaults
for (const propertyType of propertyTypes) {
if (propertyType.defaultValue != null) {
values[propertyType.metadata.id] = propertyType.defaultValue;
}
}
// Get unique tags for filtering
const tags: string[] = [];
for (const propertyType of propertyTypes) {
const propertyTags = propertyType.metadata.tags || [];
for (const tag of propertyTags) {
if (!tags.includes(tag)) {
tags.push(tag);
}
}
}
// Filter property types by selected tag
let filteredTypes = propertyTypes;
if (selectedTag != null) {
filteredTypes = propertyTypes.filter(pt =>
(pt.metadata.tags || []).includes(selectedTag!)
);
}
// Sort by rank
const sortedTypes = sortByRank(filteredTypes);
// Render form (pseudo-rendering - in real UI framework, this would be JSX/TSX)
console.log('Rendering form...');
// Tag filter dropdown
if (tags.length > 0) {
console.log('Tag filter dropdown:', selectedTag);
console.log(' Option: All properties');
for (const tag of tags) {
console.log(` Option: ${tag}`);
}
}
// Property fields
for (const propertyType of sortedTypes) {
const fieldId = propertyType.metadata.id;
const fieldValue = values[fieldId] ?? propertyType.defaultValue ?? '';
console.log(`Field: ${propertyType.metadata.name} (${fieldId})`);
if (propertyType.metadata.description) {
console.log(` Description: ${propertyType.metadata.description}`);
}
if (propertyType.protected) {
console.log(` Input: text, value: ${fieldValue}, readOnly: true`);
} else {
propertyInput(propertyType, fieldValue, (newValue) => {
values[fieldId] = newValue;
});
}
}
// Submit button
console.log('Submit button: Save Properties');
return { propertyTypes, values, selectedTag };
}
function propertyInput(
propertyType: PropertyType,
value: any,
onChange: (value: any) => void
): void {
// Handle numeric ranges
if (propertyType.numericRanges && propertyType.numericRanges.length > 0) {
console.log(' Select dropdown with numeric ranges');
console.log(' Option: Select...');
for (const range of propertyType.numericRanges) {
console.log(` Option: ${formatRange(range)} (value: ${range.key})`);
}
return;
}
// Handle multivalued properties
if (propertyType.multivalued) {
const valueList: any[] = Array.isArray(value) ? value : (value ? [value] : []);
console.log(' Multi-value input container:');
for (let index = 0; index < valueList.length; index++) {
const val = valueList[index];
const inputType = getInputType(propertyType.type);
console.log(` Input[${index}]: ${inputType}, value: ${val}`);
// onChange would update valueList[index] = newVal, then call onChange(valueList)
}
console.log(' Button: Add Value');
return;
}
// Regular single-value input
const inputType = getInputType(propertyType.type);
console.log(` Input: ${inputType}, value: ${value}`);
}
function getInputType(valueType: string): string {
if (valueType === 'integer' || valueType === 'long') {
return 'number';
} else if (valueType === 'date') {
return 'date';
} else if (valueType === 'boolean') {
return 'checkbox';
} else if (valueType === 'email') {
return 'email';
} else {
return 'text';
}
}71.19. Related Topics
-
Data Model Overview - Learn about the overall data model
-
Writing Plugins - Learn how to create plugins with property types
-
JSON Schemas - Learn about JSON schema support in Unomi
-
GraphQL API - Learn about GraphQL property type operations
71.20. Built-in Event types
Apache Unomi comes with built-in event types, which we describe below.
71.20.1. Login event type
The login event type is used to signal an authentication event has been triggered. This event should be “secured”, meaning that it should not be accepted from any location, and by default Apache Unomi will only accept this event from configured “third-party” servers (identified by their IP address and a Unomi application key).
Usually, the login event will contain information passed by the authentication server and may include user properties and any additional information. Rules may be set up to copy the information from the event into the profile, but this is not done in the default set of rules provided by Apache Unomi for security reasons. You can find an example of such a rule here: https://github.com/apache/unomi/blob/master/samples/login-integration/src/main/resources/META-INF/cxs/rules/exampleLogin.json
Structure overview
Based on the structure of the following object: Event
| Field name | Value/description |
|---|---|
eventType |
login |
source |
Not used (null) |
target |
an Item representing the user that logged in |
scope |
the scope in which the user has authenticated |
properties |
Not used (empty) |
Example
In this case, a user has logged into a site called “digitall”, and his user information the following properties are associated with the active user..and perhaps show his visitor profile or user information.
{
"itemId": "0b8825a6-efb8-41a6-bea5-d745b33c94cb",
"itemType": "event",
"scope": "digitall",
"eventType": "login",
"sessionId": "7b8a5f17-cdb0-4c14-b676-34c1c0de0825",
"profileId": "f7d1f1b9-4415-4ff1-8fee-407b109364f7",
"timeStamp": "2020-01-30T21:18:28Z",
"properties": {},
"source": null,
"target": {
"itemId": "13054a95-092d-4d7b-81f5-e4656c2ebc88",
"itemType": "cmsUser",
"scope": null,
"properties": {
"j:function": "Vice President",
"preferredLanguage": "en",
"j:title": "mister",
"emailNotificationsDisabled": "true",
"j:organization": "Acme Space",
"j:gender": "male",
"j:nodename": "bill",
"j:lastName": "Galileo",
"j:publicProperties": "j:about,j:firstName,j:function,j:gender,j:lastName,j:organization,j:picture,j:title",
"j:firstName": "Bill",
"j:about": "<p> Lorem Ipsum dolor sit amet.</p> "
}
}
}71.20.2. View event type
This event is triggered when a web page is viewed by a user. Some integrators might also want to trigger it when a single-page-application screen is displayed or when a mobile application screen is displayed.
Structure description
Based on the structure of the following object: Event
| Field name | Value/description |
|---|---|
eventType |
view |
source |
the source for the view event, could be a web site, an application name, etc… |
target |
the page/screen being viewed |
properties |
Not used (empty) |
Example
In this case a use has visited the home page of the digitall site. As this is the first page upon login, the destination and referring URL are the same.
{
"itemId": "c75f50c2-ab55-4d95-be69-cbbeee180d6b",
"itemType": "event",
"scope": "digitall",
"eventType": "view",
"sessionId": "7b8a5f17-cdb0-4c14-b676-34c1c0de0825",
"profileId": "f7d1f1b9-4415-4ff1-8fee-407b109364f7",
"timeStamp": "2020-01-30T21:18:32Z",
"properties": {},
"source": {
"itemId": "29f5fe37-28c0-48f3-966b-5353bed87308",
"itemType": "site",
"scope": "digitall",
"properties": {}
},
"target": {
"itemId": "f20836ab-608f-4551-a930-9796ec991340",
"itemType": "page",
"scope": "digitall",
"properties": {
"pageInfo": {
"templateName": "home",
"language": "en",
"destinationURL": "http://localhost:8080/sites/digitall/home.html",
"categories": [],
"pageID": "f20836ab-608f-4551-a930-9796ec991340",
"nodeType": "jnt:page",
"pagePath": "/sites/digitall/home",
"pageName": "Home",
"referringURL": "http://localhost:8080/sites/digitall/home.html",
"tags": [],
"isContentTemplate": false
},
"attributes": {},
"consentTypes": []
}
}
}71.20.3. Form event type
This event type is used to track form submissions. These could range from login to survey form data captured and processed in Apache Unomi using rules.
Structure description
Based on the structure of the following object: Event
| Field name | Value/description |
|---|---|
eventType |
form |
source |
the page/screen on which the form was submitted |
target |
the form that was submitted (there could be more than one form on a page/screen) |
properties |
contain the data submitted in the form |
Example
A form exists on the digitall site, and has been submitted by a visitor. In this case it was a search form that contains fields to adjust the search parameters.
{
"itemId": "44177ffe-b5c8-4575-a8e5-f8aa0d4ee792",
"itemType": "event",
"scope": "digitall",
"eventType": "form",
"sessionId": "be416c08-8b9b-4611-990f-3a8bf3ed4e68",
"profileId": "bc1e1238-a9ac-4b3a-8f63-5eec205cfcd5",
"timeStamp": "2020-01-30T21:41:22Z",
"properties": {
"jcrMethodToCall": "get",
"src_originSiteKey": "digitall",
"src_terms[0].term": "test",
"src_terms[0].applyFilter": "true",
"src_terms[0].match": "all_words",
"src_terms[0].fields.siteContent": "true",
"src_terms[0].fields.tags": "true",
"src_terms[0].fields.files": "true",
"src_sites.values": "digitall",
"src_sitesForReferences.values": "systemsite",
"src_languages.values": "en"
},
"source": {
"itemId": "97e14221-33dd-4608-82ae-9724d15d4f12",
"itemType": "page",
"scope": "digitall",
"properties": {
"pageInfo": {
"templateName": "home",
"language": "en",
"destinationURL": "http://localhost:8080/sites/digitall/home/search-results.html",
"categories": [],
"pageID": "97e14221-33dd-4608-82ae-9724d15d4f12",
"nodeType": "jnt:page",
"pagePath": "/sites/digitall/home/search-results",
"pageName": "Search Results",
"referringURL": "http://localhost:8080/cms/edit/default/en/sites/digitall/home.html",
"tags": [],
"isContentTemplate": false
},
"attributes": {},
"consentTypes": []
}
},
"target": {
"itemId": "searchForm",
"itemType": "form",
"scope": "digitall",
"properties": {}
}
}71.20.4. Update properties event type
This event is usually used by user interfaces that make it possible to modify profile properties, for example a form where a user can edit his profile properties, or a management UI to modify.
Note that this event type is a protected event type that is only accepted from configured third-party servers.
Structure definition
Based on the structure of the following object: Event
| Field name | Value/description |
|---|---|
eventType |
updateProperties |
source |
the screen that has triggered the update to the profile properties |
target |
Not used (null) |
properties |
{ targetId: the identifier of the profile to update targetType: “profile” if updating a profile or “persona” for personas add/update/delete: properties to be added/updated or deleted on the target profile} |
Example
In this example, this “updateProperties” event contains properties that must be added to the targetId profile.
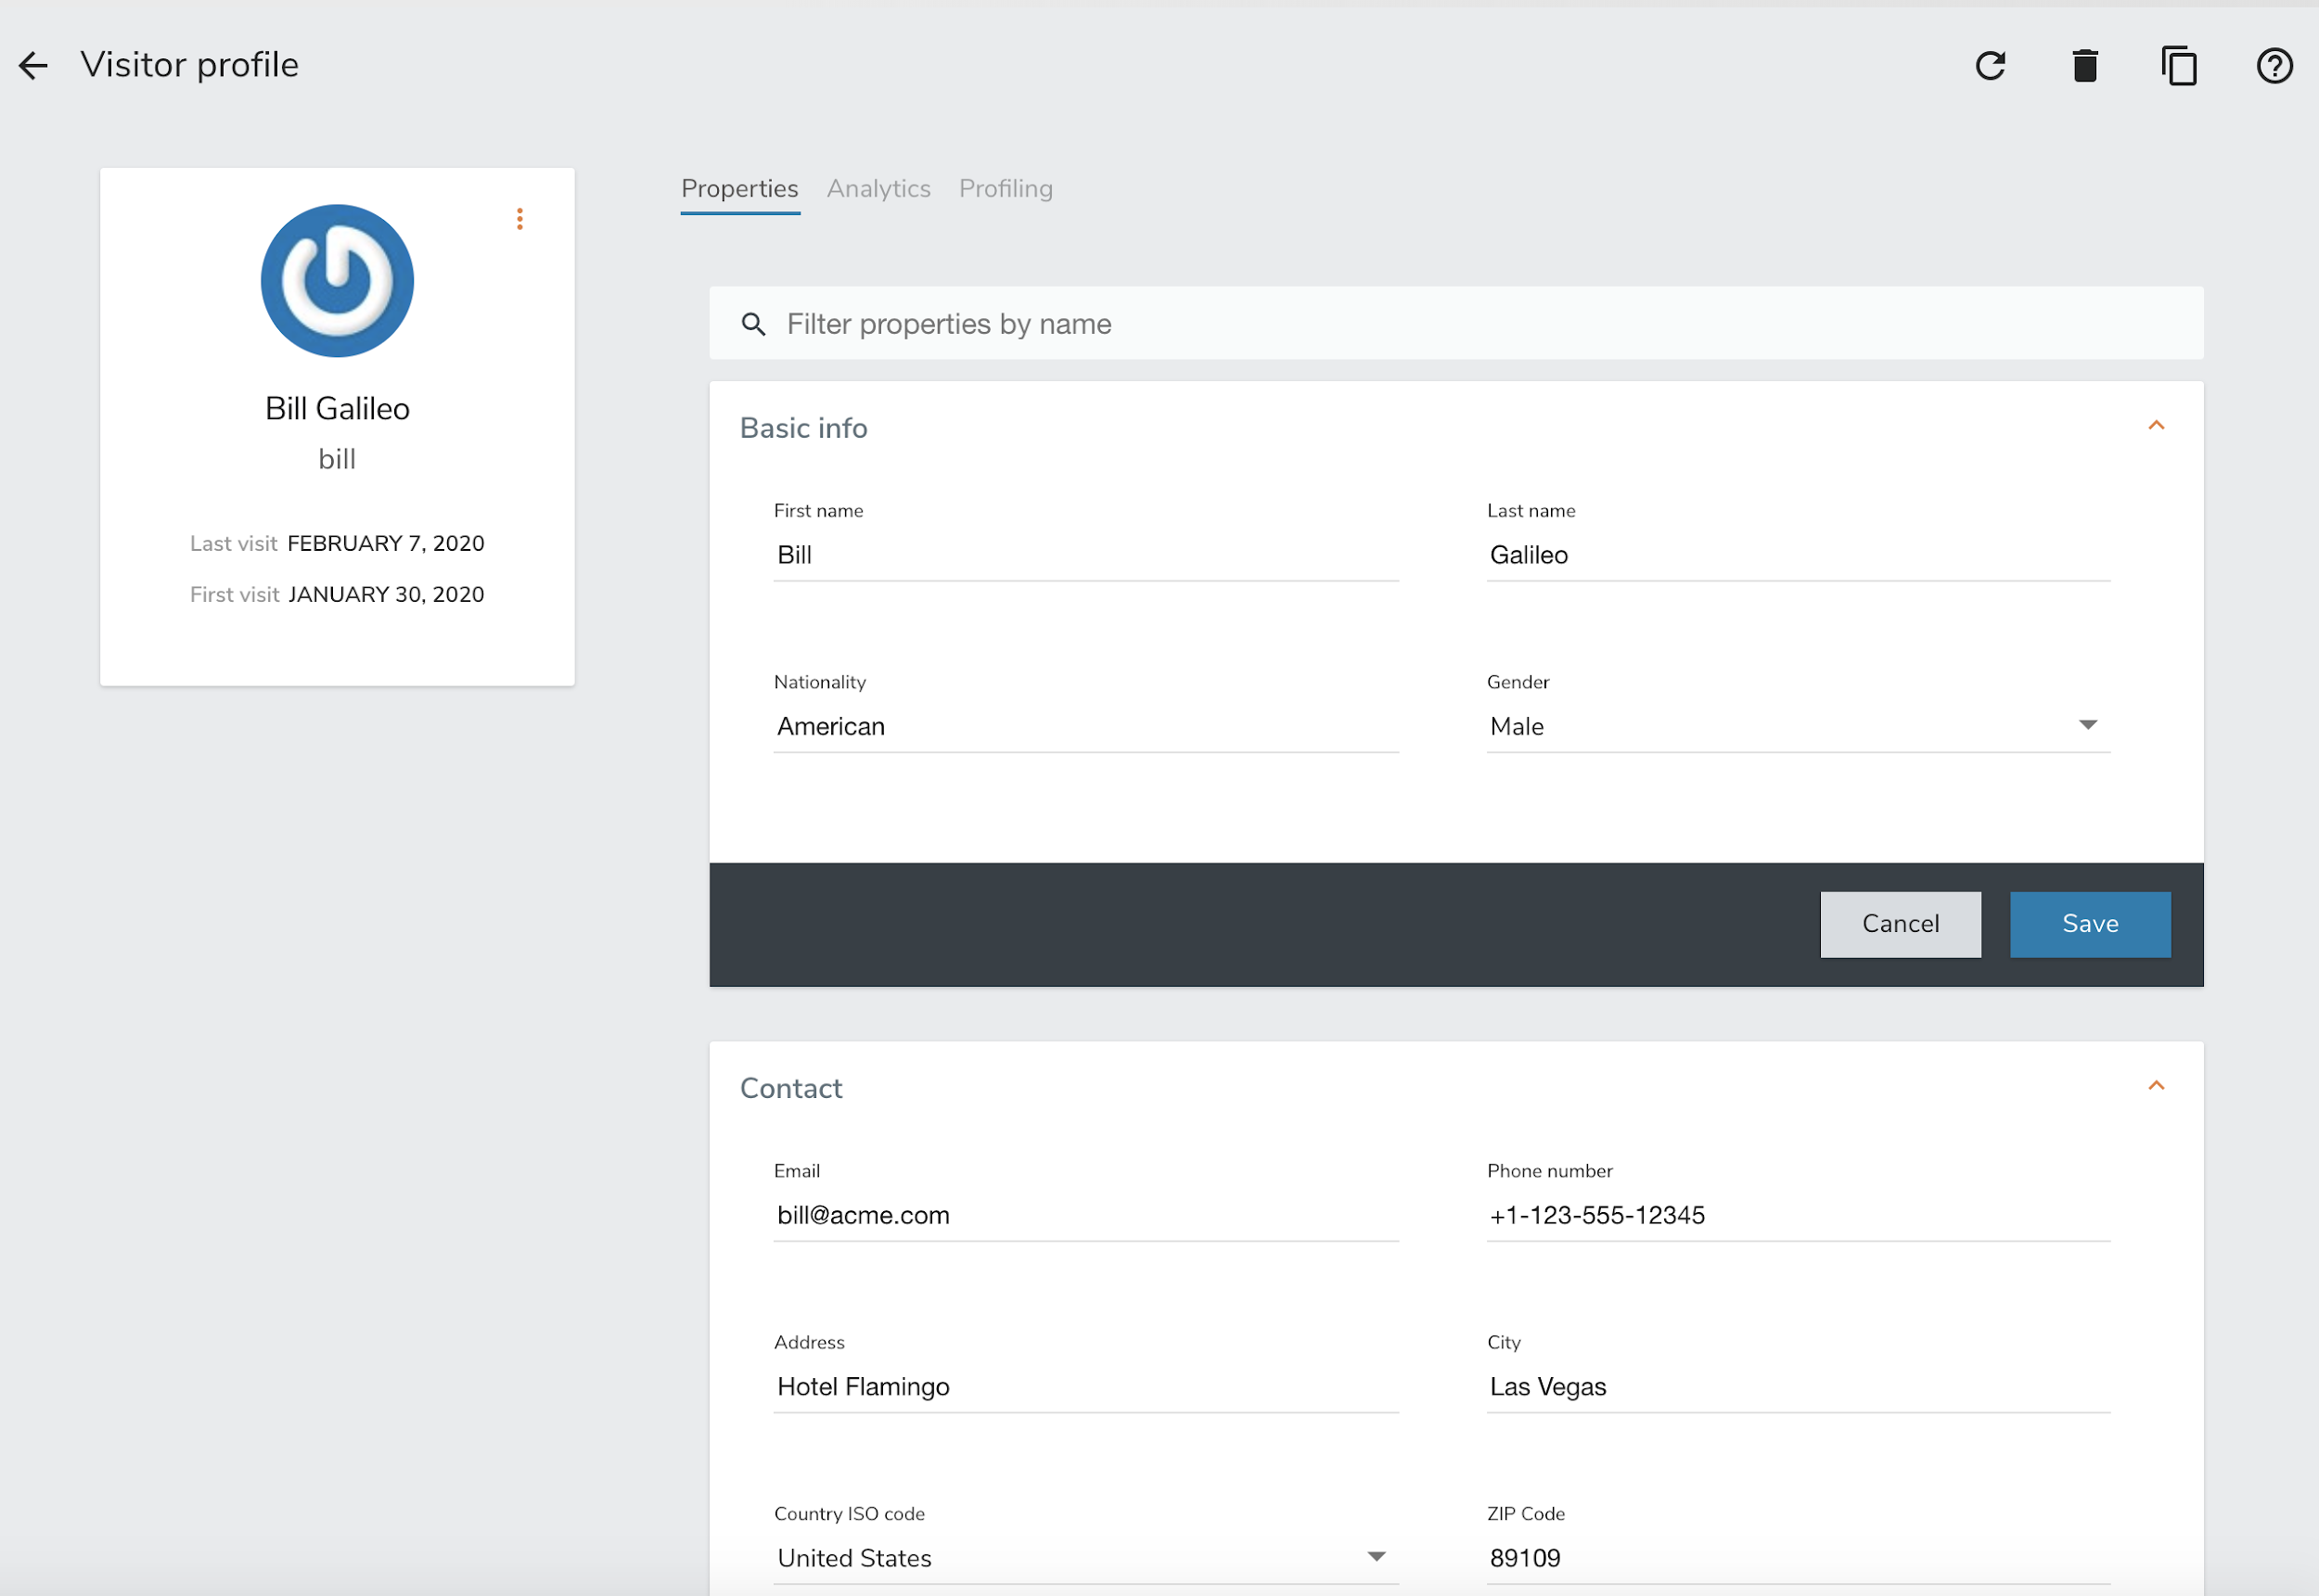
{
"itemId": "d8fec330-33cb-42bc-a4e2-bb48ea7ed29b",
"itemType": "event",
"scope": null,
"eventType": "updateProperties",
"sessionId": "66e63ec9-66bc-4fac-8a8a-febcc3d6cbb7",
"profileId": "bc1e1238-a9ac-4b3a-8f63-5eec205cfcd5",
"timeStamp": "2020-01-31T08:51:15Z",
"properties": {
"targetId": "f7d1f1b9-4415-4ff1-8fee-407b109364f7",
"targetType": "profile",
"add": {
"properties.phoneNumber": "+1-123-555-12345",
"properties.countryName": "US",
"properties.city": "Las Vegas",
"properties.address": "Hotel Flamingo",
"properties.zipCode": "89109",
"properties.email": "bill@acme.com"
}
},
"source": {
"itemId": "wemProfile",
"itemType": "wemProfile",
"scope": "digitall",
"properties": {}
},
"target": null
}71.20.5. Identify event type
This event type is used to add information learned about the current profile. This could be through a form that has asked the user to provide some information about himself, or it could be information sent by another system (CRM, SSO, DMP, LiveRamp or equivalent) to augment the data for the current profile.
It should be noted that, as in the case of a login event, it might be a good idea to be careful as to who and what system are allowed to send this event. Also, in order for this event to perform any modifications, an associated rule will be needed in the Unomi system to perform modifications to a profile (there is no default rule).
| Event type | Available publicly | Default rule | Targeted at back-office | Can remove/update properties |
|---|---|---|---|---|
identify |
yes |
no |
no |
no |
updateProperties |
no |
yes |
yes |
yes |
The rule of thumb is: if you need to send profile data from public system to add information to a profile you should use the identify event type and add a rule to only process the data you want to accept. If you want to add/update/delete properties in a secure manner from a known server you could use the updateProperties but you should always check first if you can’t use the identify or event form event types with specific rules as this reduces greatly the potential for misuse.
Structure description
Based on the structure of the following object: Event
| Field name | Value/description |
|---|---|
eventType |
identify |
source |
the site/application name that triggered the identify event |
target |
the user information contained in the event |
properties |
Not used (empty) |
Example
In this example, an event containing additional information about the user (his nickname, favorite compiler and industry) was sent to Apache Unomi.
{
"itemId": "18dfd6c7-9055-4ef0-a2eb-14c1482b4544",
"itemType": "event",
"scope": "myScope",
"eventType": "identify",
"sessionId": "928d9237-fb3d-4e53-cbee-1aeb1df7f03a",
"profileId": "temp_023ded50-bb43-4fe2-acbc-13bfa8de16de",
"timeStamp": "2020-01-15T14:13:25Z",
"properties": {},
"source": {
"itemId": "myScope",
"itemType": "site",
"scope": "myScope",
"properties": {
"page": {
"path": "/web-page/",
"referrer": "http://localhost:8181/",
"search": "",
"title": "Apache Unomi Web Test Page",
"url": "http://localhost:8181/web-page/"
}
}
},
"target": {
"itemId": "null",
"itemType": "analyticsUser",
"scope": "myScope",
"properties": {
"nickname": "Amazing Grace",
"favoriteCompiler": "A-0",
"industry": "Computer Science"
}
}
}71.20.6. Session created event type
The session created event is an internal event created by Apache Unomi when a new session is created. This indicates that a new visitor has interacted with a system that is using Apache Unomi to track their behavior.
Structure definition
Based on the structure of the following object: Event
| Field name | Value/description |
|---|---|
eventType |
sessionCreated |
source |
Not used (null) |
target |
the Session item that was created with all its fields and properties |
properties |
Not used (empty) |
Example
In this example, a new session was created for a visitor coming to the digitall website. The session contains the firstVisit property. It may be augmented over time with more information including location.
{
"itemId": "b3f5486f-b317-4182-9bf4-f497271e5363",
"itemType": "event",
"scope": "digitall",
"eventType": "sessionCreated",
"sessionId": "be416c08-8b9b-4611-990f-3a8bf3ed4e68",
"profileId": "bc1e1238-a9ac-4b3a-8f63-5eec205cfcd5",
"timeStamp": "2020-01-30T21:13:26Z",
"properties": {},
"source": null,
"target": {
"itemId": "be416c08-8b9b-4611-990f-3a8bf3ed4e68",
"itemType": "session",
"scope": "digitall",
"profileId": "bc1e1238-a9ac-4b3a-8f63-5eec205cfcd5",
"profile": {
"itemId": "bc1e1238-a9ac-4b3a-8f63-5eec205cfcd5",
"itemType": "profile",
"properties": {
"firstVisit": "2020-01-30T21:13:26Z"
},
"systemProperties": {},
"segments": [],
"scores": null,
"mergedWith": null,
"consents": {}
},
"properties": {},
"systemProperties": {},
"timeStamp": "2020-01-30T21:13:26Z",
"lastEventDate": null,
"size": 0,
"duration": 0
}
}71.20.7. Goal event type
A goal event is triggered when the current profile (visitor) reaches a goal.
Structure definition
Based on the structure of the following object: Event
| Field name | Value/description |
|---|---|
eventType |
goal |
source |
the Event that triggered the goal completion |
target |
the Goal item that was reached |
properties |
Not used (empty) |
Example
In this example, a visitor has reached a goal by viewing a page called “sub-home” on the site “digitall” (event source). This goal event had the goal object as a target. The goal object (see Goal object later in this document) has a start event of creating a new session and a target event of a page view on the page “sub-home”.
{
"itemId": "9fa70519-382d-412b-82ea-99b5989fbd0d",
"itemType": "event",
"scope": "digitall",
"eventType": "goal",
"sessionId": "42bd3fde-5fe9-4df6-8ae6-8550b8b06a7f",
"profileId": "3ec46b2c-fbaa-42d5-99df-54199c807fc8",
"timeStamp": "2017-05-29T23:49:16Z",
"properties": {},
"source": {
"itemId": "aadcd86c-9431-43c2-bdc3-06683ac25927",
"itemType": "event",
"scope": "digitall",
"eventType": "view",
"sessionId": "42bd3fde-5fe9-4df6-8ae6-8550b8b06a7f",
"profileId": "3ec46b2c-fbaa-42d5-99df-54199c807fc8",
"timeStamp": "2017-05-29T23:49:16Z",
"properties": {},
"source": {
"itemId": "6d5f4ae3-30c9-4561-81f3-06f82af7da1e",
"itemType": "site",
"scope": "digitall",
"properties": {}
},
"target": {
"itemId": "67dfc299-9b74-4264-a865-aebdc3482539",
"itemType": "page",
"scope": "digitall",
"properties": {
"pageInfo": {
"language": "en",
"destinationURL": "https://acme.com/home/sub-home.html",
"pageID": "67dfc299-9b74-4264-a865-aebdc3482539",
"pagePath": "/sites/digitall/home/sub-home",
"pageName": "sub-home",
"referringURL": "https://acme.com/home/perso-on-profile-past-event-page.html"
},
"category": {},
"attributes": {}
}
}
},
"target": {
"itemId": "_v4ref2mxg",
"itemType": "goal",
"startEvent": {
"parameterValues": {},
"type": "sessionCreatedEventCondition"
},
"targetEvent": {
"parameterValues": {
"pagePath": "/sites/digitall/home/sub-home"
},
"type": "pageViewEventCondition"
},
"campaignId": null,
"metadata": {
"id": "_v4ref2mxg",
"name": "sub-home-visit",
"description": "",
"scope": "digitall",
"tags": [
"pageVisitGoal"
],
"enabled": true,
"missingPlugins": false,
"hidden": false,
"readOnly": false
}
}
}71.20.8. Modify consent event type
Consent type modification events are used to tell Unomi that consents were modified. A built-in rule will update the current profile with the consent modifications contained in the event. Consent events may be sent directly by a current profile to update their consents on the profile.
Structure definition
Based on the structure of the following object: Event
| Field name | Value/description |
|---|---|
eventType |
modifyConsent |
source |
the page that has triggered the update the consents and that contains the different consent types the current profile could grant or deny |
target |
The consent that was modified |
properties |
The consent’s new value. See the Consent object type for more information. |
Example
In this example, a user-generated a consent modification when visiting the home page, possibly by interacting with a consent form that captured his preferences. Different consent types were present on the page and he decided to GRANT the “tracking” consent.
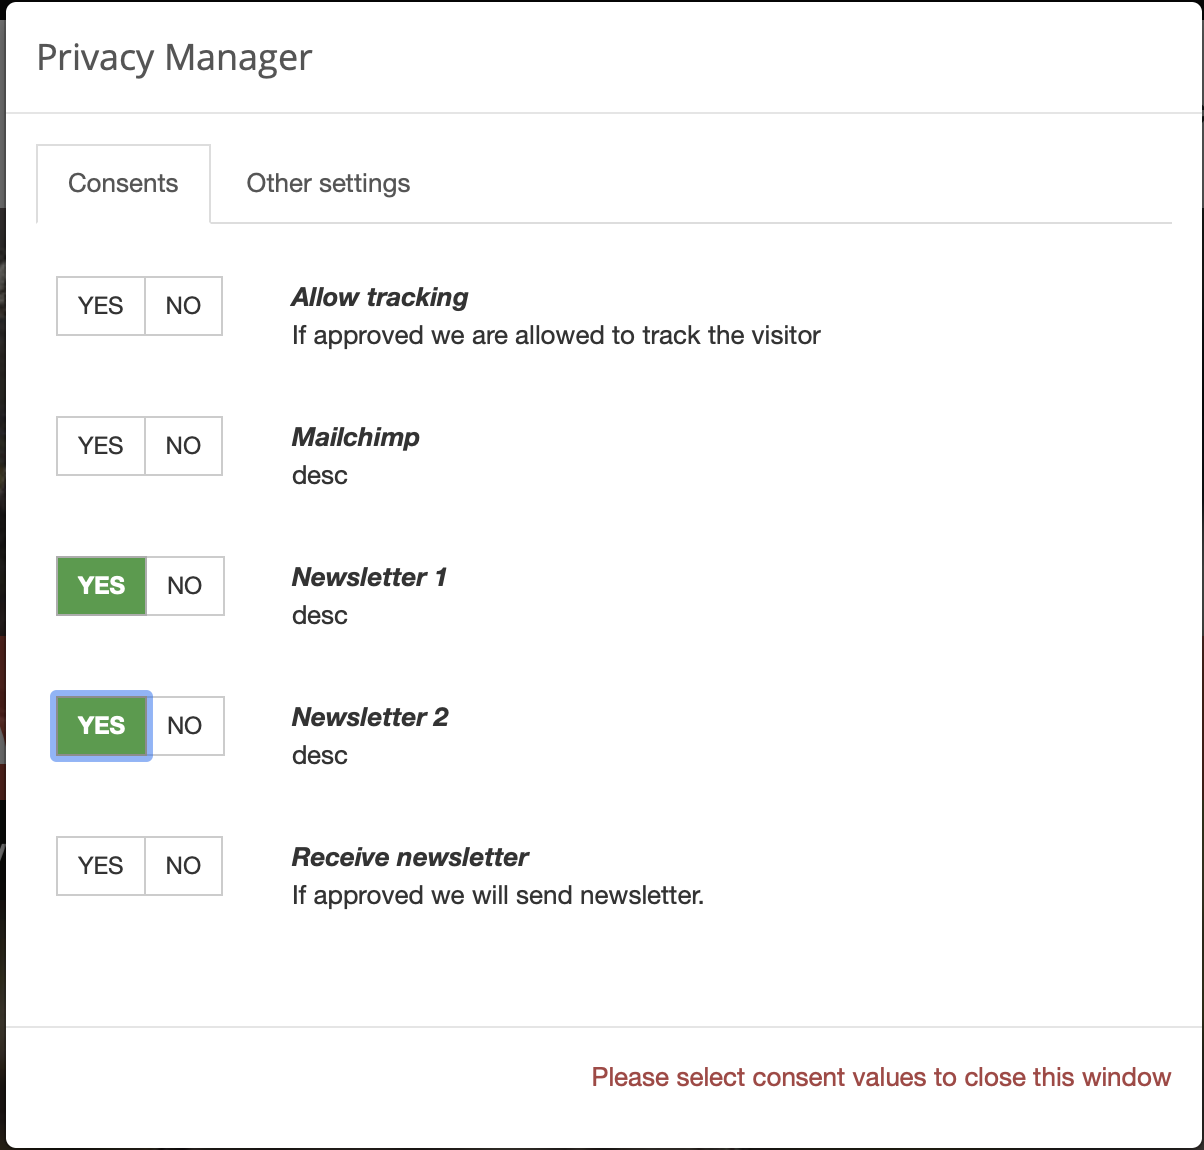
{
"scope": "digitall",
"eventType": "modifyConsent",
"source": {
"itemType": "page",
"scope": "digitall",
"itemId": "f20836ab-608f-4551-a930-9796ec991340",
"properties": {
"pageInfo": {
"pageID": "f20836ab-608f-4551-a930-9796ec991340",
"nodeType": "jnt:page",
"pageName": "Home",
"pagePath": "/sites/digitall/home",
"templateName": "home",
"destinationURL": "http://localhost:8080/sites/digitall/home.html",
"referringURL": "http://localhost:8080/cms/render/default/en/sites/digitall/home.html",
"language": "en",
"categories": [],
"tags": [],
"isContentTemplate": false
},
"attributes": {},
"consentTypes": [
{
"typeIdentifier": "tracking",
"activated": true,
"title": "Allow tracking",
"description": "If approved we are allowed to track the visitor"
},
{
"typeIdentifier": "newsletter1",
"activated": true,
"title": "Newsletter 1",
"description": "desc"
},
{
"typeIdentifier": "newsletter2",
"activated": true,
"title": "Newsletter 2",
"description": "desc"
},
{
"typeIdentifier": "newsletter",
"activated": true,
"title": "Receive newsletter",
"description": "If approved we will send newsletter."
}
]
}
},
"target": {
"itemType": "consent",
"scope": "digitall",
"itemId": "tracking"
},
"properties": {
"consent": {
"scope": "digitall",
"typeIdentifier": "tracking",
"status": "GRANTED",
"statusDate": "2020-01-31T20:10:00.463Z",
"revokeDate": "2022-01-30T20:10:00.463Z"
}
}
}71.21. Built-in condition types
Apache Unomi ships with built-in condition types in the base plugin and optional extensions.
For a hands-on introduction with examples, see Conditions guide.
For save-time parameter rules (required, allowedValues, exclusive groups), see Condition validation.
71.21.1. Condition type descriptor shape
{
"metadata": {
"id": "booleanCondition",
"name": "booleanCondition",
"description": "Combines multiple conditions with a logical operator",
"systemTags": ["logical", "profileCondition", "eventCondition"],
"readOnly": true
},
"conditionEvaluator": "booleanConditionEvaluator",
"queryBuilder": "booleanConditionQueryBuilder",
"parameters": [
{
"id": "operator",
"type": "string",
"defaultValue": "and",
"validation": { "required": true, "allowedValues": ["and", "or"] }
},
{
"id": "subConditions",
"type": "Condition",
"multivalued": true,
"validation": { "required": true }
}
]
}Parameters may include a validation object (see Condition validation).
Real descriptors in the base plugin use this heavily — for example pastEventCondition requires an eventCondition sub-condition tagged eventCondition.
Each condition type provides:
-
conditionEvaluator— real-time evaluation against profile, session, and/or event -
queryBuilder— converts the condition to an Elasticsearch or OpenSearch query (Unomi 3.0+ uses generic*QueryBuilderIDs)
Some types use parentCondition to specialize a base type (for example eventTypeCondition extends eventPropertyCondition).
71.21.2. Plugin registration (Unomi 3.0+)
New plugins use Declarative Services (@Component). Legacy Blueprint XML remains in some shipped bundles during migration; do not copy it for new code. In particular, the built-in BooleanConditionEvaluator, BooleanConditionESQueryBuilder, and BooleanConditionOSQueryBuilder classes are themselves still registered via Blueprint XML today — the snippets below illustrate how a new condition type should be registered, not the current state of those specific built-in classes.
Condition evaluator (see plugins/advanced-conditions):
@Component(service = ConditionEvaluator.class, property = {"conditionEvaluatorId=myCustomConditionEvaluator"})
public class MyCustomConditionEvaluator implements ConditionEvaluator {
// ...
}Elasticsearch query builder (in your ES-specific bundle):
@Component(service = ConditionESQueryBuilder.class, property = {"queryBuilderId=myCustomConditionQueryBuilder"})
public class MyCustomConditionESQueryBuilder implements ConditionESQueryBuilder {
// ...
}OpenSearch query builder (in your OS-specific bundle):
@Component(service = ConditionOSQueryBuilder.class, property = {"queryBuilderId=myCustomConditionQueryBuilder"})
public class MyCustomConditionOSQueryBuilder implements ConditionOSQueryBuilder {
// ...
}Use the same queryBuilderId in JSON, Elasticsearch, and OpenSearch registrations. See Writing plugins for module layout and POM setup.
71.21.3. Catalog — base plugin
| Condition type ID | Category | Parent | Key parameters / notes |
|---|---|---|---|
|
Event |
— |
Combines multiple conditions with a logical operator. Params: operator, subConditions |
|
Event |
— |
Params: propertyName, comparisonOperator, propertyValue, propertyValueInteger, propertyValueDouble, propertyValueDate, propertyValueDateExpr, propertyValues |
|
Event |
eventPropertyCondition |
Params: eventTypeId |
|
Event |
booleanCondition |
Params: formId, pagePath |
|
Session |
— |
Params: type, rectLatitudeNE, rectLongitudeNE, rectLatitudeSW, rectLongitudeSW, circleLatitude, circleLongitude, distance |
|
Session |
booleanCondition |
Params: country, admin1, admin2, city |
|
Profile |
profilePropertyCondition |
Params: goalId, comparisonOperator |
|
Other |
— |
Params: ids, match |
|
Event |
— |
Params: — |
|
Event |
eventTypeCondition |
Used to match any consent modification. Params: — |
|
Event |
booleanCondition |
Used to match status modifications on a specific consent. Params: consentTypeId, consentStatus |
|
Session |
— |
Evaluates a condition on nested items within a profile or session property. Params: path, subCondition |
|
Session |
booleanCondition |
Params: since |
|
Event |
— |
Params: subCondition |
|
Profile |
— |
Evaluates past events that occurred within a specified time range. Params: eventCondition, operator, numberOfDays, fromDate, toDate, minimumEventCount, maximumEventCount |
|
Other |
— |
Params: propertyName, comparisonOperator, propertyValue |
|
Profile |
— |
Evaluates a profile property against various comparison criteria. Params: propertyName, comparisonOperator, propertyValue, propertyValueInteger, propertyValueDouble, propertyValueDate, propertyValueDateExpr, propertyValues |
|
Profile |
profilePropertyCondition |
Params: segments, matchType |
|
Event |
eventTypeCondition |
Params: — |
|
Profile |
profilePropertyCondition |
Params: lists, matchType |
|
Session |
booleanCondition |
Params: since |
|
Profile |
profilePropertyCondition |
Params: scoringPlanId, scoreValue, comparisonOperator |
|
Event |
eventTypeCondition |
Params: — |
|
Session |
sessionPropertyCondition |
Params: minimumDuration, maximumDuration |
|
Session |
— |
Params: propertyName, comparisonOperator, propertyValue, propertyValueInteger, propertyValueDouble, propertyValueDate, propertyValueDateExpr, propertyValues |
|
Other |
— |
Params: propertyName, comparisonOperator, propertyValue |
|
Event |
eventTypeCondition |
Params: — |
|
Event |
booleanCondition |
Params: videoId, pagePath |
71.21.4. Catalog — extensions
| Condition type ID | Source | Key parameters / notes |
|---|---|---|
|
graphql |
Params: — |
|
hover-event |
Params: targetId, targetPath |
|
advanced-conditions |
Params: id, path, scope, type |
|
graphql |
Params: — |
|
graphql |
Params: — |
|
graphql |
Params: propertyName, comparisonOperator, propertyValue, propertyValues |
71.21.5. Source locations
Condition descriptors are JSON files under META-INF/cxs/conditions/ in each plugin, for example:
-
plugins/baseplugin/src/main/resources/META-INF/cxs/conditions/ -
plugins/advanced-conditions/src/main/resources/META-INF/cxs/conditions/ -
plugins/hover-event/src/main/resources/META-INF/cxs/conditions/
GraphQL-specific condition types ship with the GraphQL feature (graphql/cxs-impl/…).
Custom condition types can be added in your own plugins; see Writing plugins.
71.22. Built-in action types
Actions run when a rule matches. Each action type references an actionExecutor OSGi service.
71.22.1. Action type descriptor shape
{
"metadata": {
"id": "setPropertyAction",
"name": "setPropertyAction",
"systemTags": ["profileTags", "availableToEndUser"],
"readOnly": true
},
"actionExecutor": "setProperty",
"parameters": [
{ "id": "setPropertyName", "type": "string" },
{ "id": "setPropertyValue", "type": "string" }
]
}71.22.2. OSGi registration example
<bean id="setPropertyActionImpl" class="org.apache.unomi.plugins.baseplugin.actions.SetPropertyAction"/>
<service ref="setPropertyActionImpl" interface="org.apache.unomi.api.actions.ActionExecutor">
<service-properties>
<entry key="actionExecutorId" value="setProperty"/>
</service-properties>
</service>71.22.3. Catalog
| Action type ID | Source | Executor | Parameters / description |
|---|---|---|---|
|
lists-extension |
|
Params: listIdentifiers |
|
baseplugin |
|
Params: — |
|
graphql |
|
Params: state, sessionId, scope |
|
baseplugin |
|
Params: setPropertyStrategy, rootProperty, mandatoryPropTypeSystemTag |
|
baseplugin |
|
Params: — |
|
baseplugin |
|
Params: — |
|
baseplugin |
|
Params: — |
|
baseplugin |
|
Params: eventPropertyName, profilePropertyName |
|
baseplugin |
|
Params: propertyName, propertyTarget, storeInSession |
|
baseplugin |
|
Params: mergeProfilePropertyName, forceEventProfileAsMaster |
|
baseplugin |
|
Modify a profile consent. Params: — |
|
request |
|
Params: requestHeaderName, profilePropertyName, sessionPropertyName, storeAsList |
|
request |
|
Params: requestParameterName, profilePropertyName, sessionPropertyName, storeAsList |
|
baseplugin |
|
Params: eventType, eventProperties |
|
|
Params: notificationType, notificationTypeId, notifyOncePerProfile, from, to, cc, bcc, subject, template |
|
|
baseplugin |
|
Params: pastEventCondition |
|
baseplugin |
|
Params: setPropertyName, setPropertyValue, setPropertyValueBoolean, setPropertyValueInteger, setPropertyValueMultiple, setPropertyValueCurrentEventTimestamp, setPropertyValueCurrentDate, setPropertyStrategy, storeInSession |
|
request |
|
Params: — |
|
salesforce-connector |
|
Params: — |
|
salesforce-connector |
|
Params: — |
|
graphql |
|
Params: type, status, lastUpdate, expiration |
|
graphql |
|
Params: join_lists, leave_lists |
|
baseplugin |
|
Update multiple properties in profile/persona. Params: — |
|
weather-update |
|
This action will retrieve the weather associated with the resolved location of the user (from his IP address). Params: — |
71.22.4. Common action groups
Profile maintenance — setPropertyAction, updatePropertiesAction, incrementPropertyAction, copyPropertiesAction, eventToProfilePropertyAction, allEventToProfilePropertiesAction, mergeProfilesOnPropertyAction
Segmentation & scoring — evaluateProfileSegmentsAction, evaluateProfileAgeAction, evaluateVisitPropertiesAction
Events & consent — sendEventAction, modifyConsentAction, setEventOccurenceCountAction
HTTP request — requestHeaderToProfilePropertyAction, requestParameterToProfilePropertyAction, setRemoteHostInfoAction (request plugin)
Notifications — sendMailAction (mail plugin)
Integrations — addToListsAction, Salesforce actions, weatherUpdateAction, GraphQL CDP actions (when GraphQL feature is installed)
71.22.5. Source locations
-
plugins/baseplugin/src/main/resources/META-INF/cxs/actions/ -
plugins/mail/src/main/resources/META-INF/cxs/actions/ -
plugins/request/src/main/resources/META-INF/cxs/actions/ -
Extension plugins under
extensions/*/src/main/resources/META-INF/cxs/actions/
List action types at runtime: GET /cxs/definitions/actions (tenant private key or admin).
See Writing plugins to implement custom actions.
71.23. Updating Events Using the Context Servlet
One of the use cases that needed to be supported by Unomi is the ability to build a user profile based on Internal System events or Change Data Capture which usally transported through internal messaging queues such as Kafka.
This can easily achieved using the KafkaInjector module built in within Unomi.
But, as streaming system usually operates in at-least-once semantics, we need to have a way to guarantee we wont have duplicate events in the system.
71.23.1. Authentication Requirements
To update events in Unomi, you must authenticate as either:
-
A tenant administrator
-
The system administrator
This authentication requirement ensures proper access control and security when modifying event data.
71.23.2. Solution
One of the solutions to this scenario is to have the ability to control and pass in the eventId property from outside of Unomi,
Using an authorized 3rd party. This way whenever an event with the same itemId will be processed once again he wont be appended to list of events, but will be updated.
Here is an example of a request contains the itemdId
curl -X POST http://localhost:8181/cxs/context.json \
-H "Content-Type: application/json" \
--user "TENANT_ID:PRIVATE_KEY" \
-d @- <<'EOF'
{
"events":[
{
"itemId": "exampleEventId",
"eventType":"view",
"scope": "example",
"properties" : {
"firstName" : "example"
}
}
]
}
EOFMake sure to authenticate as either a tenant administrator or system administrator using Basic Authentication, and verify that the eventType is in the list of allowed events.
71.23.3. Defining Rules
Another use case we support is the ability to define a rule on the above mentioned events.
If we have a rule that increment a property on profile level, we would want the action to be executed only once per event id.
this can be achieved by adding "raiseEventOnlyOnce": false to the rule definition.
curl -X POST http://localhost:8181/cxs/context.json \
-H "Content-Type: application/json" \
-H "X-Unomi-Api-Key: YOUR_PUBLIC_API_KEY" \
-d @- <<'EOF'
{
"metadata": {
"id": "updateNumberOfOrders",
"name": "update number of orders on orderCreated eventType",
"description": "update number of orders on orderCreated eventType"
},
"raiseEventOnlyOnce": false,
"condition": {
"type": "eventTypeCondition",
"parameterValues": {
"eventTypeId": "orderCreated"
}
},
"actions": [
{
"parameterValues": {
"setPropertyName": "properties.nbOfOrders",
"setPropertyValue": "script::profile.properties.?nbOfOrders != null ? (profile.properties.nbOfOrders + 1) : 1",
"storeInSession": false
},
"type": "setPropertyAction"
}
]
}
EOF71.24. Unomi Web Tracker reference
In this section of the documentation, more details are provided about the web tracker provided by Unomi.
71.24.1. Custom events
In order to be able to use your own custom events with the web tracker, you must first declare them in Unomi so that they are properly recognized and validated by the /context.json or /eventcollector endpoints.
Declaring JSON schema
The first step is to declare a JSON schema for your custom event type. Here’s an example of such a declaration:
{
"$id": "https://unomi.apache.org/schemas/json/events/click/1-0-0",
"$schema": "https://json-schema.org/draft/2019-09/schema",
"self": {
"vendor": "org.apache.unomi",
"target": "events",
"name": "click",
"format": "jsonschema",
"version": "1-0-0"
},
"title": "ClickEvent",
"type": "object",
"allOf": [
{
"$ref": "https://unomi.apache.org/schemas/json/event/1-0-0"
}
],
"properties": {
"source": {
"$ref": "https://unomi.apache.org/schemas/json/items/page/1-0-0"
},
"target": {
"$ref": "https://unomi.apache.org/schemas/json/item/1-0-0"
}
},
"unevaluatedProperties": false
}The above example comes from a built-in event type that is already declared in Unomi but that illustrates the structure of a JSON schema. It is not however the objective of this section of the documentation to go into the details of how to declare a JSON schema, instead, we recommend you go to the corresponding section of the documentation.
Sending event from tracker
In the Unomi web tracker, you can use the following function to send an event to Unomi:
/**
* This function will send an event to Apache Unomi
* @param {object} event The event object to send, you can build it using wem.buildEvent(eventType, target, source)
* @param {function} successCallback optional, will be executed in case of success
* @param {function} errorCallback optional, will be executed in case of error
* @return {undefined}
*/
collectEvent: function (event, successCallback = undefined, errorCallback = undefined)As you can see this function is quite straight forward to use. There are also helper functions to build events, such as :
/**
* This function return the basic structure for an event, it must be adapted to your need
*
* @param {string} eventType The name of your event
* @param {object} [target] The target object for your event can be build with wem.buildTarget(targetId, targetType, targetProperties)
* @param {object} [source] The source object for your event can be build with wem.buildSource(sourceId, sourceType, sourceProperties)
* @returns {object} the event
*/
buildEvent: function (eventType, target, source)
/**
* This function return an event of type form
*
* @param {string} formName The HTML name of id of the form to use in the target of the event
* @param {HTMLFormElement} form optional HTML form element, if provided will be used to extract the form fields and populate the form event
* @returns {object} the form event
*/
buildFormEvent: function (formName, form = undefined)
/**
* This function return the source object for a source of type page
*
* @returns {object} the target page
*/
buildTargetPage: function ()
/**
* This function return the source object for a source of type page
*
* @returns {object} the source page
*/
buildSourcePage: function ()
/**
* This function return the basic structure for the target of your event
*
* @param {string} targetId The ID of the target
* @param {string} targetType The type of the target
* @param {object} [targetProperties] The optional properties of the target
* @returns {object} the target
*/
buildTarget: function (targetId, targetType, targetProperties = undefined)
/**
* This function return the basic structure for the source of your event
*
* @param {string} sourceId The ID of the source
* @param {string} sourceType The type of the source
* @param {object} [sourceProperties] The optional properties of the source
* @returns {object} the source
*/
buildSource: function (sourceId, sourceType, sourceProperties = undefined)Here’s an example of using these helper functions and the collectEvent function alltogether:
var clickEvent = wem.buildEvent('click',
wem.buildTarget('buttonId', 'button'),
wem.buildSourcePage());
wem.collectEvent(clickEvent, function (xhr) {
console.info('Click event successfully collected.');
}, function (xhr) {
console.error('Could not send click event.');
});Sending multiple events
In some cases, especially when multiple events must be sent fast and the order of the events is critical for rules to be properly executed, it is better to use another function called collectEvents that will batch the sending of events to Unomi in a single HTTP request. Here’s the signature of this function:
/**
* This function will send the events to Apache Unomi
*
* @param {object} events Javascript object { events: [event1, event2] }
* @param {function} successCallback optional, will be executed in case of success
* @param {function} errorCallback optional, will be executed in case of error
* @return {undefined}
*/
collectEvents: function (events, successCallback = undefined, errorCallback = undefined)This function is almost exactly the same as the collectEvent method except that it takes an events array instead of a single one. The events in the array may be of any mixture of types.
Extending existing events
An alternative to defining custom event types is to extend existing event types. This, for example, can be used to add new properties to the built-in view event type.
For more information about event type extensions, please read the JSON schema section of this documentation.
71.24.2. Integrating with tag managers
Integrating with tag managers such as Google Tag Manager is an important part of the way trackers can be added to an existing site. Unomi’s web tracker should be pretty easy to integrate with such tools: you simply need to insert the script tag to load the script and then another tag to initialize it and map any tag manager variables you want.
Personalization scripts should however be modified to check for the existence of the tracker object in the page because tag managers might deactivate scripts based on conditions such as GDPR approval, cookie preferences, …
71.24.3. Cookie/session handling
In order to track profiles, an identifier must be stored in the browser so that subsequent requests can keep a reference to the visitor’s profile. Also, a session identifier must be generated to group the current visitor interactions.
Unomi’s web tracker uses 3 cookies in the tracker by default:
-
server profile ID, called
context-profile-idby default, that is sent from the Unomi server -
web tracker profile ID, called
web-profile-idby default (this is a copy of the server profile ID that can be managed by the tracker directly) -
web tracker session ID, called
wem-session-idby default
It is possible to change the name of these cookie by passing the following properties to the start’s initialization:
"wemInitConfig": {
...
"contextServerCookieName": "context-profile-id",
"trackerSessionIdCookieName": "unomi-tracker-test-session-id",
"trackerProfileIdCookieName": "unomi-tracker-test-profile-id"
}Please note however that the contextServerCookieName will also have to be changed in the server configuration in order for it to work. See the Configuration section for details on how to do this.
For session tracking, it is important to provide a value for the cookie otherwise the tracker will not initialize (a message is displayed in the console that explains that the session cookie is missing). Here is the code excerpt from the initialization code used in the tutorial that creates the initial cookie value.
// generate a new session
if (unomiWebTracker.getCookie(unomiTrackerTestConf.wemInitConfig.trackerSessionIdCookieName) == null) {
unomiWebTracker.setCookie(unomiTrackerTestConf.wemInitConfig.trackerSessionIdCookieName, unomiWebTracker.generateGuid(), 1);
}Note that this is just an example, you could very well customize this code to create session IDs another way.
71.24.4. JavaScript API
The JavaScript API for the web tracker is directly provided in the source code of the web tracker. You can find it here: https://github.com/apache/unomi-tracker/blob/main/src/apache-unomi-tracker.js
Please note that only the functions that do NOT start with an underscore should be used. The ones that start with an underscore are not considered part of the public API and could change or even be removed at any point in the future.
71.25. Implementing a JavaScript Tracker
This guide explains how to implement a basic JavaScript tracker for Apache Unomi from scratch. This will help you understand the underlying concepts and API interactions, whether you’re building a custom tracker or integrating Apache Unomi into an existing application.
|
Note
|
Apache Unomi provides an official web tracker (see Unomi Web Tracker reference) that handles many of these details automatically. This guide is useful if you need a custom implementation or want to understand how the tracker works internally. |
71.25.1. Prerequisites
Before implementing a tracker, you need:
-
An Apache Unomi instance running and accessible
-
A tenant created with a public API key (see Request examples for tenant creation)
-
Basic knowledge of JavaScript and HTTP requests
-
Understanding of how profile tracking works (see How profile tracking works)
71.25.2. Basic Tracker Structure
A basic JavaScript tracker needs to:
-
Manage session and profile identifiers - Generate and store session IDs, handle profile ID cookies
-
Make context requests - Call
/cxs/context.jsonto retrieve profile/session data -
Send events - Send user interaction events to Apache Unomi
-
Handle personalization - Request and apply personalized content
-
Manage cookies - Read and write cookies for profile tracking
Here’s a minimal tracker structure:
(function() {
'use strict';
// Configuration
const CONFIG = {
contextServerUrl: 'http://localhost:8181',
apiKey: 'YOUR_PUBLIC_API_KEY',
scope: 'mydigital',
sessionCookieName: 'unomi-session-id',
profileCookieName: 'context-profile-id'
};
// Tracker object
const tracker = {
// Session management
getSessionId: function() { /* ... */ },
setSessionId: function(sessionId) { /* ... */ },
// Cookie utilities
getCookie: function(name) { /* ... */ },
setCookie: function(name, value, days) { /* ... */ },
// Context requests
getContext: function(options, callback) { /* ... */ },
// Event tracking
trackEvent: function(event, callback) { /* ... */ },
trackEvents: function(events, callback) { /* ... */ },
// Personalization
personalize: function(personalizations, callback) { /* ... */ },
// Initialization
init: function() { /* ... */ }
};
// Expose tracker globally
window.unomiTracker = tracker;
})();71.25.3. Cookie Management
The tracker needs to read and write cookies to maintain the session ID and handle the profile ID cookie set by Apache Unomi.
// Cookie utilities
getCookie: function(name) {
const value = `; ${document.cookie}`;
const parts = value.split(`; ${name}=`);
if (parts.length === 2) {
return parts.pop().split(';').shift();
}
return null;
},
setCookie: function(name, value, days) {
const expires = new Date();
expires.setTime(expires.getTime() + (days * 24 * 60 * 60 * 1000));
document.cookie = `${name}=${value};expires=${expires.toUTCString()};path=/`;
},
deleteCookie: function(name) {
document.cookie = `${name}=;expires=Thu, 01 Jan 1970 00:00:00 UTC;path=/;`;
}71.25.4. Session Management
The tracker needs to generate and maintain a session ID. If no session ID exists, generate a new one:
// Generate a UUID v4
// Uses crypto.randomUUID() if available (most secure, modern browsers)
// Falls back to crypto.getRandomValues() (secure, widely supported)
// Falls back to Math.random() only for very old browsers (less secure)
generateUUID: function() {
// Use crypto.randomUUID() if available (Chrome 92+, Firefox 95+, Safari 15.4+, Node.js 19+)
if (typeof crypto !== 'undefined' && crypto.randomUUID) {
return crypto.randomUUID();
}
// Use crypto.getRandomValues() if available (widely supported, secure)
if (typeof crypto !== 'undefined' && crypto.getRandomValues) {
return 'xxxxxxxx-xxxx-4xxx-yxxx-xxxxxxxxxxxx'.replace(/[xy]/g, function(c) {
const r = crypto.getRandomValues(new Uint8Array(1))[0] % 16;
const v = c === 'x' ? r : (r & 0x3 | 0x8);
return v.toString(16);
});
}
// Fallback to Math.random() for very old browsers (not cryptographically secure)
// Note: This is less secure and should only be used as a last resort
return 'xxxxxxxx-xxxx-4xxx-yxxx-xxxxxxxxxxxx'.replace(/[xy]/g, function(c) {
const r = Math.random() * 16 | 0;
const v = c === 'x' ? r : (r & 0x3 | 0x8);
return v.toString(16);
});
},
// Get or create session ID
getSessionId: function() {
let sessionId = this.getCookie(CONFIG.sessionCookieName);
if (!sessionId) {
sessionId = this.generateUUID();
this.setSessionId(sessionId);
}
return sessionId;
},
setSessionId: function(sessionId) {
this.setCookie(CONFIG.sessionCookieName, sessionId, 1); // 1 day expiration
}71.25.5. Making Context Requests
The core of the tracker is making requests to /cxs/context.json. This endpoint:
-
Automatically creates or loads profiles and sessions
-
Processes events
-
Resolves personalization
-
Returns profile and session data
// Make a context request
getContext: function(options, callback) {
const sessionId = this.getSessionId();
const url = `${CONFIG.contextServerUrl}/cxs/context.json?sessionId=${encodeURIComponent(sessionId)}`;
// Build request payload
const payload = {
source: {
itemId: options.sourceId || window.location.pathname,
itemType: options.sourceType || 'page',
scope: CONFIG.scope
}
};
// Add optional parameters
if (options.requiredProfileProperties) {
payload.requiredProfileProperties = options.requiredProfileProperties;
}
if (options.requiredSessionProperties) {
payload.requiredSessionProperties = options.requiredSessionProperties;
}
if (options.requireSegments) {
payload.requireSegments = true;
}
if (options.requireScores) {
payload.requireScores = true;
}
if (options.events) {
payload.events = options.events;
}
if (options.filters) {
payload.filters = options.filters;
}
if (options.personalizations) {
payload.personalizations = options.personalizations;
}
// Make the request
const xhr = new XMLHttpRequest();
xhr.open('POST', url, true);
xhr.setRequestHeader('Content-Type', 'application/json');
xhr.setRequestHeader('X-Unomi-Api-Key', CONFIG.apiKey);
xhr.withCredentials = true; // Important for cookies
xhr.onreadystatechange = function() {
if (xhr.readyState === 4) {
if (xhr.status === 200) {
try {
const response = JSON.parse(xhr.responseText);
if (callback) {
callback(null, response);
}
} catch (e) {
if (callback) {
callback(new Error('Failed to parse response: ' + e.message), null);
}
}
} else {
if (callback) {
callback(new Error('Request failed with status: ' + xhr.status), null);
}
}
}
};
xhr.send(JSON.stringify(payload));
}71.25.6. Retrieving Profile and Session Properties
To retrieve profile and session properties, include them in the context request:
// Get all profile and session properties
tracker.getContext({
requireSegments: true,
requireScores: true,
requiredProfileProperties: ['*'], // '*' means all properties
requiredSessionProperties: ['*']
}, function(error, response) {
if (error) {
console.error('Failed to get context:', error);
return;
}
console.log('Profile ID:', response.profileId);
console.log('Session ID:', response.sessionId);
console.log('Profile Properties:', response.profileProperties);
console.log('Session Properties:', response.sessionProperties);
console.log('Profile Segments:', response.profileSegments);
console.log('Profile Scores:', response.profileScores);
});You can also request specific properties:
// Get specific profile properties
tracker.getContext({
requiredProfileProperties: ['firstName', 'lastName', 'email', 'pageViewCount']
}, function(error, response) {
if (error) {
console.error('Failed to get context:', error);
return;
}
const profile = response.profileProperties || {};
console.log('User:', profile.firstName, profile.lastName);
console.log('Email:', profile.email);
console.log('Page Views:', profile.pageViewCount);
});71.25.7. Sending Events
Events are sent as part of the context request. You can send a single event or multiple events in one request:
// Build an event object
buildEvent: function(eventType, target, source) {
const event = {
eventType: eventType,
scope: CONFIG.scope
};
// Set source if provided, otherwise use default based on event type
if (source) {
event.source = source;
} else if (eventType === 'view') {
// For view events, source should typically be a site
event.source = {
itemType: 'site',
scope: CONFIG.scope,
itemId: window.location.hostname || 'default-site'
};
} else {
// For other events, source defaults to the current page
event.source = {
itemType: 'page',
scope: CONFIG.scope,
itemId: window.location.pathname
};
}
// Set target if provided
if (target) {
event.target = target;
}
return event;
},
// Track a single event
trackEvent: function(event, callback) {
this.getContext({
events: [event]
}, callback);
},
// Track multiple events (more efficient)
trackEvents: function(events, callback) {
this.getContext({
events: events
}, callback);
}Example: Tracking a page view
// Track a page view event
const viewEvent = tracker.buildEvent('view', {
itemType: 'page',
scope: CONFIG.scope,
itemId: window.location.pathname,
properties: {
pageInfo: {
pageName: document.title,
destinationURL: window.location.href,
referringURL: document.referrer
}
}
}, {
itemType: 'site',
scope: CONFIG.scope,
itemId: window.location.hostname || 'default-site'
});
tracker.trackEvent(viewEvent, function(error, response) {
if (error) {
console.error('Failed to track view event:', error);
return;
}
console.log('View event tracked. Processed events:', response.processedEvents);
});Example: Tracking a click event
// Track a click on a button
function trackButtonClick(buttonId, buttonText) {
const clickEvent = tracker.buildEvent('click', {
itemType: 'button',
scope: CONFIG.scope,
itemId: buttonId,
properties: {
text: buttonText
}
});
tracker.trackEvent(clickEvent, function(error, response) {
if (error) {
console.error('Failed to track click:', error);
return;
}
console.log('Click event tracked');
});
}
// Use it
document.getElementById('myButton').addEventListener('click', function() {
trackButtonClick('myButton', 'Click Me');
});Example: Tracking a form submission
// Track a form submission
function trackFormSubmission(formId, formData) {
const formEvent = {
eventType: 'form',
scope: CONFIG.scope,
source: {
itemType: 'page',
scope: CONFIG.scope,
itemId: window.location.pathname
},
target: {
itemType: 'form',
scope: CONFIG.scope,
itemId: formId,
properties: formData
}
};
tracker.trackEvent(formEvent, function(error, response) {
if (error) {
console.error('Failed to track form:', error);
return;
}
console.log('Form event tracked');
});
}
// Use it
document.getElementById('myForm').addEventListener('submit', function(e) {
e.preventDefault();
const formData = {
formName: this.id,
formFields: {}
};
// Extract form field values
Array.from(this.elements).forEach(function(element) {
if (element.name) {
formData.formFields[element.name] = element.value;
}
});
trackFormSubmission(this.id, formData);
});71.25.8. Using Filters
Filters allow you to evaluate conditions against the profile and session to determine which content should be displayed. Filters return boolean results indicating whether conditions match.
// Request filter evaluation
tracker.getContext({
filters: [
{
id: 'premium-user-filter',
filters: [
{
condition: {
type: 'profileSegmentCondition',
parameterValues: {
segments: ['premium-users']
}
}
}
]
},
{
id: 'new-visitor-filter',
filters: [
{
condition: {
type: 'profilePropertyCondition',
parameterValues: {
propertyName: 'properties.firstVisit',
comparisonOperator: 'exists'
}
}
}
]
}
]
}, function(error, response) {
if (error) {
console.error('Failed to evaluate filters:', error);
return;
}
const results = response.filteringResults || {};
if (results['premium-user-filter']) {
console.log('User is a premium user');
// Show premium content
}
if (results['new-visitor-filter']) {
console.log('User is a new visitor');
// Show welcome message
}
});71.25.9. Using Personalization
Personalization allows you to request content variants and have Apache Unomi select the most appropriate one based on the profile and session state.
// Request personalization
tracker.getContext({
personalizations: [
{
id: 'homepage-hero',
strategy: 'matching-first',
strategyOptions: {
fallback: 'default-hero'
},
contents: [
{
id: 'premium-user-hero',
filters: [
{
condition: {
type: 'profileSegmentCondition',
parameterValues: {
segments: ['premium-users']
}
}
}
]
},
{
id: 'new-visitor-hero',
filters: [
{
condition: {
type: 'profilePropertyCondition',
parameterValues: {
propertyName: 'properties.firstVisit',
comparisonOperator: 'exists'
}
}
}
]
},
{
id: 'default-hero'
}
]
}
]
}, function(error, response) {
if (error) {
console.error('Failed to get personalization:', error);
return;
}
// Get selected content ID(s)
// Note: personalizations is deprecated but still available
// It returns a List<String>, so get the first element for single-selection strategies
const contentIds = response.personalizations['homepage-hero'];
const selectedContentId = contentIds && contentIds.length > 0 ? contentIds[0] : null;
// Alternatively, use personalizationResults for more detailed information
const personalizationResult = response.personalizationResults['homepage-hero'];
if (personalizationResult && personalizationResult.contentIds && personalizationResult.contentIds.length > 0) {
const selectedId = personalizationResult.contentIds[0];
console.log('Selected content:', selectedId);
console.log('Strategy used:', personalizationResult.strategy);
applyPersonalizedContent('homepage-hero', selectedId);
} else if (selectedContentId) {
console.log('Selected content:', selectedContentId);
applyPersonalizedContent('homepage-hero', selectedContentId);
} else {
console.log('No content selected, using fallback');
applyPersonalizedContent('homepage-hero', 'default-hero');
}
});
function applyPersonalizedContent(personalizationId, contentId) {
// Your logic to apply the personalized content
const element = document.getElementById(personalizationId);
if (element) {
// Example: Update content based on selected ID
if (contentId === 'premium-user-hero') {
element.innerHTML = '<h1>Welcome, Premium Member!</h1>';
} else if (contentId === 'new-visitor-hero') {
element.innerHTML = '<h1>Welcome! Sign up today!</h1>';
} else {
element.innerHTML = '<h1>Welcome!</h1>';
}
}
}71.25.10. Complete Example: Page Load with Personalization
Here’s a complete example that loads context, tracks a page view, and applies personalization on page load:
// Initialize tracker on page load
tracker.init = function() {
const sessionId = this.getSessionId();
// Build page view event
const viewEvent = this.buildEvent('view', {
itemType: 'page',
scope: CONFIG.scope,
itemId: window.location.pathname,
properties: {
pageInfo: {
pageName: document.title,
destinationURL: window.location.href,
referringURL: document.referrer
}
}
});
// Request context with event and personalization
this.getContext({
events: [viewEvent],
requireSegments: true,
requiredProfileProperties: ['firstName', 'lastName', 'pageViewCount'],
personalizations: [
{
id: 'homepage-hero',
strategy: 'matching-first',
strategyOptions: {
fallback: 'default-hero'
},
contents: [
{
id: 'premium-user-hero',
filters: [
{
condition: {
type: 'profileSegmentCondition',
parameterValues: {
segments: ['premium-users']
}
}
}
]
},
{
id: 'new-visitor-hero',
filters: [
{
condition: {
type: 'profilePropertyCondition',
parameterValues: {
propertyName: 'properties.firstVisit',
comparisonOperator: 'exists'
}
}
}
]
},
{
id: 'default-hero'
}
]
}
]
}, function(error, response) {
if (error) {
console.error('Failed to initialize tracker:', error);
return;
}
// Log profile information
console.log('Profile ID:', response.profileId);
console.log('Session ID:', response.sessionId);
console.log('Profile Segments:', response.profileSegments);
// Apply personalization
// Get the first content ID from the list (for single-selection strategies like 'matching-first')
// Note: personalizations returns a List<String>, so get the first element
const contentIds = response.personalizations && response.personalizations['homepage-hero'];
const selectedContentId = contentIds && contentIds.length > 0 ? contentIds[0] : 'default-hero';
applyPersonalizedContent('homepage-hero', selectedContentId);
// Update UI with profile data
if (response.profileProperties) {
const profile = response.profileProperties;
if (profile.firstName) {
updateWelcomeMessage(profile.firstName, profile.lastName);
}
if (profile.pageViewCount) {
updatePageViewCount(profile.pageViewCount);
}
}
});
};
function applyPersonalizedContent(personalizationId, contentId) {
const element = document.getElementById(personalizationId);
if (!element) return;
const contentMap = {
'premium-user-hero': '<div class="hero premium"><h1>Welcome, Premium Member!</h1><p>Thank you for your loyalty.</p></div>',
'new-visitor-hero': '<div class="hero new-visitor"><h1>Welcome!</h1><p>Sign up today and get 10% off your first purchase.</p></div>',
'default-hero': '<div class="hero default"><h1>Welcome!</h1><p>Discover our amazing products.</p></div>'
};
element.innerHTML = contentMap[contentId] || contentMap['default-hero'];
}
function updateWelcomeMessage(firstName, lastName) {
const element = document.getElementById('welcome-message');
if (element) {
element.textContent = `Welcome back, ${firstName} ${lastName}!`;
}
}
function updatePageViewCount(count) {
const element = document.getElementById('page-view-count');
if (element) {
element.textContent = `You've viewed ${count} pages`;
}
}
// Initialize when DOM is ready
if (document.readyState === 'loading') {
document.addEventListener('DOMContentLoaded', function() {
tracker.init();
});
} else {
tracker.init();
}71.25.11. Advanced Features
Batch Event Tracking
For better performance, batch multiple events into a single request:
// Track multiple events in one request
const events = [
tracker.buildEvent('view', { /* ... */ }),
tracker.buildEvent('click', { /* ... */ }),
tracker.buildEvent('form', { /* ... */ })
];
tracker.trackEvents(events, function(error, response) {
if (error) {
console.error('Failed to track events:', error);
return;
}
console.log('Tracked', response.processedEvents, 'events');
});Event Queue
Implement an event queue to batch events and send them periodically or when a threshold is reached:
// Event queue implementation
const eventQueue = {
queue: [],
maxSize: 10,
flushInterval: 5000, // 5 seconds
add: function(event) {
this.queue.push(event);
if (this.queue.length >= this.maxSize) {
this.flush();
}
},
flush: function() {
if (this.queue.length === 0) return;
const events = this.queue.slice();
this.queue = [];
tracker.trackEvents(events, function(error, response) {
if (error) {
console.error('Failed to flush events:', error);
// Re-add events to queue on error
eventQueue.queue = events.concat(eventQueue.queue);
} else {
console.log('Flushed', response.processedEvents, 'events');
}
});
},
start: function() {
setInterval(function() {
eventQueue.flush();
}, this.flushInterval);
}
};
// Start automatic flushing
eventQueue.start();
// Add events to queue
eventQueue.add(tracker.buildEvent('click', { /* ... */ }));Error Handling and Retry Logic
Implement robust error handling with retry logic:
// Enhanced context request with retry logic
getContextWithRetry: function(options, callback, maxRetries) {
maxRetries = maxRetries || 3;
let retries = 0;
const attempt = () => {
this.getContext(options, function(error, response) {
if (error && retries < maxRetries) {
retries++;
console.warn('Request failed, retrying...', retries);
setTimeout(attempt, 1000 * retries); // Exponential backoff
} else {
callback(error, response);
}
});
};
attempt();
}Profile ID Synchronization
The profile ID is set by Apache Unomi in a cookie. Make sure to read it from the response:
// Enhanced context request that handles profile ID cookie
getContext: function(options, callback) {
// ... existing code ...
xhr.onreadystatechange = function() {
if (xhr.readyState === 4) {
if (xhr.status === 200) {
try {
const response = JSON.parse(xhr.responseText);
// Profile ID cookie is automatically set by Apache Unomi
// but we can verify it matches the response
const cookieProfileId = tracker.getCookie(CONFIG.profileCookieName);
if (response.profileId && cookieProfileId !== response.profileId) {
console.warn('Profile ID mismatch:', {
cookie: cookieProfileId,
response: response.profileId
});
}
if (callback) {
callback(null, response);
}
} catch (e) {
if (callback) {
callback(new Error('Failed to parse response: ' + e.message), null);
}
}
} else {
if (callback) {
callback(new Error('Request failed with status: ' + xhr.status), null);
}
}
}
};
// ... rest of existing code ...
}Consent Management
Handle user consent for tracking:
// Check if user has consented to tracking
hasConsent: function(consentType) {
// Check localStorage or cookie for consent
const consent = localStorage.getItem('unomi-consent-' + consentType);
return consent === 'true';
},
// Request context only if consent is given
getContextWithConsent: function(options, callback) {
if (!this.hasConsent('tracking')) {
console.warn('User has not consented to tracking');
if (callback) {
callback(new Error('Consent required'), null);
}
return;
}
this.getContext(options, callback);
}Cross-Domain Tracking
For cross-domain tracking, ensure cookies are set with the correct domain:
// Enhanced cookie setting with domain support
setCookie: function(name, value, days, domain) {
const expires = new Date();
expires.setTime(expires.getTime() + (days * 24 * 60 * 60 * 1000));
let cookie = `${name}=${value};expires=${expires.toUTCString()};path=/`;
if (domain) {
cookie += `;domain=${domain}`;
}
document.cookie = cookie;
}Performance Optimization
Optimize performance by:
-
Debouncing events: Don’t send every single interaction immediately
-
Batching requests: Combine multiple operations into one request
-
Caching context: Cache profile data and only refresh when needed
// Debounce function
debounce: function(func, wait) {
let timeout;
return function executedFunction(...args) {
const later = () => {
clearTimeout(timeout);
func(...args);
};
clearTimeout(timeout);
timeout = setTimeout(later, wait);
};
},
// Debounced event tracking
trackEventDebounced: this.debounce(function(event) {
tracker.trackEvent(event, function(error, response) {
if (error) {
console.error('Failed to track event:', error);
}
});
}, 1000), // Wait 1 second before sending
// Context caching
contextCache: {
data: null,
timestamp: null,
ttl: 60000, // 1 minute
get: function() {
if (this.data && this.timestamp && (Date.now() - this.timestamp) < this.ttl) {
return this.data;
}
return null;
},
set: function(data) {
this.data = data;
this.timestamp = Date.now();
},
clear: function() {
this.data = null;
this.timestamp = null;
}
}71.25.12. Complete Tracker Implementation
Here’s a complete, production-ready tracker implementation combining all the concepts:
(function() {
'use strict';
const CONFIG = {
contextServerUrl: 'http://localhost:8181',
apiKey: 'YOUR_PUBLIC_API_KEY',
scope: 'mydigital',
sessionCookieName: 'unomi-session-id',
profileCookieName: 'context-profile-id',
eventQueueSize: 10,
eventQueueInterval: 5000
};
const tracker = {
// Cookie management
getCookie: function(name) {
const value = `; ${document.cookie}`;
const parts = value.split(`; ${name}=`);
if (parts.length === 2) {
return parts.pop().split(';').shift();
}
return null;
},
setCookie: function(name, value, days, domain) {
const expires = new Date();
expires.setTime(expires.getTime() + (days * 24 * 60 * 60 * 1000));
let cookie = `${name}=${value};expires=${expires.toUTCString()};path=/`;
if (domain) {
cookie += `;domain=${domain}`;
}
document.cookie = cookie;
},
// UUID generation
// Uses crypto.randomUUID() if available (most secure, modern browsers)
// Falls back to crypto.getRandomValues() (secure, widely supported)
// Falls back to Math.random() only for very old browsers (less secure)
generateUUID: function() {
// Use crypto.randomUUID() if available (Chrome 92+, Firefox 95+, Safari 15.4+, Node.js 19+)
if (typeof crypto !== 'undefined' && crypto.randomUUID) {
return crypto.randomUUID();
}
// Use crypto.getRandomValues() if available (widely supported, secure)
if (typeof crypto !== 'undefined' && crypto.getRandomValues) {
return 'xxxxxxxx-xxxx-4xxx-yxxx-xxxxxxxxxxxx'.replace(/[xy]/g, function(c) {
const r = crypto.getRandomValues(new Uint8Array(1))[0] % 16;
const v = c === 'x' ? r : (r & 0x3 | 0x8);
return v.toString(16);
});
}
// Fallback to Math.random() for very old browsers (not cryptographically secure)
// Note: This is less secure and should only be used as a last resort
return 'xxxxxxxx-xxxx-4xxx-yxxx-xxxxxxxxxxxx'.replace(/[xy]/g, function(c) {
const r = Math.random() * 16 | 0;
const v = c === 'x' ? r : (r & 0x3 | 0x8);
return v.toString(16);
});
},
// Session management
getSessionId: function() {
let sessionId = this.getCookie(CONFIG.sessionCookieName);
if (!sessionId) {
sessionId = this.generateUUID();
this.setSessionId(sessionId);
}
return sessionId;
},
setSessionId: function(sessionId) {
this.setCookie(CONFIG.sessionCookieName, sessionId, 1);
},
// Event building
buildEvent: function(eventType, target, source) {
return {
eventType: eventType,
scope: CONFIG.scope,
source: source || {
itemType: 'page',
scope: CONFIG.scope,
itemId: window.location.pathname
},
target: target
};
},
// Context request
getContext: function(options, callback) {
const sessionId = this.getSessionId();
const url = `${CONFIG.contextServerUrl}/cxs/context.json?sessionId=${encodeURIComponent(sessionId)}`;
const payload = {
source: {
itemId: options.sourceId || window.location.pathname,
itemType: options.sourceType || 'page',
scope: CONFIG.scope
}
};
if (options.requiredProfileProperties) {
payload.requiredProfileProperties = options.requiredProfileProperties;
}
if (options.requiredSessionProperties) {
payload.requiredSessionProperties = options.requiredSessionProperties;
}
if (options.requireSegments) {
payload.requireSegments = true;
}
if (options.requireScores) {
payload.requireScores = true;
}
if (options.events) {
payload.events = options.events;
}
if (options.filters) {
payload.filters = options.filters;
}
if (options.personalizations) {
payload.personalizations = options.personalizations;
}
const xhr = new XMLHttpRequest();
xhr.open('POST', url, true);
xhr.setRequestHeader('Content-Type', 'application/json');
xhr.setRequestHeader('X-Unomi-Api-Key', CONFIG.apiKey);
xhr.withCredentials = true;
xhr.onreadystatechange = function() {
if (xhr.readyState === 4) {
if (xhr.status === 200) {
try {
const response = JSON.parse(xhr.responseText);
if (callback) {
callback(null, response);
}
} catch (e) {
if (callback) {
callback(new Error('Failed to parse response: ' + e.message), null);
}
}
} else {
if (callback) {
callback(new Error('Request failed with status: ' + xhr.status), null);
}
}
}
};
xhr.send(JSON.stringify(payload));
},
// Event tracking
trackEvent: function(event, callback) {
this.getContext({
events: [event]
}, callback);
},
trackEvents: function(events, callback) {
this.getContext({
events: events
}, callback);
},
// Initialization
init: function(config) {
// Merge custom config
if (config) {
Object.assign(CONFIG, config);
}
// Initialize session
this.getSessionId();
// Track page view
const viewEvent = this.buildEvent('view', {
itemType: 'page',
scope: CONFIG.scope,
itemId: window.location.pathname,
properties: {
pageInfo: {
pageName: document.title,
destinationURL: window.location.href,
referringURL: document.referrer
}
}
});
this.trackEvent(viewEvent, function(error, response) {
if (error) {
console.error('Failed to track page view:', error);
} else {
console.log('Page view tracked');
}
});
}
};
// Expose tracker
window.unomiTracker = tracker;
// Auto-initialize if DOM is ready
if (document.readyState === 'loading') {
document.addEventListener('DOMContentLoaded', function() {
tracker.init();
});
} else {
tracker.init();
}
})();71.25.13. Best Practices
-
Always use HTTPS in production - Update
contextServerUrlto use HTTPS -
Handle errors gracefully - Don’t break the user experience if tracking fails
-
Respect user privacy - Implement consent management
-
Optimize performance - Batch events, cache context, debounce rapid interactions
-
Test thoroughly - Test with different browsers, network conditions, and privacy settings
-
Monitor and log - Log errors and track success rates
-
Keep session IDs secure - Use cryptographically secure UUID generation (see UUID generation section below)
-
Handle cookie restrictions - Some browsers block third-party cookies
71.25.14. UUID Generation Security
|
Important
|
Security Considerations for UUID Generation The tracker uses UUIDs for session IDs, which should be unpredictable to prevent session hijacking. The implementation in this guide uses a secure fallback chain:
Recommendations:
* For production applications, ensure your minimum browser support includes browsers with Browser Compatibility:
* For maximum security and compatibility, the implementation automatically uses the best available method. |
71.25.15. Next Steps
-
Learn about How profile tracking works to understand the full flow
-
Review the official Unomi Web Tracker for a production-ready implementation
-
Explore Request examples for more API usage patterns
-
Check Built-in event types for available event types
-
Review Built-in condition types for filter conditions
72. Integration samples
72.1. Samples
Apache Unomi provides the following integration demos in samples/.
These are scenario walkthroughs, not maintained plugin templates — for plugin development see Writing plugins.
72.2. Login sample
This samples is an example of what is involved in integrated a login with Apache Unomi.
72.2.1. Warning !
The example code uses client-side Javascript code to send the login event. This is only done this way for the sake of samples simplicity but if should NEVER BE DONE THIS WAY in real cases.
The login event should always be sent from the server performing the actual login since it must only be sent if the user has authenticated properly, and only the authentication server can validate this.
72.2.2. Installing the samples
Login into the Unomi Karaf SSH shell using something like this :
ssh -p 8102 karaf@localhost (default password is karaf)Install the login samples using the following command:
bundle:install mvn:org.apache.unomi/login-integration-sample/${project.version}when the bundle is successfully install you will get an bundle ID back we will call it BUNDLE_ID.
You can then do:
bundle:start BUNDLE_IDIf all went well you can access the login samples HTML page here :
http://localhost:8181/login/index.htmlYou can fill in the form to test it. Note that the hardcoded password is:
test123472.3. Twitter sample
72.3.1. Overview
We will examine how a simple HTML page can interact with Unomi to enrich a user’s profile. The use case we will follow
is a rather simple one: we use a Twitter button to record the number of times the visitor tweeted (as a tweetNb profile
integer property) as well as the URLs they tweeted from (as a tweetedFrom multi-valued string profile property).
A javascript script will use the Twitter API to react to clicks on this button
and update the user profile using a ContextServlet request triggering a custom event. This event will, in turn,
trigger a Unomi action on the server implemented using a Unomi plugin, a standard extension point for the server.
Building the tweet button samples
In your local copy of the Unomi repository and run:
cd samples/tweet-button-plugin
mvn clean installThis will compile and create the OSGi bundle that can be deployed on Unomi to extend it.
Deploying the tweet button samples
In standard Karaf fashion, you will need to copy the samples bundle to your Karaf deploy directory.
If you are using the packaged version of Unomi (as opposed to deploying it to your own Karaf version), you can simply run, assuming your current directory is samples/tweet-button-plugin and that you uncompressed the archive in the directory it was created:
cp target/tweet-button-plugin-2.0.0-SNAPSHOT.jar ../../package/target/unomi-2.0.0-SNAPSHOT/deployTesting the samples
You can now go to http://localhost:8181/twitter/index.html to test the samples code. The page is very simple, you will see a Twitter button, which, once clicked, will open a new window to tweet about the current page. The original page should be updated with the new values of the properties coming from Unomi. Additionnally, the raw JSON response is displayed.
We will now explain in greater details some concepts and see how the example works.
72.3.2. Interacting with the context server
There are essentially two modalities to interact with the context server, reflecting different types of Unomi users: context server clients and context server integrators.
Context server clients are usually web applications or content management systems. They interact with Unomi by providing raw, uninterpreted contextual data in the form of events and associated metadata. That contextual data is then processed by the context server to be fed to clients once actionable. In that sense context server clients are both consumers and producers of contextual data. Context server clients will mostly interact with Unomi using a single entry point called the ContextServlet, requesting context for the current user and providing any triggered events along the way.
On the other hand, context server integrators provide ways to feed more structured data to the context server either to integrate with third party services or to provide analysis of the uninterpreted data provided by context server clients. Such integration will mostly be done using Unomi’s API either directly using Unomi plugins or via the provided REST APIs. However, access to REST APIs is restricted due for security reasons, requiring privileged access to the Unomi server, making things a little more complex to set up.
For simplicity’s sake, this document will focus solely on the first use case and will interact only with the context servlet.
72.3.3. Retrieving context information from Unomi using the context servlet
Unomi provides two ways to retrieve context: either as a pure JSON object containing strictly context information or as a couple of JSON objects augmented with javascript functions that can be used to interact with the Unomi server using the <context server base URL>/cxs/context.json or <context server base URL>/context.js URLs, respectively.
Below is an example of asynchronously loading the initial context using the javascript version, assuming a default Unomi install running on http://localhost:8181:
// Load context from Unomi asynchronously
(function (document, elementToCreate, id) {
var js, fjs = document.getElementsByTagName(elementToCreate)[0];
if (document.getElementById(id)) return;
js = document.createElement(elementToCreate);
js.id = id;
js.src = 'http://localhost:8181/cxs/context.js';
fjs.parentNode.insertBefore(js, fjs);
}(document, 'script', 'context'));This initial context results in a javascript file providing some functions to interact with the context server from javascript along with two objects: a cxs object containing
information about the context for the current user and a digitalData object that is injected into the browser’s window object (leveraging the
Customer Experience Digital Data Layer standard). Note that this last object is not under control of the context server and clients
are free to use it or not. Our example will not make use of it.
On the other hand, the cxs top level object contains interesting contextual information about the current user:
{
"profileId":<identifier of the profile associated with the current user>,
"sessionId":<identifier of the current user session>,
"profileProperties":<requested profile properties, if any>,
"sessionProperties":<requested session properties, if any>,
"profileSegments":<segments the profile is part of if requested>,
"filteringResults":<result of the evaluation of content filters>,
"personalizations":<result of the evaluation of personalization filters>,
"trackedConditions":<tracked conditions in the source page, if any>
}We will look at the details of the context request and response later.
72.4. Example
72.4.1. HTML page
The code for the HTML page with our Tweet button can be found at https://github.com/apache/unomi/blob/master/wab/src/main/webapp/index.html.
This HTML page is fairly straightforward: we create a tweet button using the Twitter API while a Javascript script performs the actual logic.
72.4.2. Javascript
Globally, the script loads both the twitter widget and the initial context asynchronously (as shown previously). This is accomplished using fairly standard javascript code and we won’t look at it here. Using the Twitter API, we react to the tweet event and call the Unomi server to update the user’s profile with the required information, triggering a custom tweetEvent event. This is accomplished using a contextRequest function which is an extended version of a classic AJAX request:
function contextRequest(successCallback, errorCallback, payload) {
var data = JSON.stringify(payload);
// if we don't already have a session id, generate one
var sessionId = cxs.sessionId || generateUUID();
var url = 'http://localhost:8181/cxs/context.json?sessionId=' + sessionId;
var xhr = new XMLHttpRequest();
var isGet = data.length < 100;
if (isGet) {
xhr.withCredentials = true;
xhr.open("GET", url + "&payload=" + encodeURIComponent(data), true);
} else if ("withCredentials" in xhr) {
xhr.open("POST", url, true);
xhr.withCredentials = true;
} else if (typeof XDomainRequest != "undefined") {
xhr = new XDomainRequest();
xhr.open("POST", url);
}
xhr.onreadystatechange = function () {
if (xhr.readyState != 4) {
return;
}
if (xhr.status ==== 200) {
var response = xhr.responseText ? JSON.parse(xhr.responseText) : undefined;
if (response) {
cxs.sessionId = response.sessionId;
successCallback(response);
}
} else {
console.log("contextserver: " + xhr.status + " ERROR: " + xhr.statusText);
if (errorCallback) {
errorCallback(xhr);
}
}
};
xhr.setRequestHeader("Content-Type", "text/plain;charset=UTF-8"); // Use text/plain to avoid CORS preflight
if (isGet) {
xhr.send();
} else {
xhr.send(data);
}
}There are a couple of things to note here:
-
If we specify a payload, it is expected to use the JSON format so we
stringifyit and encode it if passed as a URL parameter in aGETrequest. -
We need to make a
CORSrequest since the Unomi server is most likely not running on the same host than the one from which the request originates. The specific details are fairly standard and we will not explain them here. -
We need to either retrieve (from the initial context we retrieved previously using
cxs.sessionId) or generate a session identifier for our request since Unomi currently requires one. -
We’re calling the
ContextServletusing the default install URI, specifying the session identifier:http://localhost:8181/cxs/context.json?sessionId=sessionId. This URI requests context from Unomi, resulting in an updatedcxsobject in the javascript global scope. The context server can reply to this request either by returning a JSON-only object containing solely the context information as is the case when the requested URI iscontext.json. However, if the client requestscontext.jsthen useful functions to interact with Unomi are added to thecxsobject in addition to the context information as depicted above. -
We don’t need to provide any authentication at all to interact with this part of Unomi since we only have access to read-only data (as well as providing events as we shall see later on). If we had been using the REST API, we would have needed to provide authentication information as well.
Context request and response structure
The interesting part, though, is the payload. This is where we provide Unomi with contextual information as well as ask for data in return. This allows clients to specify which type of information they are interested in getting from the context server as well as specify incoming events or content filtering or property/segment overrides for personalization or impersonation. This conditions what the context server will return with its response.
Let’s look at the context request structure:
{
"sessionId" : <optional session identifier>,
"source": <Item source of the context request>,
"events": <optional array of events to trigger>,
"requiredProfileProperties": <optional array of property identifiers>,
"requiredSessionProperties": <optional array of property identifiers>,
filters: <optional array of filters to evaluate>,
"personalitations": <optional array of personalizations to evaluate>,
"profileOverrides": <optional profile containing segments,scores or profile properties to override>,
- segments: <optional array of segment identifiers>,
- profileProperties: <optional map of property name / value pairs>,
- scores: <optional map of score id / value pairs>
"sessionPropertiesOverrides": <optional map of property name / value pairs>,
"requireSegments": <boolean, whether to return the associated segments>
}We will now look at each part in greater details.
Source
A context request payload needs to at least specify some information about the source of the request in the form of an Item (meaning identifier, type and scope plus any additional properties we might have to provide), via the source property of the payload. Of course the more information can be provided about the source, the better.
Filters
A client wishing to perform content personalization might also specify filtering conditions to be evaluated by the
context server so that it can tell the client whether the content associated with the filter should be activated for
this profile/session. This is accomplished by providing a list of filter definitions to be evaluated by the context
server via the filters field of the payload. If provided, the evaluation results will be provided in the
filteringResults field of the resulting cxs object the context server will send.
Here is an example of a filter request:
curl --location --request POST 'http://localhost:8181/cxs/context.json' \
--header 'Content-Type: application/json' \
--header 'X-Unomi-Api-Key: YOUR_PUBLIC_API_KEY' \
--header 'Cookie: JSESSIONID=48C8AFB3E18B8E3C93C2F4D5B7BD43B7; context-profile-id=01060c4c-a055-4c8f-9692-8a699d0c434a' \
--data-raw '{
"source": null,
"requireSegments": false,
"requiredProfileProperties": null,
"requiredSessionProperties": null,
"events": null,
"filters": [
{
"id" : "filter1",
"filters" : [
{
"condition": {
"parameterValues": {
"propertyName": "properties.gender",
"comparisonOperator": "equals",
"propertyValue": "male"
},
"type": "profilePropertyCondition"
}
}
]
}
],
"personalizations": null,
"profileOverrides": null,
"sessionPropertiesOverrides": null,
"sessionId": "demo-session-id"
}'And here’s the result:
{
"profileId": "01060c4c-a055-4c8f-9692-8a699d0c434a",
"sessionId": "demo-session-id",
"profileProperties": null,
"sessionProperties": null,
"profileSegments": null,
"filteringResults": {
"filter1": false
},
"processedEvents": 0,
"personalizations": null,
"trackedConditions": [],
"anonymousBrowsing": false,
"consents": {}
}As we can see, the filter1 filter we sent in our request, in this example, evaluated to false for the current profile,
so we can use that result to perform any customization for the current profile, in this case use the fact that he is
male.
Personalizations
Filters make it possible to evaluate conditions against a profile in real-time, but for true personalization it is needed
to have a more powerful mechanism: strategies. Sometimes we want to provide multiple variants that each have their own
conditions and we want to know which is the best variant to use for the current profile. This can be achieved with the
personalizations structure in the ContextRequest.
Here is an example of a personalizations request:
curl --location --request POST 'http://localhost:8181/cxs/context.json' \
--header 'Content-Type: application/json' \
--header 'X-Unomi-Api-Key: YOUR_PUBLIC_API_KEY' \
--header 'Cookie: JSESSIONID=48C8AFB3E18B8E3C93C2F4D5B7BD43B7; context-profile-id=01060c4c-a055-4c8f-9692-8a699d0c434a' \
--data-raw '{
"source": null,
"requireSegments": false,
"requiredProfileProperties": null,
"requiredSessionProperties": [ "unomiControlGroups" ],
"events": null,
"filters": null,
"personalizations": [
{
"id": "gender-test",
"strategy": "matching-first",
"strategyOptions": {
"fallback": "var2",
"controlGroup" : {
"percentage" : 10.0,
"displayName" : "Gender test control group",
"path" : "/gender-test",
"storeInSession" : true
}
},
"contents": [
{
"id": "var1",
"filters": [
{
"appliesOn": null,
"condition": {
"parameterValues": {
"propertyName": "properties.gender",
"comparisonOperator": "equals",
"propertyValue": "male"
},
"type": "profilePropertyCondition"
},
"properties": null
}
],
"properties": null
},
{
"id": "var2",
"filters": null,
"properties": null
}
]
}
],
"profileOverrides": null,
"sessionPropertiesOverrides": null,
"sessionId": "demo-session-id"
}'In the above example, we basically setup two variants : var1 and var2 and setup the var2 to be the fallback variant
in case no variant is matched. We could of course specify more than a variant. The strategy indicates to the
personalization service how to calculate the "winning" variant. In this case the strategy matching-first will return variants that match the current profile. We also use the controlGroups option to specify that we want to have a control group for this personalization. The 10.0 percentage value represents 10% (0.0 to 100.0) of traffic that will be assigned randomly to the control group. The control group will be stored in the profile and the session of the visitors if they were assigned to it. We also specify that we store the control group in the session (by default it is stored in the profile)
Currently the following strategies are available:
-
matching-first: will return the variant IDs that match the current profile (using the initial content order) -
random: will return a shuffled list of variant IDs (ignoring any conditions) -
score-sorted: allows to sort the variants based on scores associated with the filtering conditions, effectively sorting them by the highest scoring condition first.
Here is the result of the above example:
{
"profileId": "01060c4c-a055-4c8f-9692-8a699d0c434a",
"sessionId": "demo-session-id",
"profileProperties": null,
"sessionProperties": {
"unomiControlGroups": [
{
"id": "previousPerso",
"displayName": "Previous perso",
"path": "/home/previousPerso.html",
"timeStamp": "2021-12-15T13:52:38Z"
}
]
},
"profileSegments": null,
"filteringResults": null,
"processedEvents": 0,
"personalizations": {
"gender-test": [
"var2"
]
},
"trackedConditions": [
],
"anonymousBrowsing": false,
"consents": {}
}In the above example we can see the profile and session were assigned to other control groups but not the current one (the ids are different).
Overrides
It is also possible for clients wishing to perform user impersonation to specify properties or segments to override the proper ones so as to emulate a specific profile, in which case the overridden value will temporarily replace the proper values so that all rules will be evaluated with these values instead of the proper ones. The segments (array of segment identifiers), profileProperties (maps of property name and associated object value) and scores (maps of score id and value) all wrapped in a profileOverrides object and the sessionPropertiesOverrides (maps of property name and associated object value) fields allow to provide such information. Providing such overrides will, of course, impact content filtering results and segments matching for this specific request.
Controlling the content of the response
The clients can also specify which information to include in the response by setting the requireSegments property to true if segments the current profile matches should be returned or provide an array of property identifiers for requiredProfileProperties or requiredSessionProperties fields to ask the context server to return the values for the specified profile or session properties, respectively. This information is provided by the profileProperties, sessionProperties and profileSegments fields of the context server response.
Additionally, the context server will also returns any tracked conditions associated with the source of the context request. Upon evaluating the incoming request, the context server will determine if there are any rules marked with the trackedCondition tag and which source condition matches the source of the incoming request and return these tracked conditions to the client. The client can use these tracked conditions to learn that the context server can react to events matching the tracked condition and coming from that source. This is, in particular, used to implement form mapping (a solution that allows clients to update user profiles based on values provided when a form is submitted).
Events
Finally, the client can specify any events triggered by the user actions, so that the context server can process them, via the events field of the context request.
Default response
If no payload is specified, the context server will simply return the minimal information deemed necessary for client applications to properly function: profile identifier, session identifier and any tracked conditions that might exist for the source of the request.
Context request for our example
Now that we’ve seen the structure of the request and what we can expect from the context response, let’s examine the request our component is doing.
In our case, our source item looks as follows: we specify a scope for our application (unomi-tweet-button-samples), specify that the item type (i.e. the kind of element that is the source of our event) is a page (which corresponds, as would be expected, to a web page), provide an identifier (in our case, a Base-64 encoded version of the page’s URL) and finally, specify extra properties (here, simply a url property corresponding to the page’s URL that will be used when we process our event in our Unomi extension).
var scope = 'unomi-tweet-button-samples';
var itemId = btoa(window.location.href);
var source = {
itemType: 'page',
scope: scope,
itemId: itemId,
properties: {
url: window.location.href
}
};We also specify that we want the context server to return the values of the tweetNb and tweetedFrom profile properties in its response. Finally, we provide a custom event of type tweetEvent with associated scope and source information, which matches the source of our context request in this case.
var contextPayload = {
source: source,
events: [
{
eventType: 'tweetEvent',
scope: scope,
source: source
}
],
requiredProfileProperties: [
'tweetNb',
'tweetedFrom'
]
};The tweetEvent event type is not defined by default in Unomi. This is where our Unomi plugin comes into play since we need to tell Unomi how to react when it encounters such events.
Unomi plugin overview
In order to react to tweetEvent events, we will define a new Unomi rule since this is exactly what Unomi rules are supposed to do. Rules are guarded by conditions and if these
conditions match, the associated set of actions will be executed. In our case, we want our new
incrementTweetNumber rule to only react to tweetEvent events and
we want it to perform the profile update accordingly: create the property types for our custom properties if they don’t exist and update them. To do so, we will create a
custom
incrementTweetNumberAction action that will be triggered any time our rule matches. An action is some custom code that is deployed in the context server and can access the
Unomi API to perform what it is that it needs to do.
Rule definition
Let’s look at how our custom incrementTweetNumber rule is defined:
{
"metadata": {
"id": "smp:incrementTweetNumber",
"name": "Increment tweet number",
"description": "Increments the number of times a user has tweeted after they click on a tweet button"
},
"raiseEventOnlyOnceForSession": false,
"condition": {
"type": "eventTypeCondition",
"parameterValues": {
"eventTypeId": "tweetEvent"
}
},
"actions": [
{
"type": "incrementTweetNumberAction",
"parameterValues": {}
}
]
}Rules define a metadata section where we specify the rule name, identifier and description.
When rules trigger, a specific event is raised so that other parts of Unomi can react to it accordingly. We can control how that event should be raised. Here we specify that the event should be raised each time the rule triggers and not only once per session by setting raiseEventOnlyOnceForSession to false, which is not strictly required since that is the default. A similar setting (raiseEventOnlyOnceForProfile) can be used to specify that the event should only be raised once per profile if needed.
We could also specify a priority for our rule in case it needs to be executed before other ones when similar conditions match. This is accomplished using the priority property. We’re using the default priority here since we don’t have other rules triggering on `tweetEvent`s and don’t need any special ordering.
We then tell Unomi which condition should trigger the rule via the condition property. Here, we specify that we want our rule to trigger on an eventTypeCondition condition. Unomi can be extended by adding new condition types that can enrich how matching or querying is performed. The condition type definition file specifies which parameters are expected for our condition to be complete. In our case, we use the built-in event type condition that will match if Unomi receives an event of the type specified in the condition’s eventTypeId parameter value: tweetEvent here.
Finally, we specify a list of actions that should be performed as consequences of the rule matching. We only need one action of type incrementTweetNumberAction that doesn’t require any parameters.
Action definition
Let’s now look at our custom incrementTweetNumberAction action type definition:
{
"id": "incrementTweetNumberAction",
"actionExecutor": "incrementTweetNumber",
"systemTags": [
"event"
],
"parameters": []
}We specify the identifier for the action type, a list of systemTags if needed: here we say that our action is a consequence of events using the event tag. Our actions does not require any parameters so we don’t define any.
Finally, we provide a mysterious actionExecutor identifier: incrementTweetNumber.
Action executor definition
The action executor references the actual implementation of the action as defined in our blueprint definition:
<blueprint xmlns:xsi="http://www.w3.org/2001/XMLSchema-instance"
xmlns="http://www.osgi.org/xmlns/blueprint/v1.0.0"
xsi:schemaLocation="http://www.osgi.org/xmlns/blueprint/v1.0.0 http://www.osgi.org/xmlns/blueprint/v1.0.0/blueprint.xsd">
<reference id="profileService" interface="org.apache.unomi.api.services.ProfileService"/>
<!-- Action executor -->
<service id="incrementTweetNumberAction" interface="org.apache.unomi.api.actions.ActionExecutor">
<service-properties>
<entry key="actionExecutorId" value="incrementTweetNumber"/>
</service-properties>
<bean class="org.apache.unomi.examples.unomi_tweet_button_plugin.actions.IncrementTweetNumberAction">
<property name="profileService" ref="profileService"/>
</bean>
</service>
</blueprint>In standard Blueprint fashion, we specify that we will need the profileService defined by Unomi and then define a service of our own to be exported for Unomi to use. Our service specifies one property: actionExecutorId which matches the identifier we specified in our action definition. We then inject the profile service in our executor and we’re done for the configuration side of things!
Action executor implementation
Our action executor definition specifies that the bean providing the service is implemented in the org.apache.unomi.samples.tweet_button_plugin.actions
.IncrementTweetNumberAction class. This class implements the Unomi ActionExecutor interface which provides a single int execute(Action action, Event event) method: the executor gets the action instance to execute along with the event that triggered it, performs its work and returns an integer status corresponding to what happened as defined by public constants of the EventService interface of Unomi: NO_CHANGE, SESSION_UPDATED or PROFILE_UPDATED.
Let’s now look at the implementation of the method:
final Profile profile = event.getProfile();
Integer tweetNb = (Integer) profile.getProperty(TWEET_NB_PROPERTY);
List<String> tweetedFrom = (List<String>) profile.getProperty(TWEETED_FROM_PROPERTY);
if (tweetNb ==== null || tweetedFrom ==== null) {
// create tweet number property type
PropertyType propertyType = new PropertyType(new Metadata(event.getScope(), TWEET_NB_PROPERTY, TWEET_NB_PROPERTY, "Number of times a user tweeted"));
propertyType.setValueTypeId("integer");
service.createPropertyType(propertyType);
// create tweeted from property type
propertyType = new PropertyType(new Metadata(event.getScope(), TWEETED_FROM_PROPERTY, TWEETED_FROM_PROPERTY, "The list of pages a user tweeted from"));
propertyType.setValueTypeId("string");
propertyType.setMultivalued(true);
service.createPropertyType(propertyType);
tweetNb = 0;
tweetedFrom = new ArrayList<>();
}
profile.setProperty(TWEET_NB_PROPERTY, tweetNb + 1);
final String sourceURL = extractSourceURL(event);
if (sourceURL != null) {
tweetedFrom.add(sourceURL);
}
profile.setProperty(TWEETED_FROM_PROPERTY, tweetedFrom);
return EventService.PROFILE_UPDATED;It is fairly straightforward: we retrieve the profile associated with the event that triggered the rule and check whether it already has the properties we are interested in. If not, we create the associated property types and initialize the property values.
Note that it is not an issue to attempt to create the same property type multiple times as Unomi will not add a new property type if an identical type already exists.
Once this is done, we update our profile with the new property values based on the previous values and the metadata extracted from the event using the extractSourceURL method which uses our url property that we’ve specified for our event source. We then return that the profile was updated as a result of our action and Unomi will properly save it for us when appropriate. That’s it!
For reference, here’s the extractSourceURL method implementation:
private String extractSourceURL(Event event) {
final Item sourceAsItem = event.getSource();
if (sourceAsItem instanceof CustomItem) {
CustomItem source = (CustomItem) sourceAsItem;
final String url = (String) source.getProperties().get("url");
if (url != null) {
return url;
}
}
return null;
}72.5. Conclusion
We have seen a simple example how to interact with Unomi using a combination of client-side code and Unomi plugin. Hopefully, this provided an introduction to the power of what Unomi can do and how it can be extended to suit your needs.
73. Connectors
73.1. Connectors
Apache Unomi provides the following connectors:
73.1.1. Call for contributors
We are looking for help with the development of additional connectors. Any contribution (large or small) is more than welcome. Feel free to discuss this in our mailing list.
73.2. Salesforce Connector
This connectors makes it possible to push and pull data to/from the Salesforce CRM. It can copy information between Apache Unomi profiles and Salesforce Leads.
73.2.1. Getting started
Salesforce account setup
-
Create a new developer account here:
https://developer.salesforce.com/signup -
Create a new Connected App, by going into Setup -> App Manager and click "Create Connected App"
-
In the settings, make sure you do the following:
Enable OAuth settings -> Activated Enable for device flow -> Activated (no need for a callback URL) Add all the selected OAuth scopes you want (or put all of them) Make sure Require Secret for Web Server flow is activated -
Make sure you retrieve the following information once you have created the app in the API (Enable OAuth Settings):
Consumer key Consumer secret (click to see it) -
You must also retrieve your user’s security token, or create it if you don’t have one already. To do this simply click on your user at the top right, select "Settings", the click on "Reset my security token". You will receive an email with the security token.
Apache Unomi setup
-
You are now ready to configure the Apache Unomi Salesforce Connector. In the etc/unomi.custom.system.properties file add/change the following settings:
org.apache.unomi.sfdc.user.username=${env:UNOMI_SFDC_USER_USERNAME:-} org.apache.unomi.sfdc.user.password=${env:UNOMI_SFDC_USER_PASSWORD:-} org.apache.unomi.sfdc.user.securityToken=${env:UNOMI_SFDC_USER_SECURITYTOKEN:-} org.apache.unomi.sfdc.consumer.key=${env:UNOMI_SFDC_CONSUMER_KEY:-} org.apache.unomi.sfdc.consumer.secret=${env:UNOMI_SFDC_CONSUMER_SECRET:-}
Deployment from Maven repository
In this procedure we assume you have access to a Maven repository that contains a compiled version of the Salesforce connector. If this is not the case or you prefer to deploy using a KAR bundle, see the KAR deployment instructions instead.
-
Connect to the Apache Unomi Karaf Shell using :
ssh -p 8102 karaf@localhost (default password is karaf) -
Deploy into Apache Unomi using the following commands from the Apache Karaf shell:
feature:repo-add mvn:org.apache.unomi/unomi-salesforce-connector-karaf-kar/${project.version}/xml/features feature:install unomi-salesforce-connector-karaf-kar
Deployment using KAR bundle
If you have a KAR bundle (for example after building from source in the extensions/salesforce-connector/karaf-kar/target directory),
you can follow these steps to install :
-
Ensure that Apache Karaf and Apache Unomi are started
-
Execute the following command in karaf:
feature:install unomi-salesforce-connector-karaf-kar -
The installation is done !
Testing the connector
-
You can then test the connection to Salesforce by accessing the following URLs:
https://localhost:9443/cxs/sfdc/version https://localhost:9443/cxs/sfdc/limitsThe first URL will give you information about the version of the connectors, so this makes it easy to check that the plugin is properly deployed, started and the correct version. The second URL will actually make a request to the Salesforce REST API to retrieve the limits of the Salesforce API.
Both URLs are password protected by the Apache Unomi (Karaf) password. You can find this user and password information in the etc/users.properties file.
You can now use the connectors’s defined actions in rules to push or pull data to/from the Salesforce CRM. You can find more information about rules in the Data Model and the Getting Started pages.
73.2.2. Properties
To define how Salesforce attributes will be mapped to Unomi profile properties, edit the following entry using the pattern below :
org.apache.unomi.sfdc.fields.mappings=${env:UNOMI_SFDC_FIELDS_MAPPINGS:-email<=>Email,firstName<=>FirstName,lastName<=>LastName,company<=>Company,phoneNumber<=>Phone,jobTitle<=>Title,city<=>City,zipCode<=>PostalCode,address<=>Street,sfdcStatus<=>Status,sfdcRating<=>Rating}Please note that Salesforce needs the company and the last name to be set, otherwise the lead won’t be created. An identifier needs to be set as well. The identifier will be used to map the Unomi profile to the Salesforce lead. By default, the email is set as the identifier, meaning that if a lead in Salesforce and a profile in Unomi have the same email, they’ll be considered as the same person.
org.apache.unomi.sfdc.fields.mappings.identifier=${env:UNOMI_SFDC_FIELDS_MAPPINGS_IDENTIFIER:-email<=>Email}73.2.3. Hot-deploying updates to the Salesforce connector (for developers)
If you followed all the steps in the Getting Started section, you can upgrade the Salesforce connectors by using the following steps:
-
Compile the connectors using:
cd extensions/salesforce-connector mvn clean install -
Login to the Unomi Karaf Shell using:
ssh -p 8102 karaf@localhost (password by default is karaf) -
Execute the following commands in the Karaf shell
feature:repo-refresh feature:uninstall unomi-salesforce-connector-karaf-feature feature:install unomi-salesforce-connector-karaf-feature -
You can then check that the new version is properly deployed by accessing the following URL and checking the build date:
https://localhost:9443/cxs/sfdc/version(if asked for a password it’s the same karaf/karaf default)
73.2.4. Using the Salesforce Workbench for testing REST API
The Salesforce Workbench contains a REST API Explorer that is very useful to test requests. You may find it here :
https://workbench.developerforce.com/restExplorer.php73.2.5. Setting up Streaming Push queries
Using the Salesforce Workbench, you can setting streaming push queries (Queries->Streaming push topics) such as the following example:
Name: LeadUpdates
Query : SELECT Id,FirstName,LastName,Email,Company FROM Lead73.2.6. Executing the unit tests
Before running the tests, make sure you have completed all the steps above, including the streaming push queries setup.
By default the unit tests will not run as they need proper Salesforce credentials to run. To set this up create a properties file like the following one:
test.properties
#
# Licensed to the Apache Software Foundation (ASF) under one or more
# contributor license agreements. See the NOTICE file distributed with
# this work for additional information regarding copyright ownership.
# The ASF licenses this file to You under the Apache License, Version 2.0
# (the "License"); you may not use this file except in compliance with
# the License. You may obtain a copy of the License at
#
# http://www.apache.org/licenses/LICENSE-2.0
#
# Unless required by applicable law or agreed to in writing, software
# distributed under the License is distributed on an "AS IS" BASIS,
# WITHOUT WARRANTIES OR CONDITIONS OF ANY KIND, either express or implied.
# See the License for the specific language governing permissions and
# limitations under the License.
#
sfdc.user.username=YOUR_USER_NAME
sfdc.user.password=YOUR_PASSWORD
sfdc.user.securityToken=YOUR_USER_SECURITY_TOKEN
sfdc.consumer.key=CONNECTED_APP_CONSUMER_KEY
sfdc.consumer.secret=CONNECTED_APP_SECRETand then use the following command line to reference the file:
cd extensions/salesforce-connector
mvn clean install -DsfdcProperties=../test.properties(in case you’re wondering the ../ is because the test is located in the services sub-directory)
74. Developers
74.1. Building
Apache Unomi 3.x provides a convenient build.sh script that simplifies the build process with
enhanced error handling, preflight validation, and deployment options. See the
Using the build.sh script section below for details. Alternatively, you can build using Maven
directly as described in this section.
74.1.1. Initial Setup
-
Install J2SE 17 SDK (or later), which can be downloaded from http://www.oracle.com/technetwork/java/javase/downloads/index.html
-
Make sure that your JAVA_HOME environment variable is set to the newly installed JDK location, and that your PATH includes %JAVA_HOME%\bin (windows) or $JAVA_HOME$/bin (unix).
-
Install Maven 3.9.8 (or later), which can be downloaded from http://maven.apache.org/download.html. Make sure that your PATH includes the MVN_HOME/bin directory.
74.1.2. Building
Unix/Linux/macOS
-
Get the code:
git clone https://github.com/apache/unomi.git -
Change to the top level directory of Apache Unomi source distribution.
-
Run
$> mvn clean installThis will compile Apache Unomi and run all of the tests in the Apache Unomi source distribution. Alternatively, you can run
$> mvn -P \!integration-tests clean installThis will compile Apache Unomi without running the tests and takes less time to build.
TipOn a non-English Windows env, the Asciidoctor Maven Plugin may fail to generate manuals due to an encoding conversion issue. To solve this issue, we recommend setting the file.encoding system property to UTF-8 like the following examples before issuing the commands shown above. > set MAVEN_OPTS=-Dfile.encoding=UTF-8 or > set MAVEN_OPTS=-Dfile.encoding=UTF-8 -Xmx2048m ... -
The distributions will be available under "package/target" directory.
74.1.3. Using the build.sh script
Apache Unomi 3.x provides a unified build.sh script that simplifies the build, deployment, and execution process.
This script replaces multiple legacy build scripts and provides enhanced error handling, colorized output, and
comprehensive environment validation.
The build.sh script offers the following features:
-
Preflight validation: Automatically checks for required tools (Java, Maven, GraphViz), system resources (memory, disk space), Maven settings, and port availability
-
Flexible build options: Support for skipping tests, running integration tests, using OpenSearch, setting Unomi distribution, debug modes, and more
-
Distribution management: The
--distributionparameter allows you to specify which Unomi distribution to use (e.g.,unomi-distribution-opensearch,unomi-distribution-elasticsearch). When used with--use-opensearch, the distribution is automatically set tounomi-distribution-opensearchif not explicitly specified. Conversely, if a distribution containing "opensearch" is specified, OpenSearch is automatically enabled for integration tests. -
Deployment helpers: Automatically copies KAR packages to Karaf deploy directory and purges caches
-
Enhanced output: Colorized, structured output with progress indicators (respects
NO_COLORenvironment variable)
To use the script:
-
Get the code:
git clone https://github.com/apache/unomi.git -
Change to the top level directory of Apache Unomi source distribution.
-
Make the script executable (if needed):
chmod +x build.sh -
Run the script with your desired options:
./build.sh --helpThis will display all available options and usage examples.
Common usage examples:
-
Build with integration tests using OpenSearch:
./build.sh --integration-tests --use-opensearch -
Build with a specific Unomi distribution (automatically enables OpenSearch for tests if distribution contains "opensearch"):
./build.sh --integration-tests --distribution unomi-distribution-opensearch -
Build with OpenSearch using explicit distribution (both parameters work together):
./build.sh --integration-tests --use-opensearch --distribution unomi-distribution-opensearch-graphql -
Build in debug mode:
./build.sh --debug --debug-port 5006 --debug-suspend -
Deploy to specific Karaf instance:
./build.sh --deploy --karaf-home ~/apache-karaf -
Build without Karaf and auto-start OpenSearch:
./build.sh --no-karaf --auto-start opensearch -
Run a single integration test:
./build.sh --integration-tests --single-test org.apache.unomi.itests.graphql.GraphQLEventIT -
Debug a single integration test:
./build.sh --integration-tests --single-test org.apache.unomi.itests.graphql.GraphQLEventIT --it-debug --it-debug-suspend -
Run without colored output:
NO_COLOR=1 ./build.shor
export NO_COLOR=1 ./build.shFor a complete list of options and examples, run
./build.sh --help.
74.1.4. Updating the website
Use the top-level generate-manual.sh script to generate and publish the documentation website.
./generate-manual.sh publish <svn_user> <svn_pass>
./generate-manual.sh simulate <svn_user> <svn_pass>Modes:
-
publish: generates all documentation and publishes to Apache SVN-
Generates exactly 2 versions (latest + stable)
-
Publishes HTML manual to
$SVN_WEBSITE_BASE/manualand API docs from master -
Uploads release packages (PDF/ZIP) to Apache Dist SVN for non-master branches
-
Removes old versions automatically on the website
-
-
simulate: dry-run; prints the commands without making changes
Requirements:
-
Java 17+, Maven 3.6+, Git, SVN client,
bc -
Access to the
masterand the stable branch configured ingenerate-manual-config.sh
Outputs and locations:
-
Staging directories under
target/generated-docs/(created by the build) -
Website content committed to
$SVN_WEBSITE_BASE/manual/<version> -
Release artifacts (PDF/ZIP + signatures/checksums) committed to Apache Dist SVN at
$SVN_DIST_BASE/<version>
Notes:
-
The script sources optional
generate-manual-config.shandshell-utils.shfor configuration/utilities. -
Javadoc aggregation is attempted; if it fails (toolchain mismatch), the rest still publishes.
74.1.5. JGitFlow
You can use the JGitFlow Maven plugin to work with feature, hotfix and other types of branches.
For example, to start a feature branch, simply use:
mvn jgitflow:feature-startThis will prompt you for the feature name, and then create a feature branch and update all the POMs to have a version that contains the feature name. This makes it easier to integrate with continuous integration systems to generate builds for the feature branch.
Once the feature is completed you can use:
mvn jgitflow:feature-finishTo merge the branch into master.
74.1.6. Installing a Search Engine
Apache Unomi 3.x does not embed a search engine. Install Elasticsearch 9.x or OpenSearch 3.x as a standalone service. See Migrate from 2.x to 3.0 for version requirements.
Option 1: Using ElasticSearch
-
Download Elasticsearch 9.4.3 from: https://www.elastic.co/downloads/past-releases/elasticsearch-9-4-3
-
Uncompress the downloaded package into a directory
-
In the config/elasticsearch.yml file, uncomment and modify the following line:
cluster.name: contextElasticSearch+ 4. Launch the server using:
bin/elasticsearch (Mac, Linux)
bin\elasticsearch.bat (Windows)Option 2: Using OpenSearch
The recommended way to run OpenSearch is using Docker Compose:
-
Create a
docker-compose.ymlfile with the following content:
version: '3.8'
services:
opensearch-node1:
image: opensearchproject/opensearch:3
environment:
- cluster.name=opensearch-cluster
- node.name=opensearch-node1
- discovery.type=single-node
- bootstrap.memory_lock=true
- "OPENSEARCH_JAVA_OPTS=-Xms512m -Xmx512m"
- OPENSEARCH_INITIAL_ADMIN_PASSWORD=${OPENSEARCH_INITIAL_ADMIN_PASSWORD:-admin}
ulimits:
memlock:
soft: -1
hard: -1
nofile:
soft: 65536
hard: 65536
volumes:
- opensearch-data1:/usr/share/opensearch/data
ports:
- 9200:9200
- 9600:9600
volumes:
opensearch-data1:+
2. Set up your Docker host environment:
* macOS & Windows: In Docker Preferences > Resources, set RAM to at least 4 GB
* Linux: Ensure vm.max_map_count is set to at least 262144
+ 3. Start OpenSearch using:
docker-compose upVerify Installation
Check that your search engine is up and running by accessing: http://localhost:9200
For OpenSearch with security enabled, you may need to use https and provide the default credentials: - Username: admin - Password: admin (or the value of OPENSEARCH_INITIAL_ADMIN_PASSWORD if set)
74.1.7. Starting Unomi
After your search engine is running, you can start Unomi using the appropriate command:
# For ElasticSearch
unomi:start elasticsearch
# For OpenSearch
unomi:start opensearch|
Note
|
Make sure to specify which start features configuration you’re using with the unomi:start command. The parameter determines which set of features and bundles are installed and started. Using just unomi:start without specifying the configuration is deprecated.
|
74.1.8. Deploying the generated binary package
The "package" sub-project generates a pre-configured Apache Karaf installation that is the simplest way to get started. Simply uncompress the package/target/unomi-VERSION.tar.gz (for Linux or Mac OS X) or package/target/unomi-VERSION.zip (for Windows) archive into the directory of your choice.
You can then start the server simply by using the command on UNIX/Linux/MacOS X :
./bin/karafor on Windows shell :
bin\karaf.batYou will then need to launch (only on the first Karaf start) the Apache Unomi packages using the following Apache Karaf shell command:
unomi:start74.1.9. Deploying into an existing Karaf server
This is only needed if you didn’t use the generated package. Also, this is the preferred way to install a development environment if you intend to re-deploy the context server KAR iteratively.
Additional requirements: * Apache Karaf 4.4.x (Unomi 3.1 ships with 4.4.11), Java 17+ — http://karaf.apache.org
Before deploying, make sure that you have Apache Karaf properly installed. Depending of your usage, you may also have to increase the memory size by adjusting the following environment values in the bin/setenv(.bat) files (at the end of the file):
MY_DIRNAME=`dirname $0`
MY_KARAF_HOME=`cd "$MY_DIRNAME/.."; pwd`
export KARAF_OPTS="$KARAF_OPTS -Xmx3G"Install the WAR support and CXF into Karaf by doing the following in the Karaf command line:
feature:repo-add cxf-jaxrs 3.6.x (match the CXF version pinned in the Unomi Karaf features)
feature:repo-add mvn:org.apache.unomi/unomi-kar/VERSION/xml/features
feature:install unomi-karCreate a new $MY_KARAF_HOME/etc/org.apache.cxf.osgi.cfg file and put the following property inside :
org.apache.cxf.servlet.context=/cxsIf all went smoothly, you should be able to access the context script here : http://localhost:8181/cxs/cluster . You should be able to login with karaf / karaf and see basic server information. If not something went wrong during the install.
74.1.10. Installing GraphViz for Manual Generation
The manual project uses PlantUML diagrams which require GraphViz to be installed. Here’s how to install it:
On macOS using Homebrew
brew install graphvizOn Linux (Debian/Ubuntu)
sudo apt-get install graphvizOn Linux (RHEL/CentOS/Fedora)
sudo dnf install graphvizOn Windows
-
Download the installer from https://graphviz.org/download/
-
Run the installer
-
Add the GraphViz bin directory to your PATH
Building the Manual
You can build the manual directly from the manual directory:
cd manual
mvn clean installThe build script will automatically detect and configure the GraphViz path. If you need to set it manually, you can:
-
Set it via environment variable:
export GRAPHVIZ_DOT=/path/to/dot mvn clean install
+ 2. Or specify it directly to Maven:
mvn clean install -Dgraphviz.dot.path=/path/to/dotThe generated documentation will be available in:
- HTML: target/generated-docs/html/latest/
- PDF: target/generated-docs/pdf/latest/
74.1.11. JDK Selection on Mac OS X
You might need to select the JDK to run the tests in the itests subproject. In order to do so you can list the installed JDKs with the following command :
/usr/libexec/java_home -Vwhich will output something like this :
Matching Java Virtual Machines (3):
11.0.5, x86_64: "OpenJDK 11.0.5" /Library/Java/JavaVirtualMachines/openjdk-11.jdk/Contents/Home
1.8.0_181, x86_64: "Java SE 8" /Library/Java/JavaVirtualMachines/jdk1.8.0_181.jdk/Contents/Home
1.7.0_80, x86_64: "Java SE 7" /Library/Java/JavaVirtualMachines/jdk1.7.0_80.jdk/Contents/Home
/Library/Java/JavaVirtualMachines/openjdk-11.jdk/Contents/HomeYou can then select the one you want using :
export JAVA_HOME=`/usr/libexec/java_home -v 11.0.5`and then check that it was correctly referenced using:
java -versionwhich should give you a result such as this:
openjdk version "11.0.5" 2019-10-15
OpenJDK Runtime Environment (build 11.0.5+10)
OpenJDK 64-Bit Server VM (build 11.0.5+10, mixed mode)74.1.12. Running the integration tests
The integration tests are not executed by default to make build time minimal, but it is recommended to run the integration tests at least once before using the server to make sure that everything is ok in the build. Another way to use these tests is to run them from a continuous integration server such as Jenkins, Apache Gump, Atlassian Bamboo or others.
Note : the integration tests require a JDK 11 or more recent !
To run the tests simply activate the following profile:
mvn -P integration-tests clean installSelecting the Search Engine for Integration Tests
By default, integration tests target ElasticSearch. To run them against OpenSearch, you can use either:
-
Using the build script (recommended):
./build.sh --integration-tests --use-opensearchOr specify the distribution directly (automatically enables OpenSearch if distribution contains "opensearch"):
./build.sh --integration-tests --distribution unomi-distribution-opensearch -
Using Maven directly: Set the activation property used by the OpenSearch profile (no additional -P flags are required):
mvn -P integration-tests -Duse.opensearch=true clean installYou can also set the Unomi distribution system property:
mvn -P integration-tests -Dunomi.distribution=unomi-distribution-opensearch clean install
74.1.13. Testing with an example page
A default test page is provided at the following URL:
http://localhost:8181/index.htmlThis test page will trigger the loading of the /cxs/context.js script, which will try to retrieving the user context or create a new one if it doesn’t exist yet. It also contains an experimental integration with Facebook Login, but it doesn’t yet save the context back to the context server.
74.2. Platform upgrades
This section is for Apache Unomi maintainers upgrading runtime platform components: Apache Karaf, JDK, CXF/Jackson/Jetty, Elasticsearch and OpenSearch clients, Log4j, integration tests, and application dependency hygiene.
Procedures are derived from git history (UNOMI-216, 491, 876, 899, 901, 828, 921, 875) and Unomi 3.1 platform upgrade work, cross-checked against Apache JIRA (see JIRA reference).
74.2.1. Overview and shared rules
Guide index
| Component | Guide | When to use |
|---|---|---|
Overview |
This section |
PR planning, shared OSGi rules, version pins, upgrade ordering |
Apache Karaf |
Major vs patch Karaf bumps, feature verify, framework cascade |
|
JDK |
Java version changes (with major Karaf migrations) |
|
CXF / Jackson / Jetty |
Libraries that cascade from Karaf but are Unomi-pinned |
|
Elasticsearch |
|
|
OpenSearch |
|
|
Log4j |
|
|
Integration tests |
IT/Docker failures, Pax Exam static init, log reading |
|
Dependency hygiene |
npm, kafka, commons — after platform pins are stable |
|
JIRA reference |
Epic UNOMI-875, blockers, ticket-to-guide map, acceptance criteria |
Platform upgrade workflow
Recommended order when bumping multiple platform components in one release cycle:
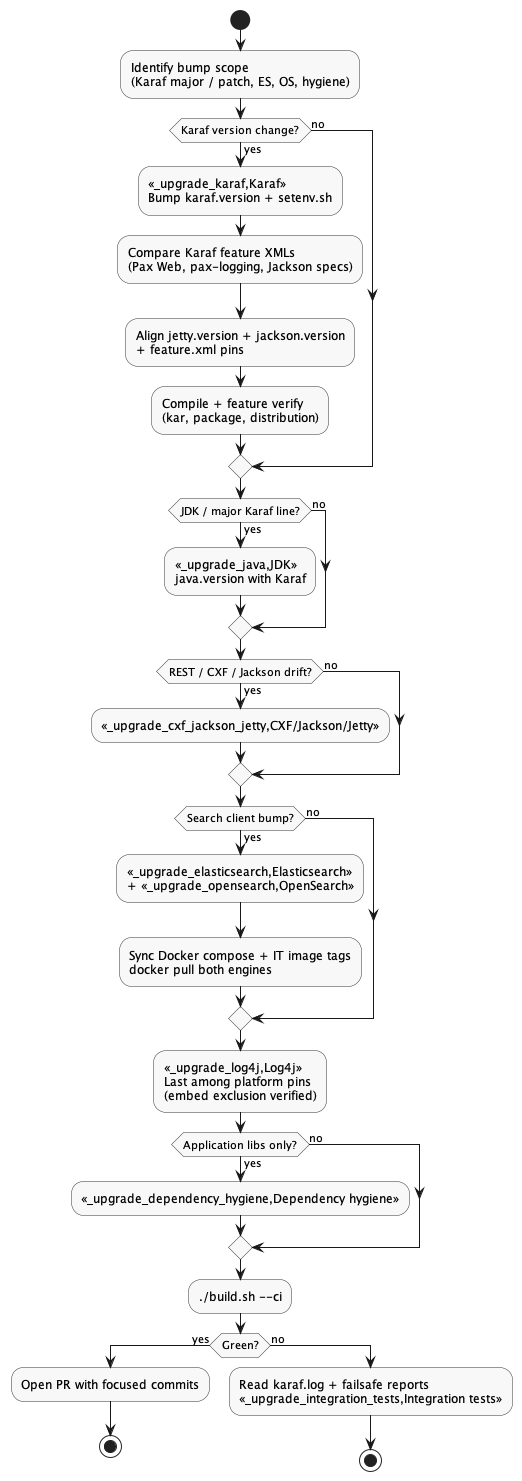
Platform component relationships
Karaf is the hub: most runtime libraries come from Karaf features, while Unomi Maven properties pin compile-time and feature-verify alignment.
Current version pins (Unomi 3.1 baseline)
| Property | Value | Primary files |
|---|---|---|
|
17 |
Root |
|
4.4.11 |
|
|
3.6.8 |
|
|
2.18.3 |
|
|
9.4.58.v20250814 |
|
|
9.4.3 |
|
|
9.4.3 |
|
|
3.7.0 |
|
|
3.7.0 |
|
|
2.24.0 |
|
|
Important
|
Maven client version, IT Docker image, and docker/ compose tags must match for each search engine. Verify with docker pull before opening a pull request.
|
|
Important
|
${log4j.version}, ${jackson.version}, and ${jetty.version} are Unomi Maven pins. Runtime versions for logging and HTTP come from Karaf/pax-logging/Pax Web — reconcile after every Karaf bump.
|
Shared OSGi rules (Elasticsearch and OpenSearch persistence)
-
Embed the client and HTTP/JSON stack:
Embed-Dependency *;scope=compile|runtime,Embed-Transitive true. -
Exclude log4j from embed:
!groupId=org.apache.logging.log4j;artifactId=*(see Log4j upgrade). -
Optional Import-Package for codecs (brotli, zstd, netty) after httpclient5 5.6 — do not add compile Maven dependencies for native codecs.
-
Provided for platform libraries:
slf4j-api, Jackson 2 (com.fasterxml.jackson.*), commons, Unomi API modules. -
Export Elasticsearch query DSL types from the core bundle only; the conditions bundle imports exports — do not re-embed the client.
-
Verify OSGi resolution, not just compilation:
mvn -pl persistence-elasticsearch/core,persistence-opensearch/core install -DskipTests
mvn -pl package -DskipTests package
./build.sh --ciRecommended pull request structure
Split platform work into focused commits when possible:
| Slice | Contents | Rationale |
|---|---|---|
Karaf + cascade libs |
|
Distribution-wide; isolate from search clients |
ES + OS + Docker |
Version pins, persistence POMs, compose files, Java API fixes |
Large OSGi and Docker surface |
Log4j last |
|
Log4j-only bump breaks ES bundle without embed fix |
Hygiene |
npm, kafka, commons (Track E1/E2) |
Lower OSGi risk once platform is green |
Git history reference
| Ticket / PR | Commit | Era | Key lesson |
|---|---|---|---|
UNOMI-216 |
|
Karaf 4.1.7 |
Property placeholders in etc require Karaf >= 4.1.6 |
UNOMI-491 |
|
Karaf 4.2.11 |
Do not duplicate Jackson in WAB; reactivate features after graph changes |
UNOMI-876 |
|
Karaf 4.4.8 + JDK 17 |
feature.xml v1.6; platform deps |
UNOMI-899 |
|
CXF 3.6.8 |
Karaf Jackson features; OpenAPI/Swagger path; pin CXF version in feature.xml |
UNOMI-901 |
|
ES 9 client |
Export |
UNOMI-828 |
|
OpenSearch module |
Lean embed + optional imports; dual-engine IT matrix |
UNOMI-921 |
|
Docker IT |
Replace elasticsearch-maven-plugin with docker-maven-plugin |
UNOMI-919 |
|
Startup feature |
Boot feature graph changes — update package verify lists |
PR2 #795 |
|
log4j 2.24 |
Embed without exclusion breaks Felix — reverted |
PR3 #796 |
|
Karaf 4.4.11 / ES 9.4 / OS 3.7 |
slf4j-api; Jackson/Jetty cascade; codec optional imports; IT lazy JSON mapper (no static init in probe) |
Pre-merge checklist
-
❏ Compared Karaf feature XMLs for Pax Web, pax-logging, Jackson specs (patch/minor Karaf bumps)
-
❏
${jetty.version}matches Pax Web Jetty bundles for${karaf.version} -
❏ Jackson features version-pinned in
feature.xml;${jackson.version}exists in Karaf specs -
❏
./build.sh --cigreen (or unit tests + both IT profiles) -
❏ After Karaf bump: no static initializers in
BaseITthat touch Jackson/Unomi types before features are up; IT JSON via lazy instancegetObjectMapper()(see Pax Exam probe & static init) -
❏
docker pullsucceeds for ES and OS IT images at pinned versions -
❏ ES/OS core manifests: no embedded log4j / brotli4j / zstd-jni JARs
-
❏
setenv.shKARAF_VERSIONmatchespom.xml -
❏ Docker README and compose tags match version properties
Quick diagnostics
rg 'karaf\.version|jackson\.version|jetty\.version|cxf\.version|elasticsearch\.version|opensearch\.version|log4j\.version' pom.xml setenv.sh kar/src/main/feature/feature.xml
mvn -pl package -DskipTests package 2>&1 | rg -i 'Unable to resolve|BUILD FAILURE'
docker pull docker.elastic.co/elasticsearch/elasticsearch:9.4.3
docker pull opensearchproject/opensearch:3.7.074.2.2. JIRA reference (platform upgrades)
This section maps Apache Unomi JIRA tickets to the upgrade runbooks in this chapter. Use it when you need why a constraint exists (Cellar removal, CXF 3.x ceiling, ES client decoupling) or when tracing work under the Unomi 3 epic.
JIRA: UNOMI project
Unomi 3 epic
UNOMI-875 (Unomi Version 3) groups most 3.x platform and product work. Karaf was initially deferred from the first 3.0 release because the cascade (Java 17, CXF, Cellar removal, WAB/Pax Web) would delay shipping again — see comments on UNOMI-898.
Platform-relevant subtasks include:
| Ticket | Summary | Upgrade guide |
|---|---|---|
Karaf 4.4.7+ (major migration) |
||
Remove Karaf Cellar / Hazelcast → PersistenceService clustering |
Karaf (prerequisite) |
|
OpenSearch persistence module |
||
HLRC → |
||
Docker-based ES in ITs (replace elasticsearch-maven-plugin) |
||
Enhanced |
||
V3 data migration scripts (audit fields, multi-tenancy) |
Manual migration chapter — not Maven version pins |
|
General dependency upgrade strategy |
|
Important
|
UNOMI-884 covers index/data migration for existing deployments. Platform upgrade guides cover runtime and client versions (Karaf, ES/OS clients, Log4j). Do not conflate the two. |
Ticket map by component
| Ticket | Status (2026) | Topic | Maintainer takeaway |
|---|---|---|---|
Closed |
Karaf 4.3 / CXF 3.4.5 / Jackson 2.12 |
Blocked by CXF-8593 and Karaf Cellar incompatibility with Karaf 4.3 |
|
Closed |
Dependency hygiene |
30-minute timebox per library; maintenance-branch strategy; Karaf blocked by KARAF-7526 until Cellar removed |
|
Closed |
CXF + jakarta.servlet |
Superseded by Karaf 4.4 migration; GraphQL still on |
|
Closed |
ES HLRC → 7.17 |
Duplicate of UNOMI-901; shipped as ES 9 + |
|
Closed |
Karaf 4.2.15 → 4.4.7 |
Duplicate of UNOMI-876 |
|
Closed |
ES 5.x externalization |
Start of external ES server; no embedded ES in modern Unomi |
|
Closed |
ES 7 / REST HLRC |
Predecessor path to UNOMI-901 |
|
Open |
IT matrix for multiple ES versions |
Partially addressed by Docker IT properties; see Integration tests |
|
In Progress |
GraphQL OSGi / |
Future hygiene risk when bumping graphql-java — not a Karaf blocker today |
|
Sub-task of 875 |
Remove OGNL scripting |
Called out in UNOMI-876 Karaf plan (Camel 4.x line) |
Karaf upgrade prerequisites (timeline)
Historical JIRA blockers explain why Karaf 4.3+ waited until Unomi 3 clustering changed:
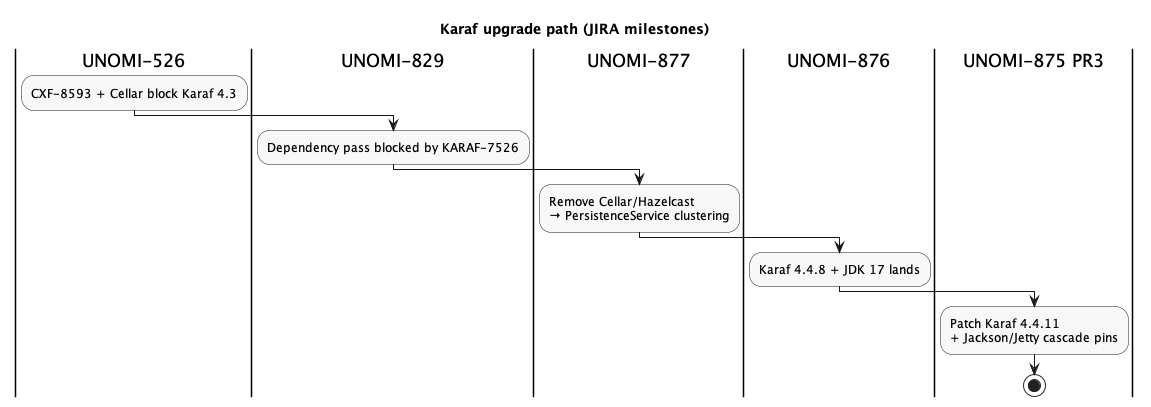
Before Unomi 3 could move to Karaf 4.3+, two recurring blockers appeared in JIRA:
-
Karaf Cellar — KARAF-7526 / Cellar 4.2.1 not compatible with Karaf 4.3 (UNOMI-526, UNOMI-829). Resolved by UNOMI-877 (PersistenceService-based clustering).
-
CXF OSGi — CXF-8593 blocked Jackson/CXF/Karaf alignment on the 4.3 line. Unomi 3 landed on Karaf 4.4 with CXF 3.6.x pinned in
feature.xml(UNOMI-899).
UNOMI-876 documents a critical decision repeated in JIRA comments: CXF 4.x removes OSGi support and is unsuitable for Karaf. Target CXF 3.6.5+ (Unomi currently pins 3.6.8), not CXF 4.
UNOMI-876 planned vs shipped
Serge Huber’s Karaf upgrade report on UNOMI-876 compares Karaf 4.2.15 vs 4.4.7 binary contents. Use it as a checklist, then verify against the current ${karaf.version} feature XMLs (see Karaf).
| Component | JIRA target (4.4.7 era) | Unomi 3.1 baseline | Notes |
|---|---|---|---|
Java |
17 |
17 |
Shipped — commit |
Karaf |
4.4.7 → later 4.4.11 |
4.4.11 |
Patch bumps need cascade pins (PR3) |
CXF |
3.6.5 (not 4.x) |
3.6.8 |
Repo override in |
Pax Web / Jetty |
8.0.30 / Jetty 9.4.x |
Pax Web 8.0.35 / Jetty 9.4.58 |
Align |
Camel |
4.9.0 (bundled with Karaf 4.4.7) |
2.23.1 in |
Router extension still ships Camel 2.x OSGi routes; Karaf may expose Camel 4 features — do not assume JIRA matrix matches router code without checking |
Jackson |
~2.15.x in report |
2.18.3 pinned |
Pin |
Servlet API |
4.0.1 ( |
javax.servlet in WAB/Pax Web 8 |
UNOMI-838 jakarta migration deferred |
Elasticsearch client strategy (UNOMI-901)
UNOMI-901 acceptance criteria: remove HLRC, adopt co.elastic.clients:elasticsearch-java, refactor persistence code, green ITs.
JIRA comment (decoupling option): if JDK 17 + Karaf upgrade is too heavy for a 2.x maintenance branch, Elastic’s ES 8 Java API client (Java 8+) can talk to ES 9 clusters as an interim step — but Karaf upgrades belong on Unomi 3, not 2.x.
For Unomi 3 platform work, treat ES client, IT Docker tag, and compose files as one atomic bump (Elasticsearch).
Dependency upgrade strategy (UNOMI-829)
When doing non-platform library bumps (Dependency hygiene), follow the process documented on UNOMI-829:
-
Prefer removing unused libraries over upgrading.
-
Timebox each failed upgrade to 30 minutes; if harder, file a follow-up and move on.
-
Prefer latest release; if breaking, use latest on same major maintenance branch and open a ticket for the next major.
-
Do not mix complex upgrades (Karaf, CXF, GraphQL OSGi) into a bulk hygiene pass.
Integration test tickets
| Ticket | Intent | Runbook |
|---|---|---|
Replace elasticsearch-maven-plugin; remove |
||
Stabilize ITs; align GitHub Actions with |
||
IT developer tooling (archival, diff, live Karaf) |
|
|
Cluster health / replica checks in IT harness |
Migration and dual-engine IT matrix |
Searching JIRA for upgrade context
Useful JQL examples (Apache JIRA → Advanced search):
project = UNOMI AND summary ~ "Karaf" ORDER BY updated DESC
project = UNOMI AND summary ~ "upgrade" AND status != Closed
project = UNOMI AND parent = UNOMI-875
project = UNOMI AND text ~ "elasticsearch-maven-plugin"When a ticket and git history disagree, prefer git commits for exact file changes and JIRA for intent, blockers, and acceptance criteria.
74.2.3. Upgrading Apache Karaf
Karaf upgrades touch the whole distribution, not a single module. Scope depends on whether you are doing a major, minor, or patch Karaf bump.
|
Tip
|
JIRA context for prerequisites (Cellar removal, CXF 3.x ceiling, UNOMI-876 version matrix): JIRA reference. |
| Bump type | Example | Typical Unomi effort |
|---|---|---|
Major |
4.2.15 → 4.4.8 (UNOMI-876) |
JDK, feature namespace, WAB/Pax Web, ~187 POMs, CXF/Jackson/Jetty, full IT matrix |
Minor / patch |
4.4.8 → 4.4.11 (UNOMI-875 PR3) |
|
Config-only |
UNOMI-919 startFeatures feature |
Feature graph / cfg — not a Karaf version bump |
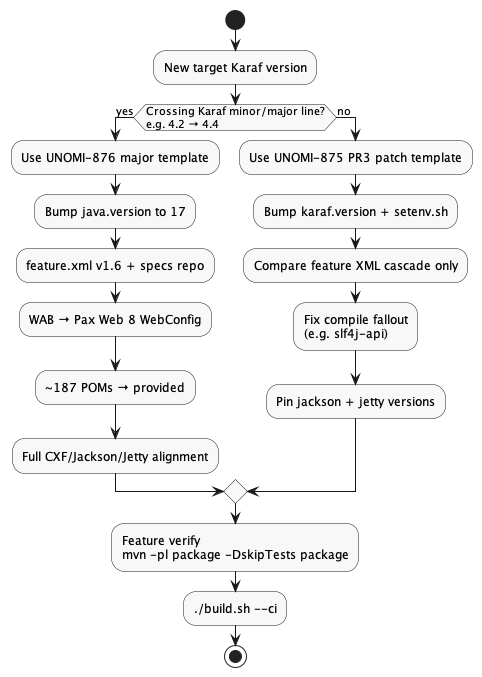
Framework cascade from Karaf feature XMLs
When ${karaf.version} changes, inspect upstream feature repositories before merging — patch releases move Pax Web, pax-logging, and Jackson specs independently of Unomi code.
Framework cascade (every Karaf bump)
Even patch releases can move platform libraries inside Karaf feature XMLs:
| Component | 4.4.8 example | 4.4.11 example | Unomi action |
|---|---|---|---|
Pax Web |
8.0.33 |
8.0.35 |
Align |
pax-logging |
2.3.0 |
2.3.3 |
Runtime Log4j version changes — see Log4j |
Jackson specs |
single 2.18.2 feature |
2.18.3 and 2.21.2 features |
Pin |
CXF |
RELEASE pointer |
RELEASE pointer |
Keep |
Compare feature XMLs before merging:
KVER=4.4.11
for repo in framework standard specs enterprise; do
echo "=== $repo ==="
curl -sL "https://repo1.maven.org/maven2/org/apache/karaf/features/${repo}/${KVER}/${repo}-${KVER}-features.xml" \
| rg -i 'pax-web|pax-logging|jackson-core|jetty-server' | head -8
doneVersion pins to update
Required (every Karaf bump):
| File | Property / variable |
|---|---|
Root |
|
|
|
Everything else should reference ${karaf.version}: bom/pom.xml, kar/pom.xml, package/pom.xml, distribution/pom.xml, itests/pom.xml, extension and GraphQL Karaf feature modules.
Search for hardcoded old versions:
rg '4\.4\.[0-9]+' --glob '!**/target/**' pom.xml setenv.sh package kar itests extensions graphqlCo-bump after comparing Karaf feature XMLs (patch/minor):
-
${jetty.version}— match Pax Web Jetty bundles -
${jackson.version}— must exist as a Karafspecsfeature version; pin infeature.xml -
${cxf.version}— only if REST/Karaf release notes require it (major jumps usually do)
Co-bump on major Karaf migration only:
-
java.version— see JDK upgrade -
Feature namespace (
v1.6.0), specs repository, WAB servlet wiring — UNOMI-876
Prerequisites (JIRA)
Karaf bumps were blocked for years until clustering moved off Karaf Cellar:
-
UNOMI-877 — replace Cellar/Hazelcast with PersistenceService-backed sync (required before 4.3+).
-
KARAF-7526 — Cellar incompatibility cited in UNOMI-526 and UNOMI-829.
-
CXF-8593 — blocked Karaf 4.3 / Jackson 2.12 alignment until the 4.4 + CXF 3.6 path.
Do not target CXF 4.x for Unomi on Karaf — UNOMI-876 notes OSGi support was removed in CXF 4.
Major Karaf migration (UNOMI-876 template)
Use this checklist when crossing Karaf minor/major lines (e.g. 4.2 → 4.4):
-
Read Karaf release notes and Java requirement.
-
Bump
${karaf.version}+java.version+setenv.sh. -
Update
kar/src/main/feature/feature.xml:-
xmlns features
v1.6.0 -
<repository>mvn:org.apache.karaf.features/specs/${karaf.version}/xml/features</repository> -
CXF repo + versioned
cxf-jaxrs -
Version-pinned
jackson/jackson-jaxrs
-
-
Migrate WAB servlets to Pax Web 8 programmatic registration (
WebConfig.java). -
Mass POM update: platform deps →
scope=provided(~187 modules in UNOMI-876). -
Update
package/pom.xmlboot/verify feature lists if graph changed (UNOMI-919:unomi-startupfeature). -
IT harness: Pax Exam
instanceStartupTimeout, Jacoco,javasein verify config. -
Full CXF/Jackson/Jetty alignment.
-
./build.sh --ci
Minor / patch Karaf migration (UNOMI-875 PR3 template)
Use when staying on the same Karaf line (e.g. 4.4.8 → 4.4.11):
-
Bump
${karaf.version}andsetenv.shonly as the first commit slice. -
Run framework cascade comparison (Pax Web, pax-logging, Jackson specs).
-
Update
${jetty.version}and${jackson.version}+ pin Jackson features infeature.xml. -
Compile all modules — fix missing
provideddeps (PR3:slf4j-apiinlifecycle-watcher):
mvn -DskipTests compile 2>&1 | rg 'cannot find symbol|package .* does not exist|slf4j'-
Feature verify (mandatory):
mvn -pl extensions/groovy-actions/karaf-kar -am -DskipTests package
mvn -pl package -DskipTests package
mvn -pl kar,distribution -DskipTests package-
Check Integration tests for probe static-init / Docker image issues.
-
./build.sh --ci
Do not skip cascade library alignment — patch Karaf releases have changed Pax Web, pax-logging, and Jackson specs without changing Unomi application code.
Lessons from past upgrades
UNOMI-216 (b873b35a2) — Karaf 4.1.7: ${env:…} placeholders in custom.system.properties need Karaf >= 4.1.6. Smoke-test property interpolation after any bump.
UNOMI-491 (dda24b66e) — Karaf 4.2.11: Moved Jackson YAML out of WAB; reactivated features in package verify. Do not embed platform Jackson in web modules.
UNOMI-876 (da9c57fd2) — Karaf 4.4.8 + JDK 17: Feature namespace v1.6; removed manual Jackson/Guava/SnakeYAML bundles; WAB → WebConfig.java; ~187 POMs to provided; CXF 3.3 → 3.6.5.
UNOMI-899 (8cff171ef) — CXF 3.6.8 + Karaf Jackson features: Independent CXF bump; switched to Karaf jackson features (must be version-pinned on 4.4.11+).
UNOMI-919 (a0a08e4ad) — startFeatures: Refactored startup to a Karaf feature; adjust package/pom.xml verify lists when changing boot order.
PR3 / UNOMI-875 (545f6b8af) — 4.4.8 → 4.4.11: lifecycle-watcher lost transitive slf4j-api; Pax Web 8.0.35 → Jetty 9.4.58; Jackson specs duplication → pin ${jackson.version}; Pax Exam IT fix — remove static ObjectMapper init in BaseIT, use lazy instance getObjectMapper() → CustomObjectMapper.getCustomInstance() (types from unomi-base, not Karaf boot) — see Pax Exam probe & static init.
Files to inspect
| Area | Paths |
|---|---|
Feature graphs |
|
Package verify |
|
Runtime config |
|
Logging |
|
IT container |
|
Anti-patterns
| Don’t | Do instead | History |
|---|---|---|
Embed platform libs in every bundle |
|
UNOMI-876, PR2 log4j |
Use unversioned |
|
PR3 cascade |
Assume a Karaf patch is "just pom.xml" |
Cascade pins + compile + feature verify |
PR3 lifecycle-watcher, Jetty, Jackson |
Skip ITs after Karaf bump |
Run |
UNOMI-876 |
74.2.4. Upgrading the JDK
A JDK upgrade is almost always bundled with a major Karaf migration. Unomi 3.x baseline is Java 17 (UNOMI-876, da9c57fd2).
Version pin
| Property | Value | Files |
|---|---|---|
|
17 |
Root |
Also update CI workflows, build.sh preflight checks, and contributor docs when raising the minimum JDK.
JDK upgrade coupled to Karaf (diagram)
Java version changes are not done in isolation on Unomi 3.x — they ride the major Karaf migration path (UNOMI-876).
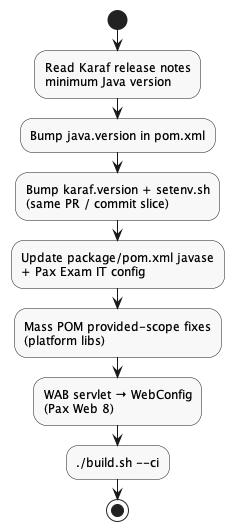
UNOMI-876 checklist (Java 11 → 17)
| Area | Action |
|---|---|
Maven compiler |
|
Karaf distribution |
Karaf 4.4.x requires Java 17 — bump |
Module POMs |
~187 modules: platform libraries → |
WAB / Pax Web |
Blueprint servlet registration → programmatic |
IT harness |
Pax Exam |
Removed APIs |
OGNL scripting removed from defaults; javax → jakarta where applicable |
Procedure
-
Confirm target Karaf version’s minimum Java from Karaf download page.
-
Bump
java.versionand${karaf.version}together (see Karaf upgrade). -
Full compile:
mvn -DskipTests compile -
Feature verify +
./build.sh --ci -
Update GitHub Actions Java version matrix if present.
Anti-patterns
| Don’t | Do instead |
|---|---|
Bump JDK without Karaf compatibility check |
Read Karaf release notes; 4.4.x needs 17 |
Embed JDK-specific libraries in bundles |
Use Karaf specs / provided scope |
Skip ITs after JDK change |
Run full |
74.2.5. CXF, Jackson, and Jetty (Karaf cascade libraries)
Karaf upgrades change the runtime versions of several frameworks even when you only bump ${karaf.version}. Unomi pins some of these in root pom.xml and kar/src/main/feature/feature.xml so compile-time, feature verify, and OSGi resolution stay aligned.
This guide covers libraries that cascade from Karaf but are owned by Unomi for REST, WAB, GraphQL, and ITs.
Version pins (Unomi 3.1 baseline)
| Property | Value | Primary consumers |
|---|---|---|
|
3.6.8 |
|
|
2.18.3 |
|
|
9.4.58.v20250814 |
|
|
Important
|
${jetty.version} must match the Jetty bundles shipped by the Pax Web version bundled in your ${karaf.version}. Inspect pax-web-features-*-features.xml on Maven Central — do not guess from release notes alone.
|
How Karaf supplies vs how Unomi overrides
| Library | Karaf source | Unomi override |
|---|---|---|
CXF |
|
Explicit repo + versioned feature in |
Jackson |
|
Pin |
Jetty |
Pax Web bundles (runtime) |
|
Log4j (runtime) |
pax-logging-log4j2 bundle |
See Log4j upgrade — |
CXF upgrade (UNOMI-899, 8cff171ef)
When: REST/OpenAPI breakage, Karaf major jump (4.2 → 4.4), or explicit CXF security release.
Steps:
-
Bump
<cxf.version>in rootpom.xml(managed viabom/pom.xml). -
Confirm
kar/src/main/feature/feature.xmlstill has:
<repository>mvn:org.apache.cxf.karaf/apache-cxf/${cxf.version}/xml/features</repository>
...
<feature version="${cxf.version}" dependency="true">cxf-jaxrs</feature>-
Rebuild REST modules and run feature verify (
mvn -pl package -DskipTests package). -
Regenerate or smoke-test OpenAPI/Swagger UI (
unomi-rest-uifeature) if JAX-RS annotations changed.
History: UNOMI-876 moved CXF 3.3.11 → 3.6.5 with Karaf 4.4.8. UNOMI-899 bumped 3.6.5 → 3.6.8 independently and switched Jackson delivery to Karaf features.
Jackson upgrade
Risk: Karaf 4.4.11+ ships multiple jackson feature versions (e.g. 2.18.3 and 2.21.2). An unversioned <feature>jackson</feature> may resolve to the newest, while Unomi still installs datatype/jaxb modules at ${jackson.version} — causing mixed Jackson on the OSGi classpath.
Required pattern in kar/src/main/feature/feature.xml:
<feature version="${jackson.version}">jackson</feature>
<feature version="${jackson.version}">jackson-jaxrs</feature>
<bundle>mvn:com.fasterxml.jackson.datatype/jackson-datatype-jsr310/${jackson.version}</bundle>
<bundle>mvn:com.fasterxml.jackson.module/jackson-module-jaxb-annotations/${jackson.version}</bundle>Procedure:
-
Check which
jacksonfeature versions exist for your${karaf.version}:
curl -sL "https://repo1.maven.org/maven2/org/apache/karaf/features/specs/${KARAF_VERSION}/specs-${KARAF_VERSION}-features.xml" \
| rg 'feature name="jackson"'-
Set
${jackson.version}to a version that exists in Karaf specs (not necessarily the highest). -
Bump
bom/pom.xmlmanaged Jackson artifacts if needed. -
Do not embed Jackson in WABs or persistence bundles —
scope=provided(UNOMI-491, UNOMI-876).
Major Karaf migration note: UNOMI-876 initially listed every Jackson JAR in feature.xml; UNOMI-899 moved to Karaf features with version pins. Do not revert to unversioned features.
Jetty alignment after Karaf bump
Pax Web version is tied to ${karaf.version}. Example: Karaf 4.4.11 → Pax Web 8.0.35 → Jetty 9.4.58.v20250814.
-
Inspect Pax Web features for your Karaf version:
curl -sL "https://repo1.maven.org/maven2/org/apache/karaf/features/standard/${KARAF_VERSION}/standard-${KARAF_VERSION}-features.xml" \
| rg 'pax-web-features'
# then open that pax-web version's features XML and rg 'jetty-server'-
Update
${jetty.version}in rootpom.xmlto match Pax Web’s Jetty bundle version. -
Modules using
${jetty.version}:graphql/karaf-feature/pom.xml,itests/pom.xml.
Runtime Jetty comes from Pax Web OSGi bundles — no Jetty bundles in Unomi feature.xml.
Verification
rg 'cxf\.version|jackson\.version|jetty\.version' pom.xml kar/src/main/feature/feature.xml
mvn -pl kar,package -DskipTests package
./build.sh --ci74.2.6. Upgrading the Elasticsearch client
Unomi does not embed the Elasticsearch server. It embeds the Java API client and REST transport inside the unomi-persistence-elasticsearch-core OSGi bundle, then exports query DSL types for the conditions bundle.
For data migration between Elasticsearch major versions, see also ES7 to ES9 migration (distinct from UNOMI-884 V3 data migration scripts).
Client migration is tracked in UNOMI-901 (supersedes UNOMI-851). JIRA notes an interim ES 8 client on Java 8 for 2.x branches only — Unomi 3 pairs ES 9 with Karaf 4.4 + JDK 17; see JIRA reference.
Version pins
| Property | Files |
|---|---|
|
Root |
|
Root |
Update in the same pull request: docker/README.md, docker/src/main/docker/docker-compose-*.yml, itests/docker-compose-snapshot-analysis.yml.
Image tag example: docker.elastic.co/elasticsearch/elasticsearch:9.4.3.
Bundle architecture
| Module | Role |
|---|---|
|
Embeds ES client; exports |
|
Query builders; imports exported ES types; does not re-embed client |
OpenSearch follows the same pattern in persistence-opensearch/core — see OpenSearch upgrade.
Embed rules (core/pom.xml):
<Embed-Dependency>
!groupId=org.apache.logging.log4j;artifactId=*,
*;scope=compile|runtime
</Embed-Dependency>
<Embed-Transitive>true</Embed-Transitive>Embed: elasticsearch-java, elasticsearch-rest5-client (9.4+), httpclient5, parsson, OpenTelemetry, etc.
Do not embed: log4j JARs (see Log4j); optional codecs (brotli, zstd, netty) — use optional Import-Package only.
Provided: slf4j-api, Jackson 2, commons, Unomi API modules.
Export from core: co.elastic.clients.elasticsearch, _types, _types.query_dsl, util.
Git history (OSGi embedding)
| Commit | Issue | Fix |
|---|---|---|
|
ES 5 monolithic embed |
REST client only; optional codec imports |
|
ES 7 resolution |
Rewrote Import-Package iteratively |
|
Test dep pollution |
Exclude lucene-core from lucene-test-framework |
|
HLRC → Java API |
Export co.elastic.clients.*; remove ChildFirstClassLoader |
PR2 #795 |
log4j 2.24 embed |
OSGi failure — exclude log4j from embed in PR3 |
PR3 #796 |
ES 9.4.3 / httpclient5 5.6 |
Routing API |
httpclient5 5.6+ optional codec imports
ES 9.4+ uses httpclient5 5.6.x. Add to Import-Package in core (before *):
com.aayushatharva.brotli4j.decoder;resolution:=optional,
com.aayushatharva.brotli4j.encoder;resolution:=optional,
com.github.luben.zstd;resolution:=optional,
io.netty.buffer;resolution:=optional,
io.netty.channel;resolution:=optional,
io.netty.util;resolution:=optional,
javax.xml.datatype;resolution:=optional,
javax.xml.namespace;resolution:=optional,
javax.xml.transform.dom;resolution:=optional,
org.newsclub.net.unix;resolution:=optional,Do not add compile Maven dependencies for brotli4j / zstd-jni.
Java API checklist
-
mvn -pl persistence-elasticsearch/core,persistence-elasticsearch/conditions -am -DskipTests compile -
Fix API breaks in
ElasticSearchPersistenceServiceImpl.java(e.g.UpdateRequest.routing()→List<String>in 9.4). -
ES 9.4 embeds Jackson 3 (
tools.jackson.core) inside the bundle; Unomi app code uses Jackson 2 — do not add Jackson 3 as a root dependency. -
Audit manifest — expect no embedded log4j or native codec JARs.
Verification
mvn -pl persistence-elasticsearch/core install -DskipTests
mvn -pl extensions/groovy-actions/karaf-kar -DskipTests package 2>&1 | rg -i 'Unable to resolve|persistence-elasticsearch'
./build.sh --ci74.2.7. Upgrading the OpenSearch client
OpenSearch persistence mirrors Elasticsearch: a fat OSGi bundle embeds the Java client and HTTP stack (UNOMI-828, 078ebceda).
For switching backends at runtime, see Elasticsearch to OpenSearch migration.
Version pins
| Property | Files |
|---|---|
|
Root |
|
Root |
|
Important
|
${opensearch.version} must match a published Docker Hub tag. Verify before bumping:
|
docker pull opensearchproject/opensearch:${opensearch.version}Latest OpenSearch 3.x line on Docker Hub (as of Unomi 3.1 work): 3.7.0. Do not assume every Maven Central opensearch-java version has a matching Docker image.
Dual-engine verification (diagram)
Unomi supports Elasticsearch and OpenSearch persistence modules; platform bumps must keep both IT profiles green.
Bundle architecture
Module: persistence-opensearch/core (+ conditions).
Same embed rules as Elasticsearch core — including log4j embed exclusion and optional codec imports after httpclient5 5.6.
Export-Package: org.opensearch., org.opensearch.index.query., org.apache.unomi.persistence.opensearch.
Step-by-step
-
Bump
opensearch.versionandopensearch.rest.client.versionin rootpom.xml. -
Update Docker compose files and
docker/README.md. -
mvn -pl persistence-opensearch/core,persistence-opensearch/conditions -am -DskipTests compile -
Fix Java API breaks in
OpenSearchPersistenceServiceImpl.javaif any. -
Sync optional Import-Package with ES core when httpclient version jumps.
-
Confirm log4j embed exclusion on OS core.
-
Feature verify +
./build.sh --ci; run OpenSearch IT profile.
ES vs OS coupling
| Concern | Keep in sync? |
|---|---|
httpclient5 optional imports |
Yes |
log4j embed exclusion |
Yes |
Docker image tags |
No — independent server versions |
Java API code changes |
No — separate impl classes |
You may upgrade ES and OS in one pull request but use separate commits for review clarity.
74.2.8. Upgrading Log4j
Unomi uses pax-logging-log4j2 as the platform logging implementation. Custom appenders live in extensions/log4j-extension as an OSGi fragment on pax-logging. Persistence bundles must never embed log4j JARs and must not call Log4j APIs at runtime.
Version pin vs runtime version
| Pin | Purpose | Notes |
|---|---|---|
|
Compile-time for |
Managed in |
pax-logging-log4j2 bundle |
Runtime Log4j inside Karaf |
Version follows |
Example: Karaf 4.4.8 ships pax-logging 2.3.0 (Log4j 2.24.3 inside the bundle). Karaf 4.4.11 ships pax-logging 2.3.3 (Log4j 2.25.4 inside). Unomi ${log4j.version} 2.24.0 is still valid for fragment compilation if APIs are compatible — but always verify after a Karaf bump.
Architecture
Persistence ES/OS cores must not call Log4j APIs at runtime. REST client verbosity is configured in etc/org.ops4j.pax.logging.cfg (see REST client log levels).
REST client log levels
Elasticsearch and OpenSearch Java clients log through Apache Commons Logging → SLF4J → pax-logging. Do not set levels in persistence start() methods or persistence CM configs.
Deploy-time: etc/custom.system.properties (or env vars):
-
org.apache.unomi.elasticsearch.logLevelRestClient/UNOMI_ELASTICSEARCH_LOG_LEVEL_REST_CLIENT(defaultERROR) -
org.apache.unomi.opensearch.logLevelRestClient/UNOMI_OPENSEARCH_LOG_LEVEL_REST_CLIENT(defaultERROR) -
org.apache.unomi.logs.restClientTracer.level/UNOMI_LOG_LEVEL_REST_CLIENT_TRACER— loggertracer(curl-style trace; defaultERROR)
Runtime: Karaf shell log:set org.elasticsearch.client.RestClient DEBUG (or edit org.ops4j.pax.logging.cfg and reload logging).
etc/org.ops4j.pax.logging.cfg maps those system properties to log4j2.logger.* entries for org.elasticsearch.client.RestClient, org.opensearch.client.RestClient, and tracer.
PR3 embed exclusion removed embedded log4j-1.2-api; legacy code that called org.apache.log4j.Logger in ElasticSearchPersistenceServiceImpl.start() then failed with ClassNotFoundException — fixed by moving control to pax-logging (not by re-embedding log4j).
Optional Maven compile deps on log4j in the ES client POM are excluded from embed and unused at runtime. Felix must not see duplicate Bundle-Activator entries from embedded log4j-core.
Git history
-
PR2 #795 (
ef10dfe15): bumped to 2.24.0 — reverted after ES OSGi bundle failed feature verify (embedded log4j conflict). -
PR3 #796 (
a5e6f35d2): re-applied 2.24.0 with persistence embed exclusion. -
UNOMI-936 (
e9a330052): log format aligned with Karaf/pax-logging patterns — config inorg.ops4j.pax.logging.cfg.
Embed exclusion (both persistence cores):
<Embed-Dependency>
!groupId=org.apache.logging.log4j;artifactId=*,
*;scope=compile|runtime
</Embed-Dependency>Procedure
-
Never bump log4j alone without persistence OSGi verification.
-
After a Karaf bump, inspect pax-logging version change — runtime Log4j may jump even if
${log4j.version}is unchanged. -
Update
${log4j.version}in rootpom.xml. -
Confirm ES and OS core embed exclusion (see Elasticsearch and OpenSearch).
-
Inspect manifests — no
log4j-*.jarinEmbedded-Artifacts. -
mvn -pl package -DskipTests packagethen./build.sh --ci.
log4j-extension fragment
extensions/log4j-extension/pom.xml: Fragment-Host = org.ops4j.pax.logging.pax-logging-log4j2; log4j-core scope = provided.
74.2.9. Integration tests and Docker
Platform upgrades are validated by Pax Exam integration tests plus Docker-backed search engines. Failures often appear in Maven Failsafe output, not in karaf.log.
See also: itests/README.md and build.sh.
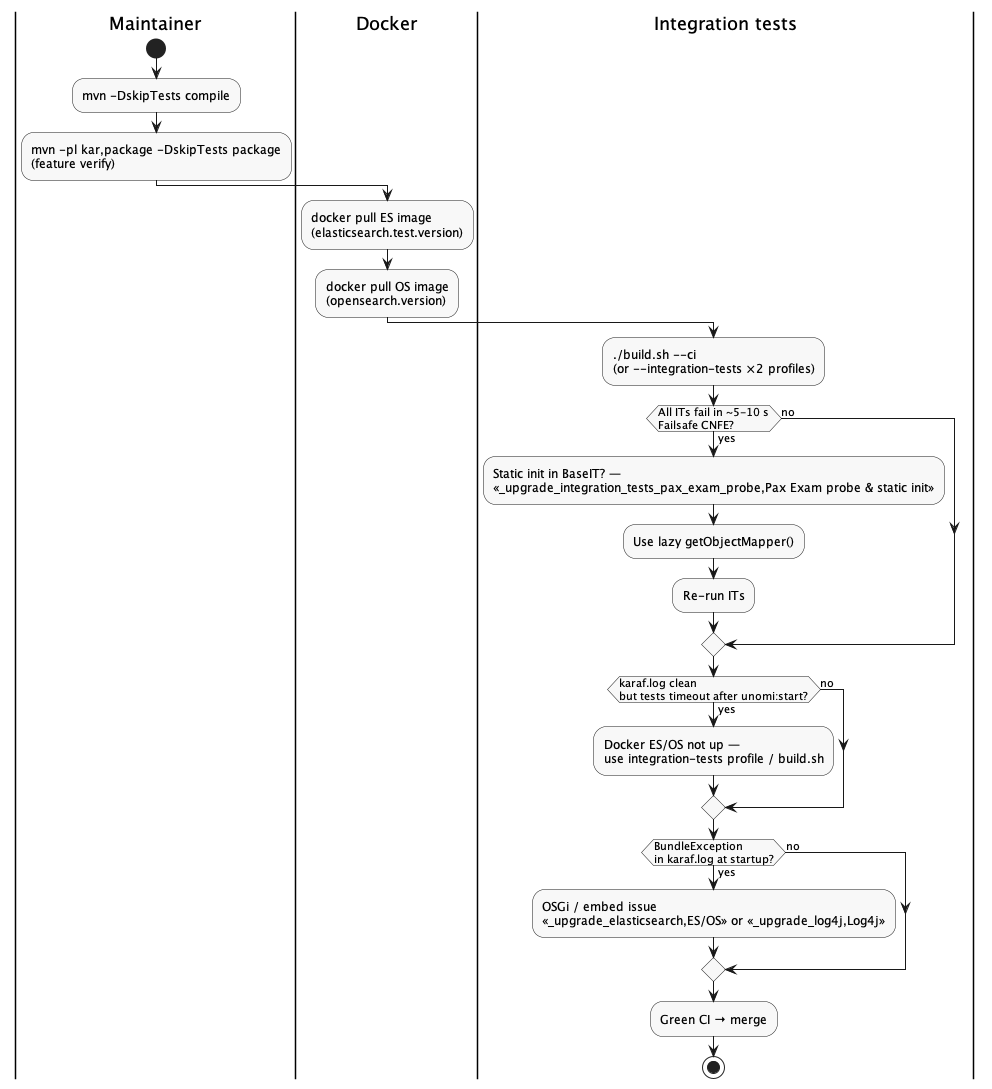
Architecture
| Layer | Technology | Location |
|---|---|---|
Test runner |
Pax Exam + JUnit 4 |
|
Karaf under test |
Unomi distribution tar.gz |
|
Search engine |
docker-maven-plugin |
ES port 9400 / OS port 9401 |
JSON in IT helpers |
|
|
Exam logs |
Karaf instance |
|
Reports |
Failsafe |
|
Docker IT (UNOMI-921)
UNOMI-921 motivation: stop downloading ES binaries in Maven, remove the default_template workaround required with elasticsearch-maven-plugin on ES 8/9, and match the OpenSearch Docker pattern.
Shipped: elasticsearch-maven-plugin replaced with io.fabric8:docker-maven-plugin (5a5aedba7, #767). Related stabilization: UNOMI-937, tooling UNOMI-944.
| Engine | Image | Property |
|---|---|---|
Elasticsearch |
|
|
OpenSearch |
|
|
Always run docker pull for both images before bumping version properties.
Pax Exam probe and static initialization (Karaf 4.4.11 / Pax Exam 4.14)
After a Karaf bump, integration tests may fail before Unomi starts. karaf.log can look healthy or incomplete while Failsafe reports hundreds of errors in a few seconds — that pattern almost always means the PAXEXAM-PROBE bundle failed to load test classes, not a Karaf startup crash.
How the probe works
-
Pax Exam 4.14 builds the probe with
rawBuilder(): compiled test classes undertarget/test-classesplusDynamicImport-Package:— *not the full Maven test classpath. -
Maven
<dependencies>onitests/pom.xmlare for compile-time only. They are not automatically embedded in the probe. -
Types the probe needs at runtime must be exported by already resolved OSGi bundles in the Karaf container, unless you explicitly embed them on
Bundle-ClassPath(avoid — see Do not embed).
Why static initializers break (UNOMI-875 PR3 lesson)
A static { … } block (or static final field initialized with new …()) runs when the JVM loads the probe class — typically when Pax Exam installs PAXEXAM-PROBE, before @Before, before unomi:start, and often before Unomi features finish installing.
That is too early for types that live in Unomi features, not in Karaf boot:
-
com.fasterxml.jackson.module.jaxb.JaxbAnnotationModule— not in Karaf’sjacksonfeature; shipped in Unomi’sunomi-base(kar/src/main/feature/feature.xml). -
CustomObjectMapperand its Jackson modules — same: available only afterunomi-basebundles are resolved.
On Karaf 4.4.8 this often appeared to work because feature boot timing usually left unomi-base ready before the probe loaded BaseIT. On 4.4.11 (heavier/async feature boot, dual Jackson stacks) the same static block fails reliably with:
ClassNotFoundException: com.fasterxml.jackson.module.jaxb.JaxbAnnotationModule
not found by PAXEXAM-PROBE-…Historical mistake: BaseIT had a static block since UNOMI-568 (May 2022) for a shared ObjectMapper; UNOMI-569 (June 2022) added JaxbAnnotationModule to mirror production JSON handling. That duplicated CustomObjectMapper and forced Jackson types to load at probe install time.
Do not do this
// BAD — runs when probe class loads, before Unomi features are up
protected static final ObjectMapper objectMapper;
static {
objectMapper = new ObjectMapper();
objectMapper.registerModule(new JaxbAnnotationModule());
}Shipped fix (UNOMI-875 PR3, current)
Use on-first-use access after Unomi is running. Delegate to the same mapper as the server:
/** JSON mapper for IT HTTP/JSON helpers — lazy, after Unomi features are up. */
protected ObjectMapper getObjectMapper() {
return CustomObjectMapper.getCustomInstance();
}Call sites use getObjectMapper() in test methods (after @Before / waitForStartup()), not a static field. CustomObjectMapper.getCustomInstance() returns the holder singleton — the first call happens when HTTP/JSON helpers run, when unomi-base (including jackson-module-jaxb-annotations) is already active, so DynamicImport-Package: * can wire the types.
Do not embed (removed anti-patterns)
An earlier PR3 attempt embedded test JARs on the probe Bundle-ClassPath (copy-probe-lib, probe-bundle-classpath.properties, getOsgiService() JDK proxy). That was more complex than necessary and caused new failures (ClassCastException, Maven phase ordering bugs, Require-Bundle wiring races). Do not reintroduce:
-
maven-dependency-plugincopying Unomi JARs intotarget/test-classes/lib/ -
@ProbeBuildersetting explicitBundle-ClassPathfor embedded libs -
Require-Bundleon the probe for Unomi bundles -
JDK dynamic proxy on
getOsgiService()to paper over duplicate embedded API classes
If ITs fail with ClassNotFoundException on Jackson or Unomi types, fix when the probe touches those types (move off static init), not by embedding the whole test classpath into the probe.
Rules for probe-safe IT code
-
No static initializers in
BaseITor IT base classes that reference Jackson modules,CustomObjectMapper, or other types from Unomi/Karaf features not in vanilla Karaf boot. -
Lazy/on-first-use for JSON mappers, parsers, and helpers that need Unomi or Jackson JAXB types — call from test methods after
@Beforehas started Unomi (or after the relevant OSGi service is known to be up). -
Do not duplicate production mapper setup in the probe; use
CustomObjectMapper.getCustomInstance()viaBaseIT.getObjectMapper()(or OSGi services from the running container). -
Do not run
mvn failsafe:integration-testonitestswithout theintegration-testsprofile unless Docker ES/OS is already listening on the IT port (9400/9401). A fixed probe can still hang inwaitForStartup()if persistence is unreachable.
Symptom → diagnosis
| Failsafe symptom | Typical cause | Fix |
|---|---|---|
|
Static init or static field touching Jackson JAXB before |
Remove static block; use lazy instance |
|
Static init or early reference before Unomi features resolve |
Move work out of static blocks; ensure |
All tests error in ~5–10 s; |
Probe class loading failed early (static init or missing dynamic import) |
Failsafe + |
Tests reach |
Docker ES/OS not running or persistence blueprint failed |
|
|
Karaf container died during startup (often ES connectivity) |
Tail of |
Reading logs
| Artifact | Healthy signal | Failure signal |
|---|---|---|
|
Features install, persistence blueprints start, Pax Web binds |
|
Failsafe reports |
Tests pass |
ClassNotFound in probe (static init), timeouts |
|
Normal run duration, memory samples |
~7 s run with 292 errors → probe failure |
docker-maven-plugin |
Container starts, HTTP 200 on |
|
|
Tip
|
A clean or truncated karaf.log with all ITs failing in seconds usually indicates probe class loading (often a static block in BaseIT). A clean log with tests stuck after unomi:start usually indicates Docker / persistence — not the probe.
|
Running ITs locally
./build.sh --integration-tests
./build.sh --integration-tests --use-opensearch
./build.sh --ci --integration-tests --no-karafUse Maven profile ci-build-itests when building the itests module directly. The integration-tests profile starts the Docker search container; ad-hoc mvn -pl itests verify without that profile (or without ./build.sh --integration-tests) skips Docker and ITs will hang waiting for Elasticsearch/OpenSearch.
Karaf bump side effects (UNOMI-875 PR3)
| Symptom | Cause | Fix |
|---|---|---|
All ITs fail in ~5–10 s; |
Static |
Lazy instance |
IT compile uses Jetty websocket client |
|
Align Jetty pin after Karaf bump — CXF/Jackson/Jetty |
Clean |
Docker ES/OS not started or wrong image tag |
|
Build script (UNOMI-887)
Prefer ./build.sh --ci over ad-hoc Maven invocations — it runs the same gates as GitHub Actions (compile, feature verify path, IT profiles). See build.sh in the manual.
IT developer tooling (UNOMI-944)
For cross-run comparison and live Karaf inspection during upgrade debugging, see itests/README.md (run archival, log diff workflows).
74.2.10. Dependency hygiene (non-platform bumps)
Not every version bump is a Karaf or persistence migration. PR2-style hygiene (UNOMI-875 #795, ef10dfe15) covers application dependencies that must not break OSGi rules established in platform upgrades.
The bulk dependency pass UNOMI-829 defines the maintenance strategy: 30-minute timebox per library, maintenance-branch fallback, and separate tickets for Karaf/CXF/GraphQL — see JIRA reference.
Scope
| Track | Examples | OSGi impact |
|---|---|---|
Frontend / WAB npm |
|
Build-time only — verify WAB packaging still works |
Messaging |
|
Usually embed or declare imports explicitly in bundle |
Commons / utilities |
|
Prefer |
Logging |
|
High — never without persistence embed exclusion |
Hygiene vs platform upgrade scope
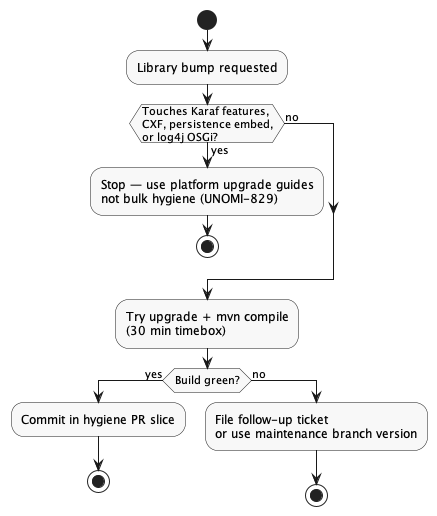
-
Karaf (+ JDK if major) — Karaf
-
CXF / Jackson / Jetty alignment — CXF/Jackson/Jetty
-
Elasticsearch + OpenSearch clients — Elasticsearch, OpenSearch
-
Log4j — Log4j (last among platform pins)
-
Application hygiene (npm, kafka, commons) — this section
-
./build.sh --ci
npm / frontend (Track E1)
-
Bump lockfiles in
wab/andgraphql-ui/withyarn upgradeor targeted version edits. -
Rebuild WAB modules:
mvn -pl wab,graphql-ui -am -DskipTests package -
Smoke-test tracker and GraphQL UI in a running Karaf if UI behavior changed.
Java libraries (Track E2)
-
Bump property in root
pom.xml; confirmbom/pom.xmlmanages the artifact. -
Check consuming bundle
Import-Package/ embed instructions — do not pull platform libs into compile scope accidentally. -
Run unit tests for affected modules before full CI.
Log4j hygiene trap (PR2 lesson)
Bumping ${log4j.version} alone caused Elasticsearch core to embed log4j-core transitively → Felix duplicate activator → feature verify failure. Always pair log4j bumps with:
!groupId=org.apache.logging.log4j;artifactId=*,in persistence ES/OS Embed-Dependency (see Log4j upgrade).
Verification
mvn -DskipTests compile
mvn -pl package -DskipTests package
./build.sh --ci74.3. SSH Shell Commands
Apache Unomi provides its own Apache Karaf Shell commands to make it easy to control the application lifecycle or perform queries or modifications on the internal state of the system.
All Apache Unomi-specific commands are namespaced and use the unomi: namespace. You can use the Apache Karaf Shell’s
autocompletion to list all the commands available.
74.3.1. Using the shell
You can connect to the Apache Karaf SSH Shell using the following command:
ssh -p 8102 karaf@localhost
The default username/password is karaf/karaf. You should change this as soon as possible by editing the etc/users.properties file.
Once connected you can simply type in :
unomi:
And hit the <tab> key to see the list of all the available Apache Unomi commands. Note that some commands are only available when the application is started.
You can also use the help command on any command such as in the following example:
karaf@root()> help unomi:migrate
DESCRIPTION
unomi:migrate
This will Migrate your date in ES to be compliant with current version.
It's possible to configure the migration using OSGI configuration file: org.apache.unomi.migration.cfg,
if no configuration is provided then questions will be prompted during the migration process.
SYNTAX
unomi:migrate [fromVersionWithoutSuffix] [skipConfirmation]
ARGUMENTS
fromVersionWithoutSuffix
Origin version without suffix/qualifier (e.g: 1.2.0)
(defaults to 1.2.0)
skipConfirmation
Should the confirmation before starting the migration process be skipped ?
(defaults to false)74.3.2. Lifecycle commands
The commands control the lifecycle of the Apache Unomi server and are used to migrate, start or stop the server.
| Command | Arguments | Description |
|---|---|---|
setup |
distribution-feature-name,--force |
This command must be used only when the Apache Unomi application is NOT STARTED. It will perform initial setup of the application using the specified distribution feature name (unomi-distribution-elasticsearch for example). |
migrate |
fromVersion |
This command must be used only when the Apache Unomi application is NOT STARTED. It will perform migration of the data stored in search engine using the argument fromVersion as a starting point. Contributors writing new scripts should read Writing migration scripts. |
stop |
n/a |
Shutsdown the Apache Unomi application |
start |
n/a |
Starts the Apache Unomi application with the specified distribution (or by default unomi-distribution-elasticsearch). Note that this state will be remembered between Apache Karaf launches, so in general it is only needed after a first installation |
version |
n/a |
Prints out the currently deployed version of the Apache Unomi application inside the Apache Karaf runtime. |
74.3.3. Runtime commands
These commands are available once the application is running. If an argument is between brackets [] it means it is optional.
| Command | Arguments | Description |
|---|---|---|
rule-list |
[--csv] [maxEntries] |
Lists all the rules registered in the Apache Unomi server. The maxEntries (defaults to 100) will allow you to specify
how many entries need to be retrieved. If the value is inferior to the total value, a message will display the total
value of rules registered in the server. If you add the "--csv" option the list will be output as a CSV formatted table.
Note: Options must come before arguments, so use |
rule-view |
rule-id |
Dumps a single rule in JSON. The rule-id argument can be retrieved from the |
rule-remove |
rule-id |
Removes a single rule from Apache Unomi. The |
rule-reset-stats |
n/a |
Resets the rule statistics. This is notably useful when trying to understand rule performance and impact |
rule-tail |
n/a |
Dumps any rule that is executed by the server. Only executed rules are logged here. If you want to have more detailed
information about a particular rule’s condition evaluation and if it’s already been raised use the |
rule-watch |
rule-ids |
Dumps detailed evaluation and execution information about the rules that are where specified in the |
event-tail |
n/a |
Dumps any incoming events to the Apache Unomi server to the console. Use CTRL+C to exit tail |
event-view |
event-id |
Dumps a single event in JSON. The |
event-list |
[--csv] [max-entries] [event-type] |
List the last events processed by Apache Unomi. The |
event-search |
profile-id [event-type] [max-entries] |
This command makes it possible to search for the last events by |
action-list |
[--csv] |
Lists all the rule actions registered in the Apache Unomi server. This command is useful when developing plugins to check that everything is properly registered. If you add the "--csv" option the list will be output as a CSV formatted table |
action-view |
action-id |
Dumps a single action in JSON. The action-id argument can be retrieved from the |
condition-list |
[--csv] |
List all the conditions registered in the server. If you add the "--csv" option the list will be output as a CSV formatted table |
condition-view |
condition-id |
Dumps a single condition in JSON. The condition-id can be retrieved from the |
profile-list |
[--csv] |
List the last 10 modified profiles. If you add the "--csv" option the list will be output as a CSV formatted table |
profile-view |
profile-id |
Dumps a single profile in JSON. The profile-id argument can be retrieved from the |
profile-remove |
profile-id |
Removes a profile identified by |
segment-list |
[--csv] |
Lists all the segments registered in the Apache Unomi server. If you add the "--csv" option the list will be output as a CSV formatted table |
segment-view |
segment-id |
Dumps a single segment in JSON. The segment-id argument can be retrieved from the |
segment-remove |
segment-id |
Removes a single segment identified by the |
session-list |
[--csv] |
Lists the last 10 sessions by last event date. If you add the "--csv" option the list will be output as a CSV formatted table |
session-view |
session-id |
Dumps a single session in JSON. The session-id argument can be retrieved from the |
deploy-definition |
[bundleId] [type] [fileName] |
This command can be used to force redeployment of definitions from bundles. By default existing definitions will not
be overriden unless they come from SNAPSHOT bundles. Using this command you can override this mechanism. Here are some
examples of using this command: |
undeploy-definition |
[bundleId] [type] [fileName] |
This command does the opposite of the |
74.3.4. Tenant commands
Multi-tenant shell operations (Unomi 3.1+). See Multi-tenancy for REST equivalents.
| Command | Arguments | Description |
|---|---|---|
tenant-get |
n/a |
Print the tenant ID stored for this Karaf session. |
tenant-set |
tenant-id |
Set the current tenant for this shell session ( |
crud list tenant |
[--csv] |
List tenants (excludes the built-in |
crud read tenant |
-i tenant-id |
Show one tenant as JSON. |
crud create tenant |
-d JSON or --file path |
Create a tenant. Use |
crud update tenant |
-i tenant-id -d JSON or --file path |
Update tenant metadata. |
crud delete tenant |
-i tenant-id |
Delete a tenant. |
crud list apikey |
[--csv] |
List API keys across all tenants (keys are masked in the table). |
crud create apikey |
-d JSON |
Create an API key for a tenant ( |
cache |
--tenant ID [--clear] |
Inspect or clear per-tenant caches (segments, rules, and related types). |
74.3.5. Scheduler commands
These commands manage background tasks created by the cluster-aware scheduler (see Task scheduler).
| Command | Arguments | Description |
|---|---|---|
task-list |
[-s status] [-t type] [--limit N] |
List scheduled tasks. Filter by status ( |
task-show |
task-id |
Show full details for one task (parameters, checkpoint data, errors). |
task-cancel |
task-id |
Cancel a task (stops future executions). |
task-retry |
task-id [-r] |
Retry a failed task. |
task-purge |
[-d days] [-f] |
Delete old |
task-executor |
boolean |
Show whether this node runs tasks and its scheduler |
74.4. Writing plugins
Apache Unomi is extensible through OSGi plugins (Karaf bundles). Many use cases do not need a plugin:
-
Groovy actions — custom rule actions stored at runtime (see Configuration)
-
Complex condition trees — combine built-in condition types
-
Rules, segments, and REST configuration — manage through APIs or JSON definitions in a bundle
-
JSON Schemas — validate events without Java code
Build a plugin when you need compiled Java logic, for example:
-
Custom
ConditionEvaluatoror search-engine*QueryBuilderimplementations -
Custom
ActionExecutorintegrations with external systems -
Index mappings, Painless scripts, or migration patches shipped with your feature
-
Background work through
TaskExecutorandSchedulerService(see Task scheduler)
74.4.1. Prerequisites
-
Java 17 or later
-
Apache Karaf 4.4 (bundled with Unomi distributions)
-
Maven
packagingset tobundle(Felix maven-bundle-plugin) -
Depend on
unomi-apiand importunomi-bomfor aligned artifact versions
See also:
-
Built-in condition types — registration patterns for Unomi 3.0+
-
Condition validation —
validationmetadata on condition parameters
74.4.2. Types vs instances
Extension points follow a type/instance model (like classes and objects):
-
ConditionType → Condition instances in segments, rules, and queries
-
ActionType → Action instances executed by rules
-
PropertyType → profile or session property metadata (UI hints; not server-side validation)
74.4.3. META-INF/cxs/ layout
A Unomi plugin is an OSGi bundle. JSON definitions and bundle resources live under src/main/resources/META-INF/cxs/ (and related paths below).
| Entity | Directory under META-INF/cxs/ |
Auto-loaded at bundle start? |
|---|---|---|
ActionType |
|
Yes |
ConditionType |
|
Yes |
ValueType |
|
Yes |
PropertyMergeStrategyType |
|
Yes |
PropertyType |
|
Yes |
Rule |
|
Yes |
Segment |
|
Yes |
Scoring |
|
Yes |
Persona |
|
Yes |
Patch |
|
Yes (first run) |
Index mapping |
|
Loaded by persistence layer |
JSON Schema |
|
Loaded by schema service |
Expression filter |
|
Loaded by scripting layer |
Painless script |
|
Loaded by persistence layer |
Migration script |
|
Used by shell migration tooling |
Goals and campaigns can be deployed with unomi:deploy-definition but are not auto-loaded from bundles the same way as rules and segments.
Tags are not separate JSON files — use systemTags on metadata inside other definitions.
74.4.4. OSGi service registration (Declarative Services)
New plugins must use OSGi Declarative Services (@Component, @Reference) — not Blueprint XML.
Unomi is migrating away from Blueprint; legacy bundles such as plugins/baseplugin and parts of persistence-* still ship Blueprint wiring, but that is not a template for new code.
Enable DS component generation in your bundle POM:
<dependency>
<groupId>org.osgi</groupId>
<artifactId>org.osgi.service.component.annotations</artifactId>
<scope>provided</scope>
</dependency><plugin>
<groupId>org.apache.felix</groupId>
<artifactId>maven-bundle-plugin</artifactId>
<configuration>
<instructions>
<_dsannotations>*</_dsannotations>
</instructions>
</configuration>
</plugin>Follow plugins/advanced-conditions/pom.xml for a minimal DS-enabled plugin module.
Service property keys:
| Extension | Service interface | OSGi property key |
|---|---|---|
Condition evaluator |
|
|
Elasticsearch query builder |
|
|
OpenSearch query builder |
|
|
Action executor |
|
|
Value type validator |
|
(service type only) |
The JSON descriptor field (conditionEvaluator, queryBuilder, actionExecutor) must match the OSGi property value.
74.4.5. Creating a Maven plugin project
A minimal plugin is a Maven bundle project. Prefer importing unomi-bom rather than pinning versions manually.
<project xmlns="http://maven.apache.org/POM/4.0.0">
<modelVersion>4.0.0</modelVersion>
<groupId>com.example</groupId>
<artifactId>my-unomi-plugin</artifactId>
<version>1.0.0-SNAPSHOT</version>
<packaging>bundle</packaging>
<properties>
<unomi.version>3.1.0-SNAPSHOT</unomi.version>
</properties>
<dependencyManagement>
<dependencies>
<dependency>
<groupId>org.apache.unomi</groupId>
<artifactId>unomi-bom</artifactId>
<version>${unomi.version}</version>
<type>pom</type>
<scope>import</scope>
</dependency>
</dependencies>
</dependencyManagement>
<dependencies>
<dependency>
<groupId>org.apache.unomi</groupId>
<artifactId>unomi-api</artifactId>
<scope>provided</scope>
</dependency>
<dependency>
<groupId>org.osgi</groupId>
<artifactId>org.osgi.service.component.annotations</artifactId>
<scope>provided</scope>
</dependency>
</dependencies>
<build>
<plugins>
<plugin>
<groupId>org.apache.felix</groupId>
<artifactId>maven-bundle-plugin</artifactId>
<version>5.1.9</version>
<extensions>true</extensions>
<configuration>
<instructions>
<Embed-Dependency>*;scope=compile|runtime</Embed-Dependency>
<_dsannotations>*</_dsannotations>
<Import-Package>*</Import-Package>
</instructions>
</configuration>
</plugin>
</plugins>
</build>
</project>74.4.6. Deployment and updates
When a bundle starts, predefined JSON definitions are deployed once if they do not already exist. Redeploying the same bundle does not overwrite existing definitions.
To force redeploy:
-
Karaf shell:
unomi:deploy-definition <bundleId> <type> <fileName>— see the shell commands chapter in this manual -
Structural changes to existing definitions: Migration patches
Wildcards are supported, for example unomi:deploy-definition 175 rules *.
74.4.7. JSON-only extensions
Predefined segments
Place JSON under META-INF/cxs/segments/:
{
"metadata": {
"id": "leads",
"name": "Leads",
"scope": "systemscope",
"description": "Profiles with leadAssignedTo set",
"readOnly": true
},
"condition": {
"type": "booleanCondition",
"parameterValues": {
"operator": "and",
"subConditions": [
{
"type": "profilePropertyCondition",
"parameterValues": {
"propertyName": "properties.leadAssignedTo",
"comparisonOperator": "exists"
}
}
]
}
}
}Predefined rules
Place JSON under META-INF/cxs/rules/:
{
"metadata": {
"id": "evaluateProfileSegments",
"name": "Evaluate segments",
"description": "Evaluate segments when a profile is modified",
"readOnly": true
},
"condition": {
"type": "profileUpdatedEventCondition",
"parameterValues": {}
},
"actions": [
{
"type": "evaluateProfileSegmentsAction",
"parameterValues": {}
}
]
}Predefined property types
-
Profiles:
META-INF/cxs/properties/profiles/ -
Sessions:
META-INF/cxs/properties/sessions/
See Property types for the full model.
Predefined child conditions
Specialize an existing condition type with parentCondition under META-INF/cxs/conditions/:
{
"metadata": {
"id": "profileUpdatedEventCondition",
"name": "profileUpdatedEventCondition",
"systemTags": ["event", "eventCondition"],
"readOnly": true
},
"parentCondition": {
"type": "eventTypeCondition",
"parameterValues": { "eventTypeId": "profileUpdated" }
},
"parameters": []
}Predefined personas
Place JSON under META-INF/cxs/personas/. Each file can define a persona profile and optional sessions for testing personalization.
74.4.8. Custom action types
-
Add
META-INF/cxs/actions/myAction.jsonwith anactionExecutorID. -
Implement
ActionExecutorand register it with@Componentand matchingactionExecutorId.
JSON descriptor (same shape as extensions/lists-extension/actions/…/addToLists.json):
{
"metadata": {
"id": "myNotifyAction",
"name": "myNotifyAction",
"readOnly": false
},
"actionExecutor": "myNotifyAction",
"parameters": [
{ "id": "message", "type": "string", "multivalued": false }
]
}Java executor (Declarative Services — write this pattern in your plugin; do not copy Blueprint from older bundles):
@Component(service = ActionExecutor.class, property = {"actionExecutorId=myNotifyAction"})
public class MyNotifyAction implements ActionExecutor {
private ProfileService profileService;
@Reference
public void setProfileService(ProfileService profileService) {
this.profileService = profileService;
}
@Override
public int execute(Action action, Event event) {
String message = (String) action.getParameter("message");
// use profileService / event as needed
return EventService.NO_CHANGE;
}
}For a maintained DS registration pattern in the tree, see graphql/cxs-impl/…/CDPUpdateListsAction.java.
For action business logic (lists), see extensions/lists-extension/actions/…/AddToListsAction.java — migrate its Blueprint wiring to DS if you use it as a starting point.
Catalog of built-in actions: Built-in action types.
74.4.9. Custom condition types
Custom condition types combine:
-
A JSON descriptor in
META-INF/cxs/conditions/ -
A
ConditionEvaluatorOSGi service (required for rule and event evaluation) -
ConditionESQueryBuilder/ConditionOSQueryBuilderservices (required when the condition is used in segments or profile queries)
Unomi 3.0+ uses engine-neutral queryBuilder IDs in JSON (for example booleanConditionQueryBuilder, not *ESQueryBuilder).
Add validation blocks on parameters so invalid instances are rejected at save time — see Condition validation.
Evaluator registration (Declarative Services)
Reference implementation: plugins/advanced-conditions (SourceEventPropertyConditionEvaluator, PastEventConditionEvaluator).
@Component(service = ConditionEvaluator.class,
property = {"conditionEvaluatorId=sourceEventPropertyConditionEvaluator"})
public class SourceEventPropertyConditionEvaluator implements ConditionEvaluator {
private DefinitionsService definitionsService;
@Reference
public void setDefinitionsService(DefinitionsService definitionsService) {
this.definitionsService = definitionsService;
}
@Override
public boolean eval(Condition condition, Item item, Map<String, Object> context,
ConditionEvaluatorDispatcher dispatcher) {
// ...
return false;
}
}Registration examples for query builders: Plugin registration (Unomi 3.0+).
Query builders and the persistence split
In the Apache Unomi distribution, core query builders for built-in conditions live in:
-
persistence-elasticsearch/core—unomi-elasticsearch-conditionsfeature -
persistence-opensearch/core—unomi-opensearch-conditionsfeature
The base plugin bundle registers evaluators only; it does not register query builders.
For custom conditions that participate in segment queries, ship search-engine-specific query builder bundles (see next section).
Query builder implementation (Elasticsearch Java API Client)
package com.example.plugin.elasticsearch;
import co.elastic.clients.elasticsearch._types.query_dsl.Query;
import org.apache.unomi.api.conditions.Condition;
import org.apache.unomi.persistence.elasticsearch.ConditionESQueryBuilder;
import org.apache.unomi.persistence.elasticsearch.ConditionESQueryBuilderDispatcher;
import java.util.Map;
public class MyCustomESQueryBuilder implements ConditionESQueryBuilder {
@Override
public Query buildQuery(Condition condition, Map<String, Object> context,
ConditionESQueryBuilderDispatcher dispatcher) {
String fieldName = (String) condition.getParameter("fieldName");
String fieldValue = (String) condition.getParameter("fieldValue");
return Query.of(q -> q.term(t -> t.field(fieldName).value(v -> v.stringValue(fieldValue))));
}
}OpenSearch uses the same pattern with org.apache.unomi.persistence.opensearch.ConditionOSQueryBuilder and org.opensearch.client.opensearch._types.query_dsl.Query.
Register the query builder with Declarative Services in your Elasticsearch or OpenSearch bundle:
@Component(service = ConditionESQueryBuilder.class, property = {"queryBuilderId=myCustomQueryBuilder"})
public class MyCustomESQueryBuilder implements ConditionESQueryBuilder {
// buildQuery implementation ...
}Core persistence modules still contain legacy Blueprint registrations for built-in query builders; new plugin code should use DS as above.
Shared condition type JSON:
{
"metadata": {
"id": "myCustomCondition",
"name": "My Custom Condition",
"systemTags": ["custom", "condition", "profileCondition"],
"readOnly": false
},
"conditionEvaluator": "myCustomConditionEvaluator",
"queryBuilder": "myCustomQueryBuilder",
"parameters": [
{ "id": "fieldName", "type": "string", "validation": { "required": true } },
{ "id": "fieldValue", "type": "string", "validation": { "required": true } }
]
}74.4.10. Multi-bundle layout for Elasticsearch and OpenSearch
When your condition needs segment/query support on both search engines, use three Maven modules:
my-plugin/
├── my-plugin-common/ # JSON descriptors, evaluators, shared code
├── my-plugin-elasticsearch/ # ConditionESQueryBuilder + ES mappings
├── my-plugin-opensearch/ # ConditionOSQueryBuilder + OS mappings
└── my-plugin-features/ # Karaf features.xmlCommon bundle dependencies:
<dependency>
<groupId>org.apache.unomi</groupId>
<artifactId>unomi-api</artifactId>
<scope>provided</scope>
</dependency>
<dependency>
<groupId>org.apache.unomi</groupId>
<artifactId>unomi-persistence-spi</artifactId>
<scope>provided</scope>
</dependency>Elasticsearch bundle adds:
<dependency>
<groupId>org.apache.unomi</groupId>
<artifactId>unomi-persistence-elasticsearch-core</artifactId>
<scope>provided</scope>
</dependency>OpenSearch bundle adds:
<dependency>
<groupId>org.apache.unomi</groupId>
<artifactId>unomi-persistence-opensearch-core</artifactId>
<scope>provided</scope>
</dependency>Karaf features
Define separate features per search engine. Use the same queryBuilderId in both implementations.
<features name="my-plugin" version="1.0.0">
<feature name="my-plugin-elasticsearch" version="1.0.0">
<bundle>mvn:com.example/my-plugin-common/1.0.0</bundle>
<bundle>mvn:com.example/my-plugin-elasticsearch/1.0.0</bundle>
<feature version="3.1.0">unomi-elasticsearch-conditions</feature>
</feature>
<feature name="my-plugin-opensearch" version="1.0.0">
<bundle>mvn:com.example/my-plugin-common/1.0.0</bundle>
<bundle>mvn:com.example/my-plugin-opensearch/1.0.0</bundle>
<feature version="3.1.0">unomi-opensearch-conditions</feature>
</feature>
</features>Install at runtime:
-
Elasticsearch:
feature:install my-plugin-elasticsearch -
OpenSearch:
feature:install my-plugin-opensearch
Custom distribution feature
For production, add your plugin feature to a custom distribution based on distribution/src/main/feature/feature.xml.
Extend unomi-distribution-elasticsearch or unomi-distribution-opensearch and append your plugin feature last.
Elasticsearch example (abbreviated — compare with the real file in the repository):
<feature name="unomi-distribution-elasticsearch-custom" version="${project.version}">
<feature dependency="true" version="${project.version}">unomi-distribution-elasticsearch</feature>
<feature dependency="true" version="${project.version}">my-plugin-elasticsearch</feature>
</feature>OpenSearch deployments use unomi-distribution-opensearch and unomi-healthcheck-opensearch instead of the Elasticsearch healthcheck feature.
See also Building and deploying and Configuration.
74.4.11. Additional bundle resources
JSON Schemas for events
Place event schemas under META-INF/cxs/schemas/. See JSON Schemas.
Index mappings and Painless scripts
-
META-INF/cxs/mappings/— custom index mappings loaded by the persistence service -
META-INF/cxs/painless/—.painlessscripts used during persistence operations
Expression filters
META-INF/cxs/expressions/ — JSON descriptors for allowed scripting expressions (MVEL and related filters).
CXS migration patch files
META-INF/cxs/patches/ — one-time structural updates. See Migration patches.
74.4.12. Custom value types and validation
Register custom parameter types for condition validation by exposing a ValueTypeValidator OSGi service.
DefinitionsService forwards validators to ConditionValidationService.
Use this when your condition type introduces a non-primitive type ID in parameter definitions.
74.4.13. Scheduling background work
Plugins can register TaskExecutor implementations and schedule tasks through SchedulerService.
See Task scheduler for REST APIs, shell commands, tenant-aware executors, and checkpoint patterns.
74.4.14. GraphQL provider extensions
For GraphQL schema extensions, see graphql/cxs-impl and GraphQL API.
74.4.15. Reference plugins in the codebase
Use maintained modules in the main tree — not the older samples/ demos (those predate DS migration and Blueprint removal).
| Module | What to study |
|---|---|
|
DS |
|
DS lifecycle ( |
|
Action type JSON + |
|
DS |
|
Query builder class implementations (study |
|
OpenSearch query builder counterparts |
The samples/ directory holds historical integration demos (Twitter button, login page, etc.).
They illustrate end-to-end scenarios but are not maintained plugin templates — copy patterns from the modules above instead.
Scenario walkthroughs that use samples: Samples.
74.4.16. Best practices
-
Prefer Groovy actions or JSON-only bundles before writing Java when possible.
-
Register OSGi services with Declarative Services (
@Component); do not add new Blueprint XML. -
Import
unomi-bom; useprovidedscope for Unomi artifacts inside Karaf. -
Use the same
queryBuilderID in JSON and in both ES/OS service registrations. -
Put evaluators and JSON descriptors in the common bundle; query builders in engine-specific bundles.
-
Add
validationmetadata on condition parameters (see Condition validation). -
Test segment conditions against both search engines if you ship both query builder bundles.
-
Use
explain=trueon context requests to debug condition evaluation — see Debugging conditions. -
Do not copy legacy
*ESQueryBuilderclass names from Unomi 2.x; follow the 3.0+ naming in Built-in condition types.
Integration testing with Docker
services:
elasticsearch:
image: docker.elastic.co/elasticsearch/elasticsearch:9.4.3
opensearch:
image: opensearchproject/opensearch:3.4.074.4.17. Reference implementations in the core codebase
Study these modules when building persistence-related plugins:
| Area | Location |
|---|---|
Elasticsearch persistence |
|
OpenSearch persistence |
|
Built-in condition evaluators (legacy Blueprint) |
|
Advanced evaluators (DS, preferred) |
|
Distribution features |
|
These show query building patterns, mapping layout, connection handling, and how built-in condition types are split between evaluators (plugins) and query builders (persistence modules).
74.5. Migration patches
You may provide patches on any predefined items by simply adding a JSON file in :
src/main/resources/META-INF/cxs/patchesThese patches will be applied when the module will be deployed the first time. They allow to modify an item, that would have been previously deployed on unomi by a previous version of the extension or by something else.
Each patch must have a unique id - unomi will use this id to remember that the patch has already been applied. It can also be used to reapply the patch when need by using the karaf command unomi:deploy-definition
A patch also need to reference the item to patch by setting patchedItemId and patchedItemType, and an operation that tells what the patch should do.
patchedItemType can take one of the following value:-
condition
-
action
-
goal
-
campaign
-
persona
-
propertyType
-
rule
-
segment
-
scoring
operation can take one of the following value:-
patch
-
override
-
remove
You can apply a patch in json-patch format in the data field, and by specifying operation patch like in this example :
{
"itemId": "firstName-patch1",
"patchedItemId": "firstName",
"patchedItemType": "propertyType",
"operation": "patch",
"data": [
{
"op": "replace", "path": "/defaultValue", "value": "foo"
}
]
}If you need to completely redeploy a definition, you can use the override operation and put the definition in data
{
"itemId": "gender-patch1",
"patchedItemId": "gender",
"patchedItemType": "propertyType",
"operation": "override",
"data": {
"metadata": {
"id": "gender",
"name": "Gender",
"systemTags": [
"properties",
"profileProperties"
]
},
"type": "string",
"defaultValue": "foo",
"automaticMappingsFrom": [ ],
"rank": "105.0"
}
}It is also possible to simply remove an item by using the operation remove :
{
"itemId": "firstName-patch2",
"patchedItemId": "firstName",
"patchedItemType": "propertyType",
"operation": "remove"
}Patches can also be deployed at runtime by using the REST endpoint /patch/apply .